Ararat to Portland
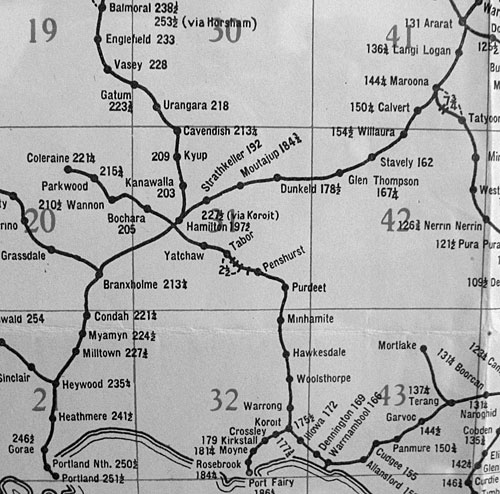
The Ararat to Portland line was opened in three sections:
Ararat to Dunkeld (47 miles) opened April 24 1877.
Dunkeld to Hamilton (19 miles) opened Oct. 29 1877.
Hamilton to Portland (53.8 miles) opened Dec.19 1877.
A total of seven lines would junction from it.
Maroona (Cressy line)
Dunkeld (the short lived Penshurst line)
Hamilton (Balmoral line)
Coleraine Junction (Coleraine and Koroit lines)
Branxholme (Casterton line)
Heywood (Mount Gambier line)
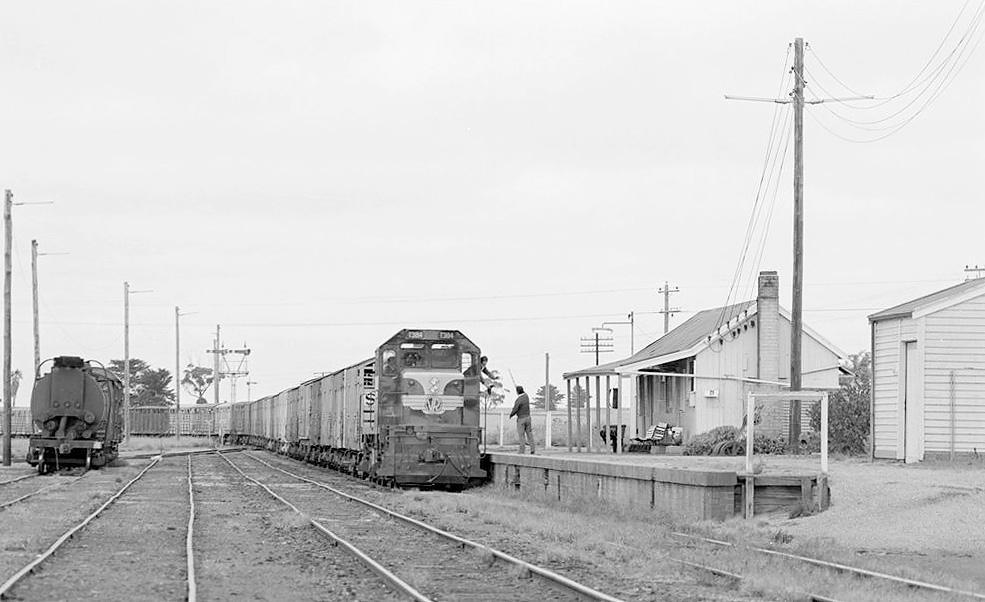
ABOVE & BELOW: A short distance from Ararat was the Shell Oil Co. siding which was a loop but in later years was truncated to a dead end siding, this view is looking towards Maroona, Aug 1986, photo below, Jan 1981. (both photos courtesy Chris Wurr)

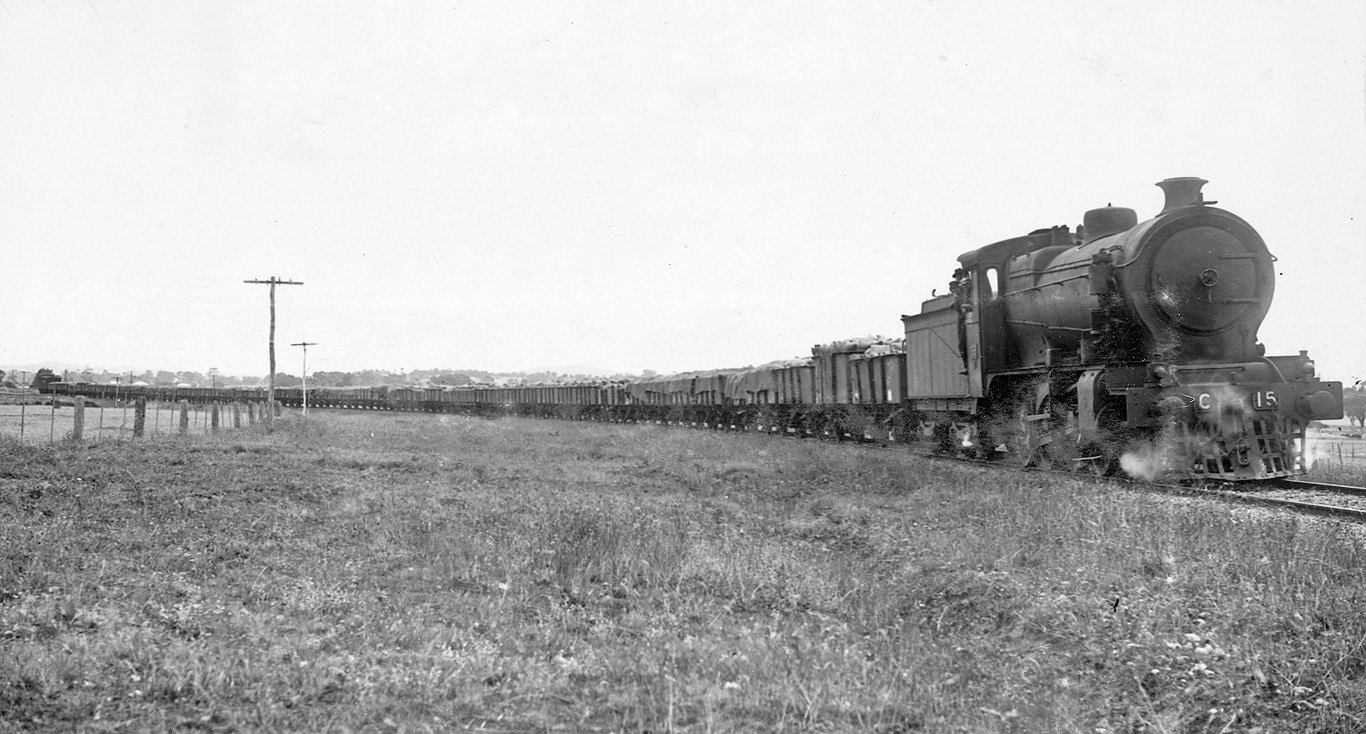
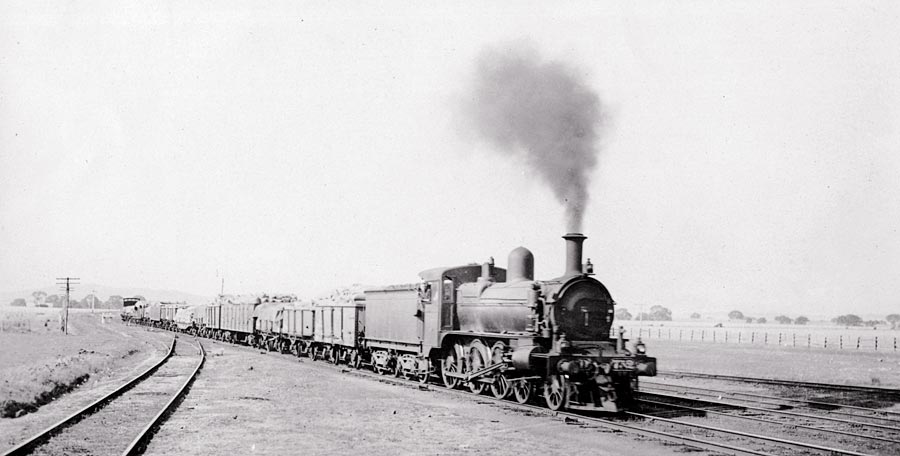
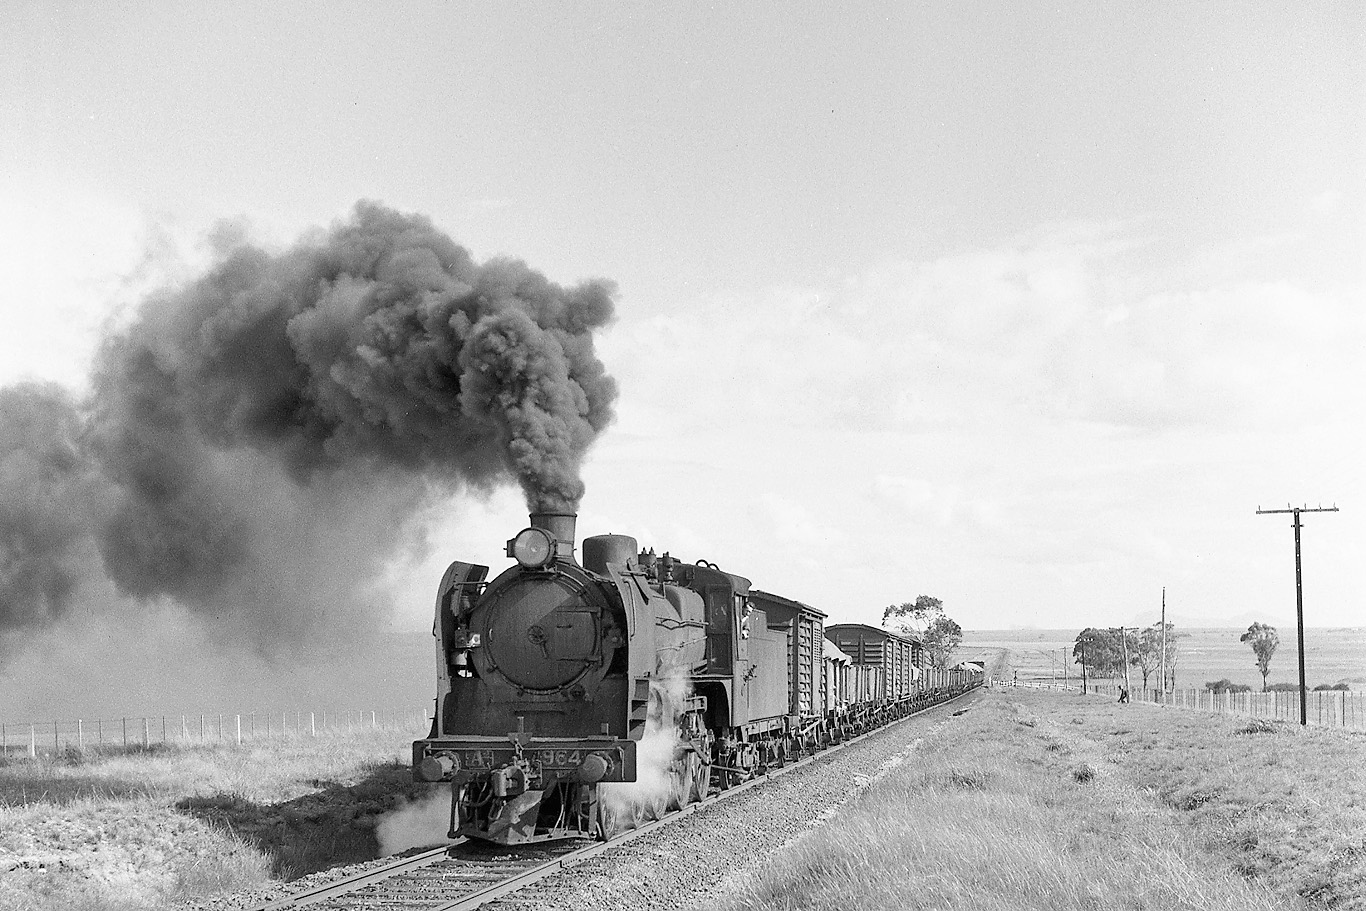
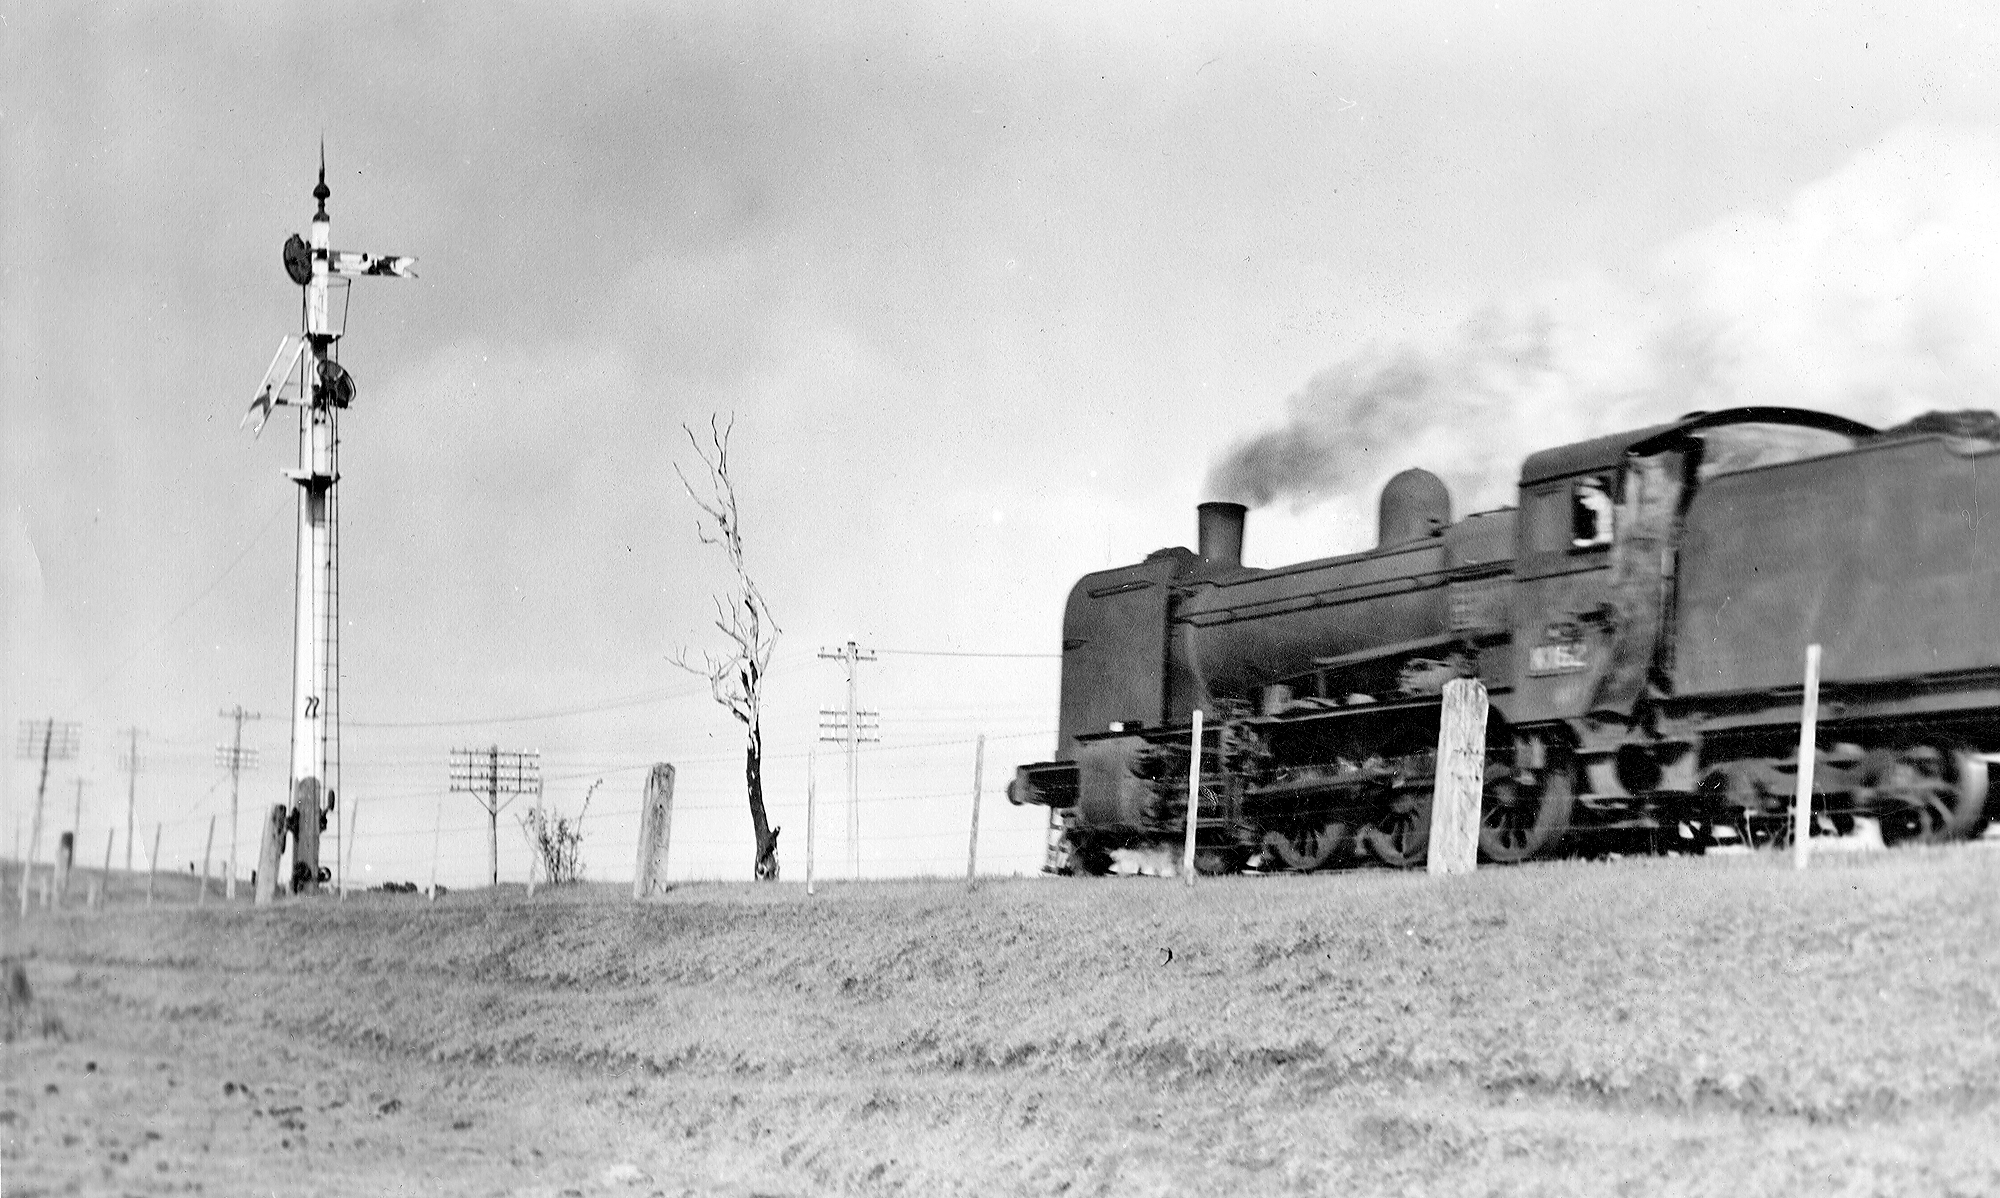
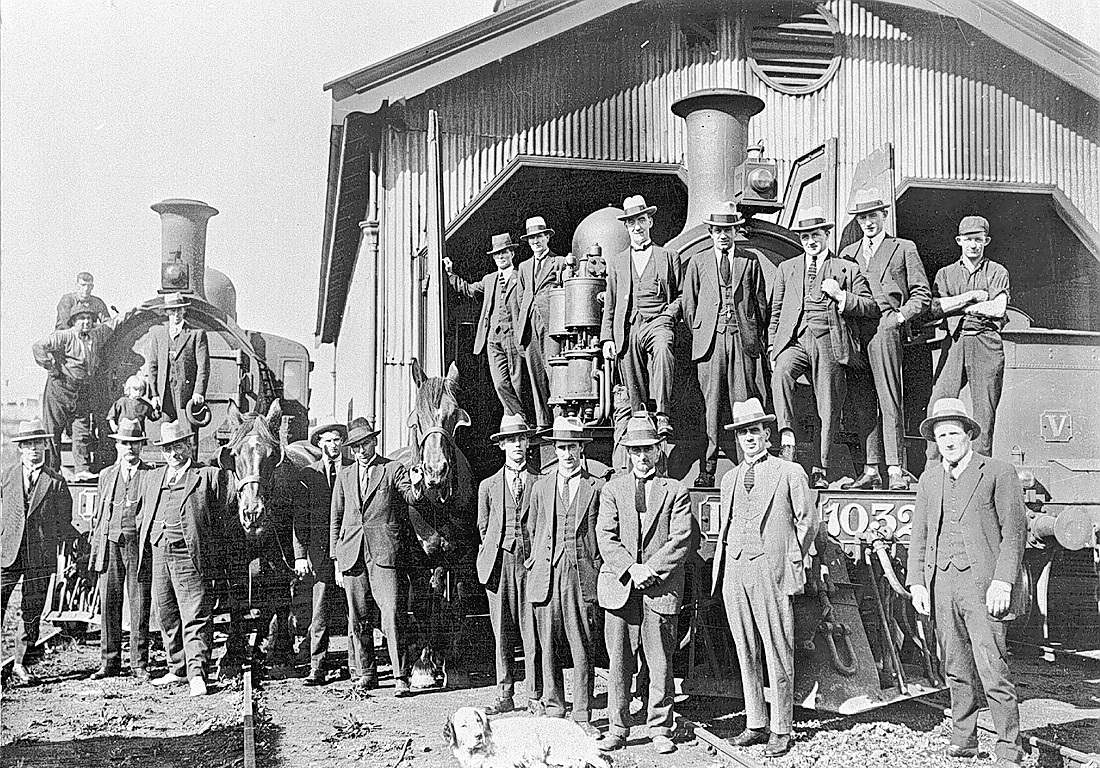
ABOVE: Just after leaving Ararat, trains to Maroona swung around a long 30 chain right hand curve, from here the track was generally downhill until it crossed the Hopkins river. C 15 swings around the curve out of Ararat as it heads towards Maroona with a lengthy bagged wheat train. circa 1930. (photo from SLV collection)
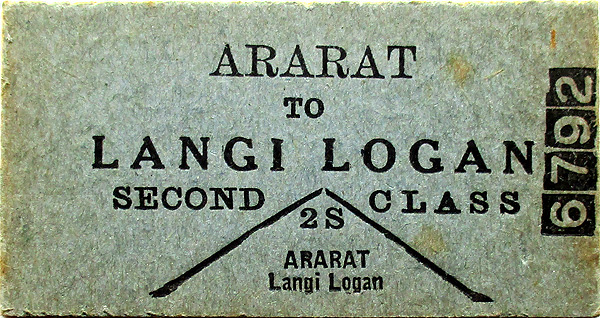
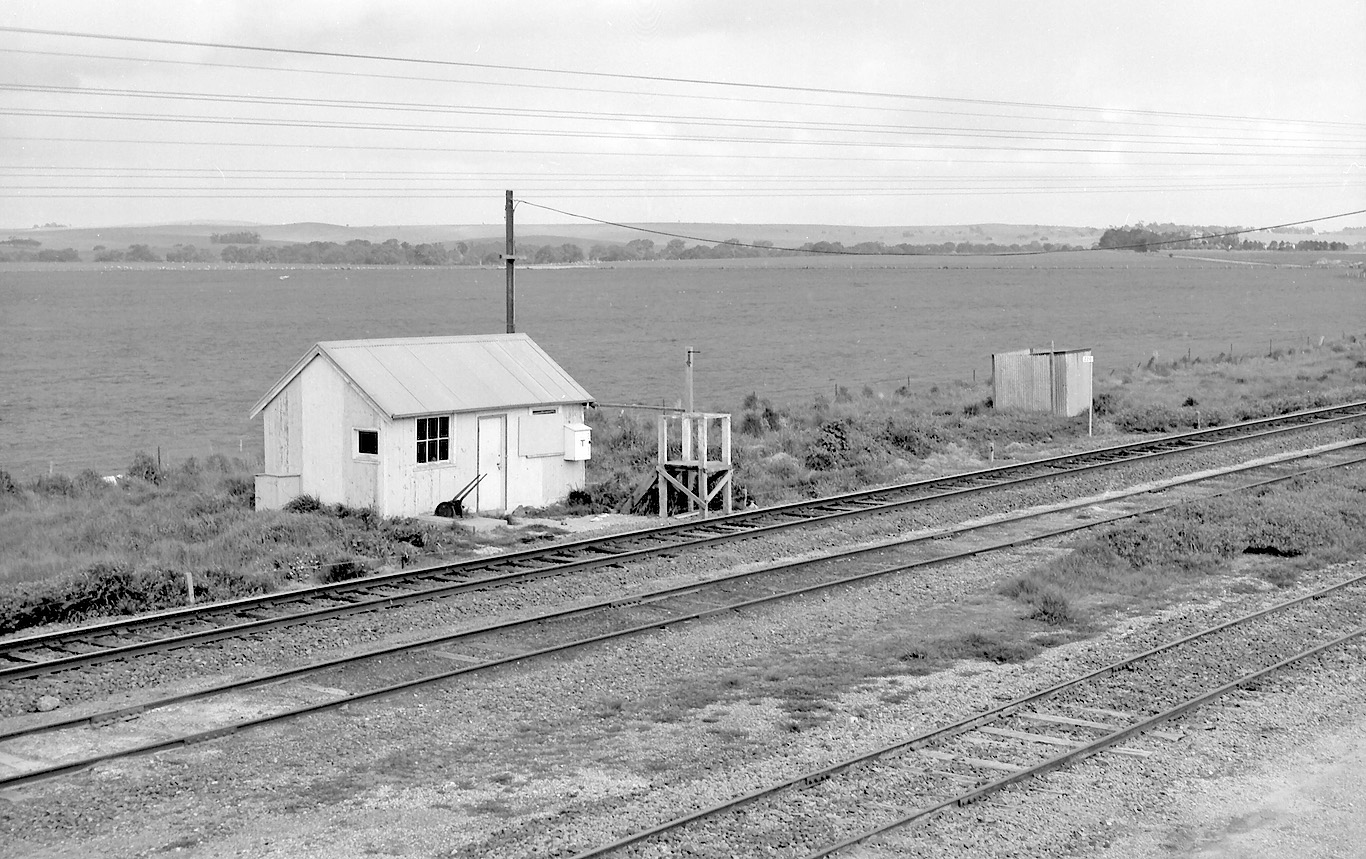
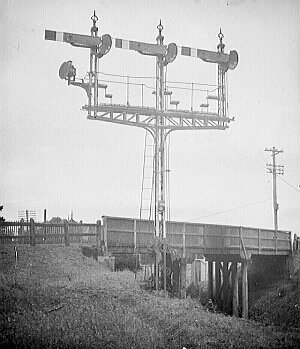
Langhi Logan
1930 Langi Logan signal arrangement diagram
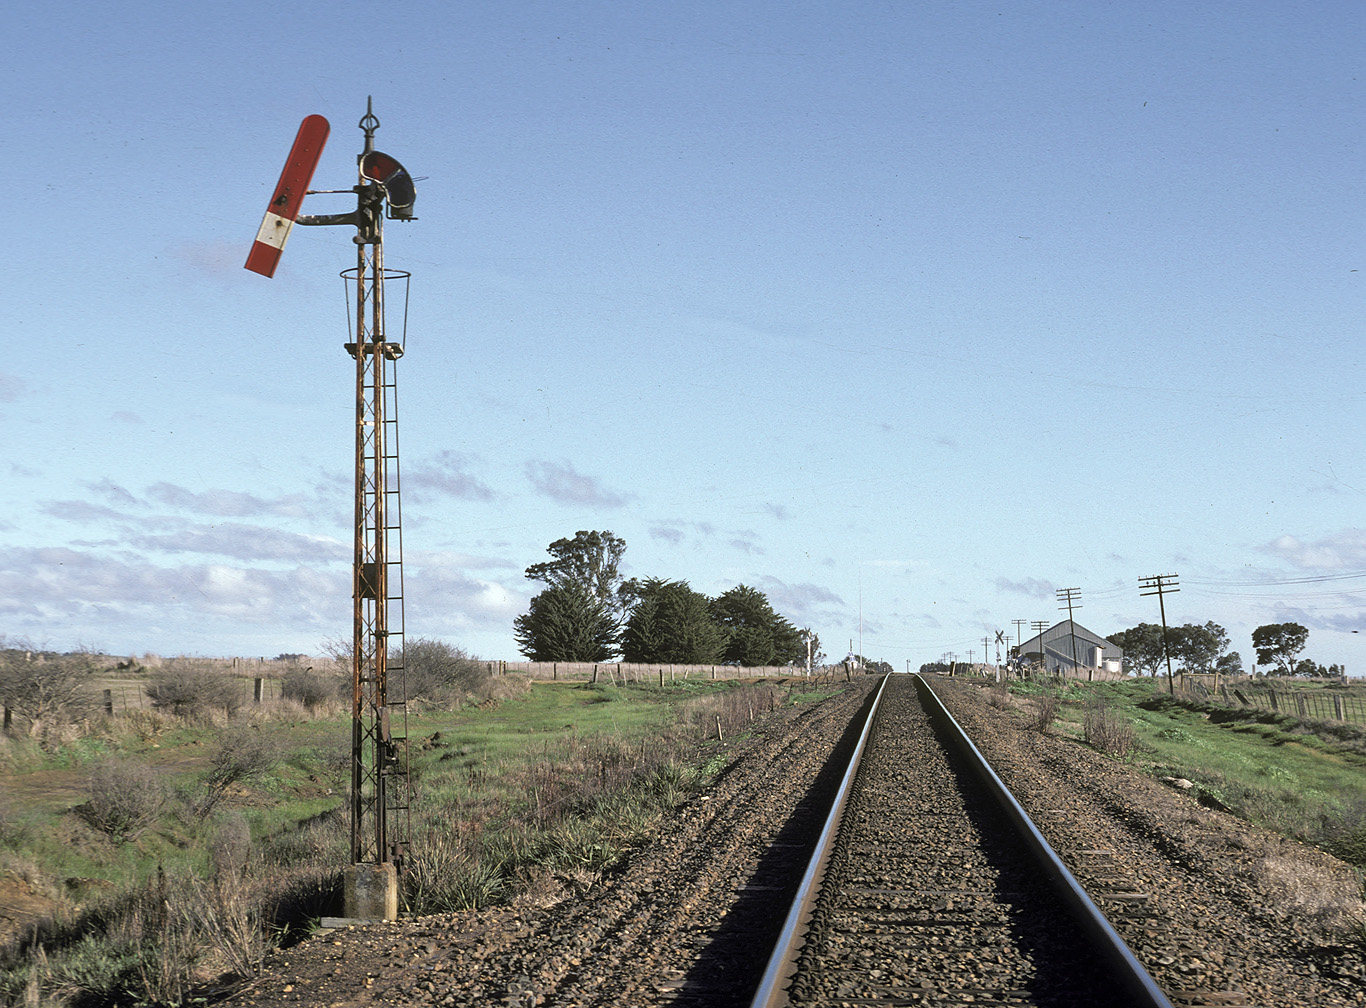
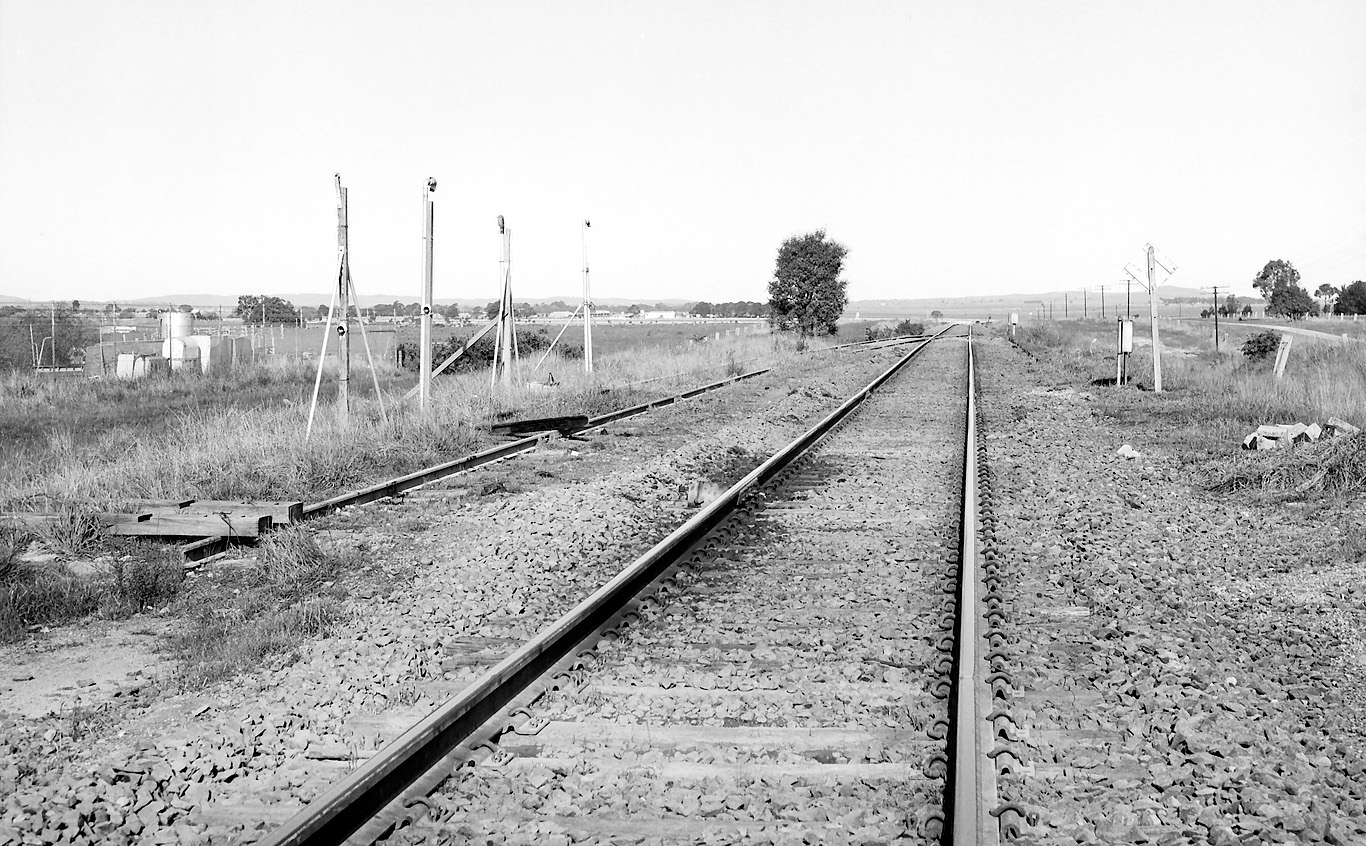
ABOVE: The down home signal at Langi Logan. By the 1970s, none of the stations on the entire line were interlocked. The points were secured by manual plunger locks and all there was signal wise was a solitary arrival signal. Not only were distant signals absent but the railways didn't even see fit to install locations boards. Aug 25 1985.

ABOVE: An up DERM arrives at Langi Logan when it still had a platform. Oct 17 1970 (photo courtesy Neville Gee)
ABOVE: The "new" signal hut looks like it is in use as the old hut and platform are demolished. Aug 8 1979. (photo courtesy Geoff Winkler)

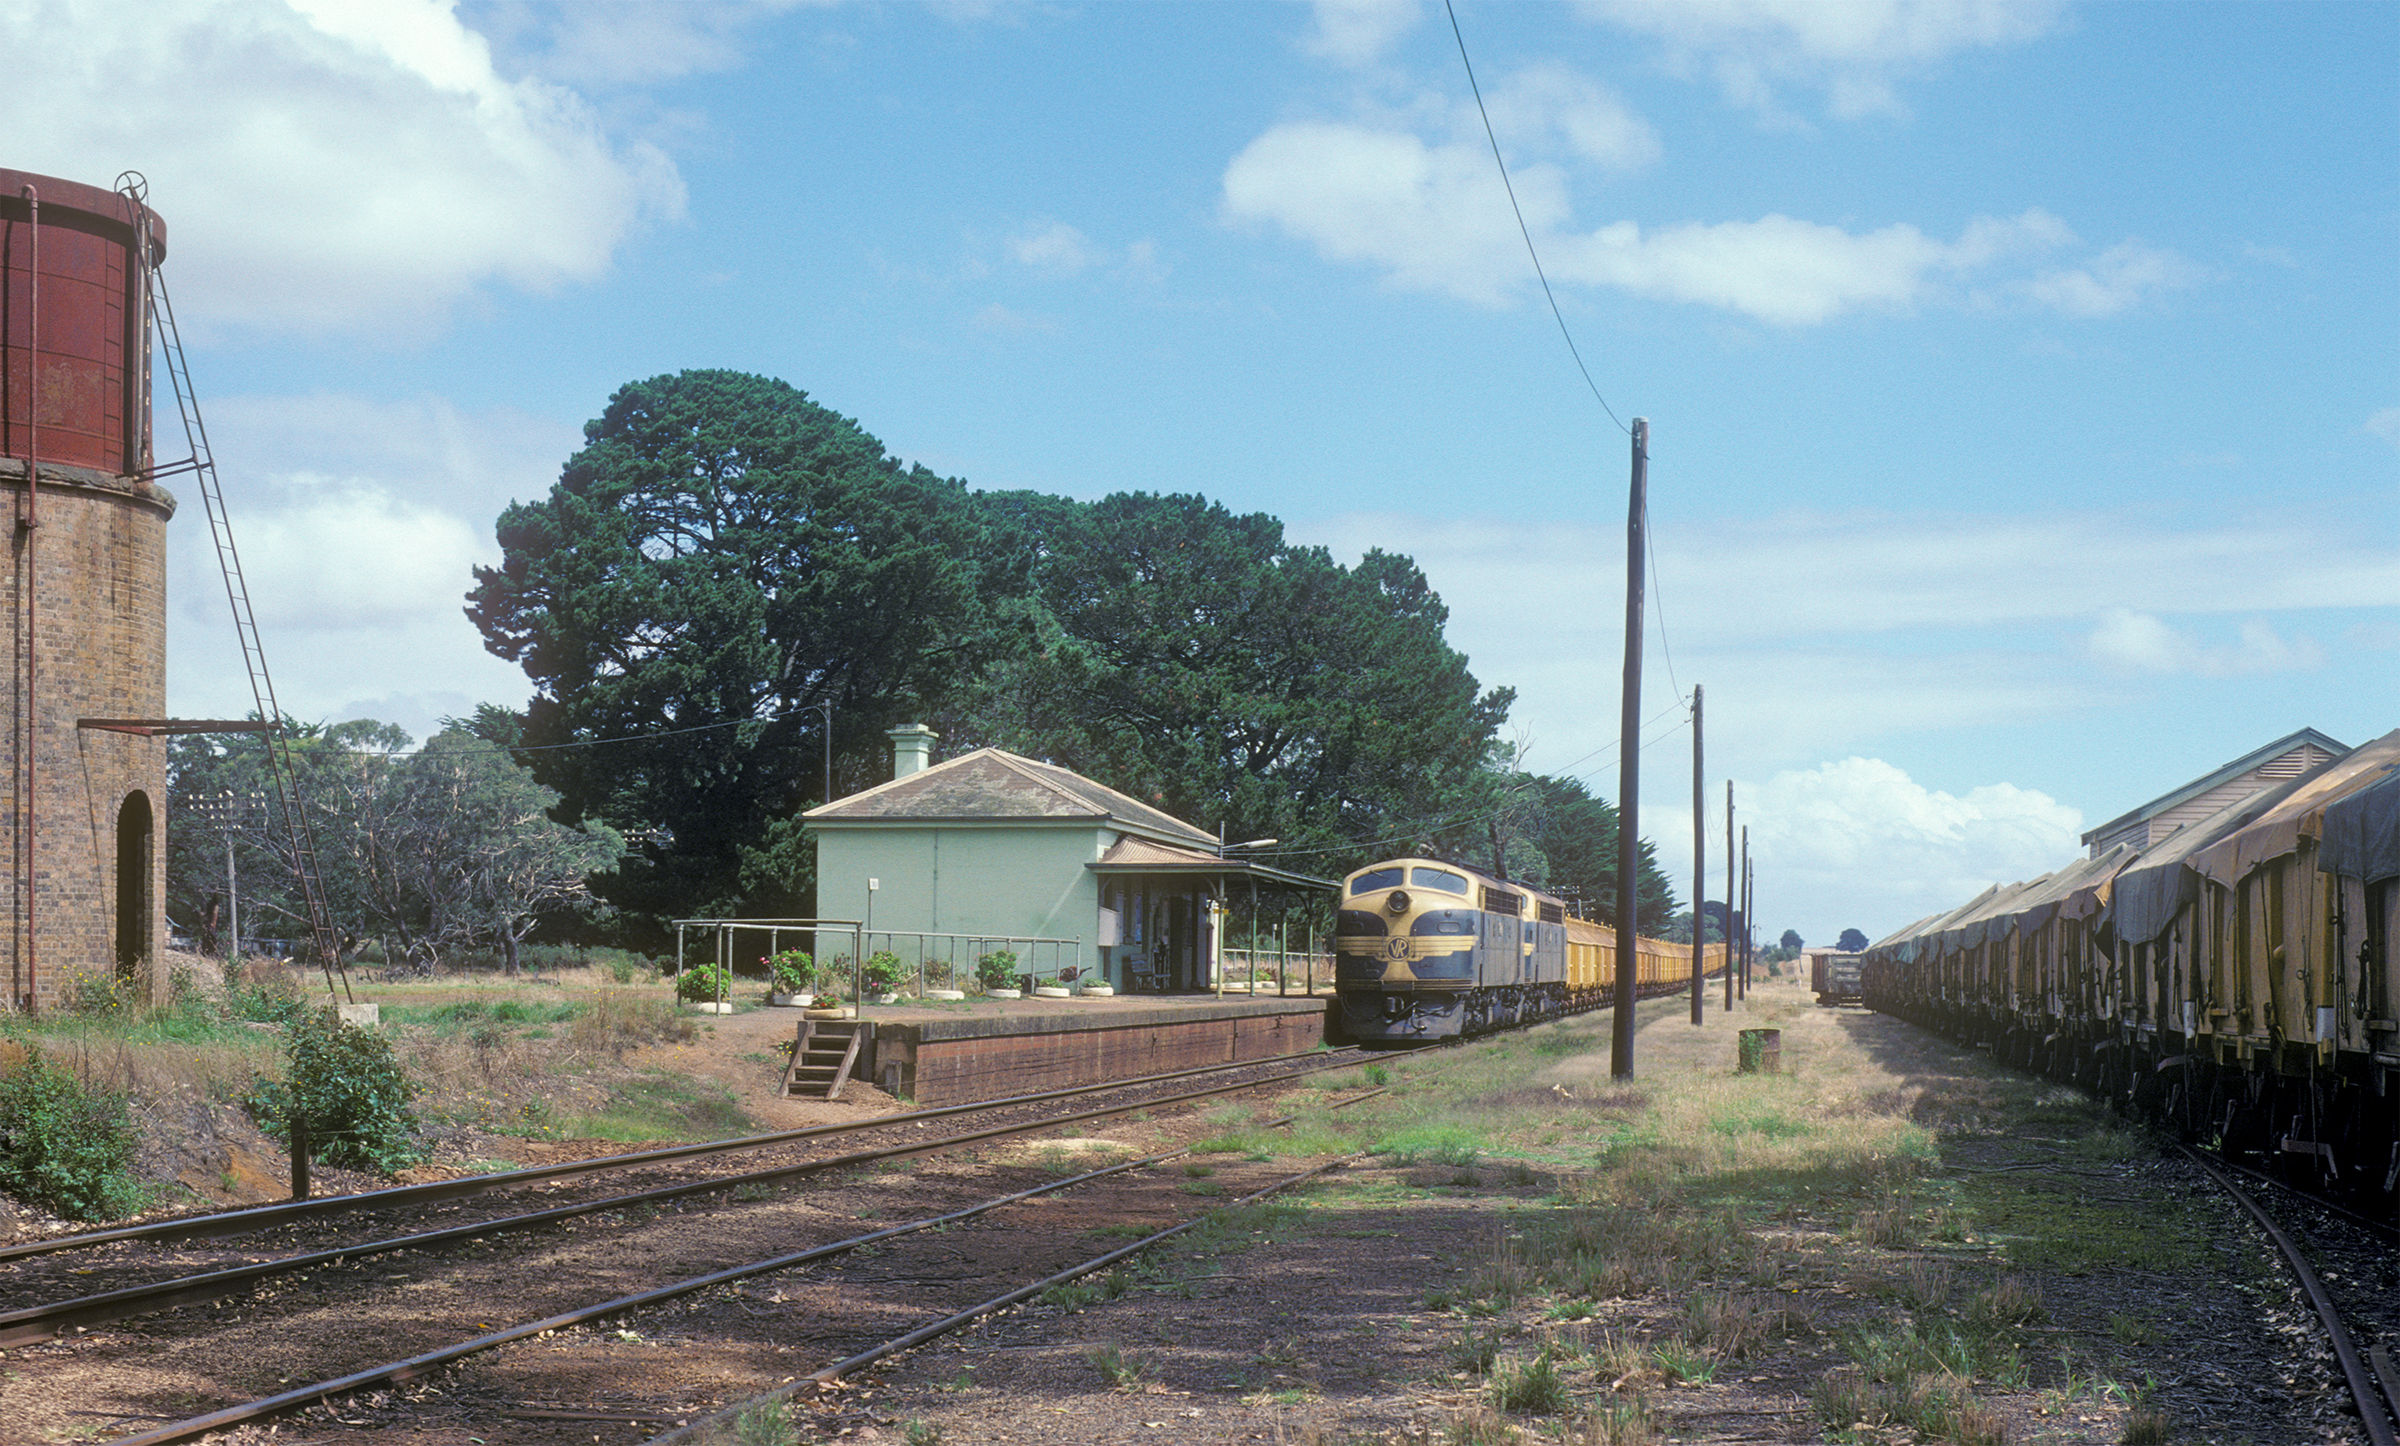
ABOVE: The station building at Langi Logan. In previous years there was a short wooden platform, in 1978 the platform was abolished and this was all there was. Langi Logan was an electric staff station which could switch out. Of interest is that whilst it contained electric staff instruments and was connected to the railway phone system, there was no SEC power so all lighting was done by kero and battery lamps. Aug 25 1985. BELOW: Another view showing the signal hut and outhouse, Sep 24 1983. The outhouse was riddled with bullet holes from bored signalmen taking their gun to a dreaded Langi Logan shift where a bit of target practice passed the time. (photo courtesy Chris Wurr)
ABOVE: The track gang have cleared up for the passage of an up Geelong bound enthusiasts special at Langi Logan, 1981.
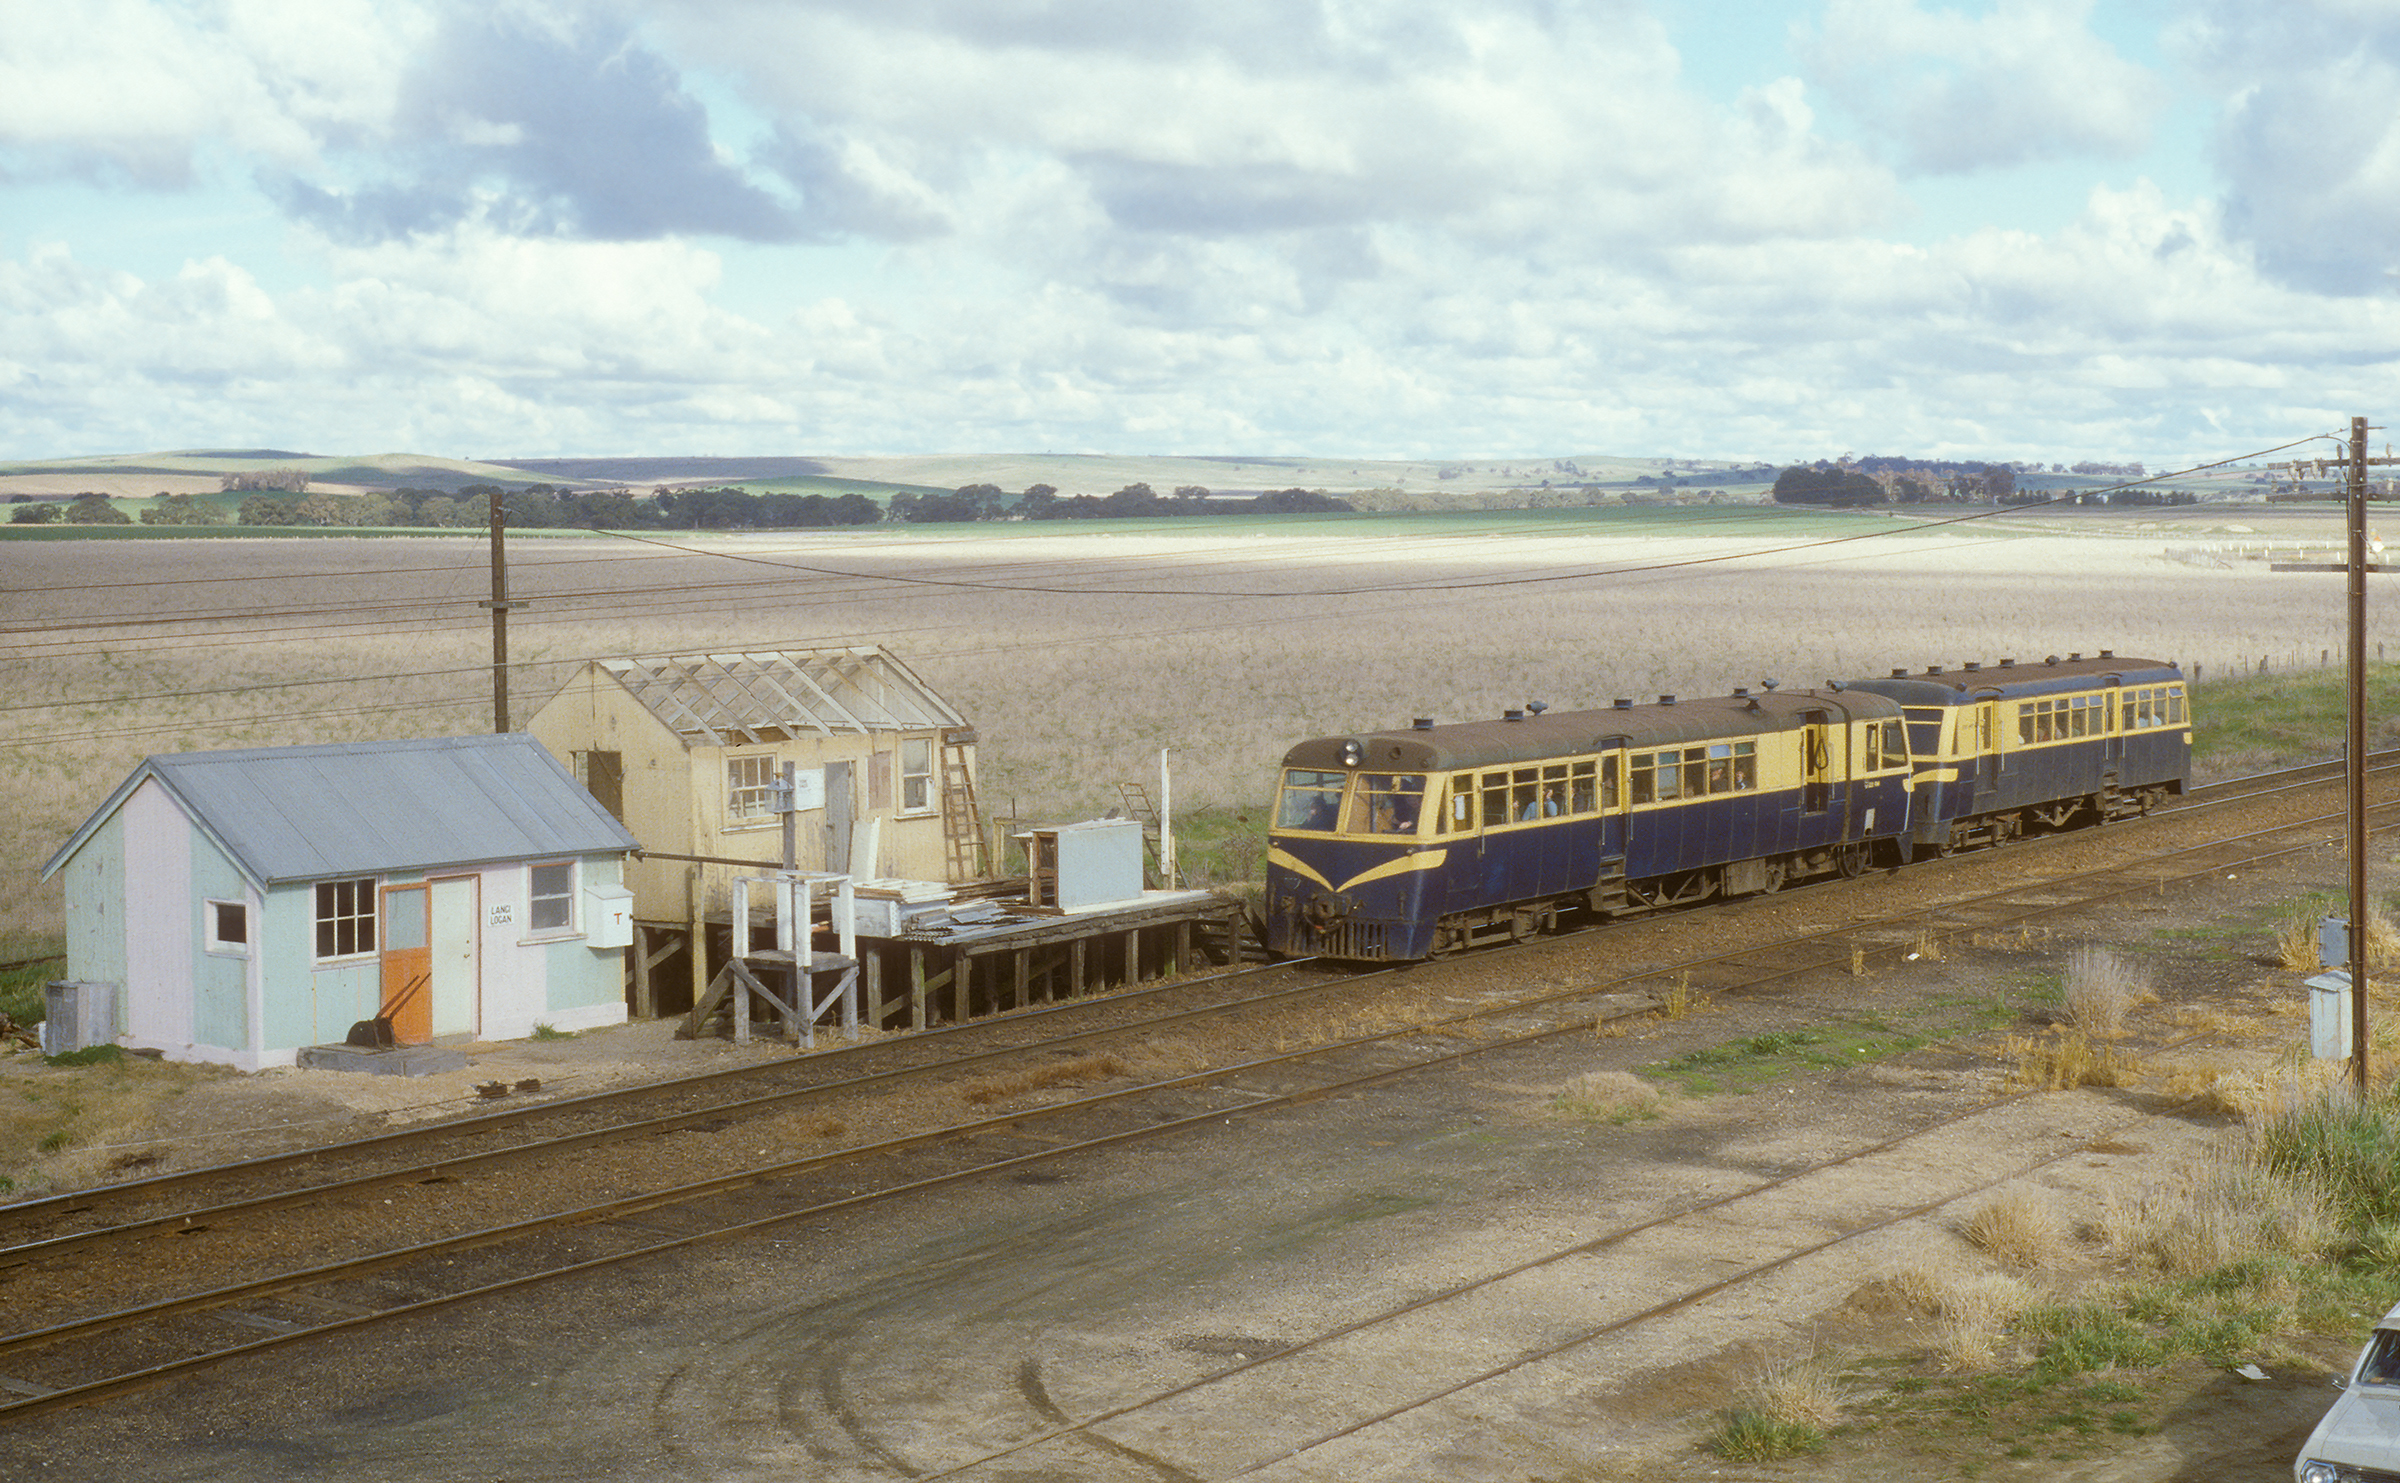
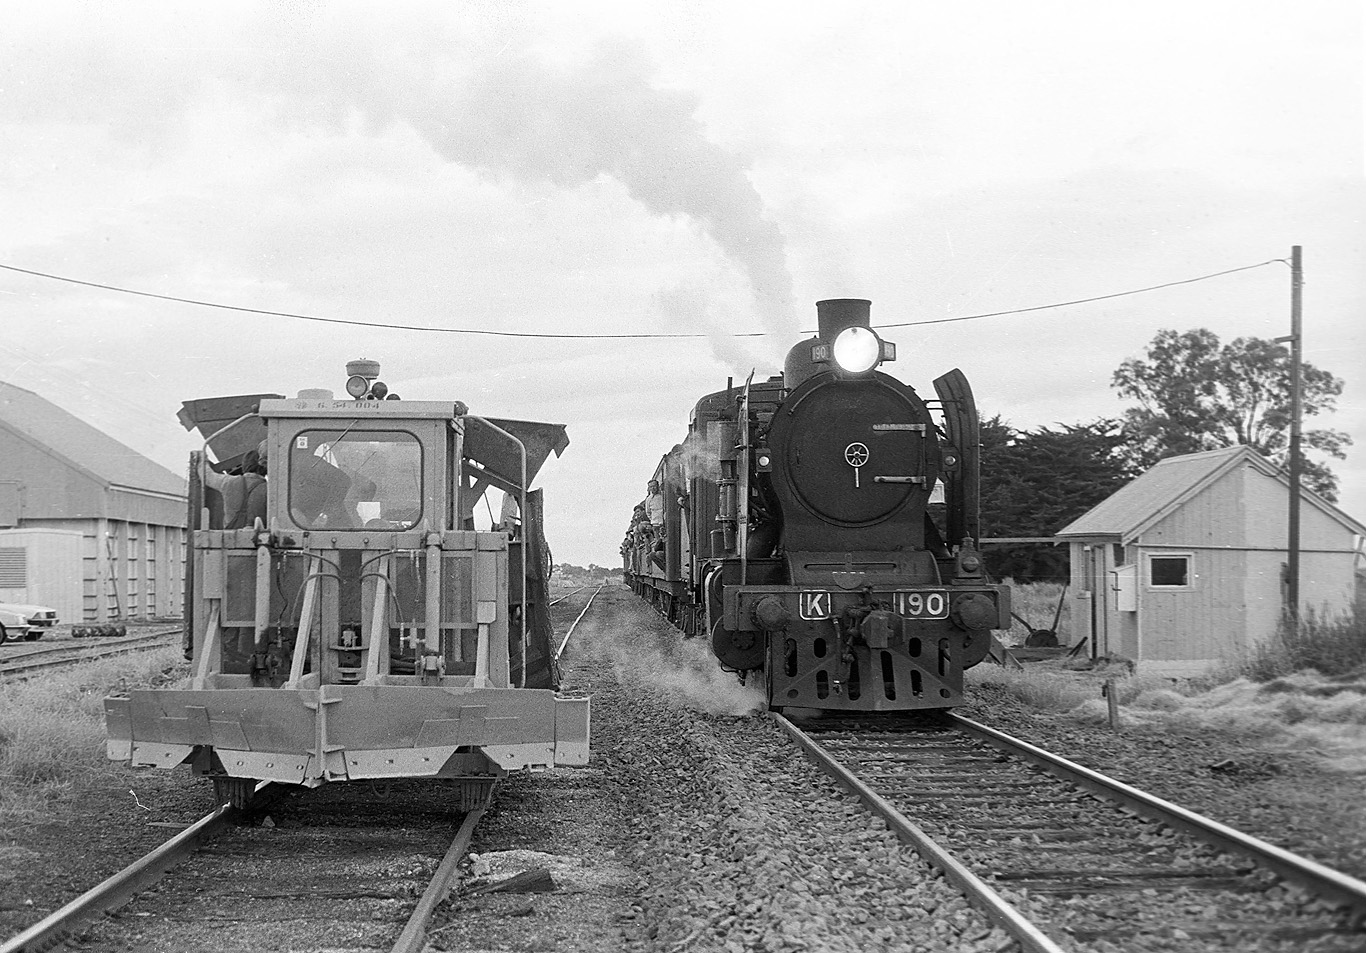
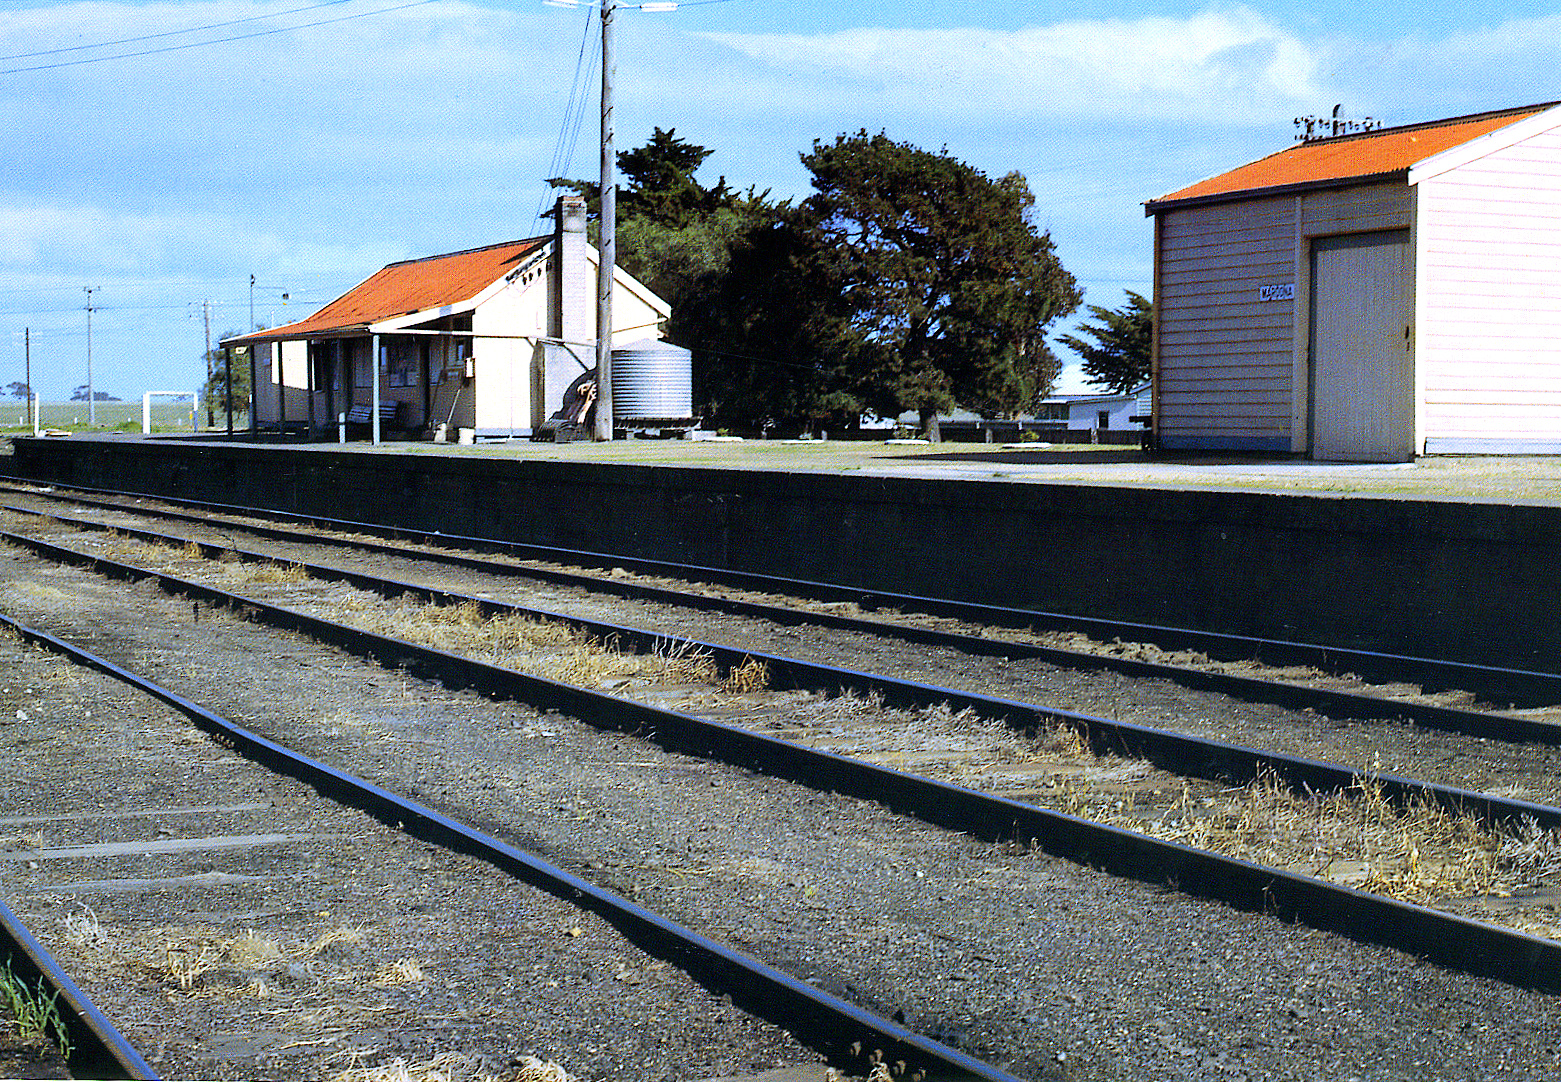
Maroona
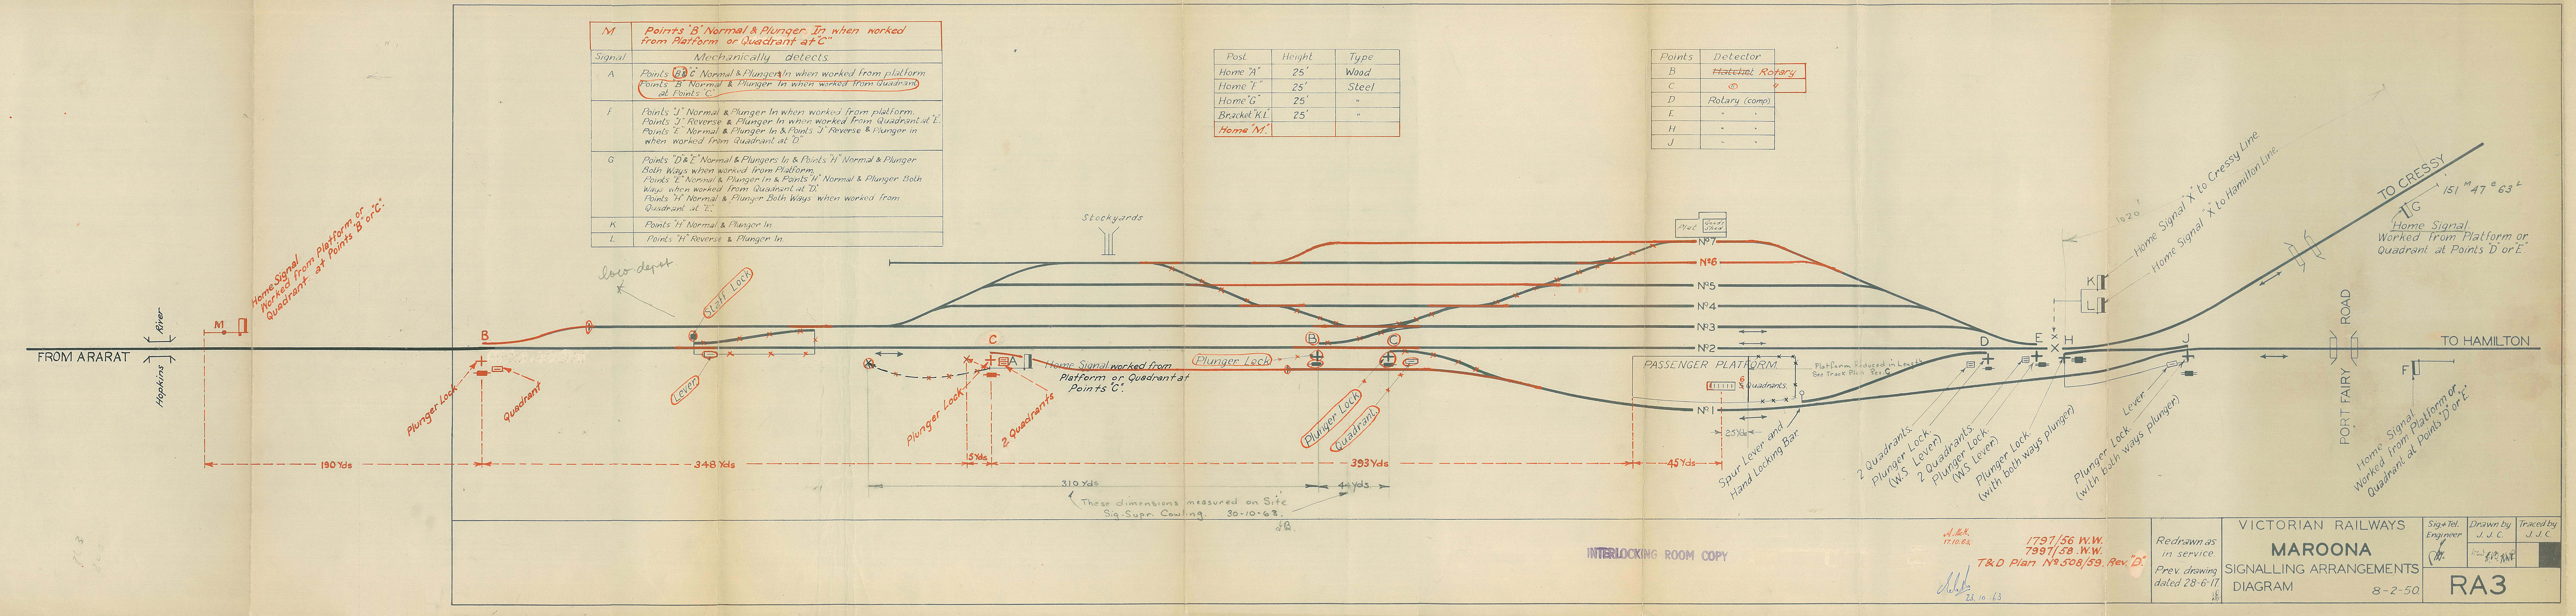
1963 Maroona signal arrangement diagram
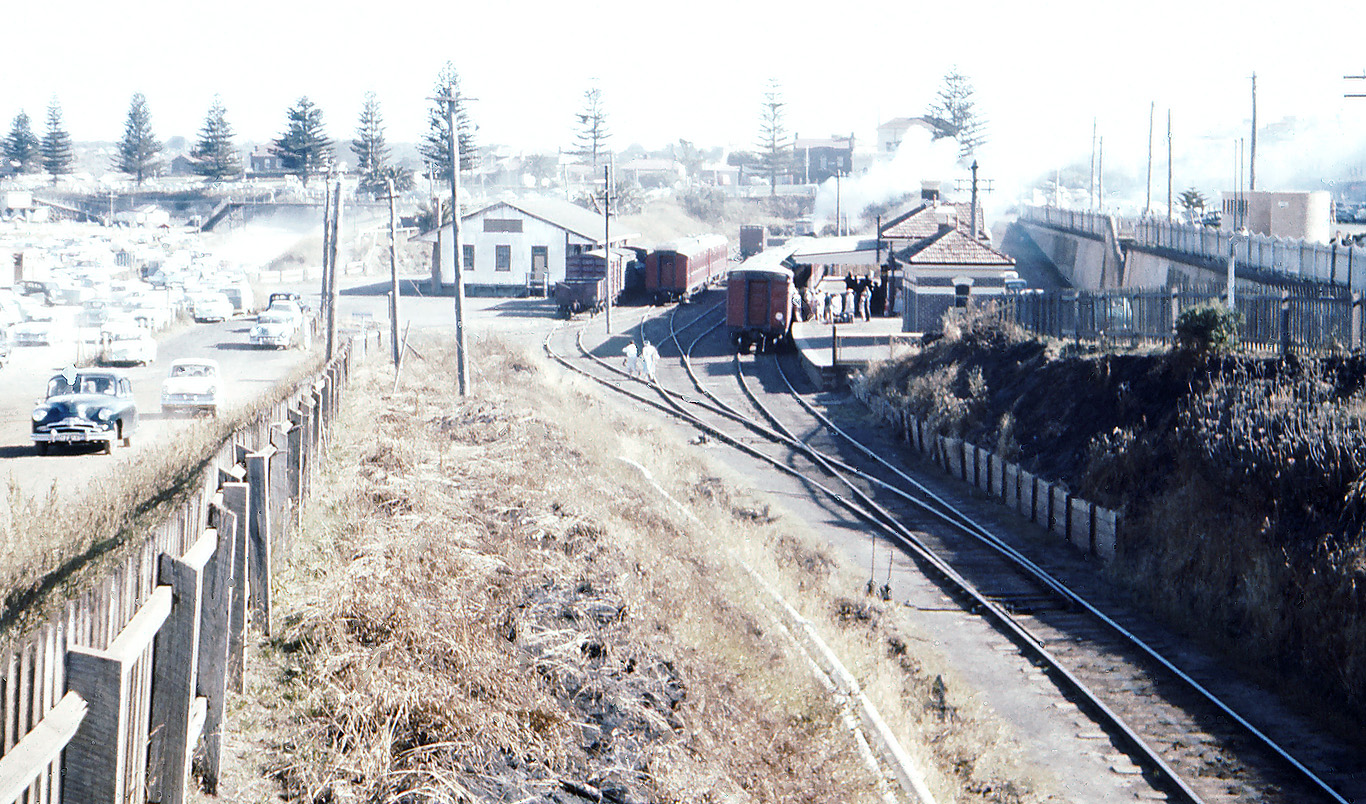
Maroona did have a classic old station building, I've never seen any photos of it (I would welcome any photos of it for inclusion here) but the plan for the original building exists. In 1915 plans were drawn up for a large signal box, fully interlocked yard and new building. Whilst the yard was never signalled, the new signalbox was built, it is unceratin how long it lasted until it was removed. Sadly, Maroona was destined to see its days out with a humble wooden portable building as its office, more appropriate for a wayside branchline station than the important, and busy, junction station that it became.
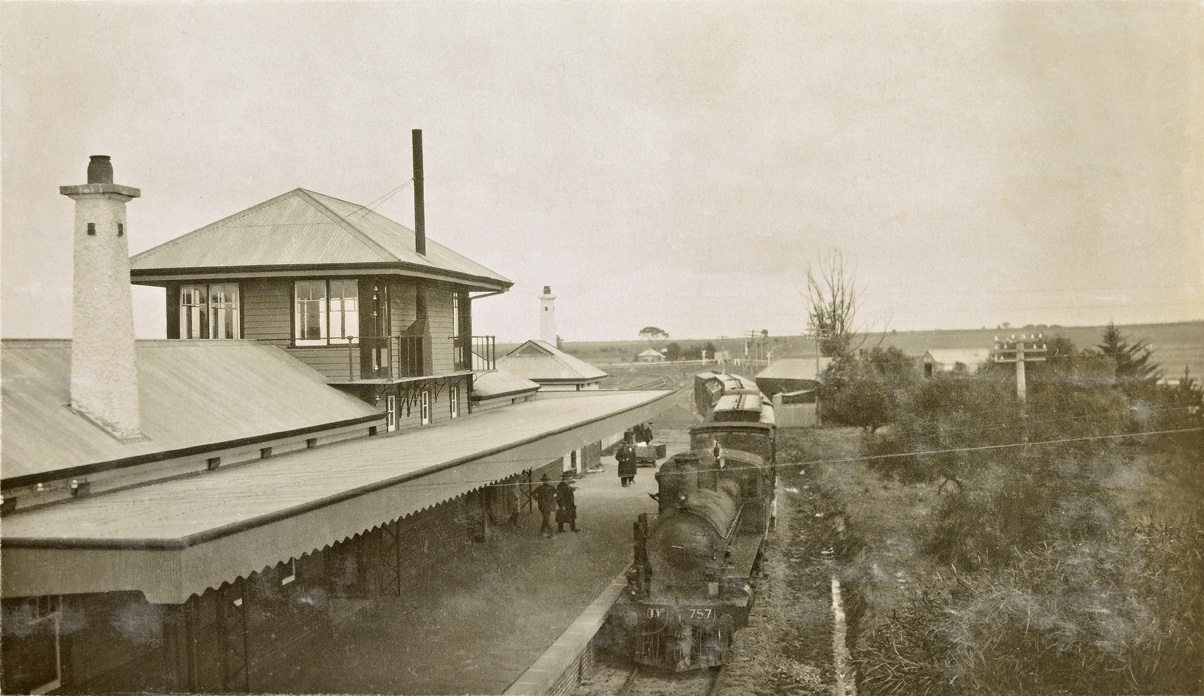
ABOVE: An Ararat bound passenger train arrives at Maroona showing the station building and elevated signal box that replaced the original stone/brick building. This station building was relocated to Redcliffs, it is unknown where the signal box ended up. Photo circa early - mid 1920s. Photo courtesy Madden collection and Steve Malpass.
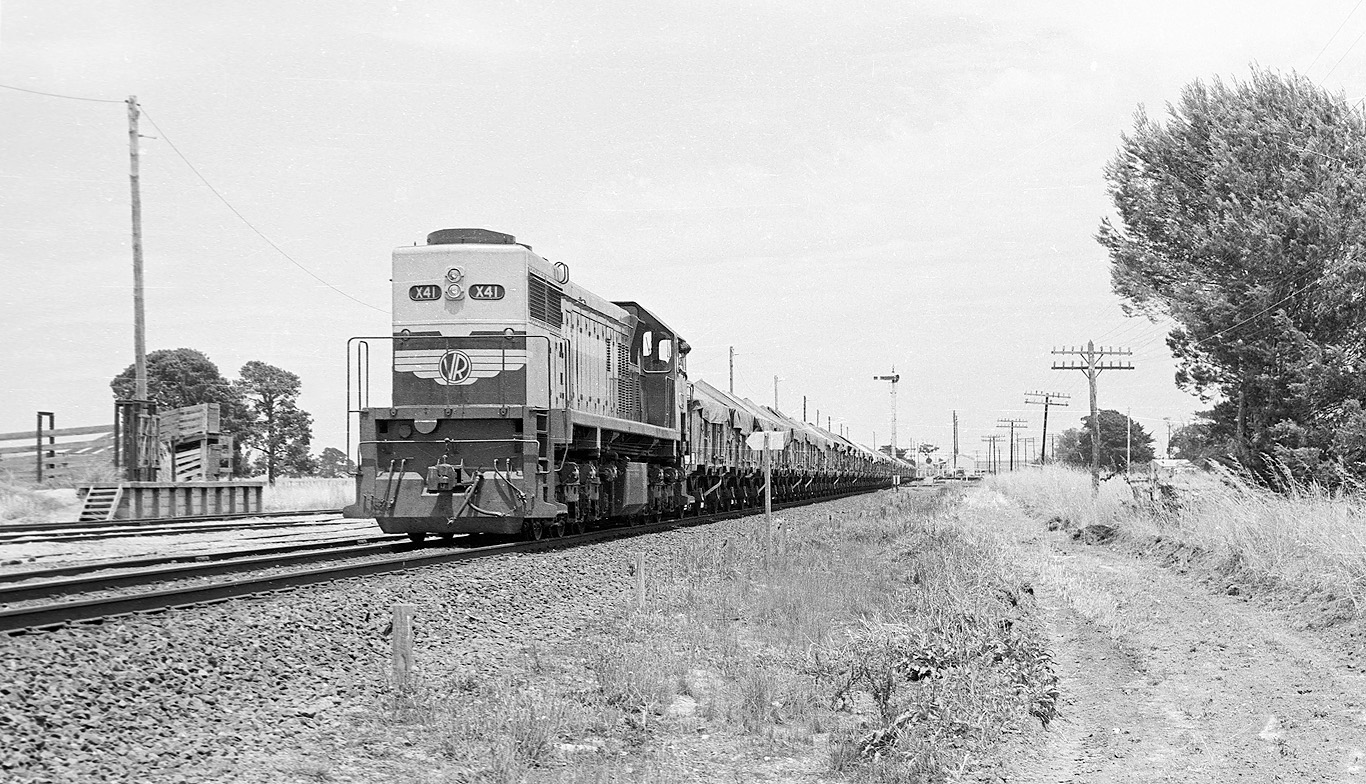
ABOVE: X 41 on an up empty grain train from Portland waits at Maroona to cross a train from Ararat, 1979.
ABOVE: Dd 732 on a bagged wheat train train from Ararat arrives at Maroona. This wheat harvest must have stretched VR's wagon fleet to the limit as the train contains a Q flat wagon loaded with bagged wheat! Circa 1930. Photo by J. C. M. Rolland
.jpg)
ABOVE: The rarely photographed back platorm at Maroona, at the right hand end of the platform facing you can see the tunnel under the platform for the never to eventuate interlocked signal box. BELOW: Van shed and station building looking towards Hamilton. Both photos July 28 1971. (courtesy Neville Gee)

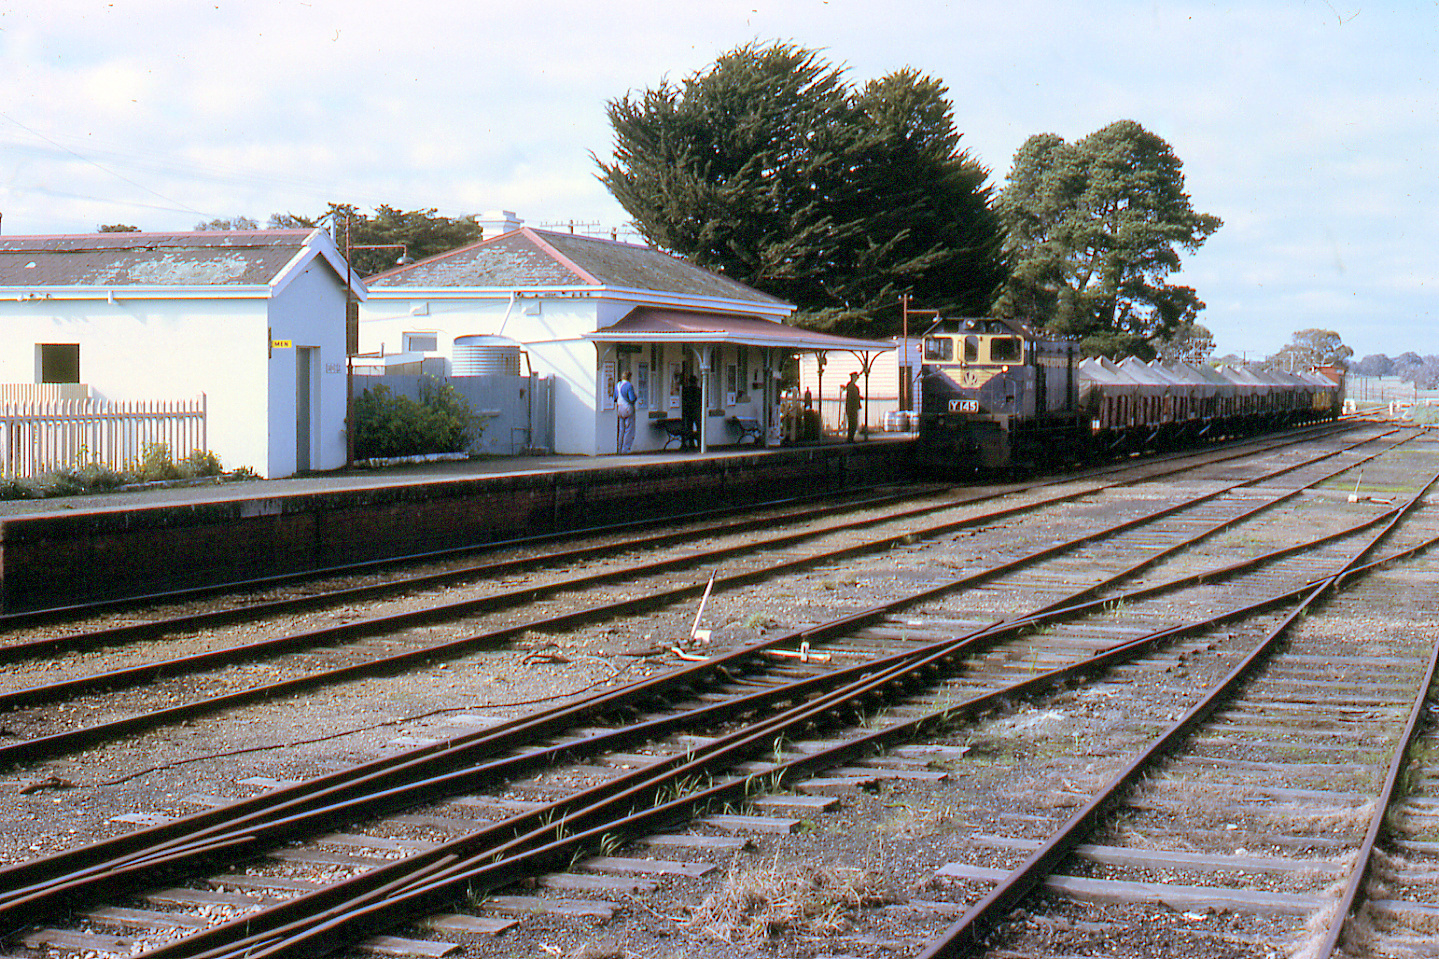
ABOVE: A great overall view of Maroona, RM 22 MT 56, on an enthusiast special, August 8, 1979. (photo courtesy Geoff Winkler)
ABOVE: A Geelong bound enthusiasts special arrives at Maroona, 1981.
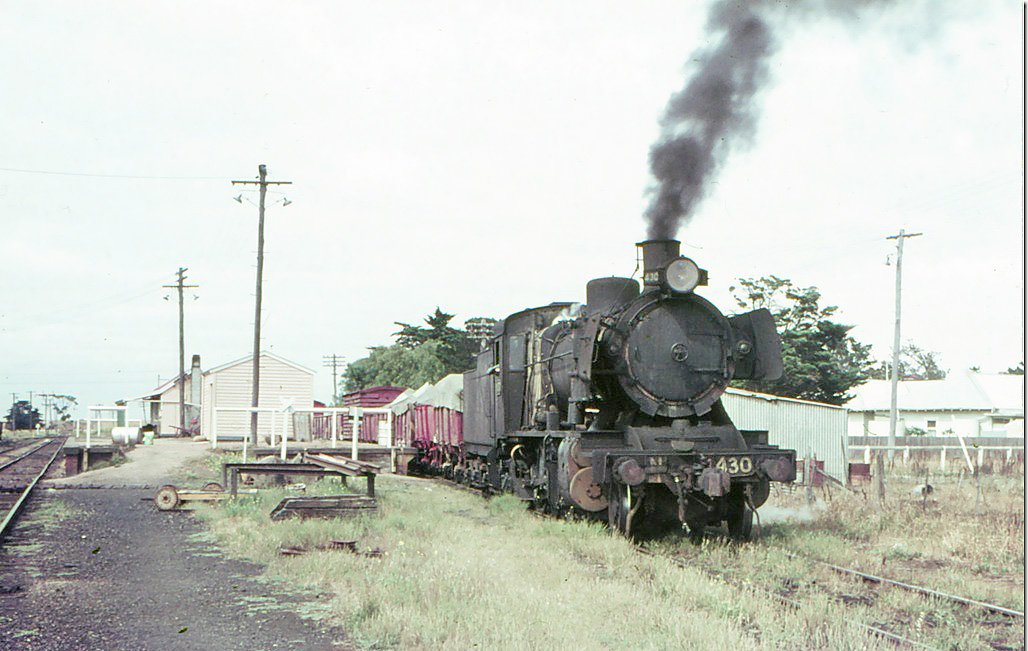
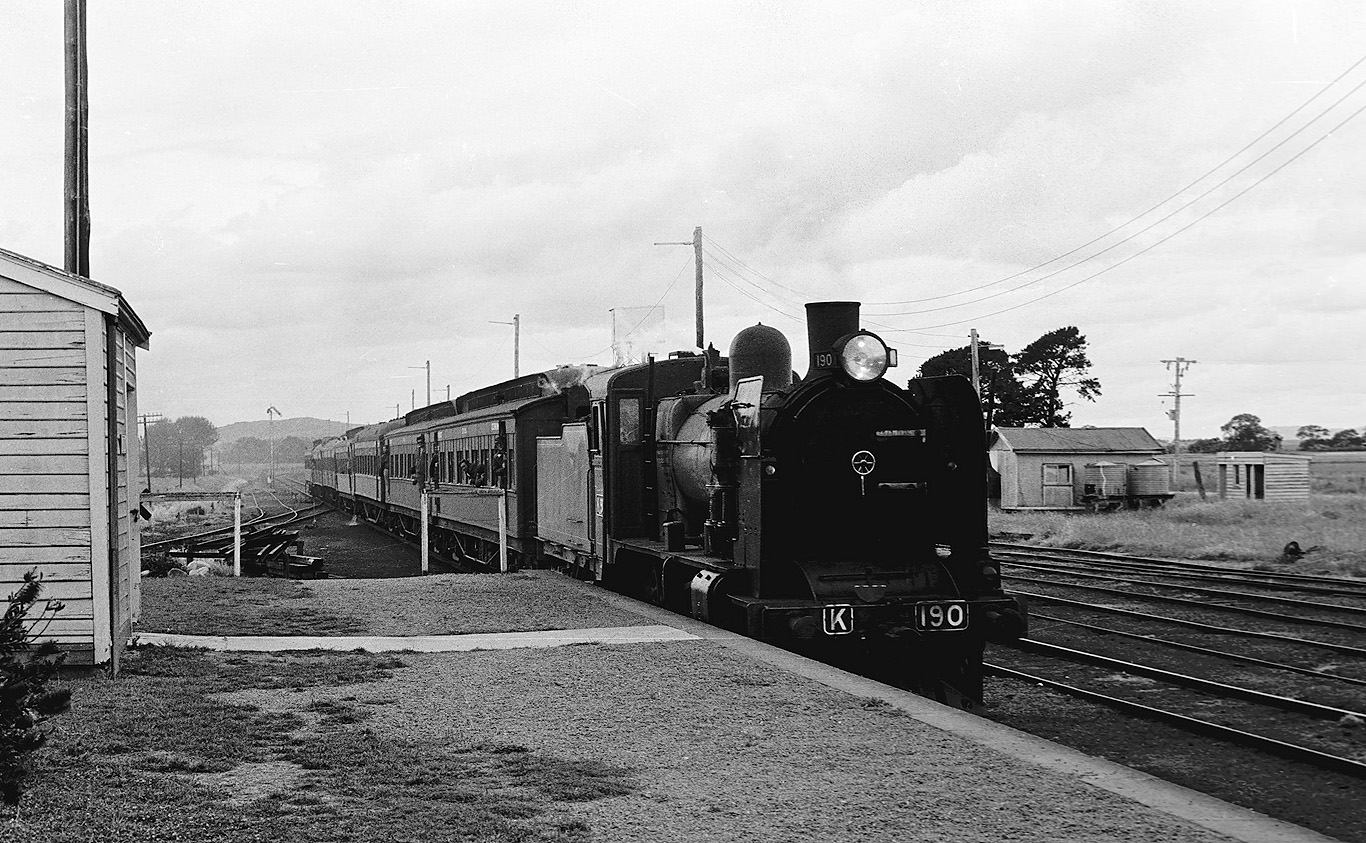
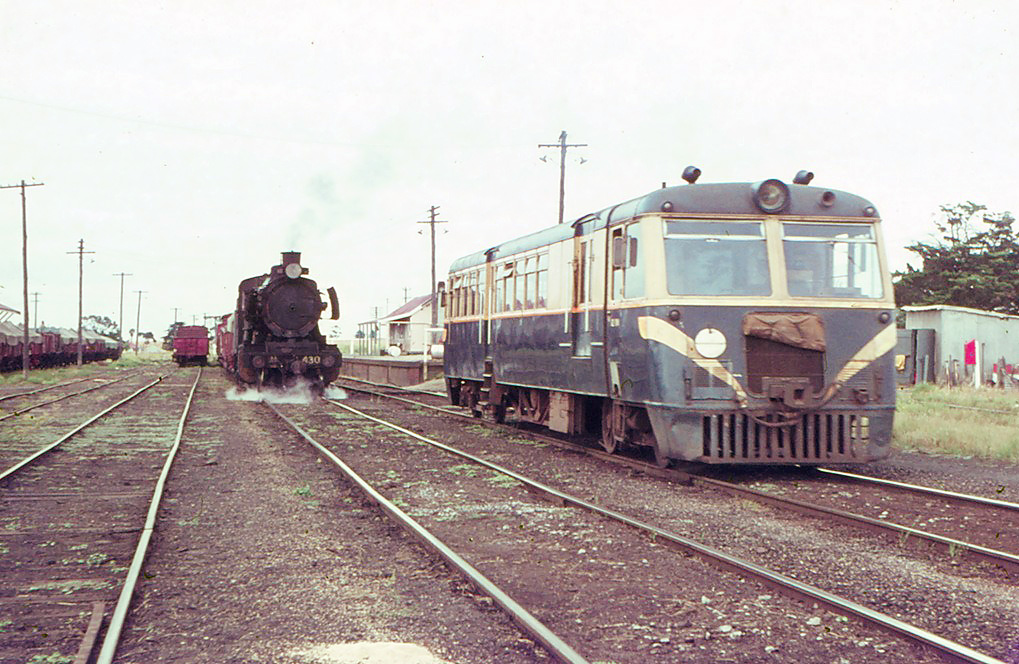
ABOVE: N 430 on an Ararat bound goods arrives Maroona via the back platform road (No. 1 road), depending on where this train came from it could be an up or down train, April 14 1967. BELOW: We now find N 430 over in the yard (No. 3 road) whilst a down 102 Walker arrives Maroona, probably running the 9.25am Ararat to Hamilton service, April 14 1967. (photo courtesy Bob Wilson) (both photos courtesy Bob Wilson)
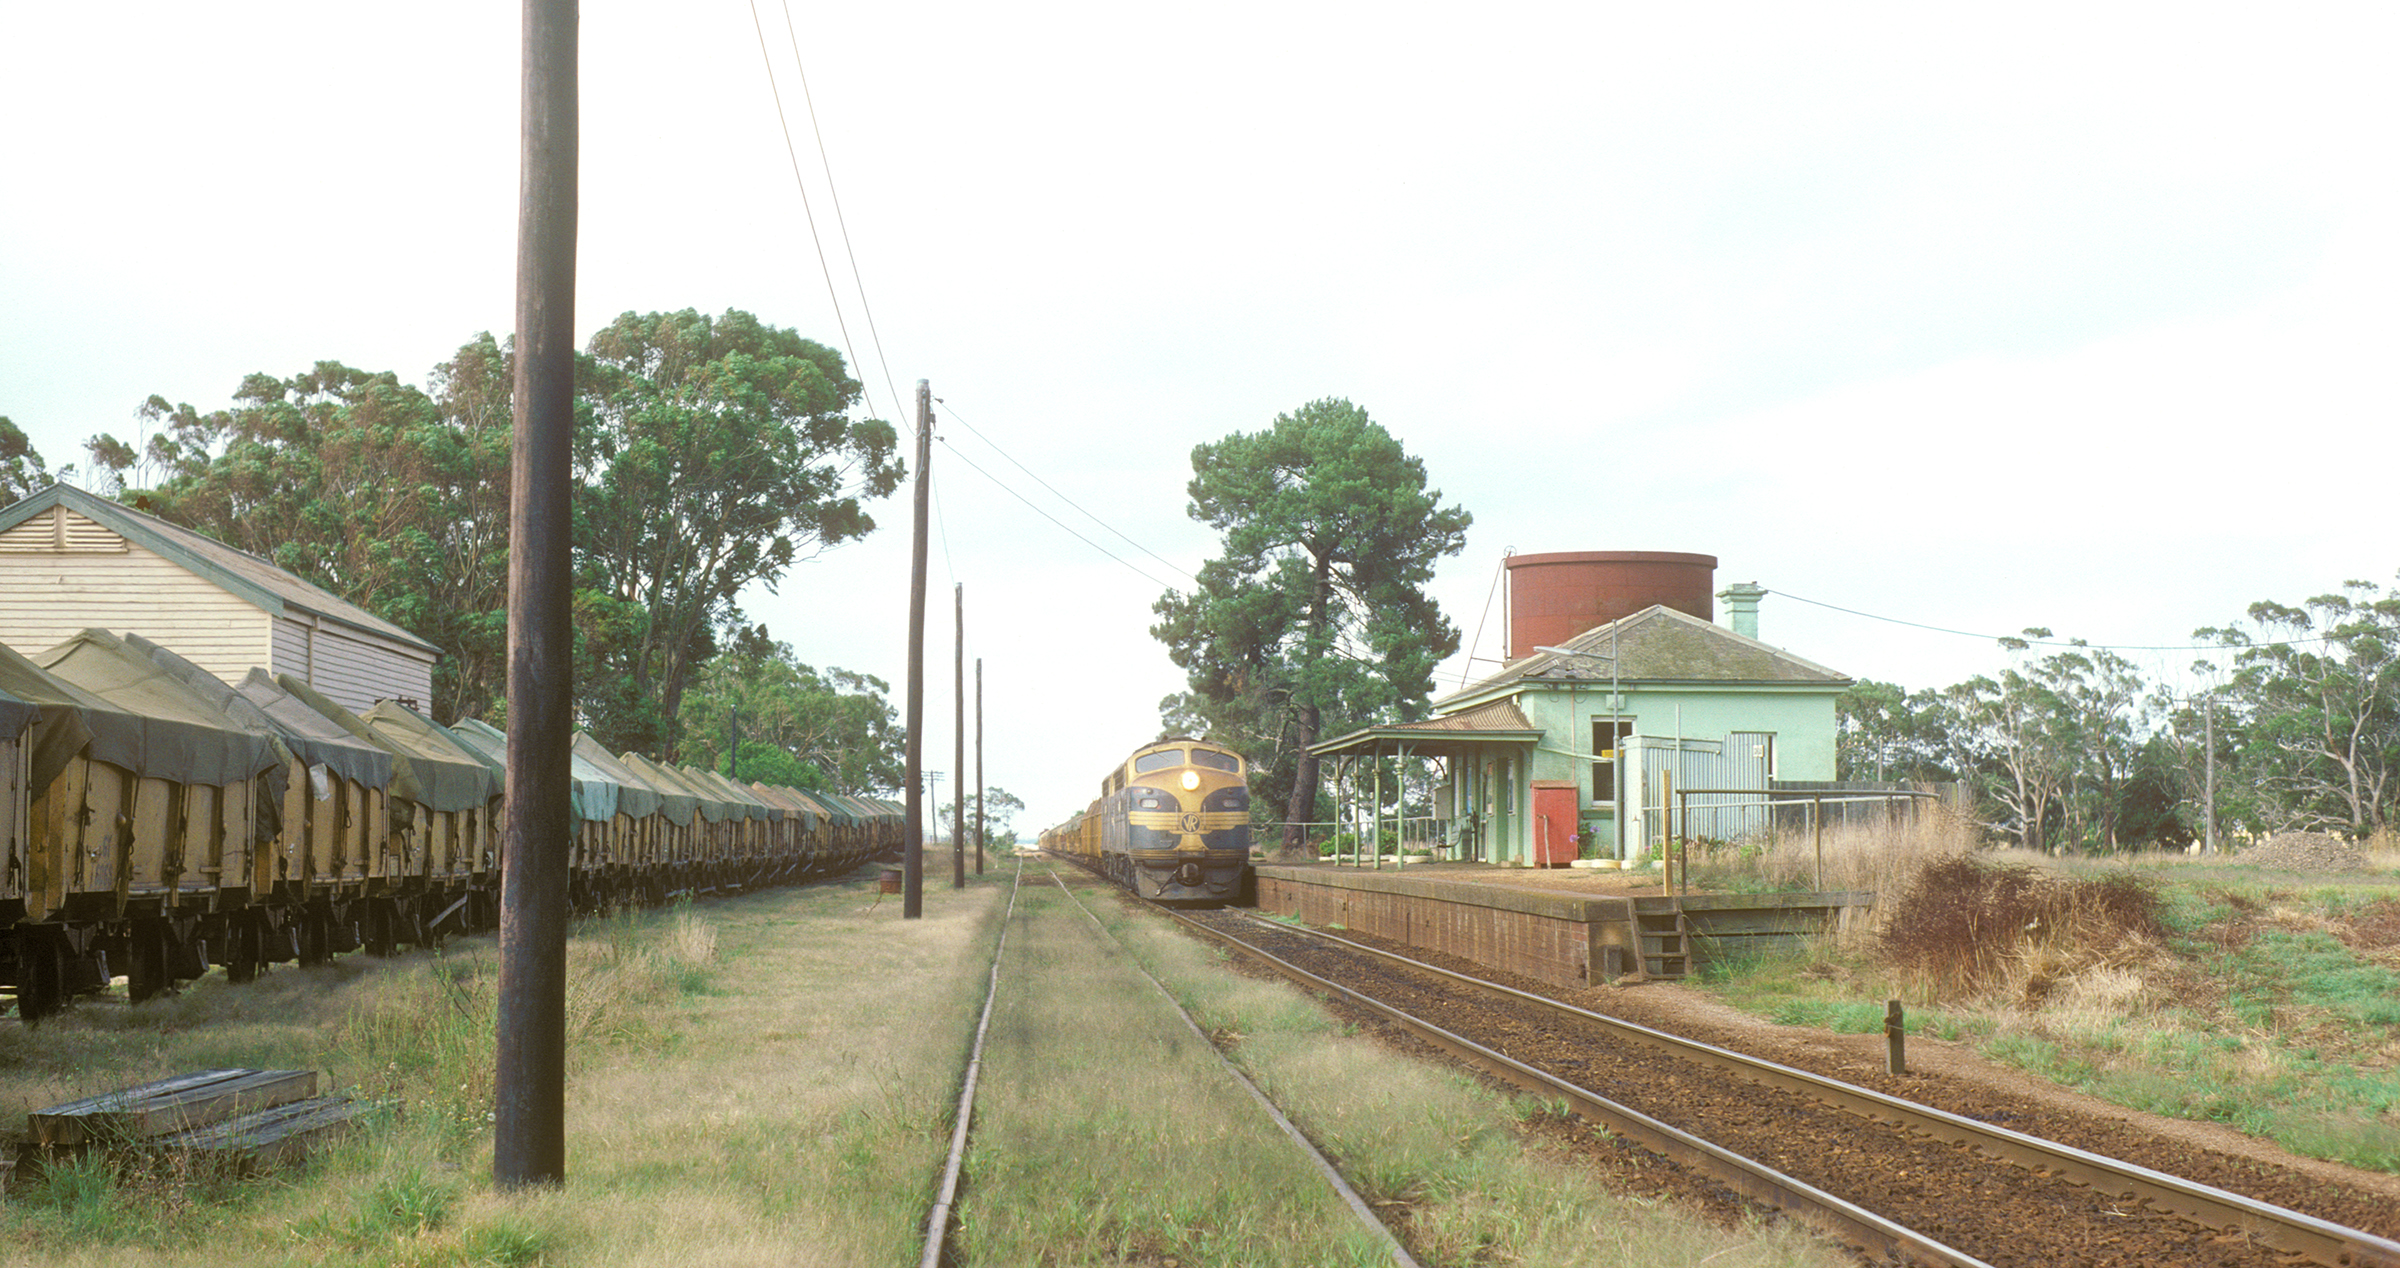
ABOVE: The fireman on a down goods off the Cressy line hands up his miniature electric staff and receives a large electric staff for the final leg of the journey to Ararat. Feb 1978. (photo courtesy Peter J. Vincent)
ABOVE: An AREA special about to depart Maroona on a Geelong bound train. July 12 1980.
ABOVE: Maroona was the junction for the Cressy (track curving to the left) and Hamilton lines and here we see an up train from Hamilton arriving Maroona. April 1982. (photo courtesy Chris Wurr) BELOW: Another view of the junction showing the departure homes with the signal at proceed for a train to Cressy. 1981.
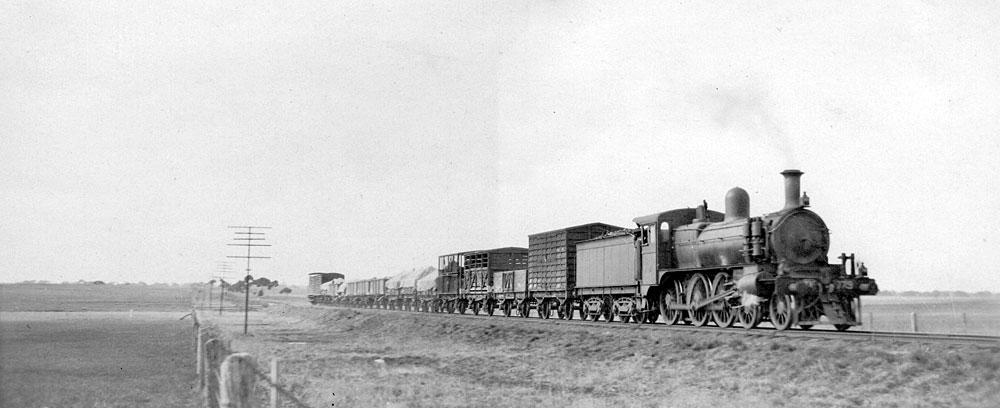
ABOVE: A2 964 on a Hamilton to Ararat goods between Calvert and Maroona at the foot of Kiora bank, Aug 18 1962. (photo courtesy Des Jowett)
Willaura
ABOVE: The down arrival home at Willaura. The signal was being equipped with a four way controller that would prove if the arm was "on" or "off" in preperation for the installation of flashing lights at the crossing ahead of the signal.May 19 1982.
ABOVE: A Dd arrives Willaura from Ararat, circa 1930's.Photo by J. C. M. Rolland

ABOVE: A2 936 up sheep train departs Willaura, June 11 1930. Photo by J. C. M. Rolland
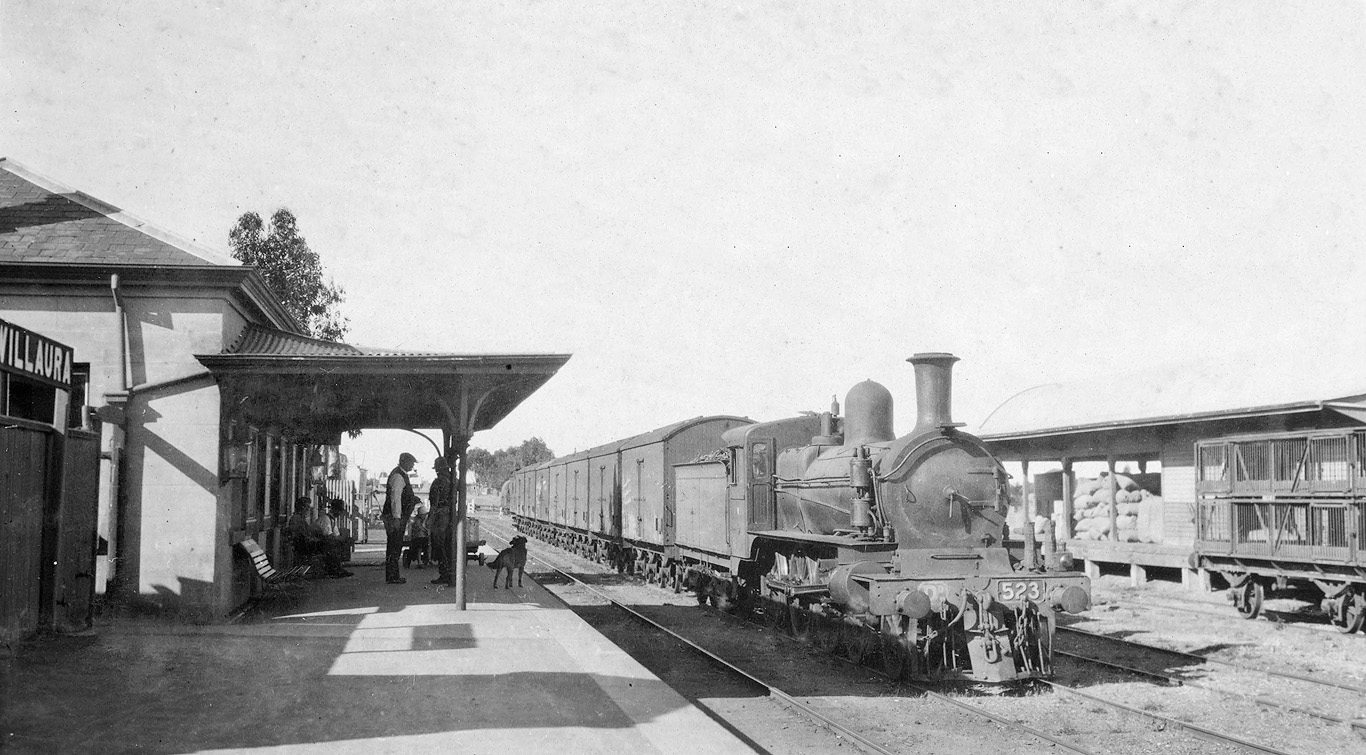
ABOVE: DD 523 on a down train consisting entirely of insulated T vans stands on No. 2 road at Willaura. circa 1930s. Photo by J. C. M. Rolland. (SLV collection)
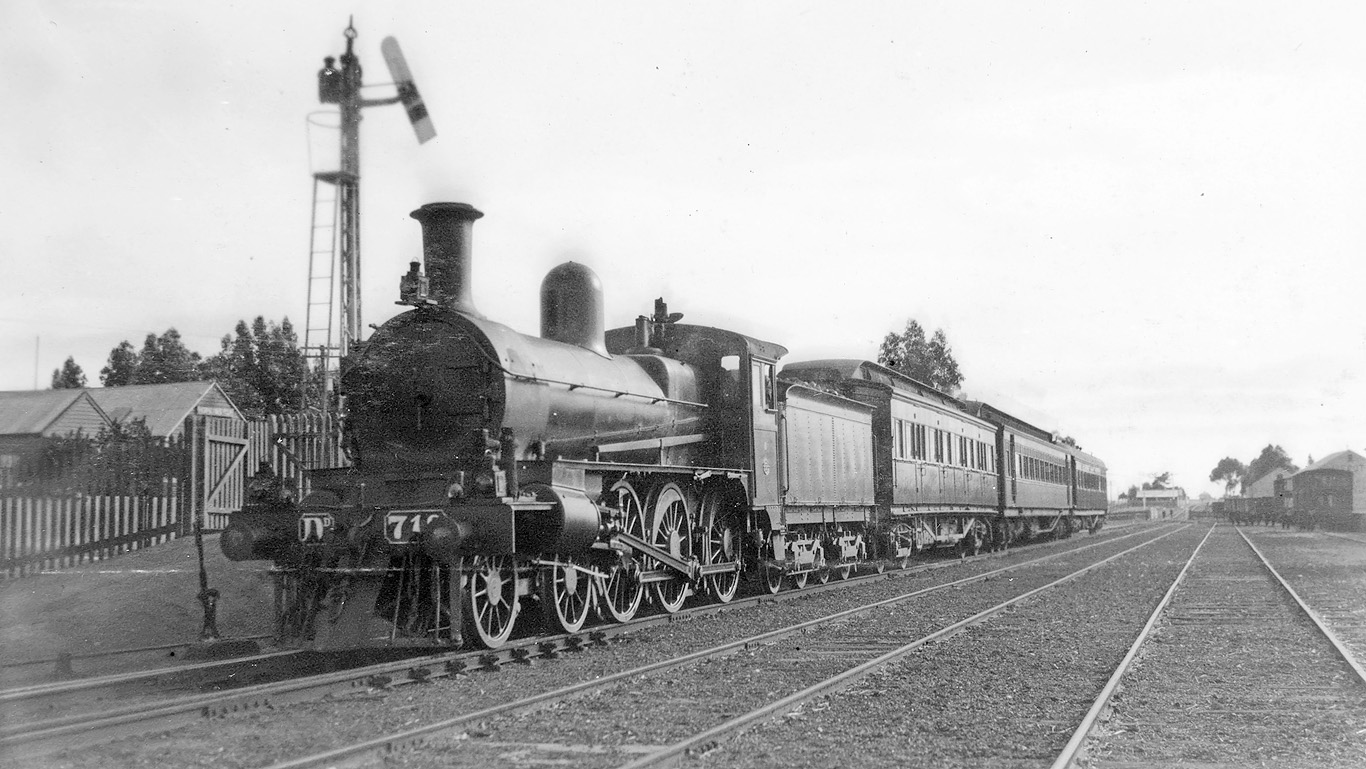
ABOVE: DD 718 on a down Commissioners' Inspection train at Willaura, March 25 1926. Photo by J. C. M. Rolland (SLV collection)
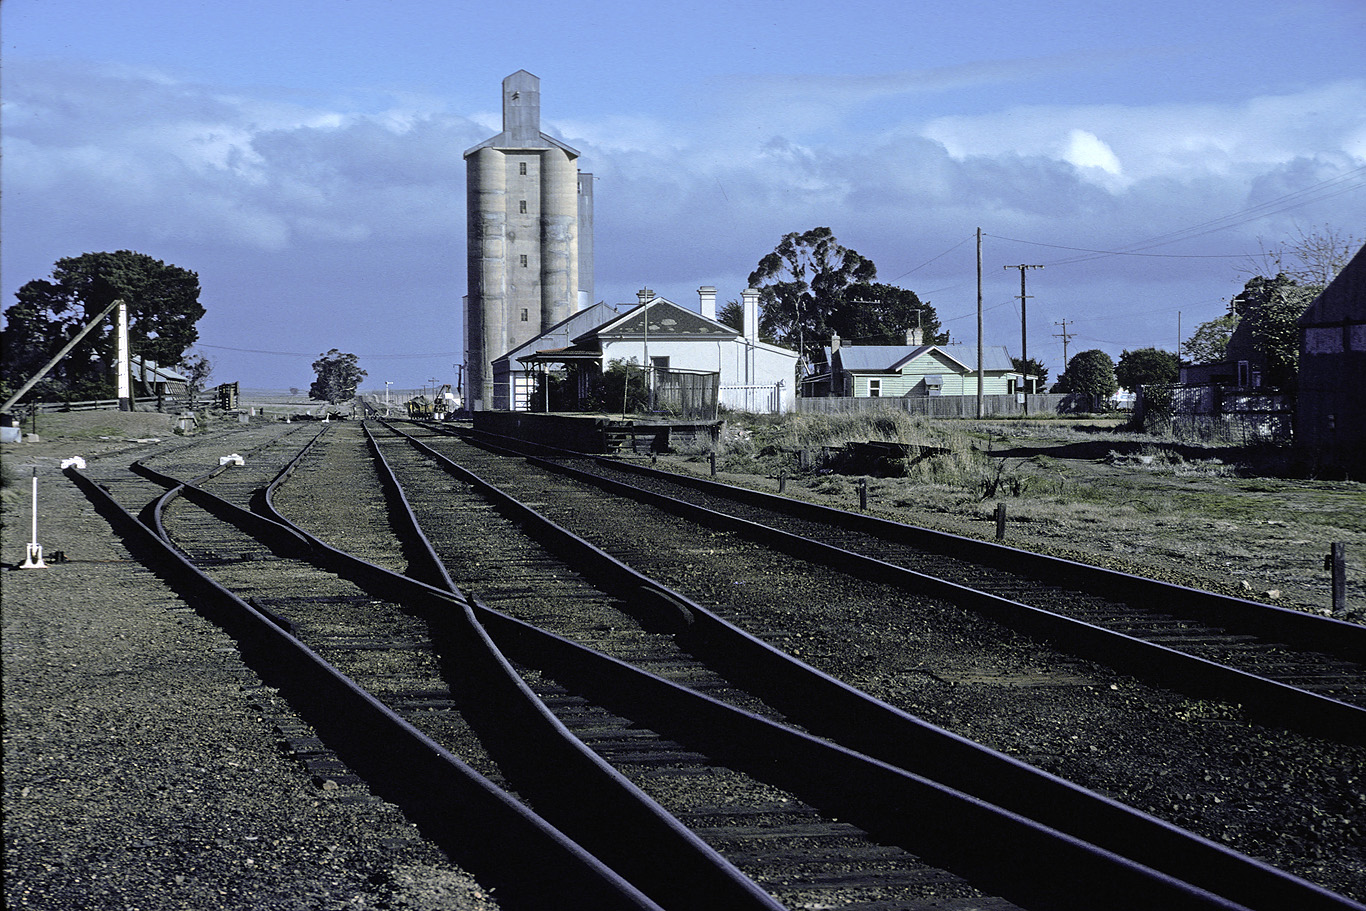
ABOVE: Willaura, looking south towards Hamilton, May 19 1982. The remains of the car dock (abolished May 1944) can be seen on the right. By this time the rare goods shed had been demolished. Apparently the silo shown here was one of the very first cement silos in Victoria.
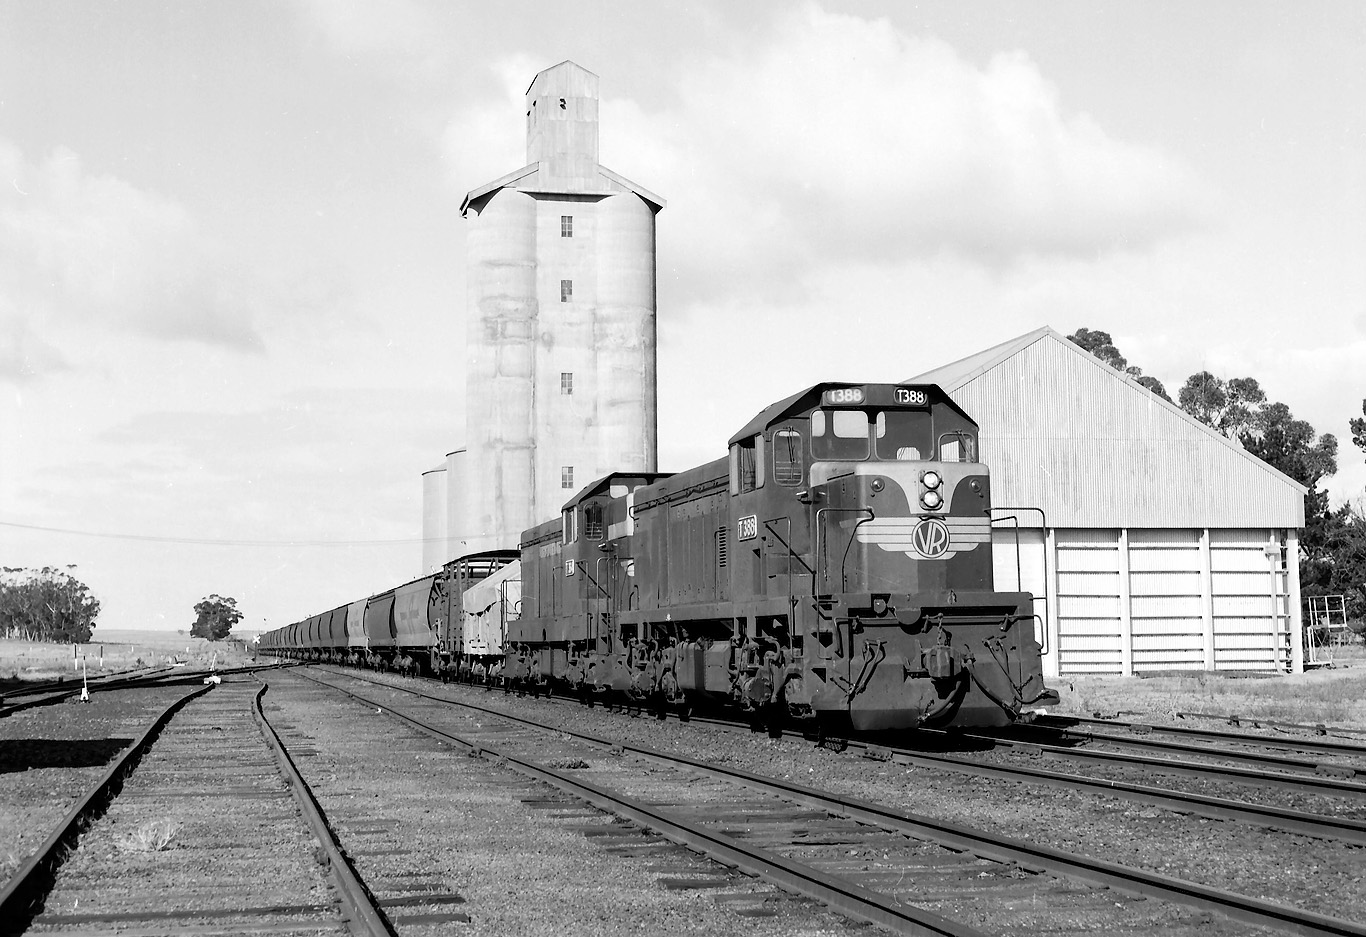
ABOVE: T 388 - T 354 on an up goods arrive Willaura April 1982. (photo courtesy Chris Wurr)
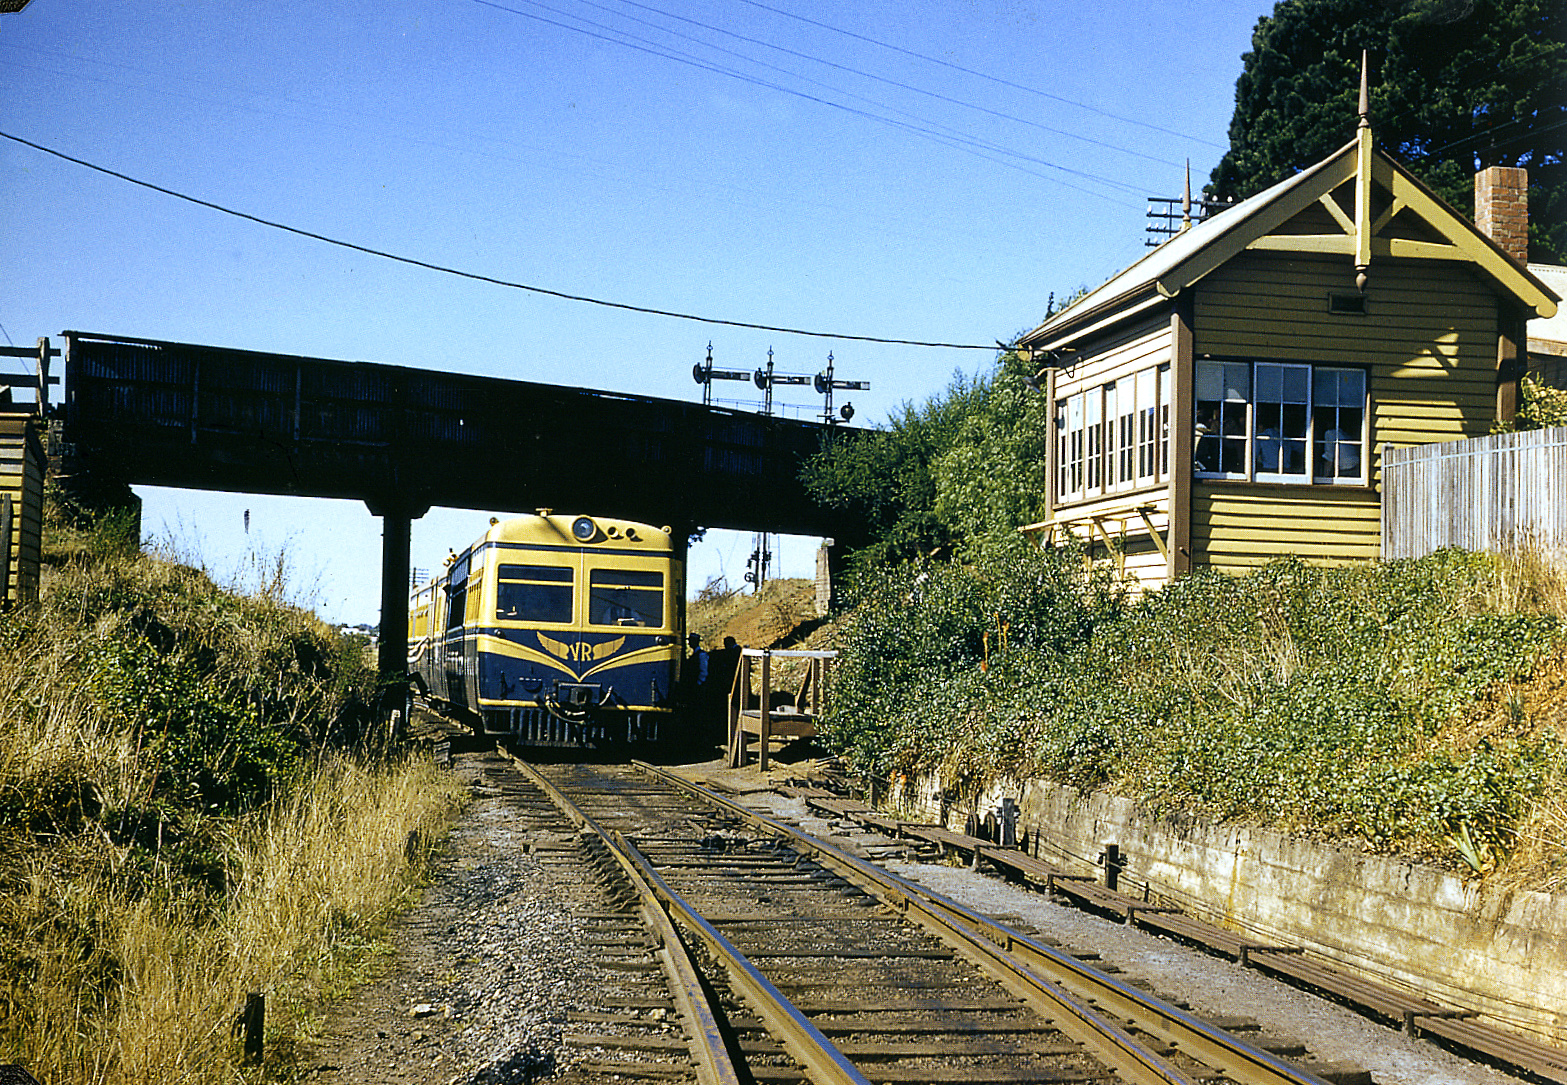
Glen Thompson
1947 Glen Thompson signal arrangement diagram
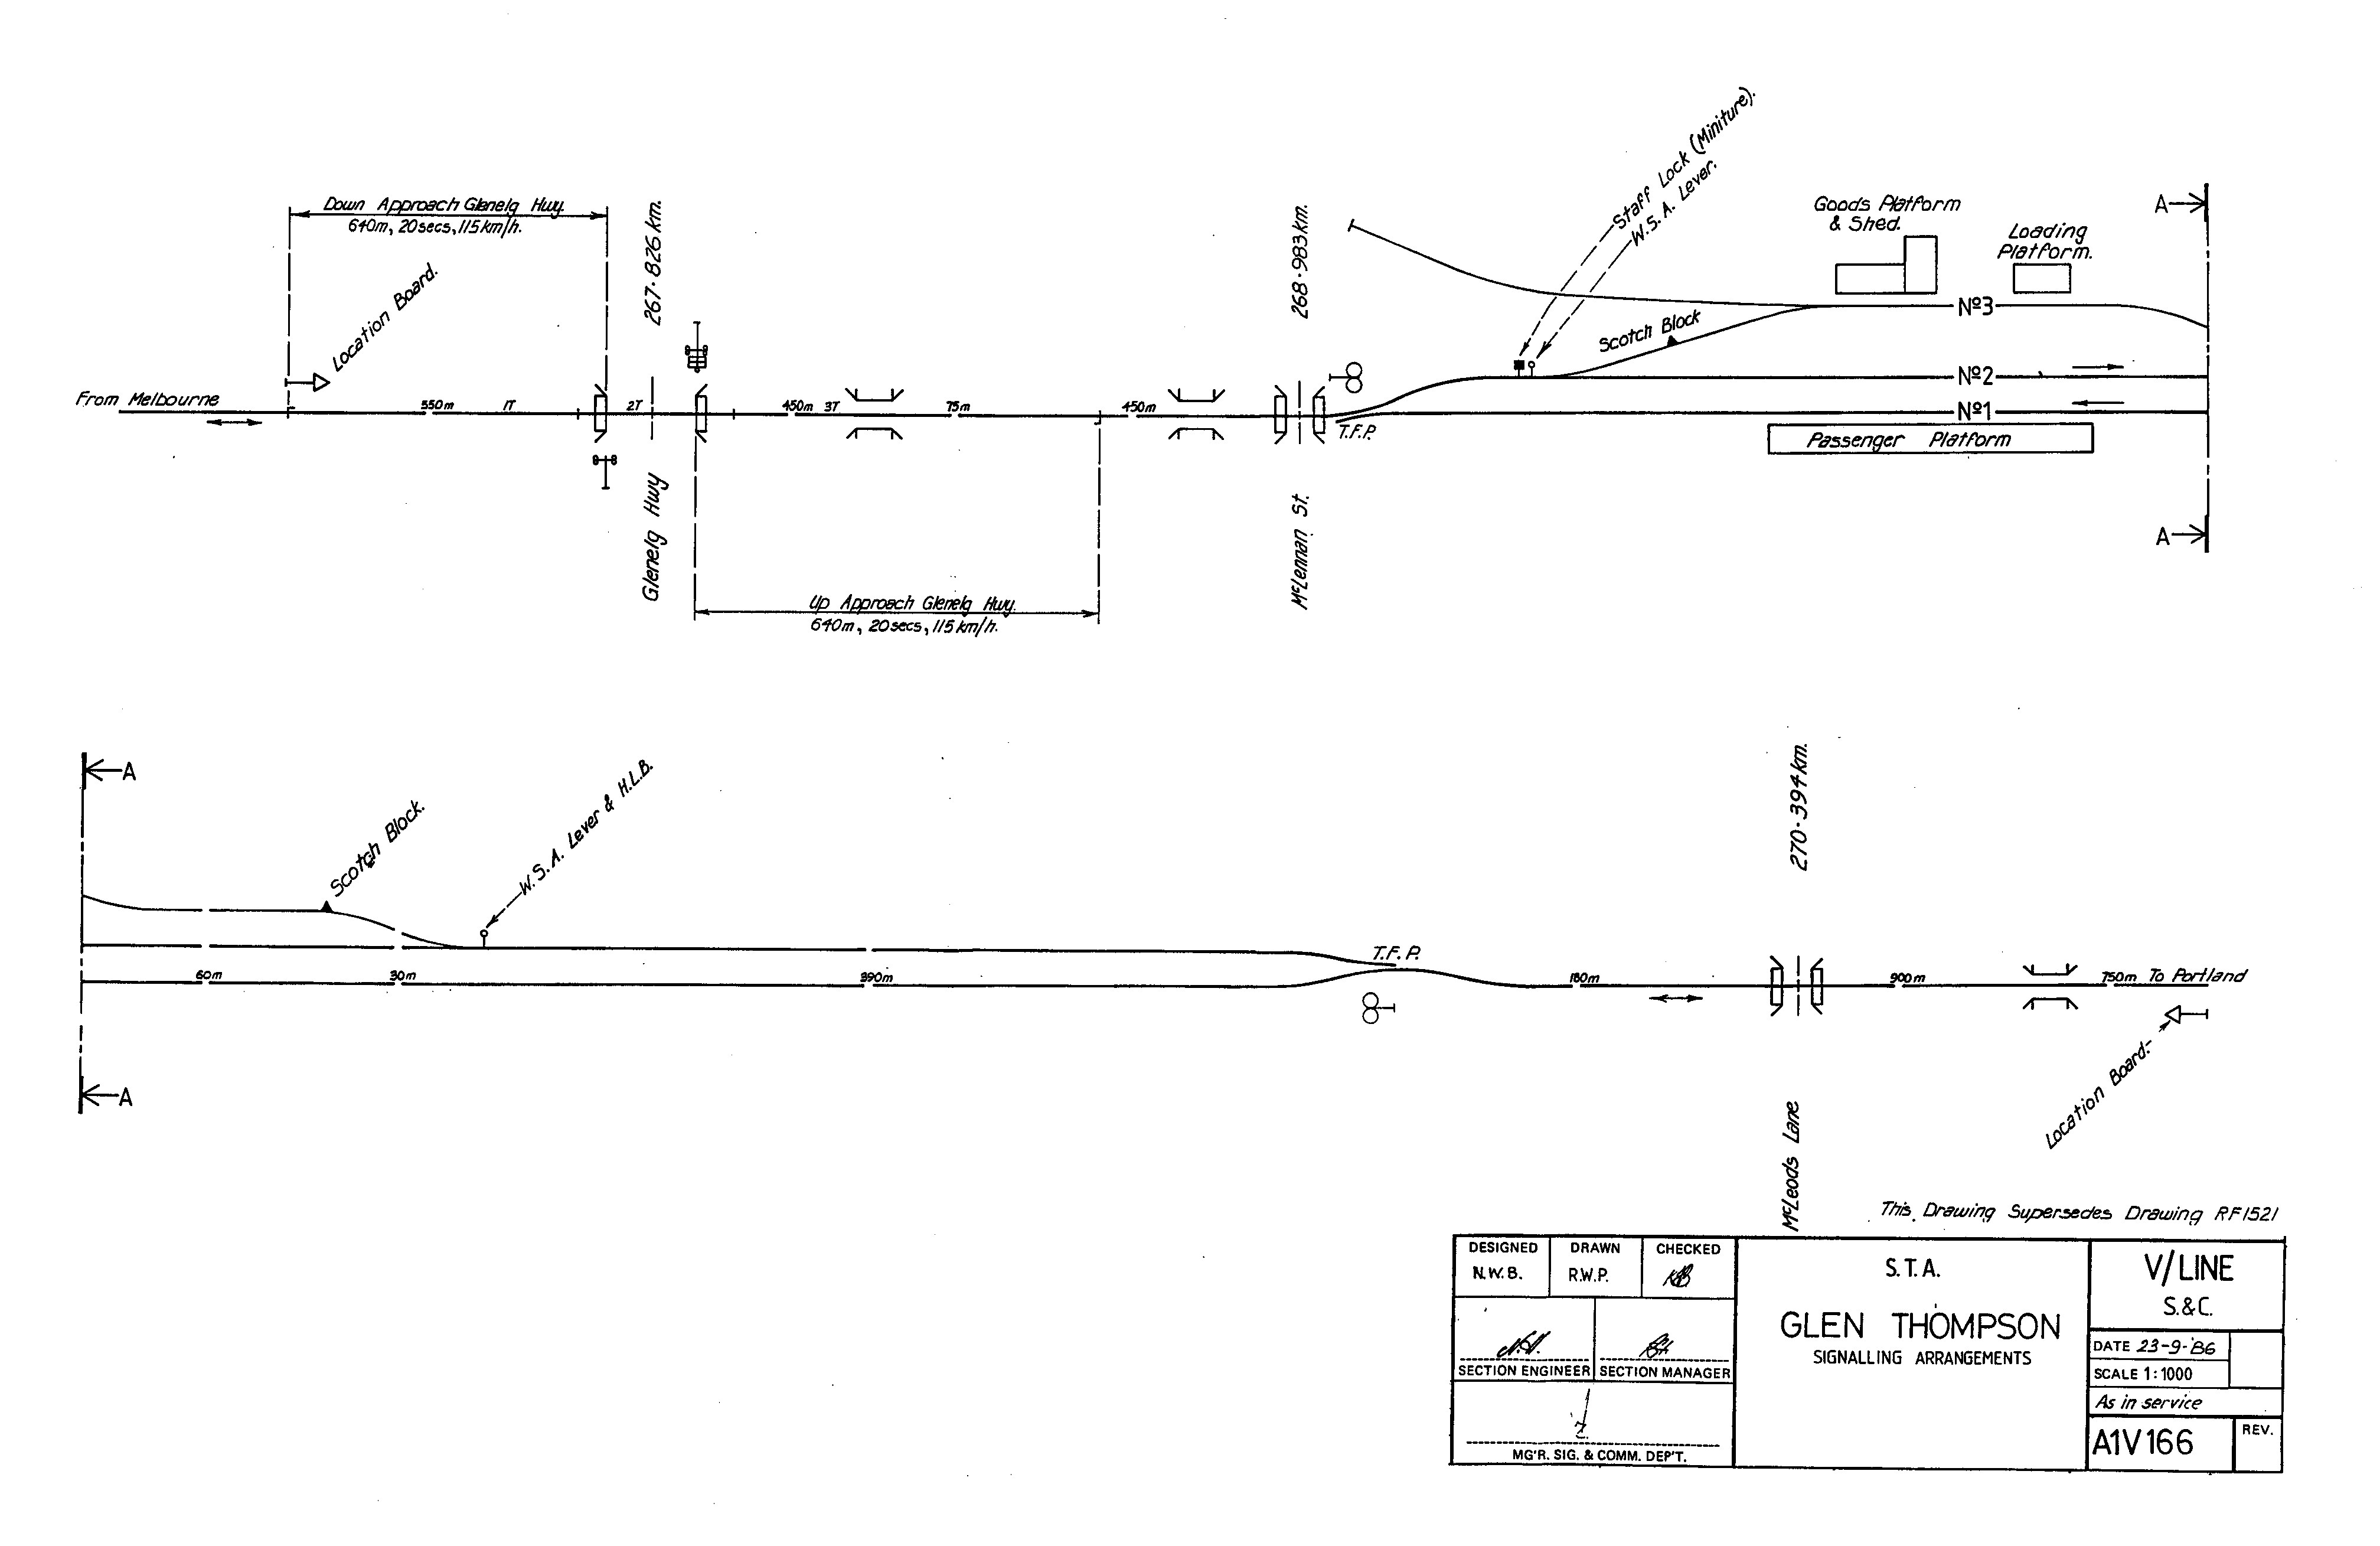
1986 Glen Thompson signal arrangement diagram
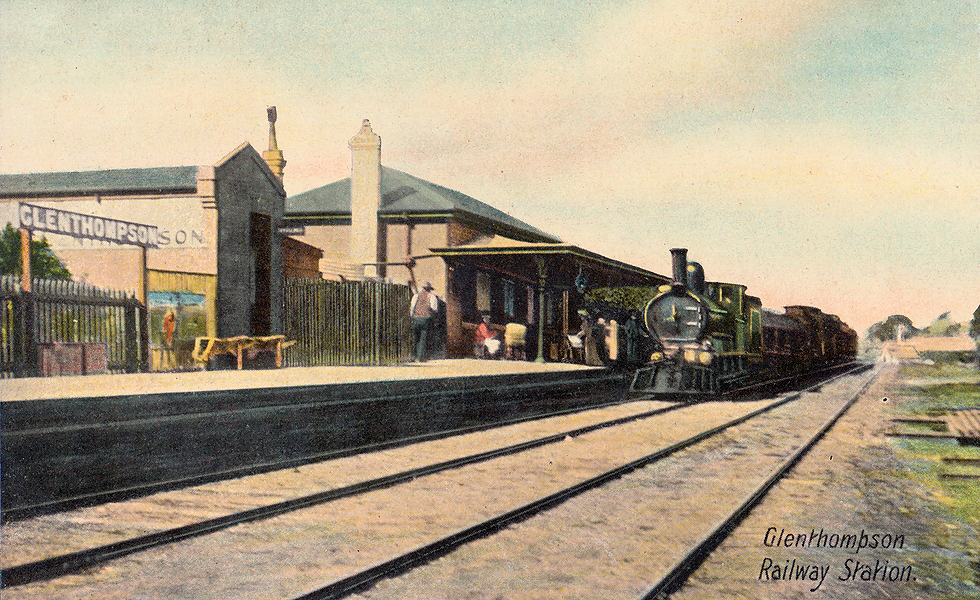
ABOVE: A down mixed at Glen Thompson, date and photograher unknown.
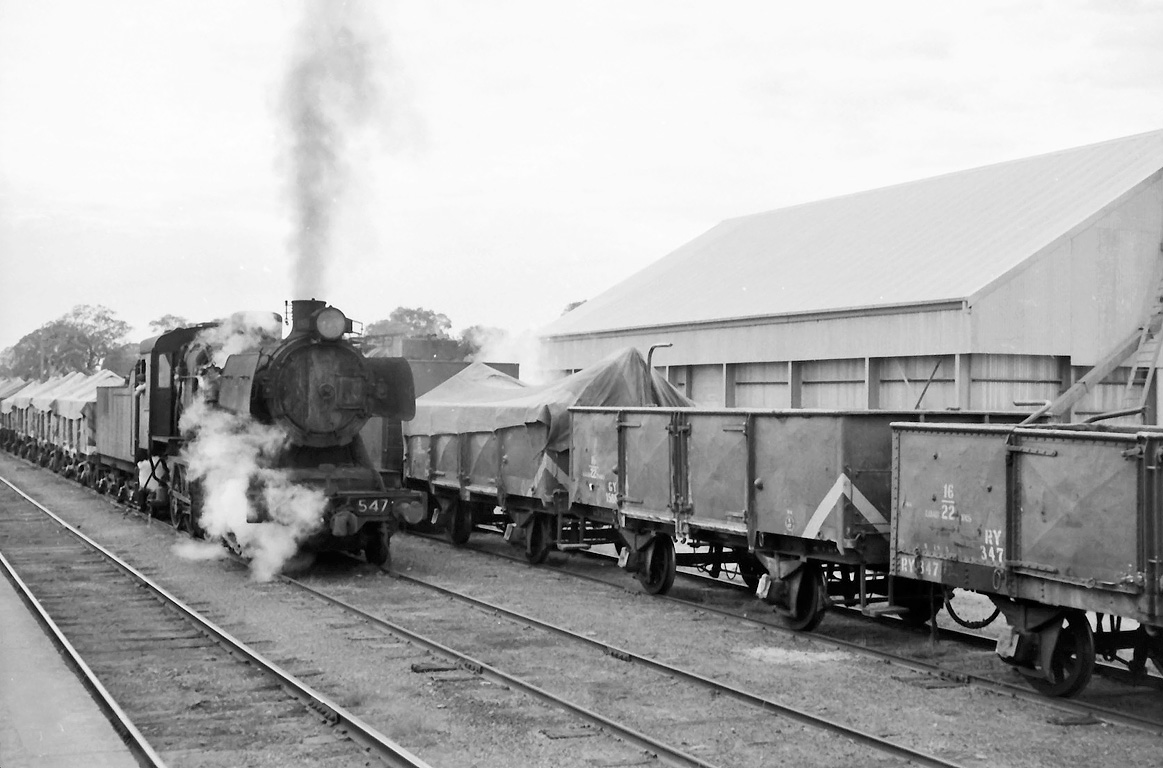
ABOVE & BELOW: J 547 on a down goods at Glen Thompson, April 14 1967. (photos courtesy Bob Wilson)

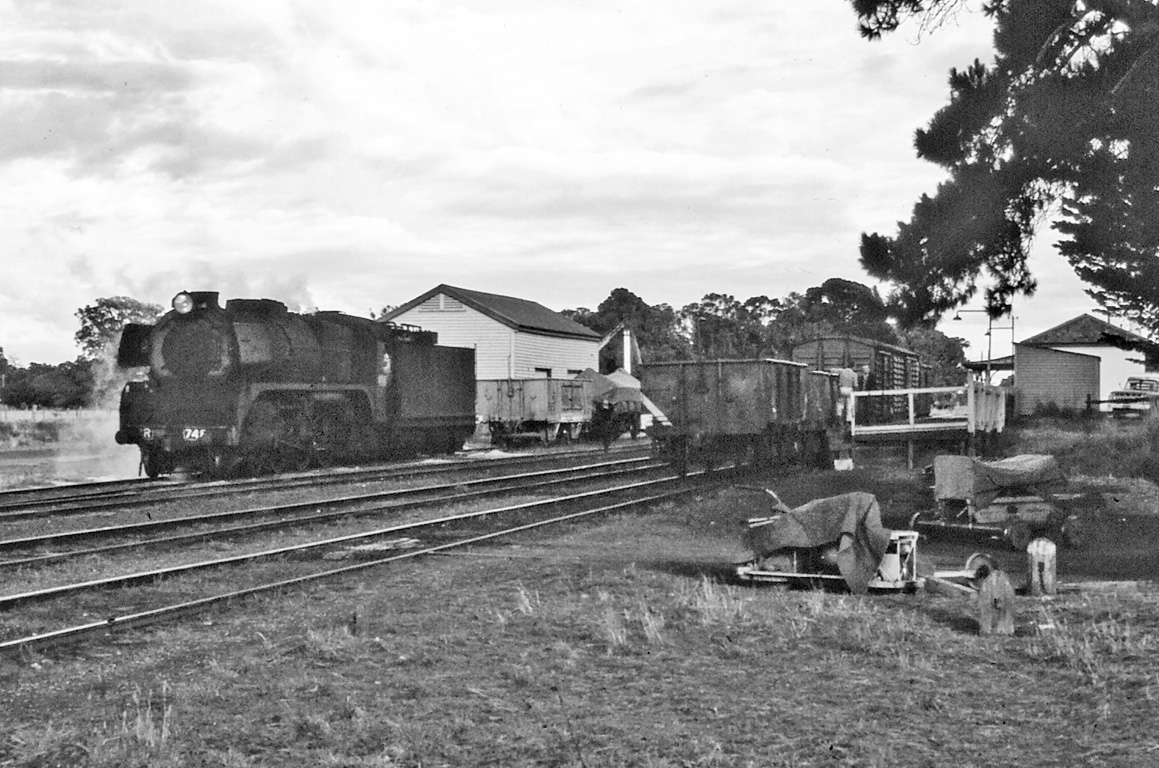
ABOVE: R 748 shunts at Glen Thompson on a short up goods from Hamilton, April 14 1967. (photo courtesy Bob Wilson)
Dunkeld
1947 Dunkeld signal arrangement diagram
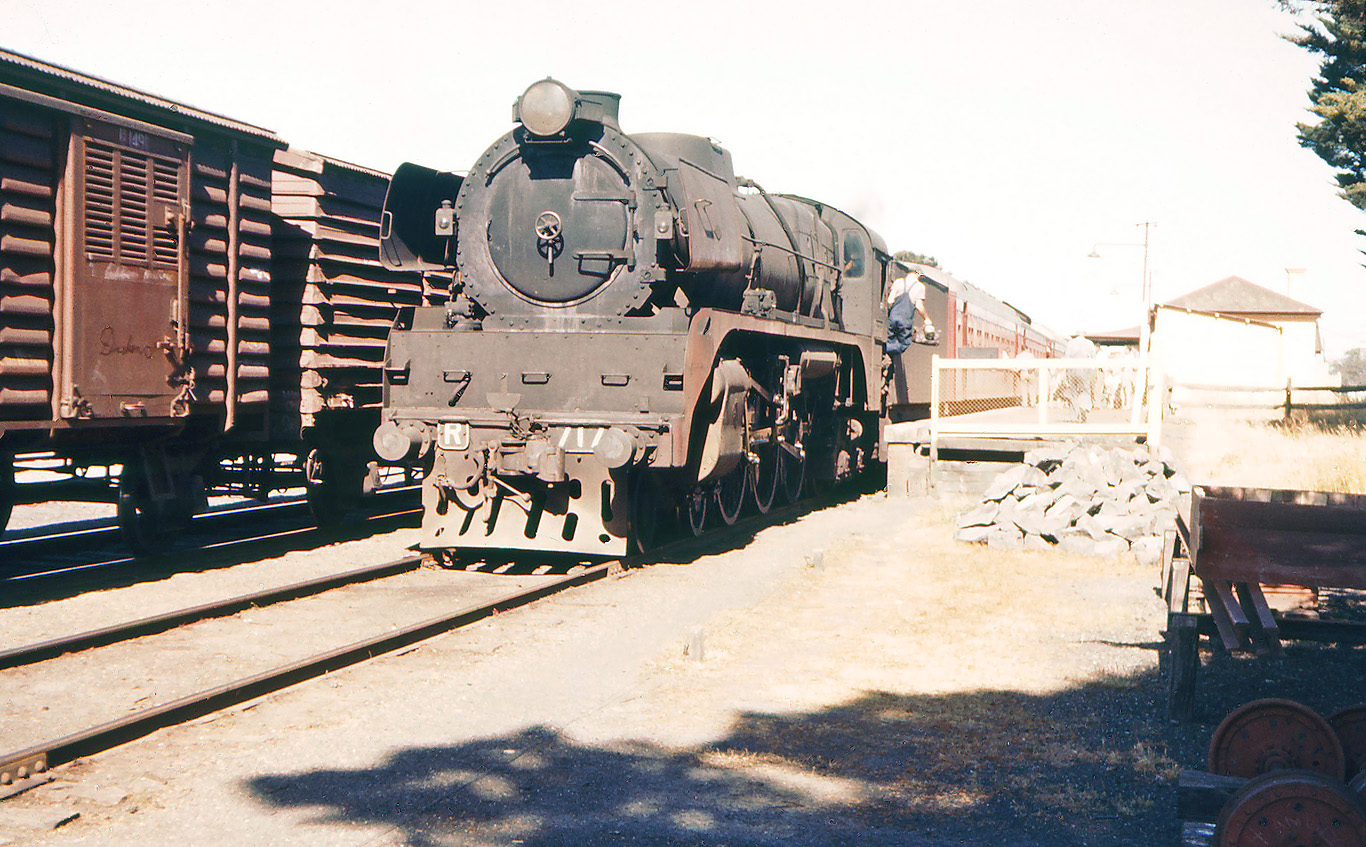
ABOVE: R 717 running an up pass. pauses at Dunkeld, Dec 27 1960. (photo courtesy Weston Langford)
ABOVE: A down goods is about to exchange the staffs at Dunkeld, July 25 1971. (photo courtesy Neville Gee)
ABOVE: A block wheat train pauses at Dunkeld, Oct 9 1986. (photo courtesy Chris Wurr)
Moutajup
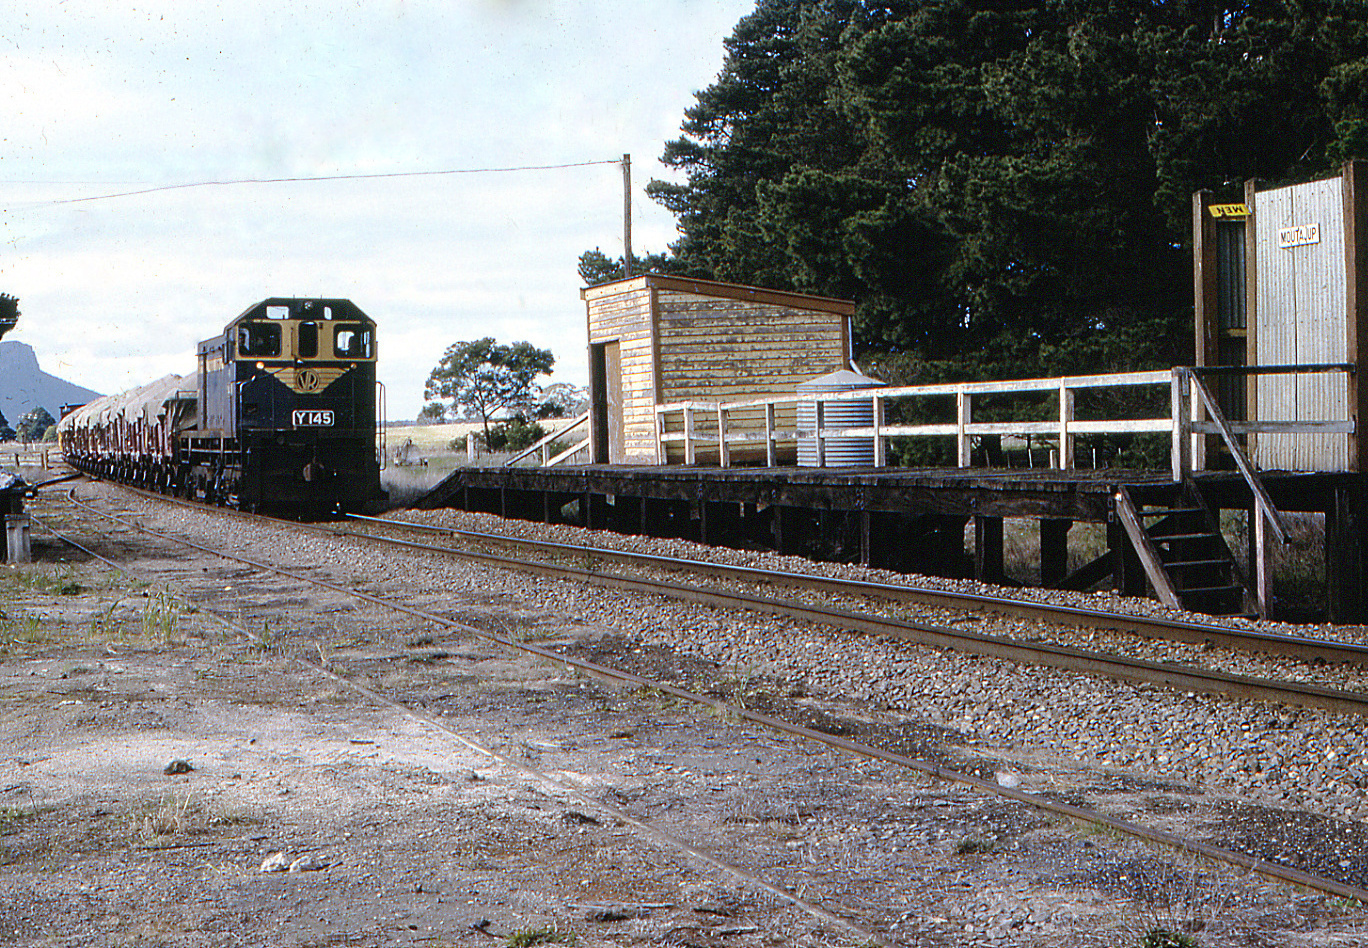
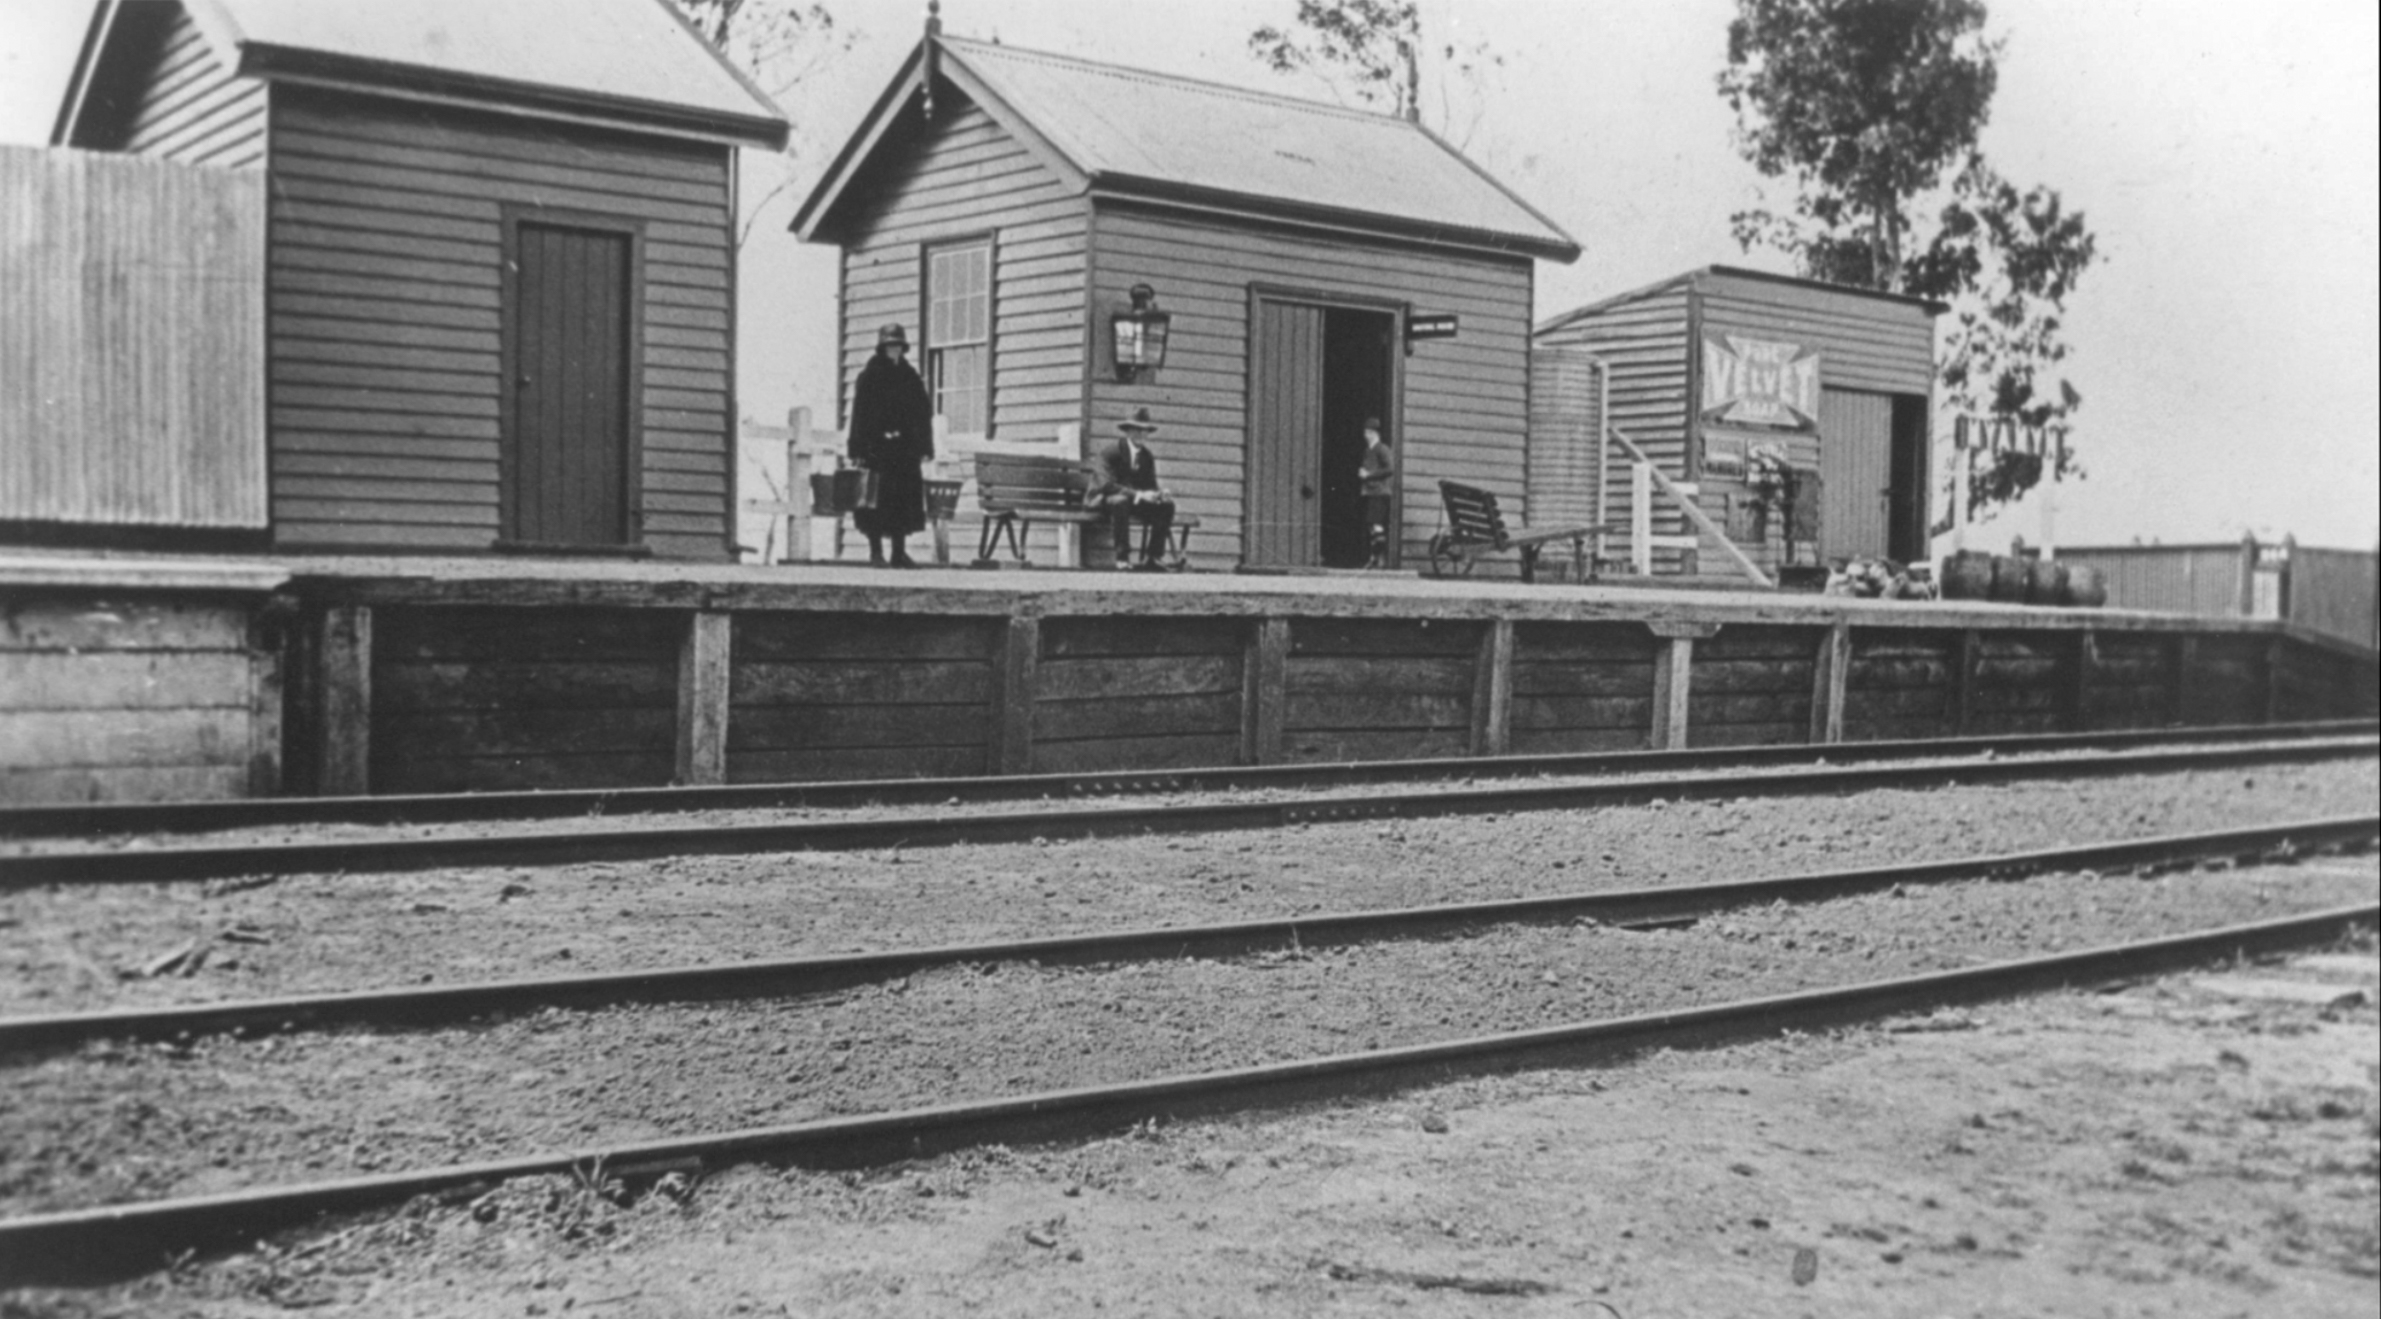
ABOVE: A down goods passes by Moutajup, July 25 1971. Similar to Strathkeller, it was never a staff station but could be used an intermediate block post. Passenger service was withdrawn Nov 1967 and the passenger platforn was removed May 1972, just after this photo was taken. (photo courtesy Neville Gee)
Strathkellar
1985 Strathkellar signal arrangement diagram
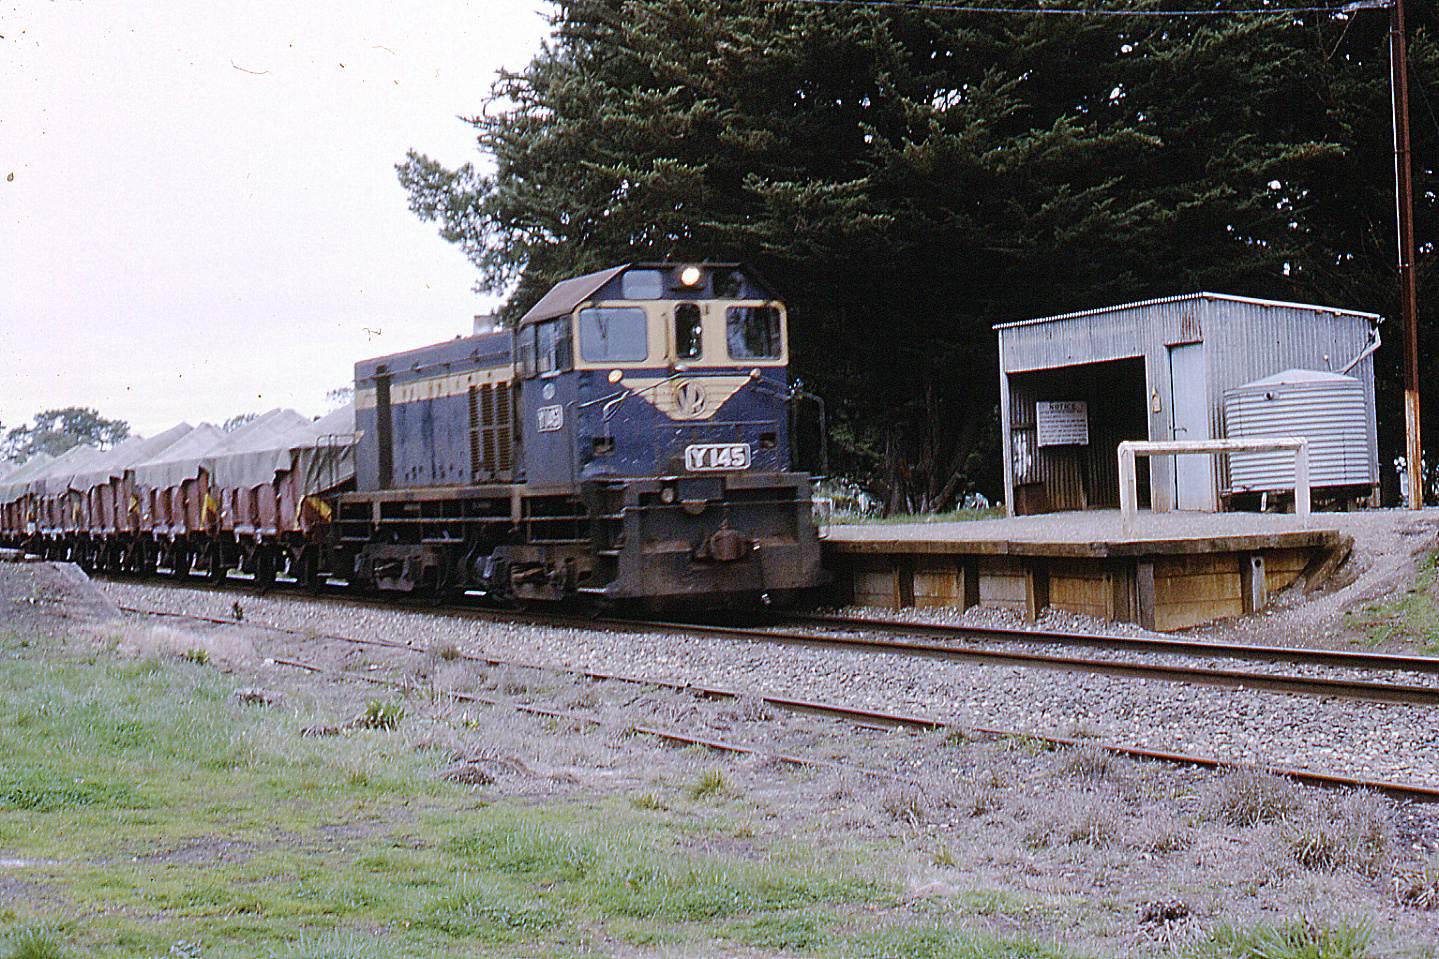
ABOVE: A down goods passes by Strathkellar, July 25 1971. Strathkellar was never a staff station although it was used as an intermediate block post in the section Dunkeld to Hamilton. It closed to passenger traffic May 1 1972. (photo courtesy Neville Gee)
Hamilton
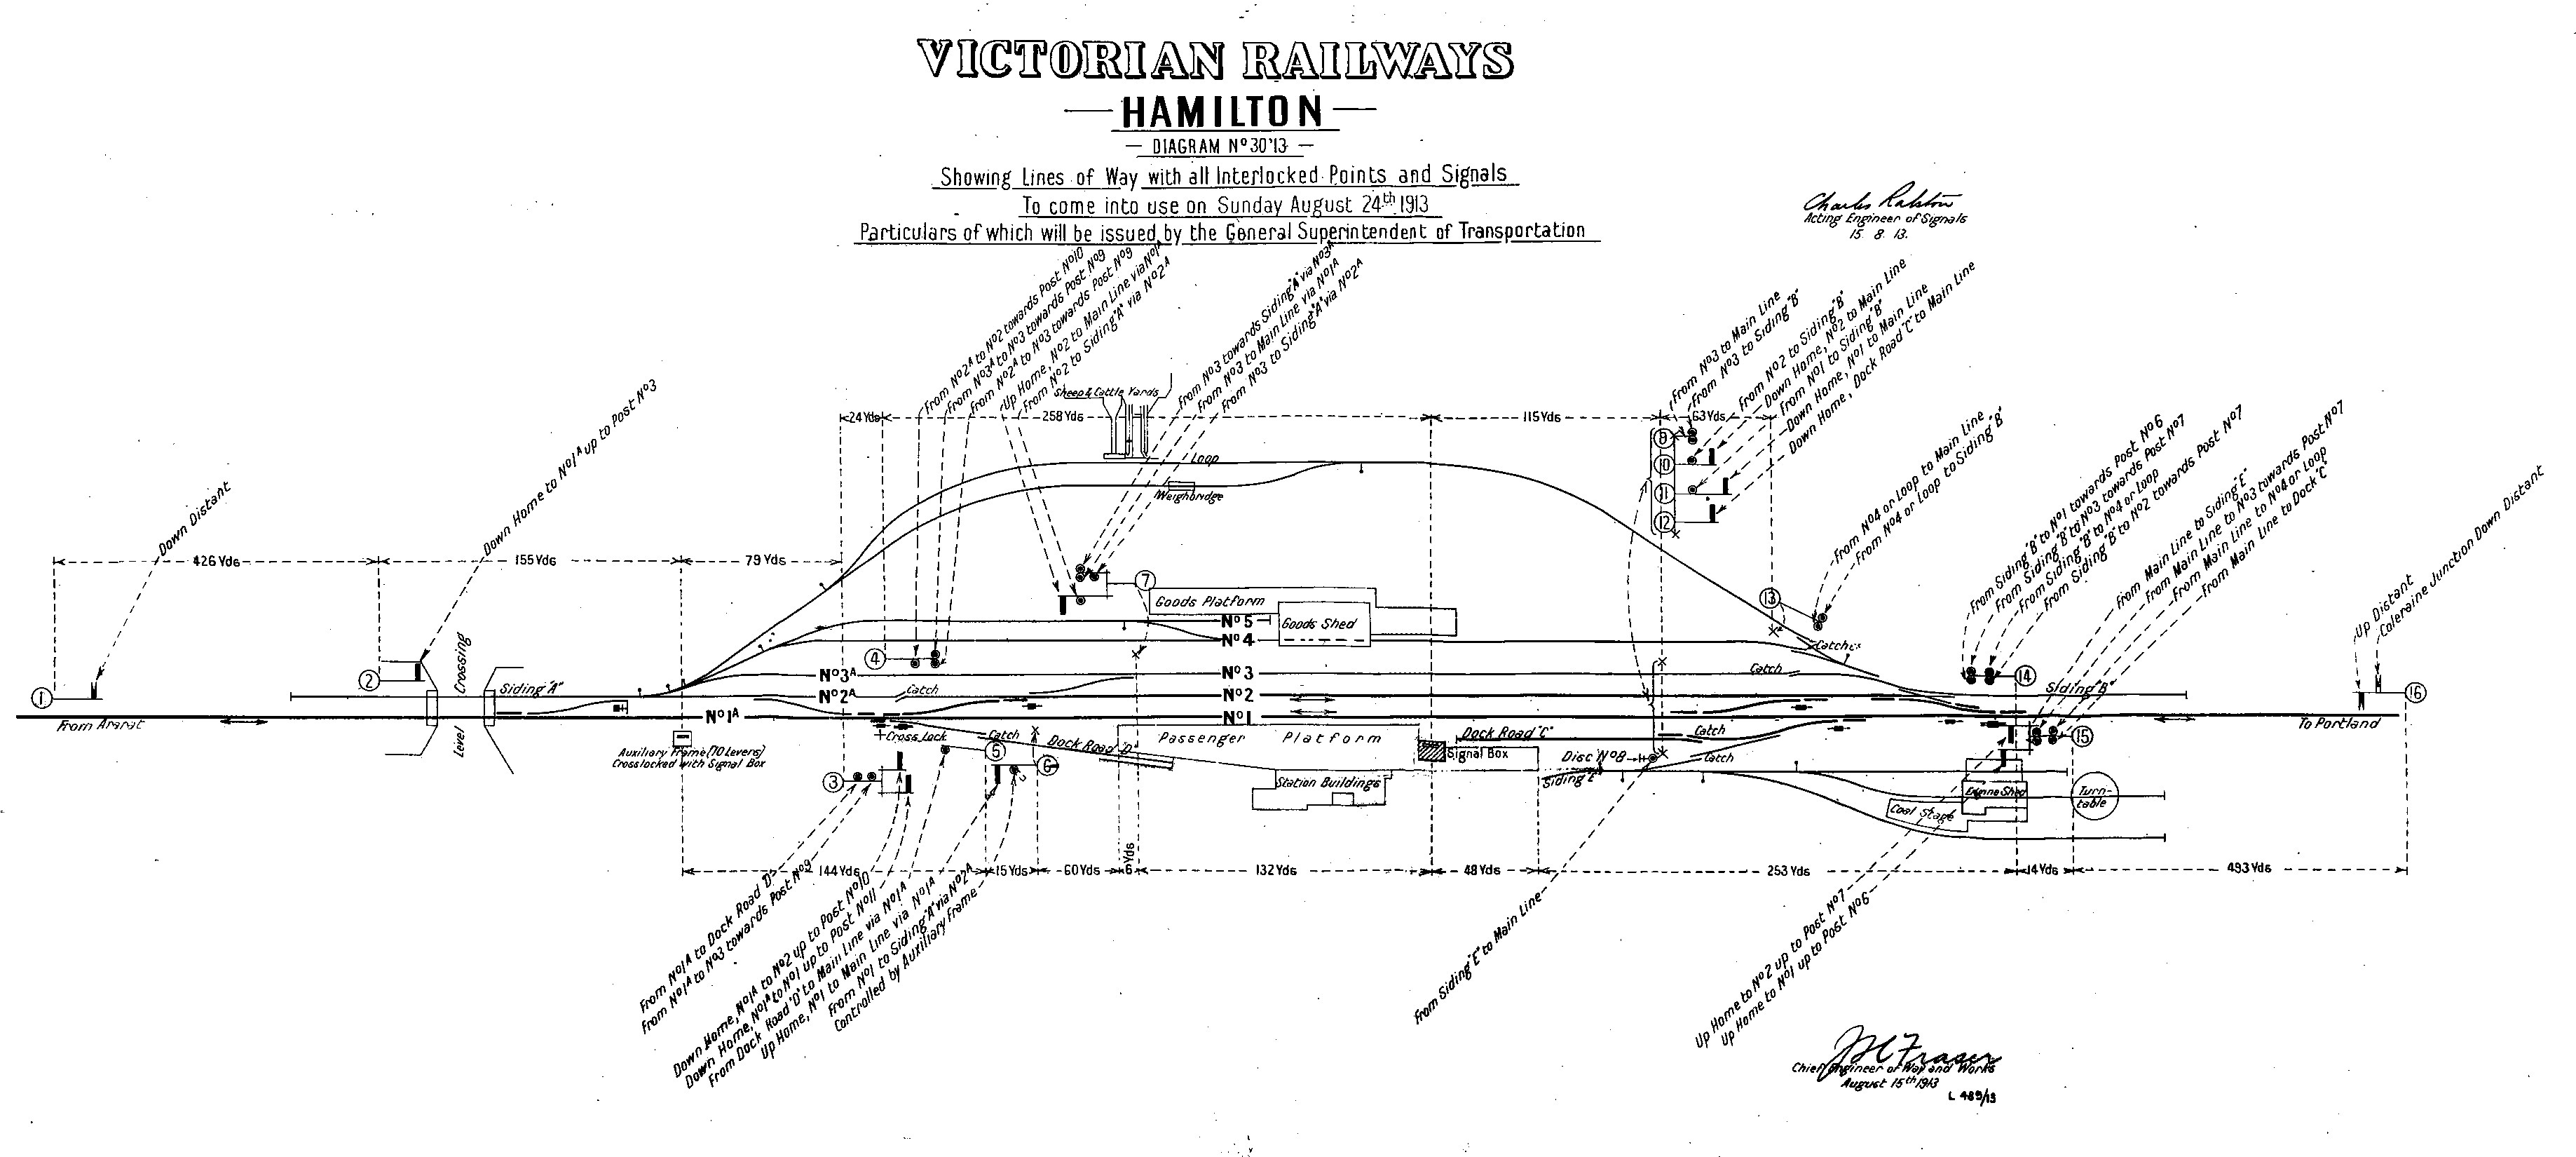
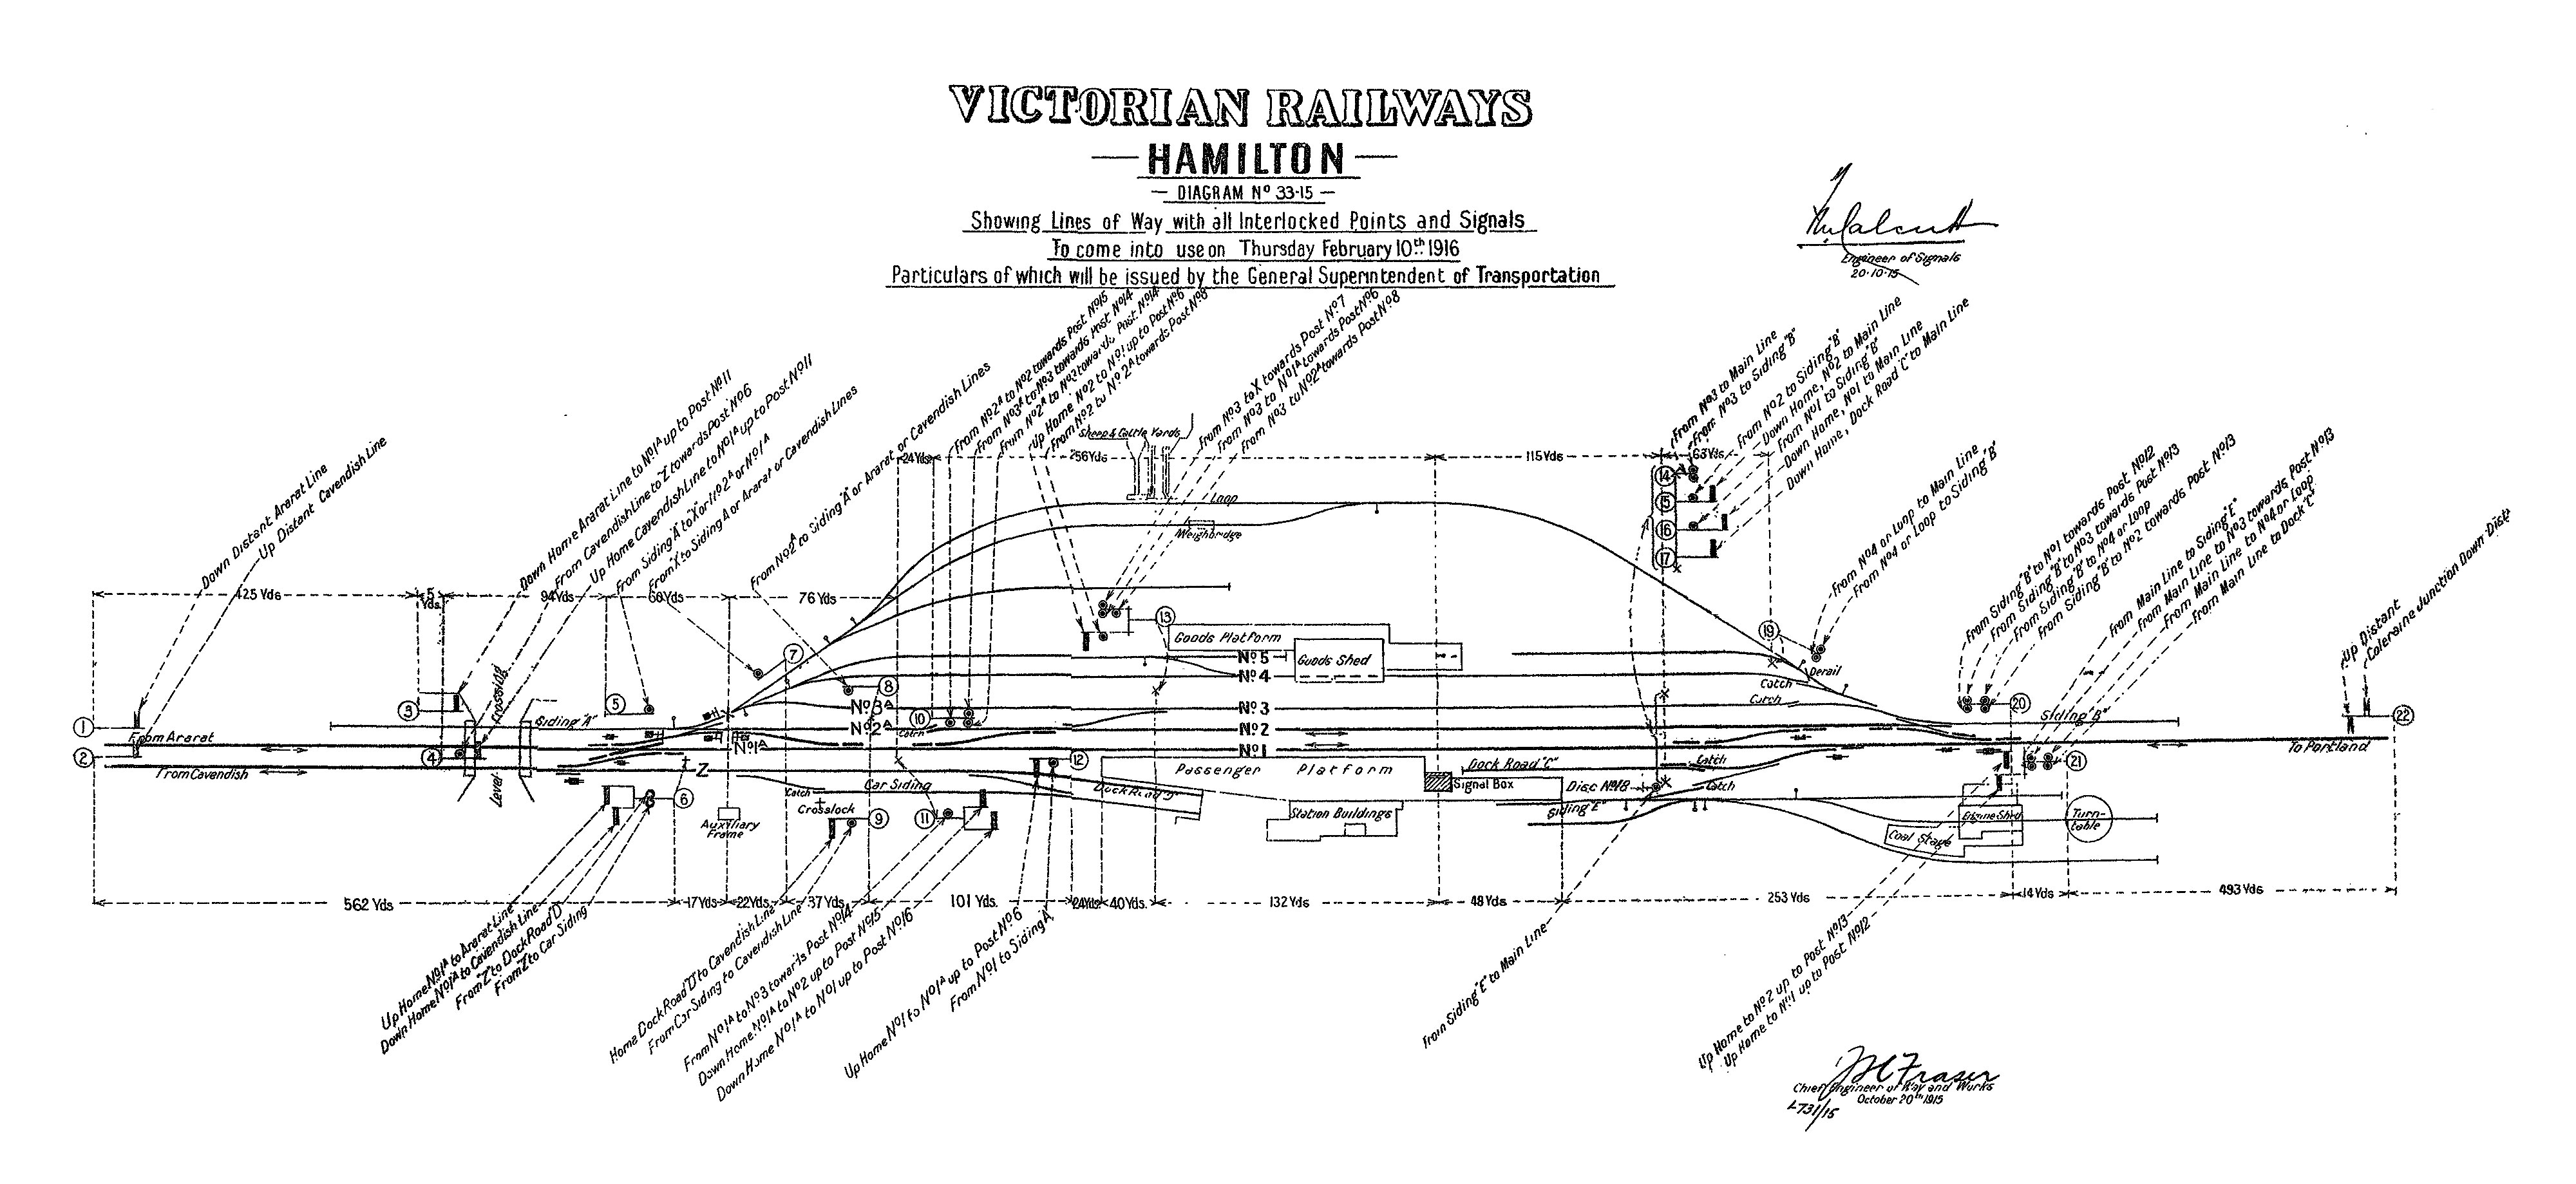
1969 Hamilton signal arrangements
1969 Hamilton and Coleraine Junction signal diagram

ABOVE: A down train at the Hamilton platform. The signal box dates from Aug 1913 and this photo was probably taken not too long after that, prior to the yard being enlarged.
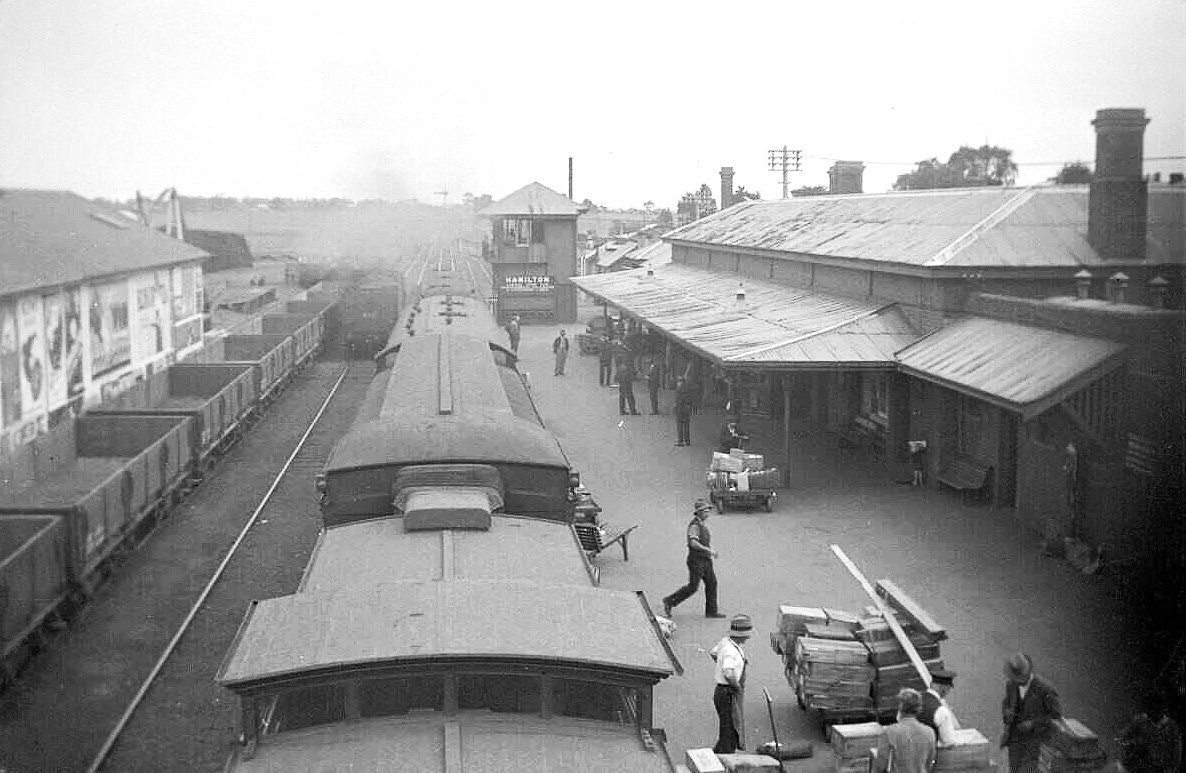
ABOVE: Looking south from the footbridge, date unknown, possibly 1930s.
ABOVE: A down goods arrives at Hamilton circa 1925-1930.
ABOVE: The RESO train at Hamilton, circa 1950? (photo courtesy SLV collection)
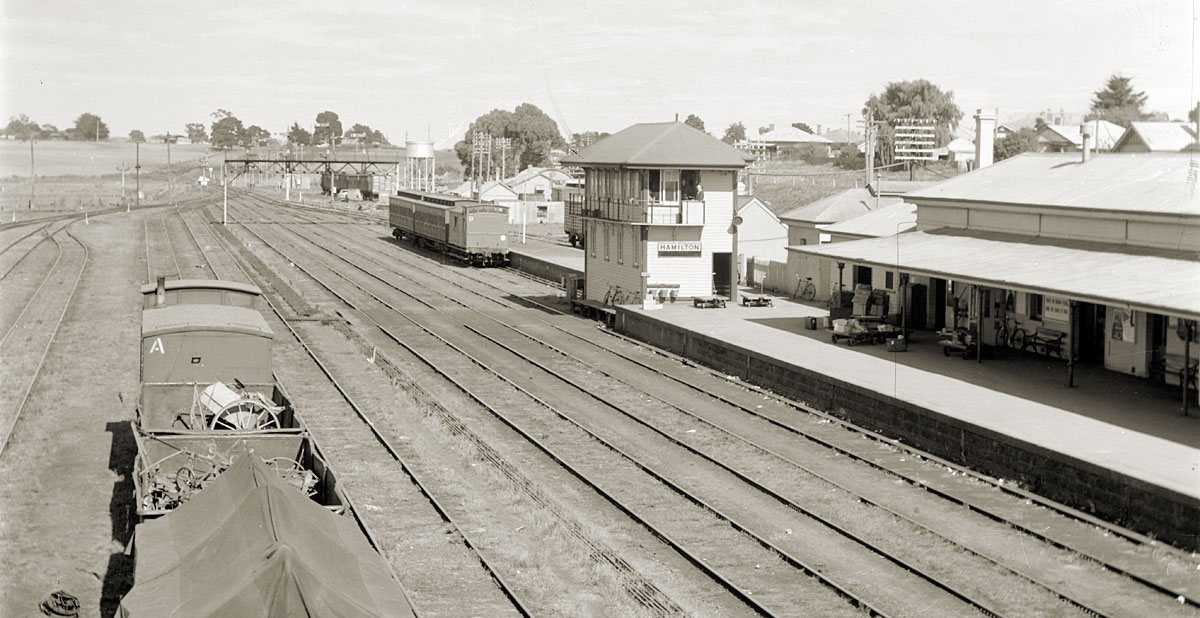
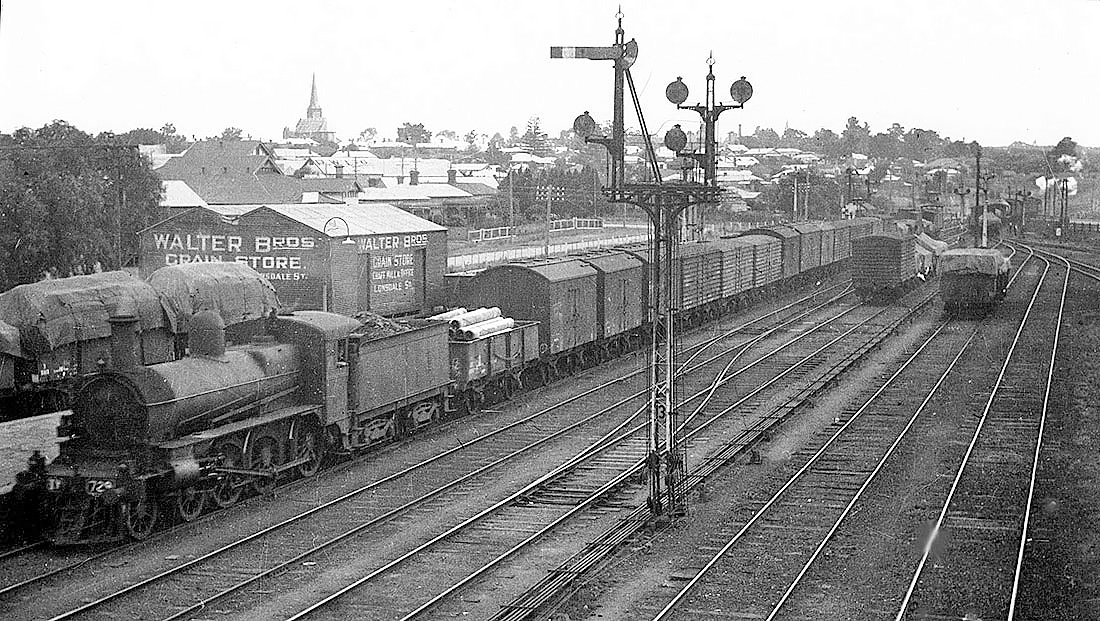
ABOVE: The down end of Hamilton yard showing the signal box (73 levers) which lasted from 1913 until 1967.
ABOVE: This view, looking south, towards Portland, was taken just before "Hamilton A" signal box was demolished and Hamilton went from a fully interlocked yard to a yard comprising a few signals and plunger locked points. (Maryborough would meet the same fate 2 years later) 1963 (photo courtesy Neville Gee)
ABOVE: After the loco depot at Coleraine Junction closed the loco facilities were moved to Hamilton station, here we see DERM 57 at the new Hamilton loco depot during a fan trip. Dec 12 1976 (Photo courtesy Stewart Lodington)
ABOVE: Post 22 was a rarity, the top arm was Hamilton's up distant and the lower arm was Coleraine junction's down distant. (date unknown)
ABOVE: The Hamilton yard pilot has just crossed the Grange Burn bridge and is taking a rake of wagons out to a siding near Coleraine Junction. Hamilton yard is seen in the background. Trains were allowed to run between Hamilton and Coleraine Junction without a guards van. 1981.
Coleraine Junction
1928 plan of Coleraine Junction and loco depot (courtesy Phil Dunn)
Coleraine Junction box diagram
1927 Coleraine Junction signal diagram
1961 Coleraine and Penshurst Junction locking sketch
1965 Coleraine Junction signal diagram

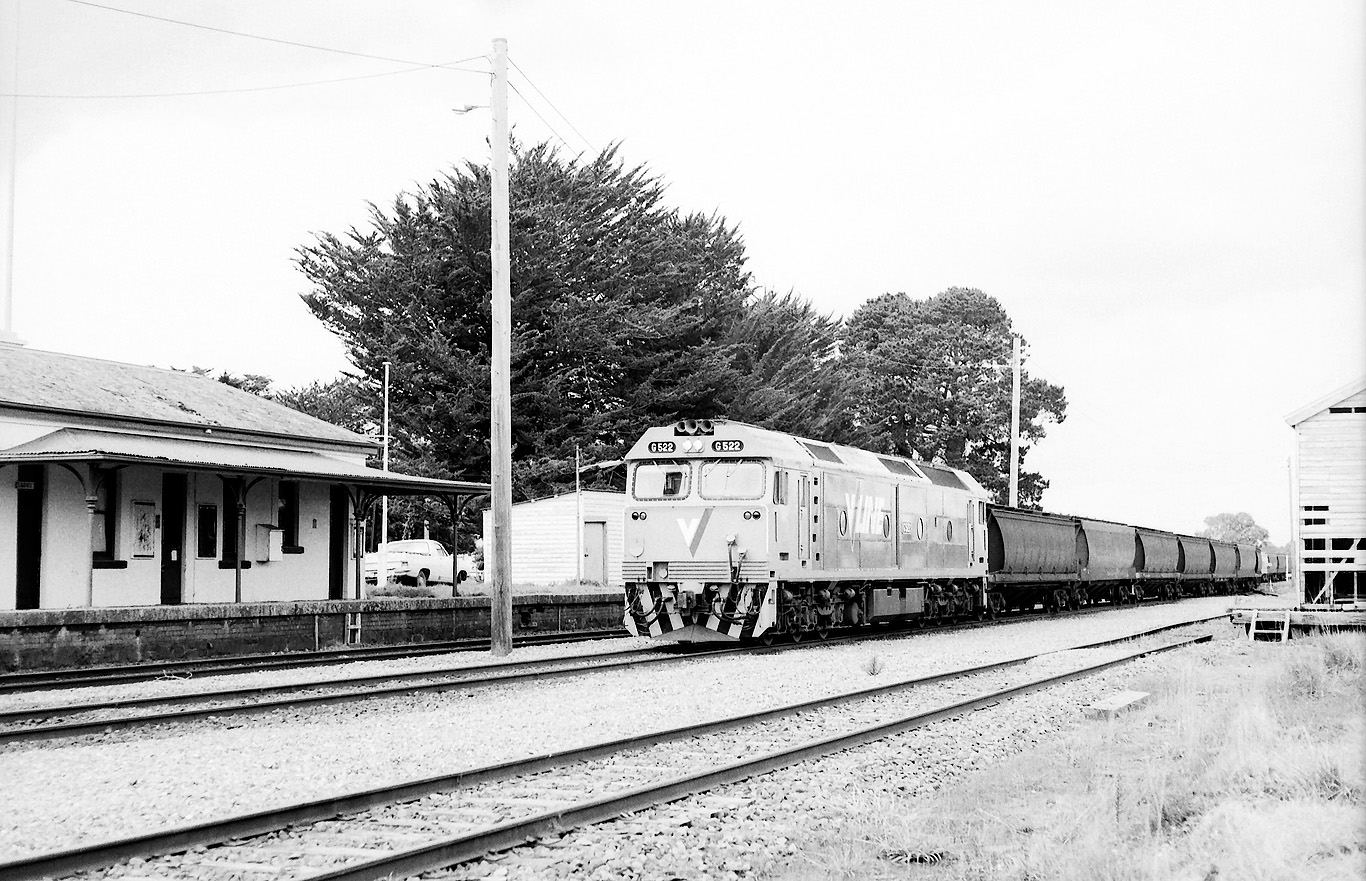
ABOVE & BELOW: B60 - B 79 on a down loaded wheat train at Coleraine Junction, Feb 2 1980. (photo courtesy Geoff Winkler)
ABOVE: The arrival home at Coleraine Junction. Left hand arm to Koroit, Centre arm to Portland, Right hand arm to Coleraine, Disc to the loco depot.
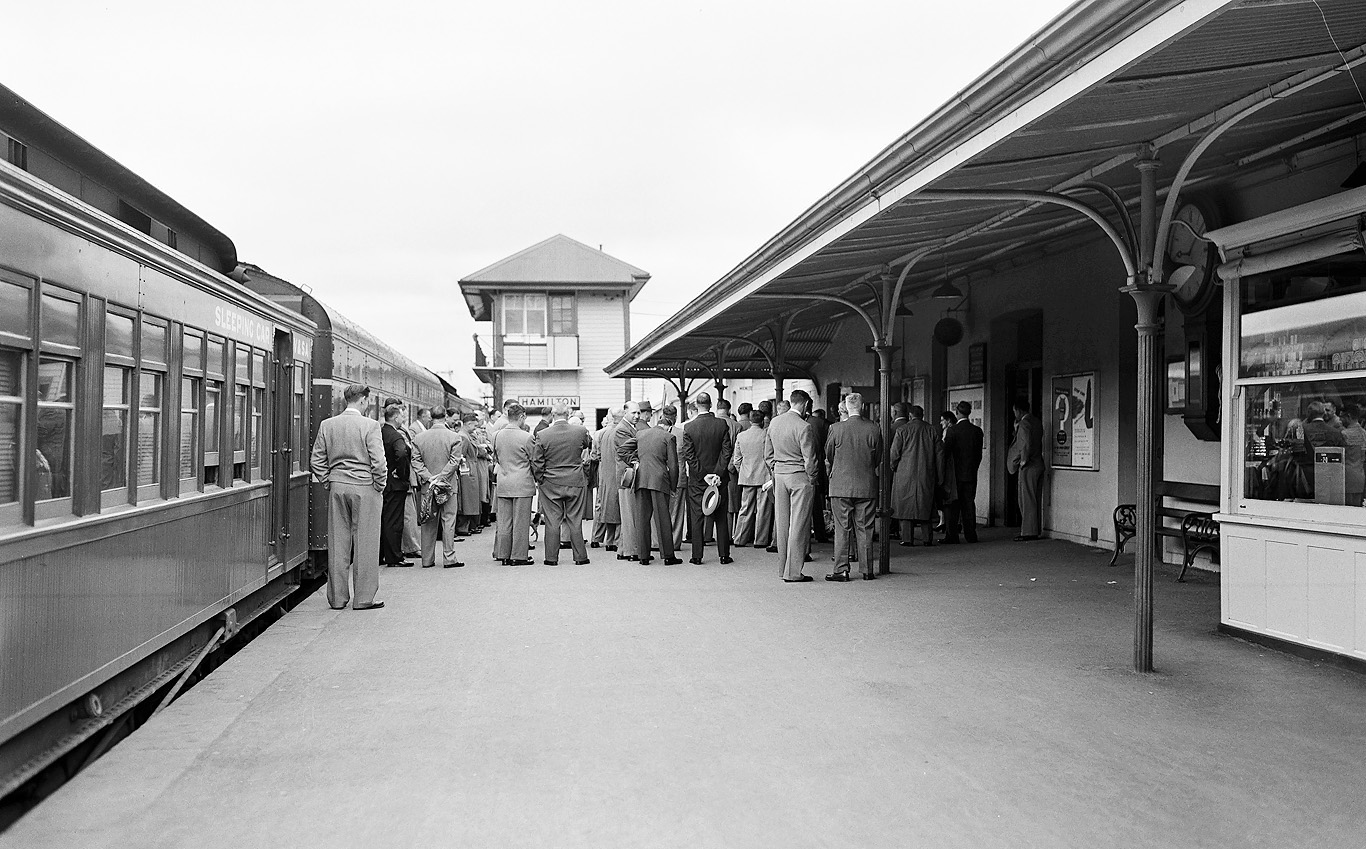
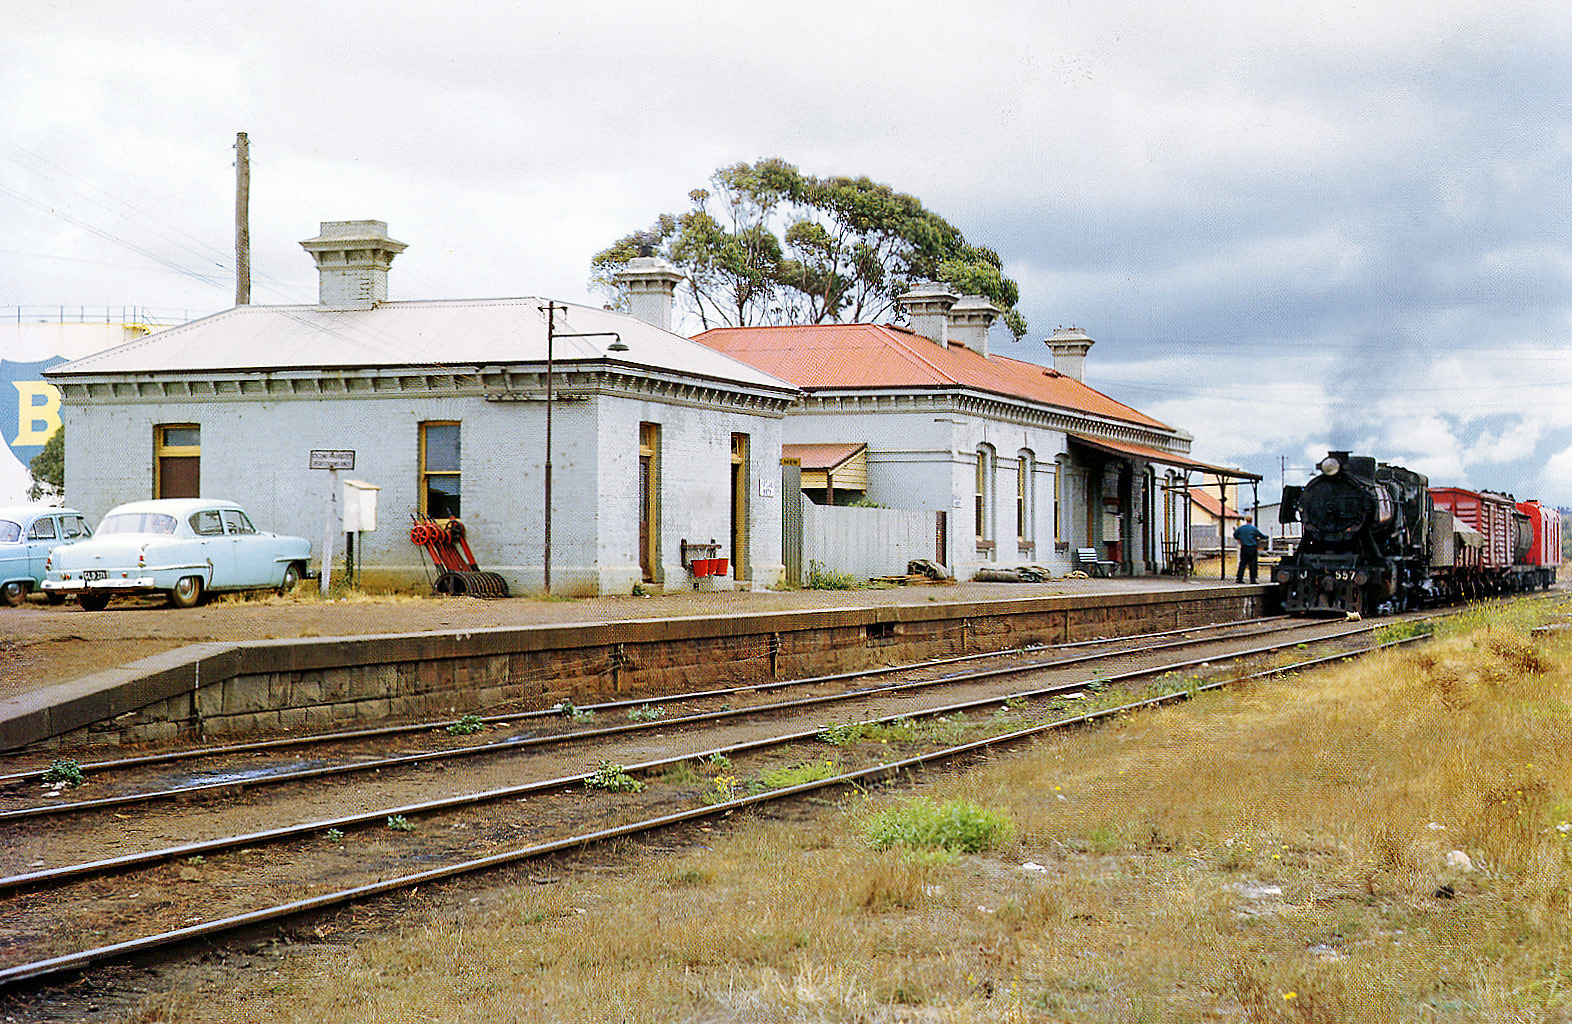
ABOVE: Coleraine Junction was only 3/4 of a mile from Hamilton. It was the junction for the Koroit and Coleraine lines, Hamilton's loco shed and turntable came off the Portland line here. Hamilton's stockyards came off the Coleraine line. The signalbox dates from 1888 and had 20 levers. The signal box was abolished in May 1967 at the same time as Hamilton A box was abolished. After this the junction points were secured by Annett locks and the loco depot was moved to Hamilton station. With the introduction of diesels, turntables were no longer needed. This photo of a down 280 Walker looks like a photostop on an enthusiasts special. Jan.1957. (photo by Peter Ralph courtesy THP Neville Gee)
ABOVE: An up goods from Portland approaches Coleraine Junction. The Coleraine line is curving away to the right, the far left track is the Koroit line and the tracks between the Koroit line and N 426 are the loco depot tracks. March 1966. (photo by the late Graham Evans and courtesy THP Neville Gee)
ABOVE: N 451 arrives at Coleraine Junction on an up goods from Portland, April 1963. (photo by Keith Turton and courtesy THP Neville Gee)
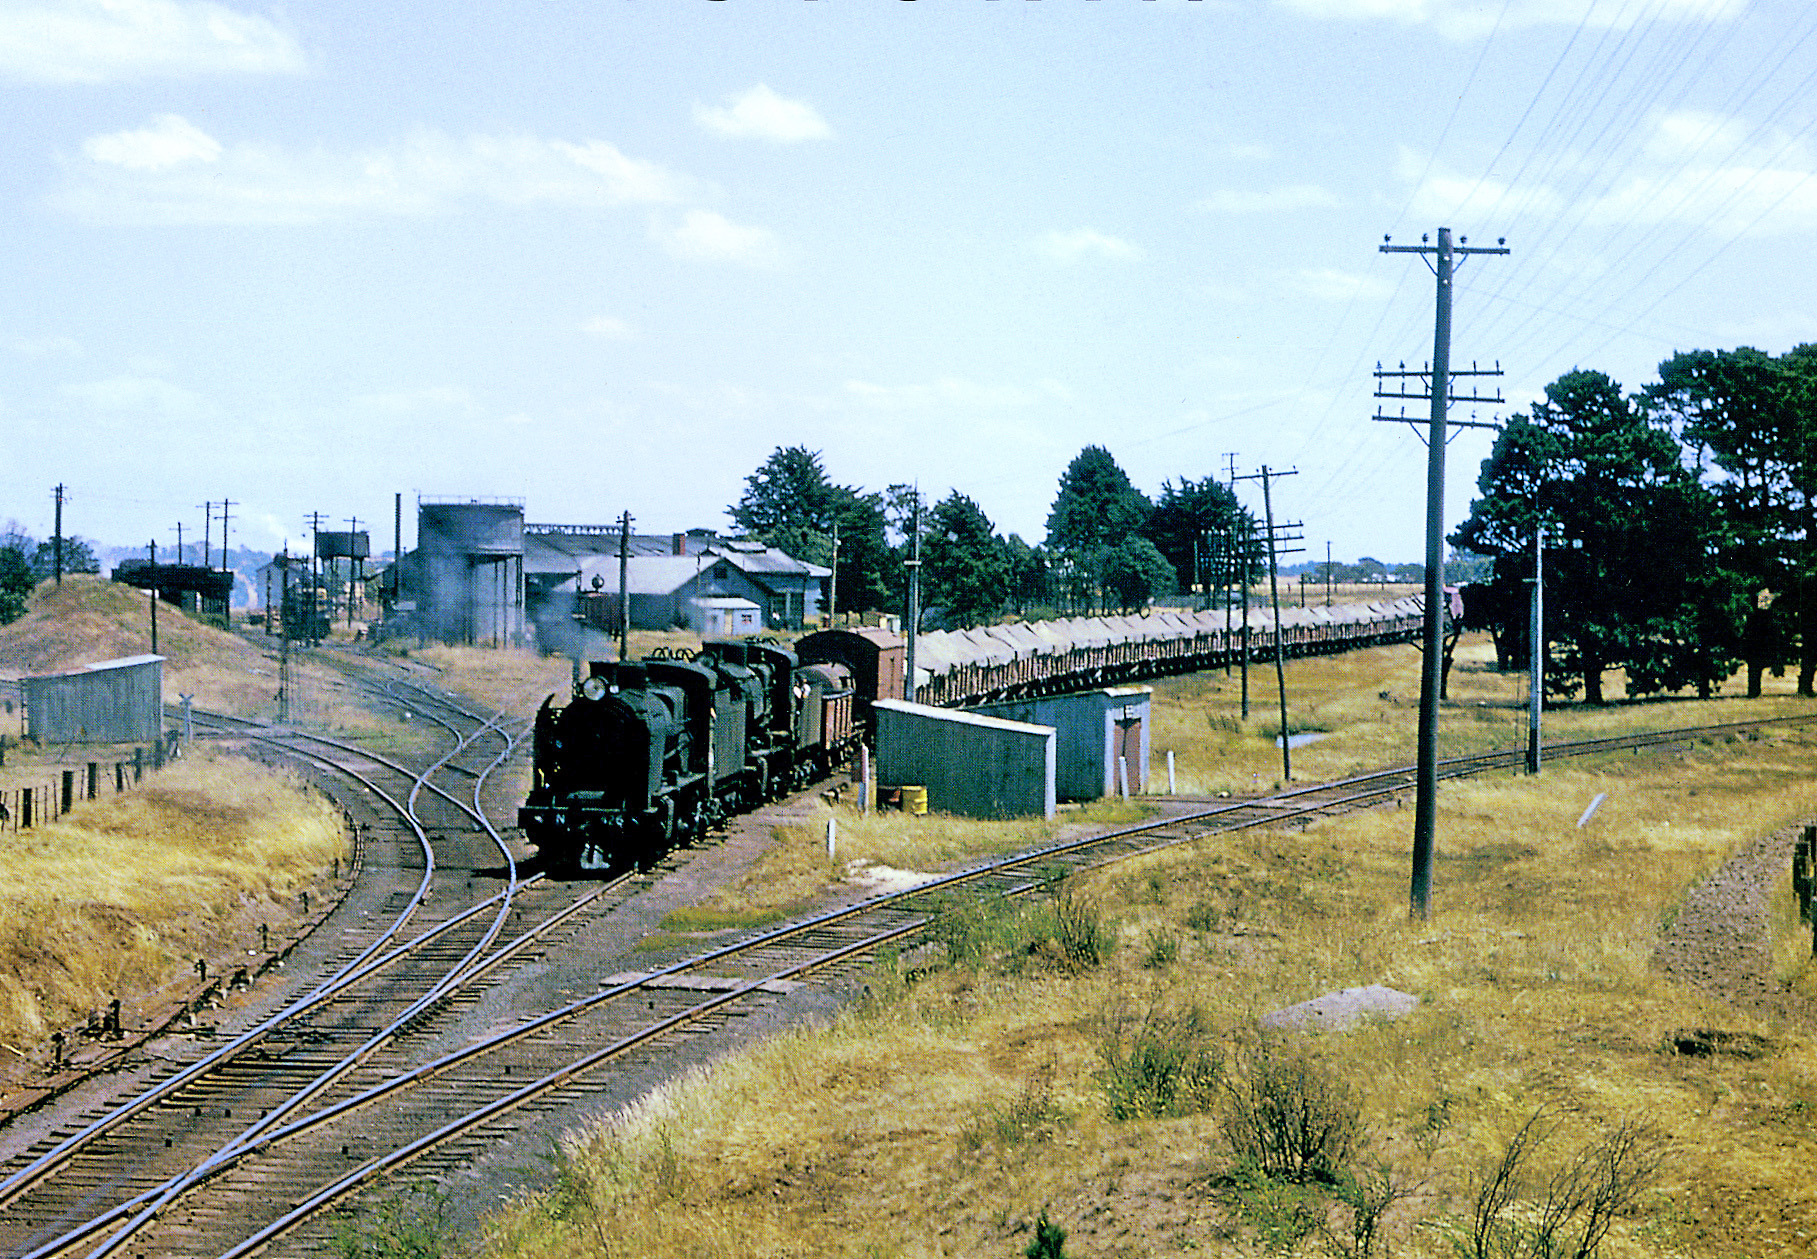
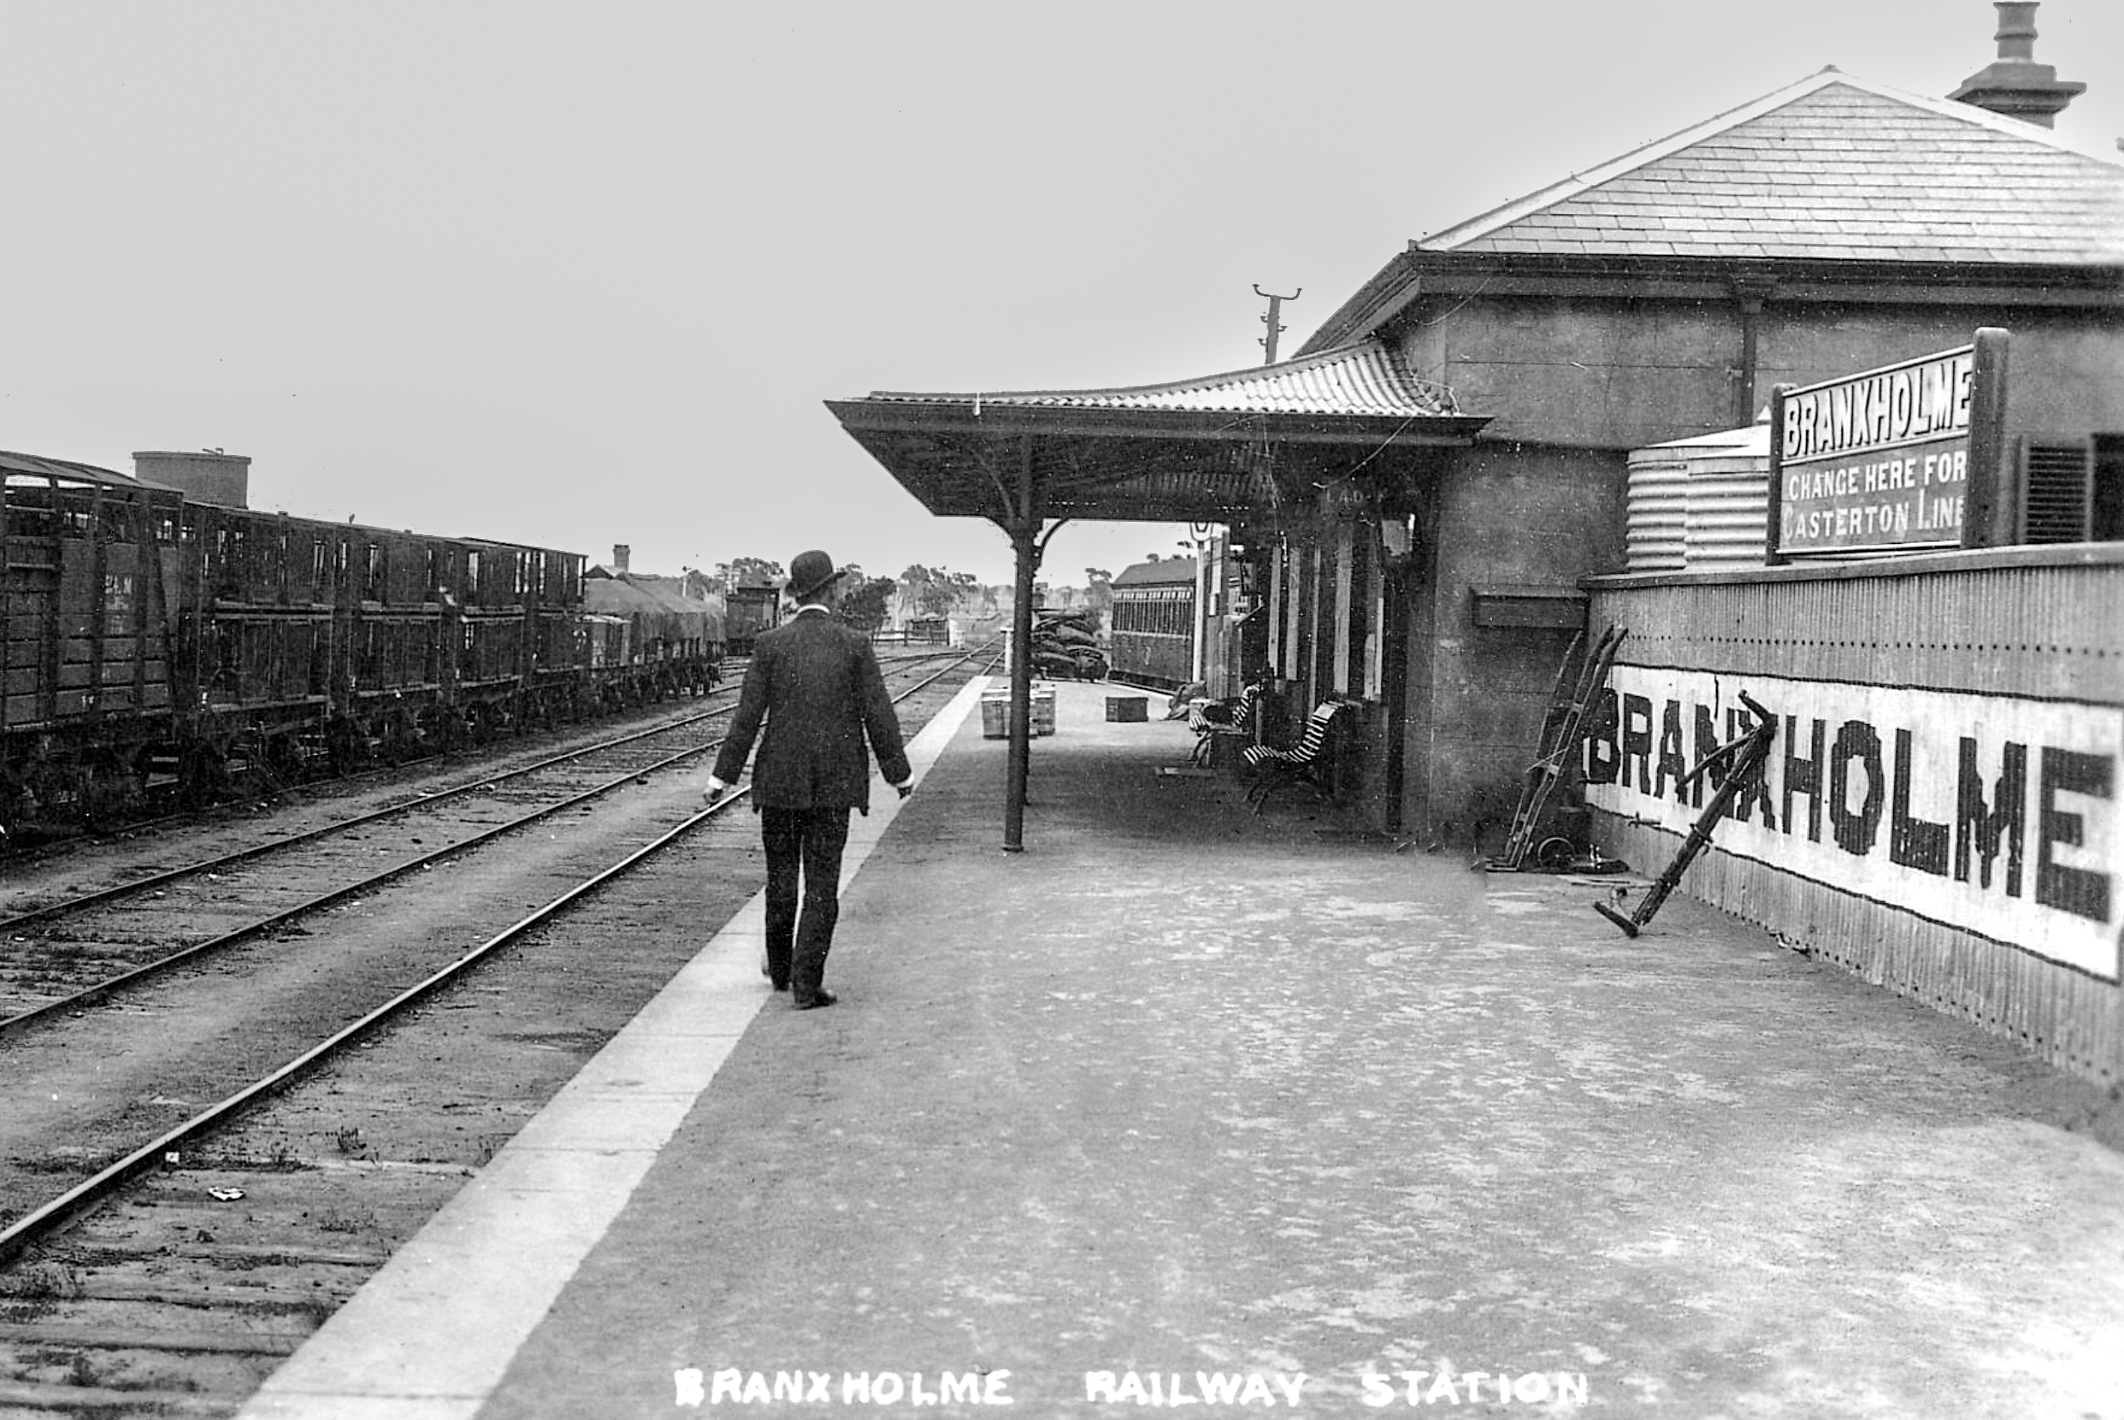
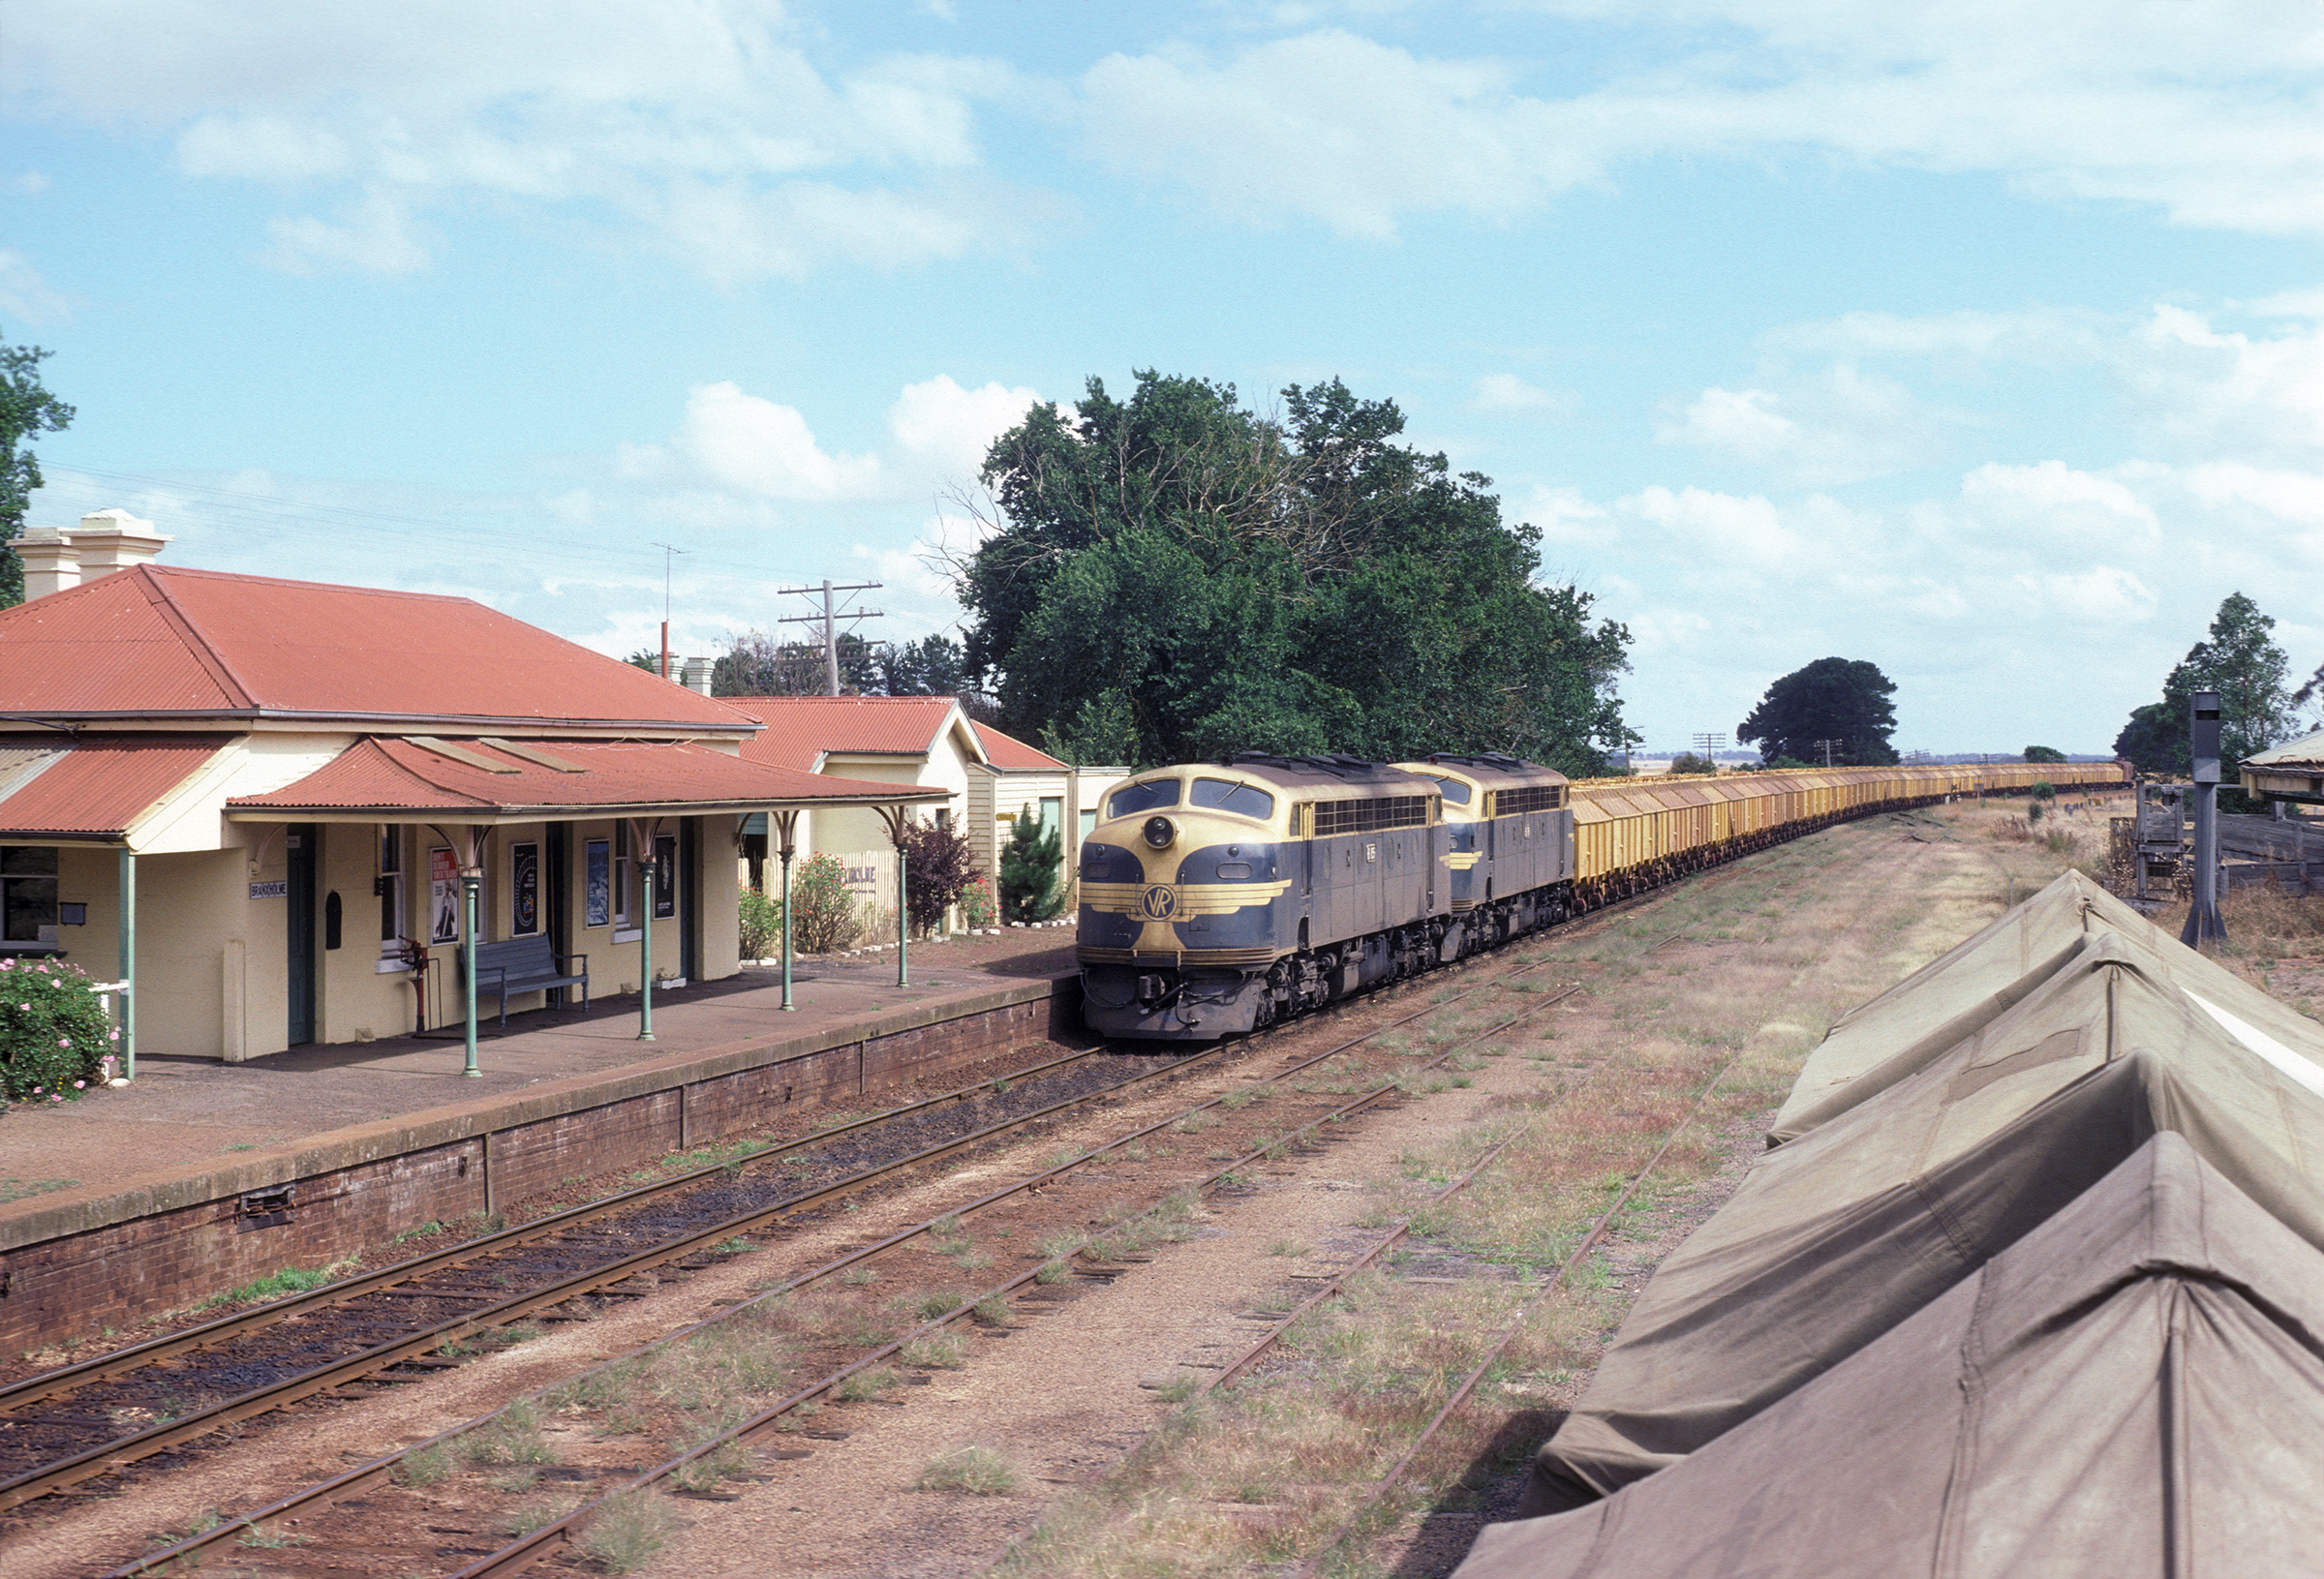
Branxholme
1969 Branxholme signal arrangement diagram
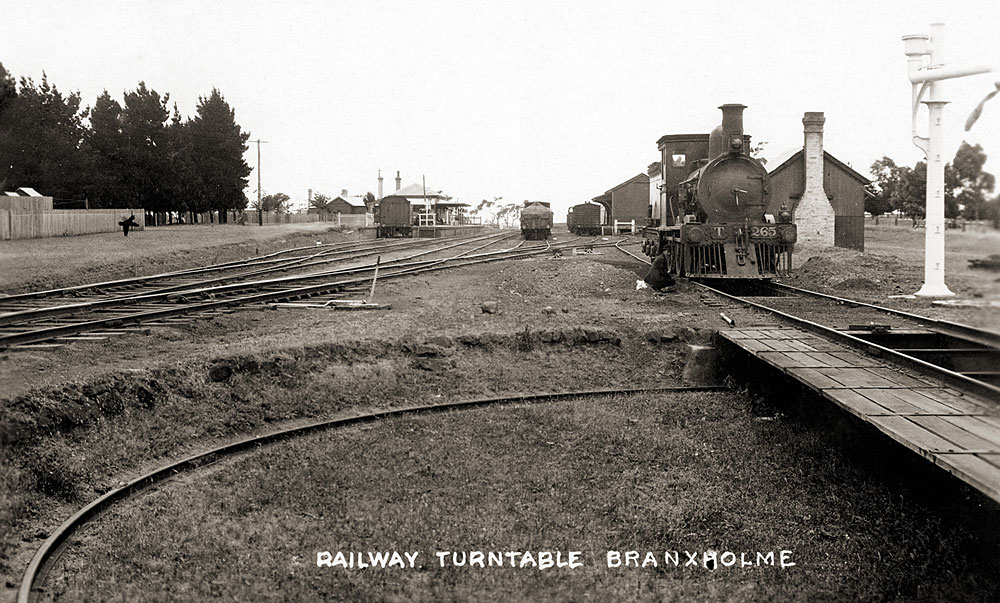
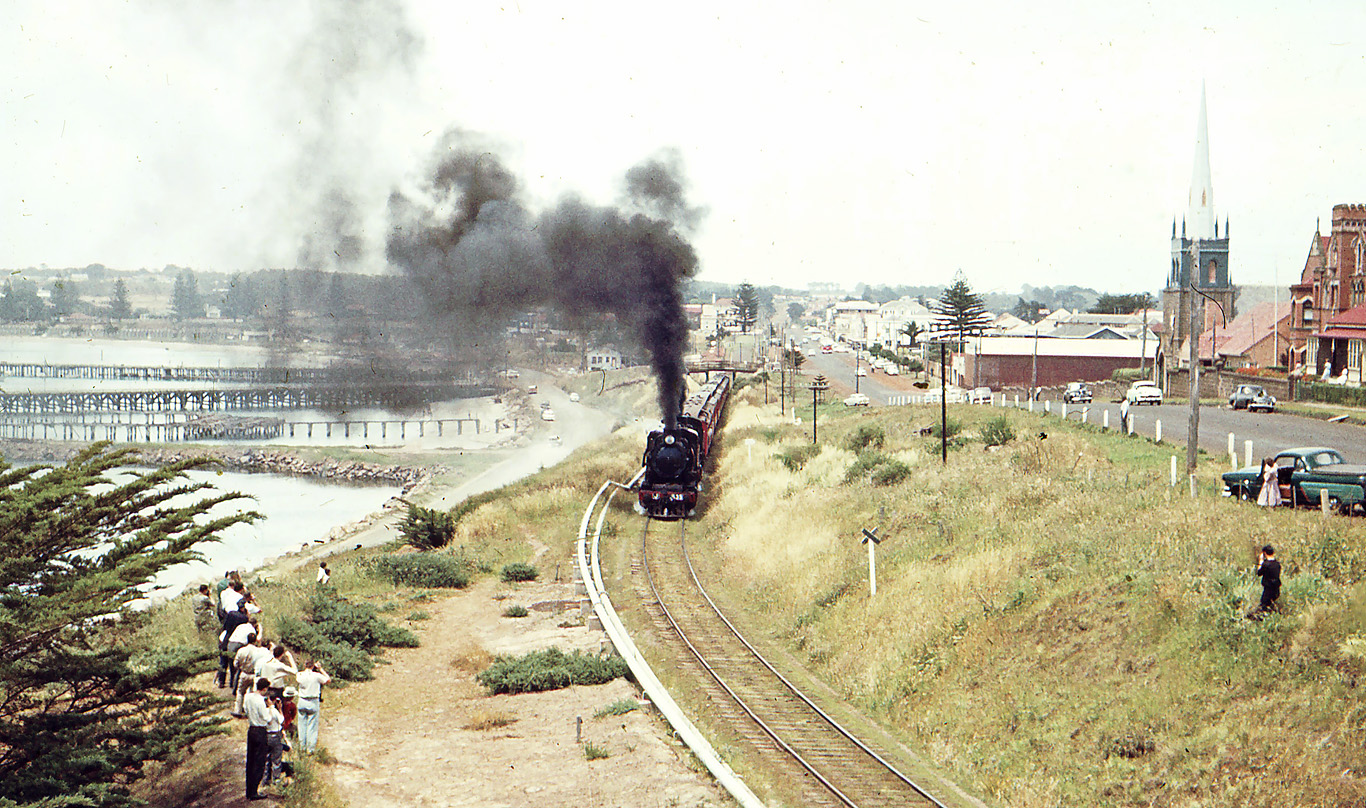
ABOVE: Branxholme was the junction for the Casterton line on the Hamilton to Portland line. Looking towards Portland. circa 1910, T 265 is probably the loco for the Casterton service. Interestingly the line to Casterton faced up trains from Portland, not trains from Melbourne as would be expected.
ABOVE: Branxholme was the junction for the 32 mile branch to Casterton. In this un-dated scene, a Mansard-roofed passenger carriage can be seen in the branch carriage dock and a locomotive in the distance in the vicinity of the coal stage and turntable - Vern McCallum Collection
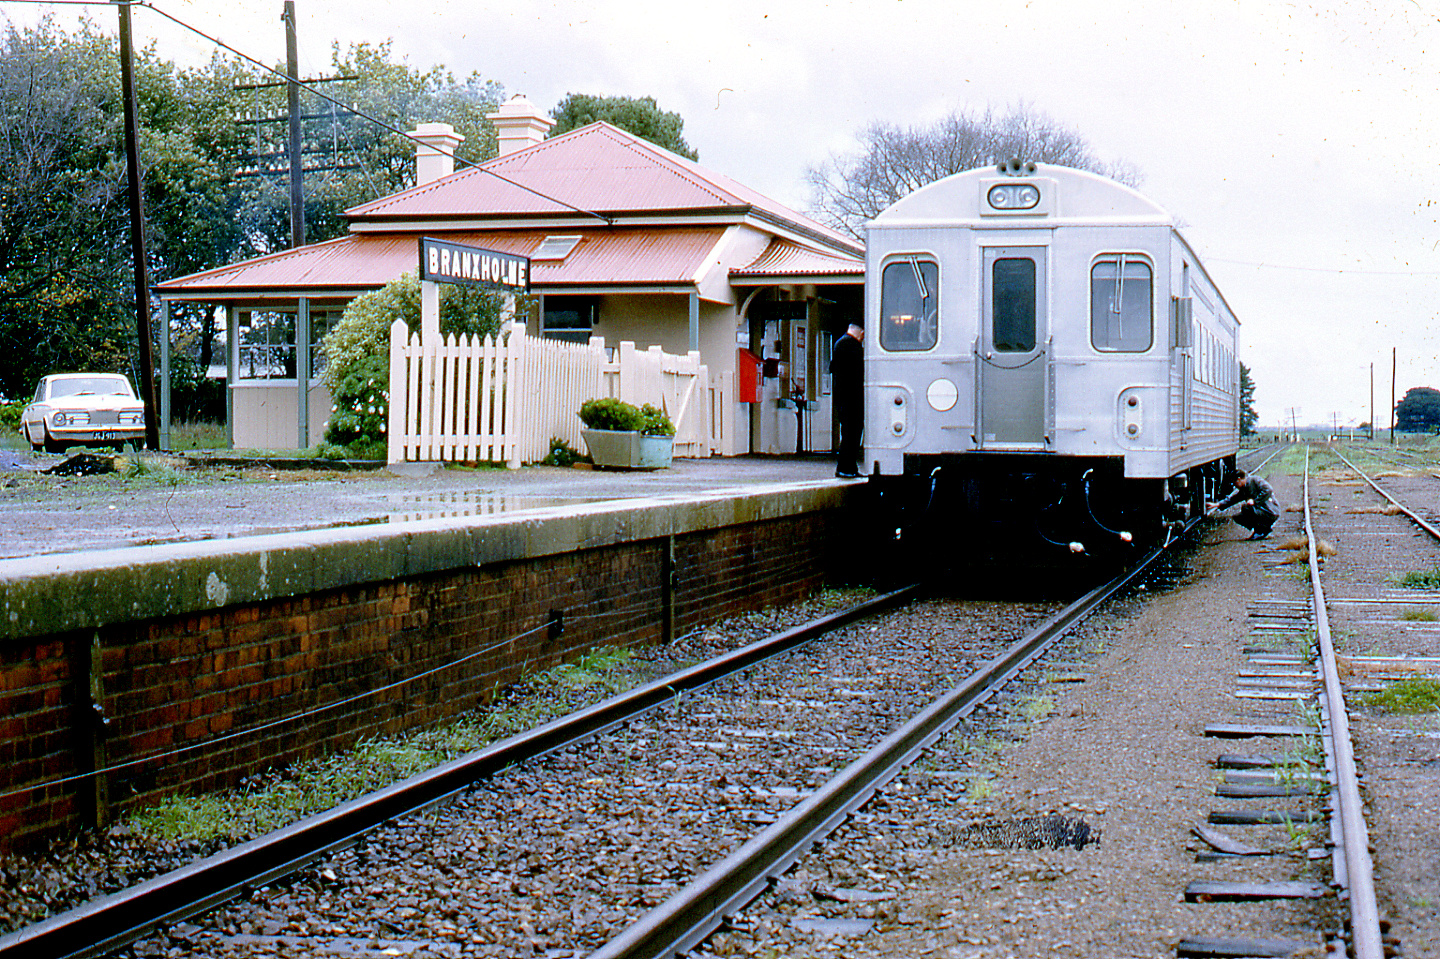
ABOVE: DRC 40 at Branxholme on its promotional tour, it has just arrived from Casterton and was about to depart for Hamilton after which it went to Coleraine, June 23 1971. (photo courtesy Neville Gee)
ABOVE & BELOW: B 85 - B 76 on an empty Portland to Ararat wheat train at Branxholme, a rake of GYs is being stored on what's left of the Casterton line. Feb 2 1980. (photo courtesy Geoff Winkler)
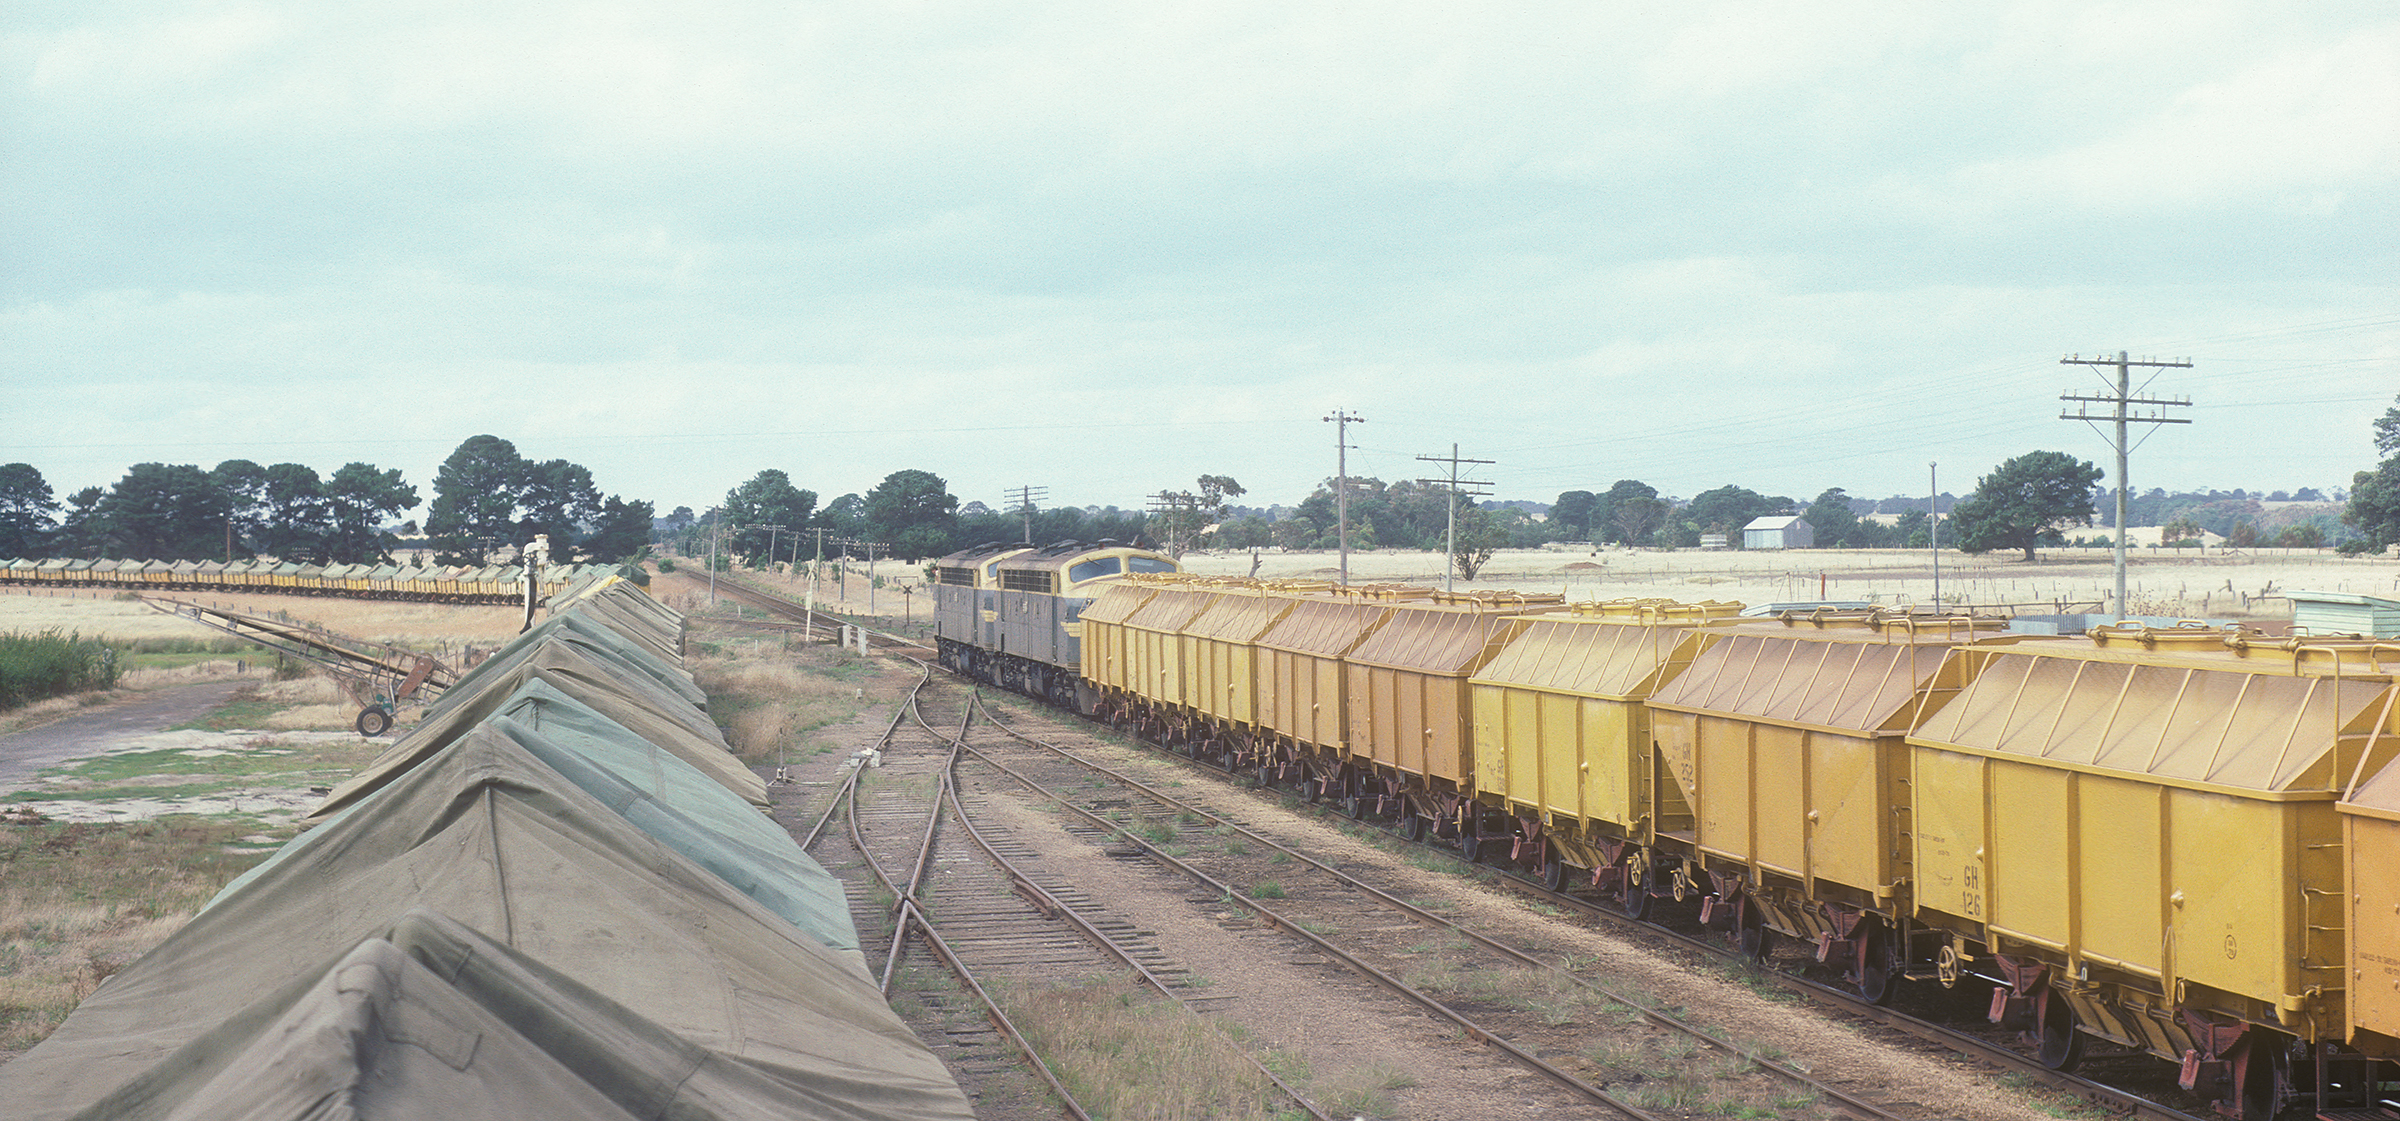
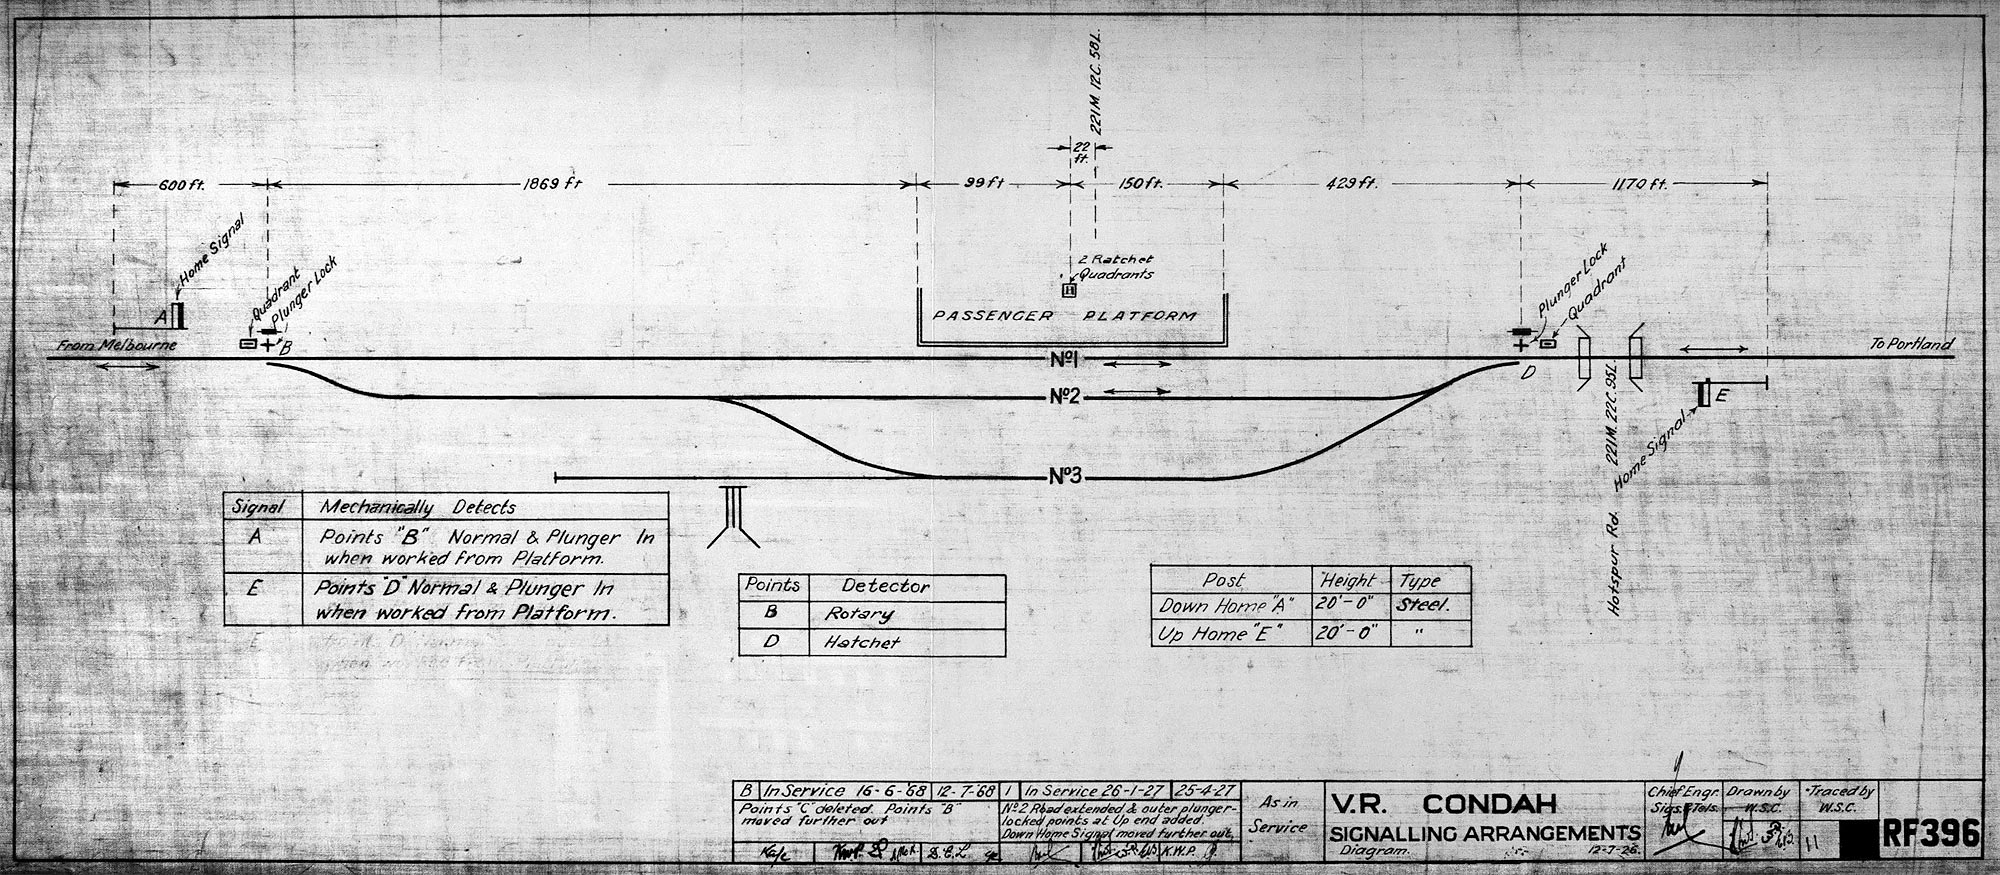
Condah
1968 Condah signal arrangement diagram
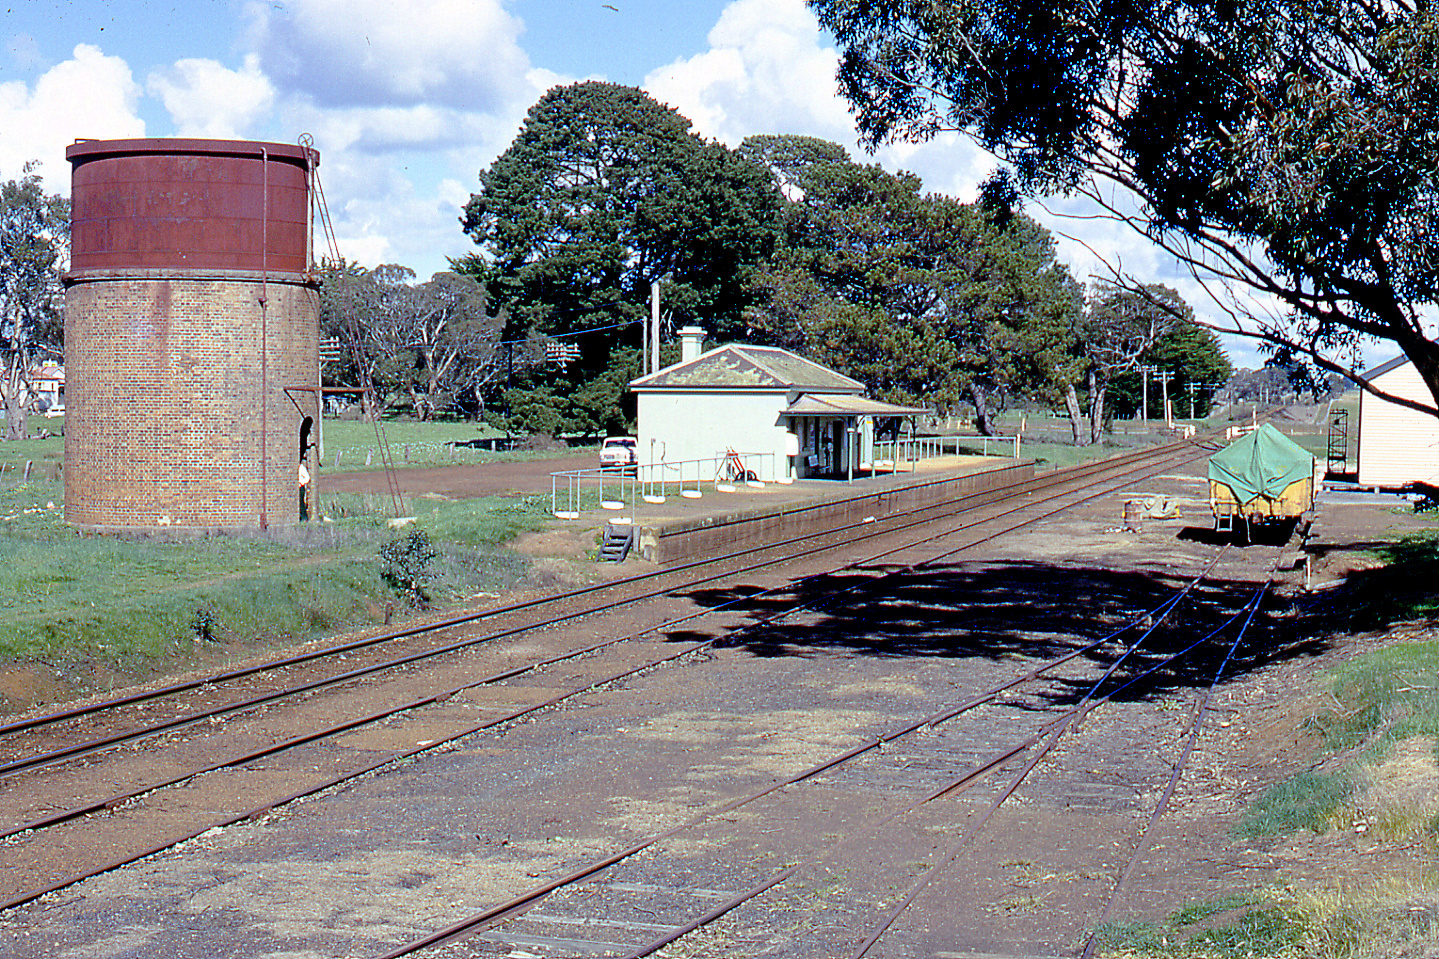
ABOVE: Condah, looking south towards Portland, Aug 24 1974. (photo courtesy Neville Gee)
ABOVE: B 85 - B 76 on an empty Portland to Ararat wheat train at Condah, Feb 2 1980. (photo courtesy Geoff Winkler)
ABOVE: B60 - B 79 on a down loaded wheat train at Condah, Feb 2 1980. (photo courtesy Geoff Winkler)
Myamyn
ABOVE: Myamyn station, located at 224.5 miles from Melbourne, probably taken around 1920 - Vern McCallum Collection
Milltown
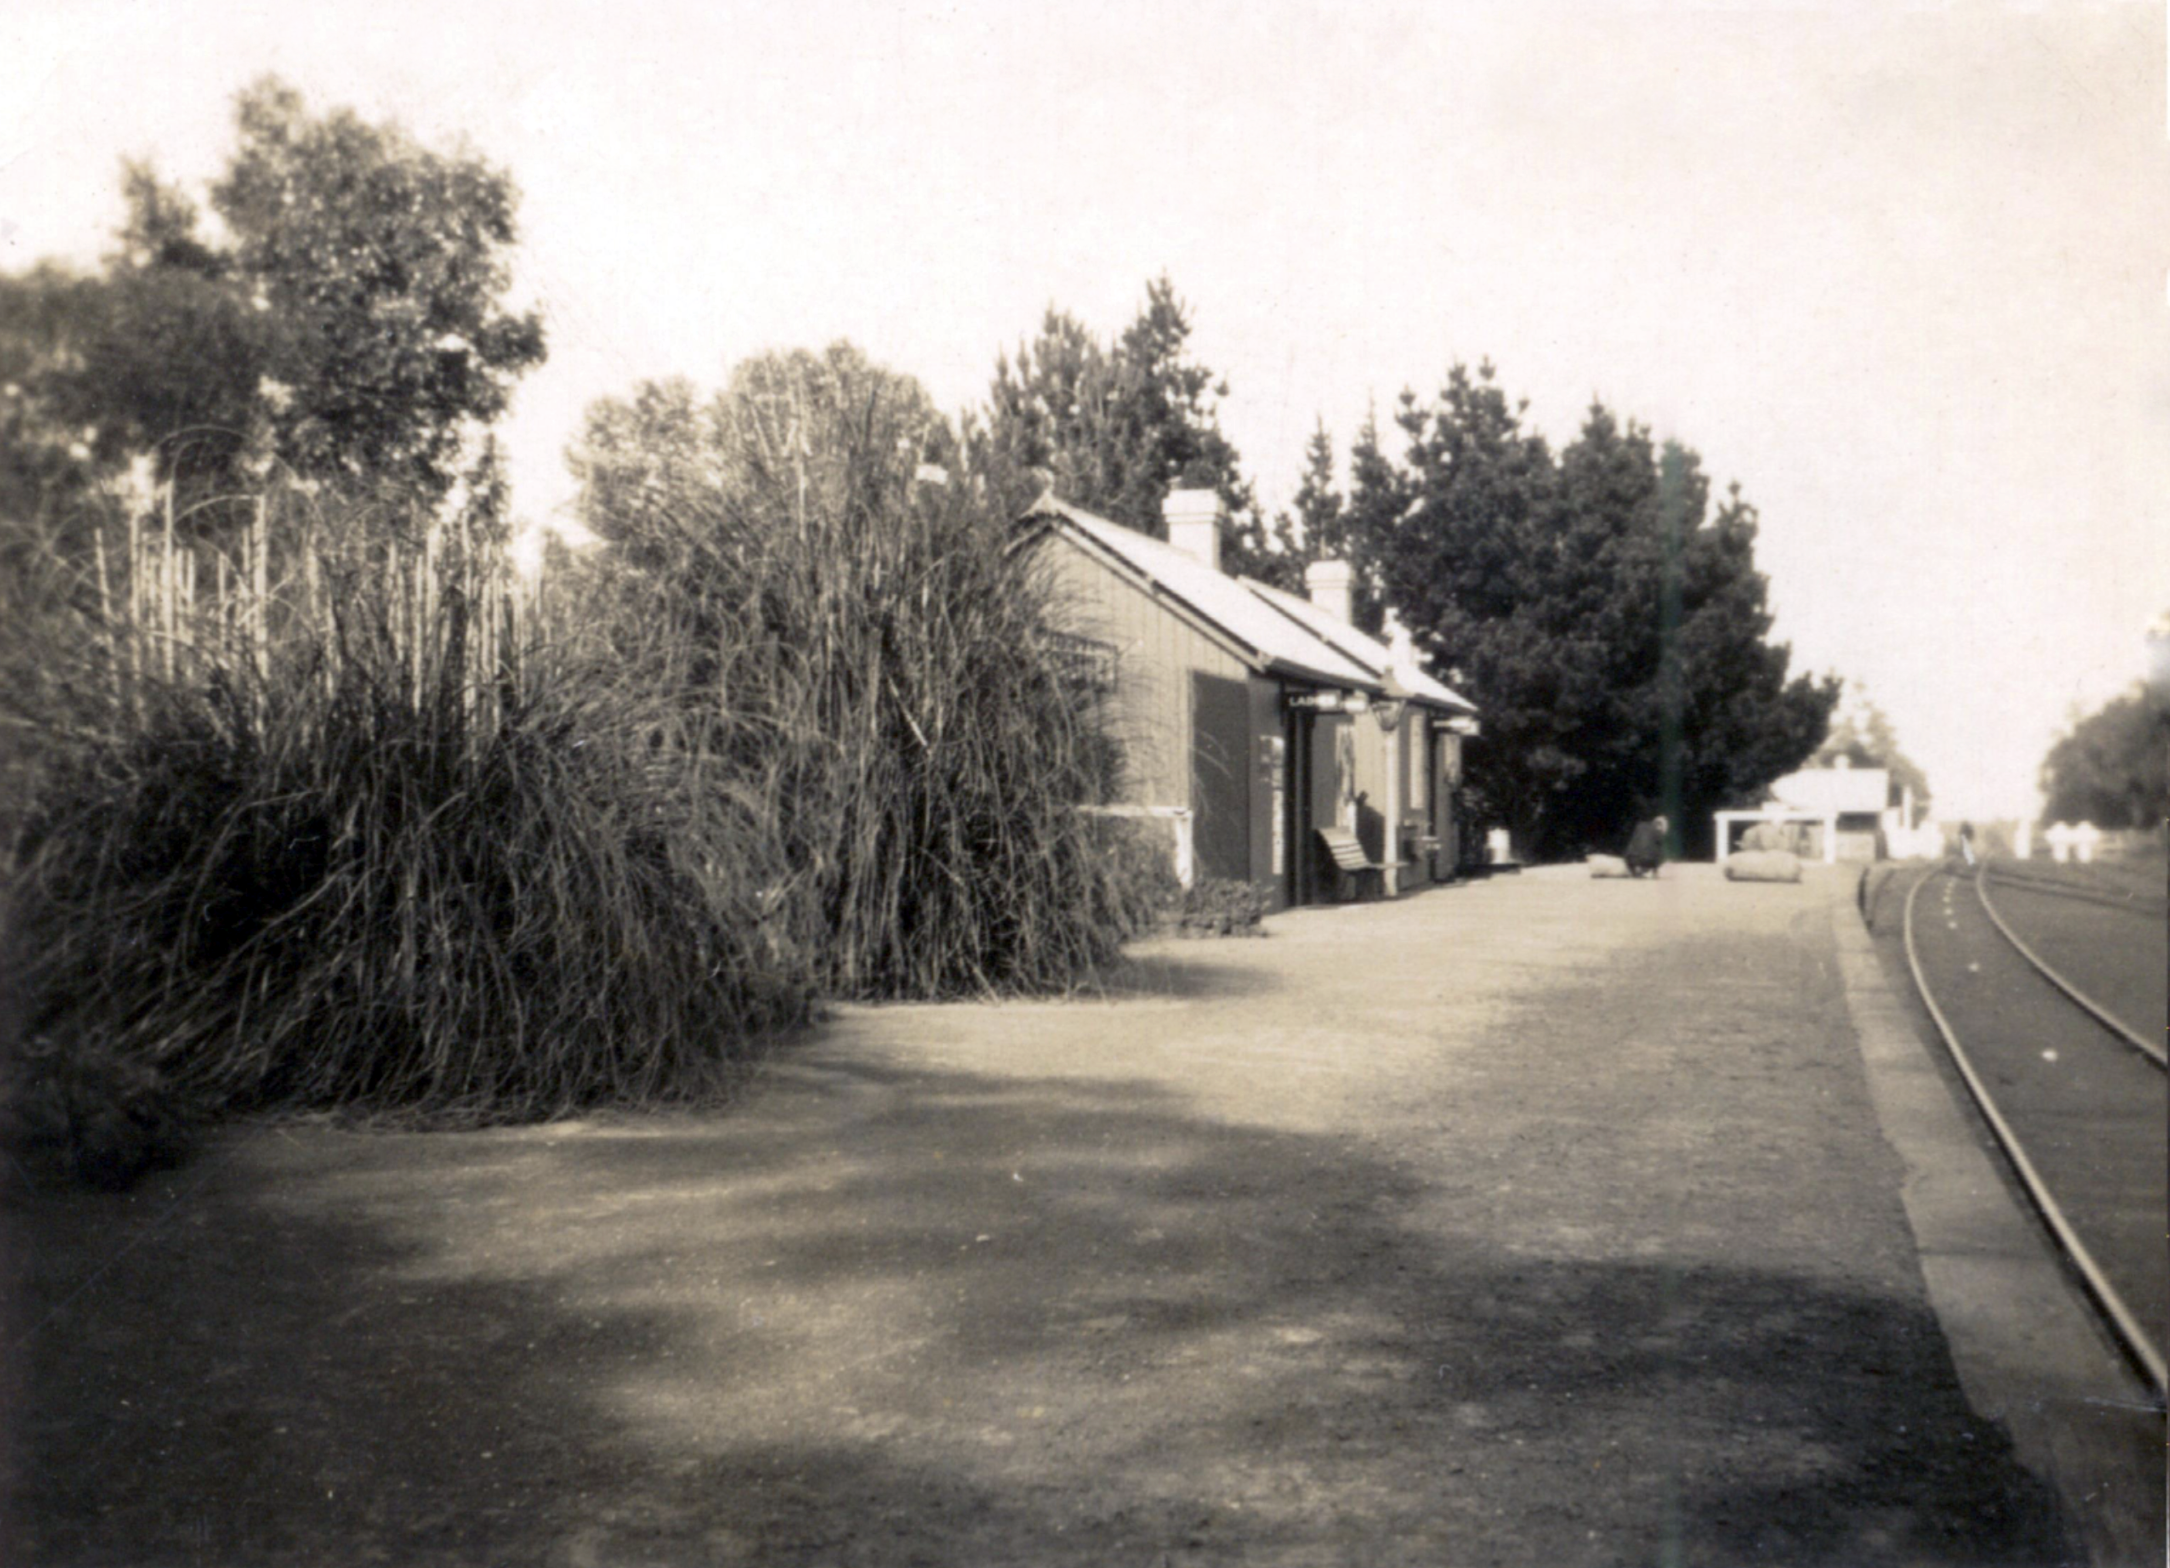
ABOVE & BELOW: Un-dated views of Milltown station, located at 227.75 miles from Melbourne, probably taken the 1950s based on the dress of the woman; possibly the caretaker - Vern McCallum Collection
 ========
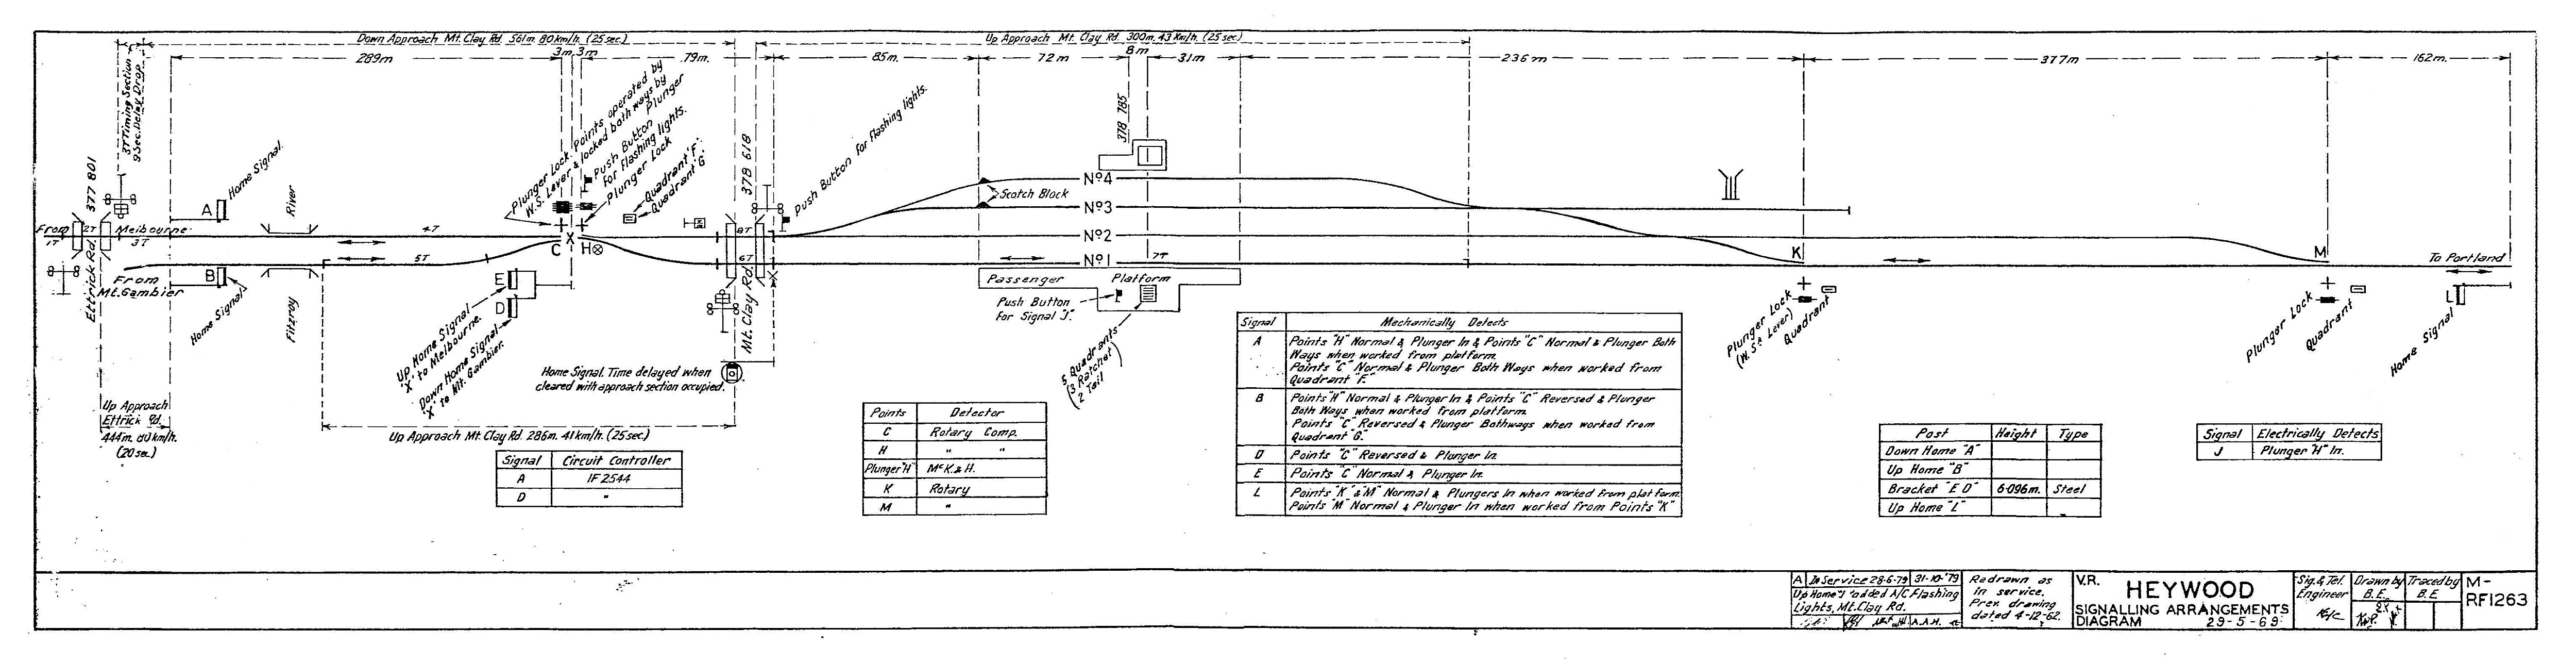
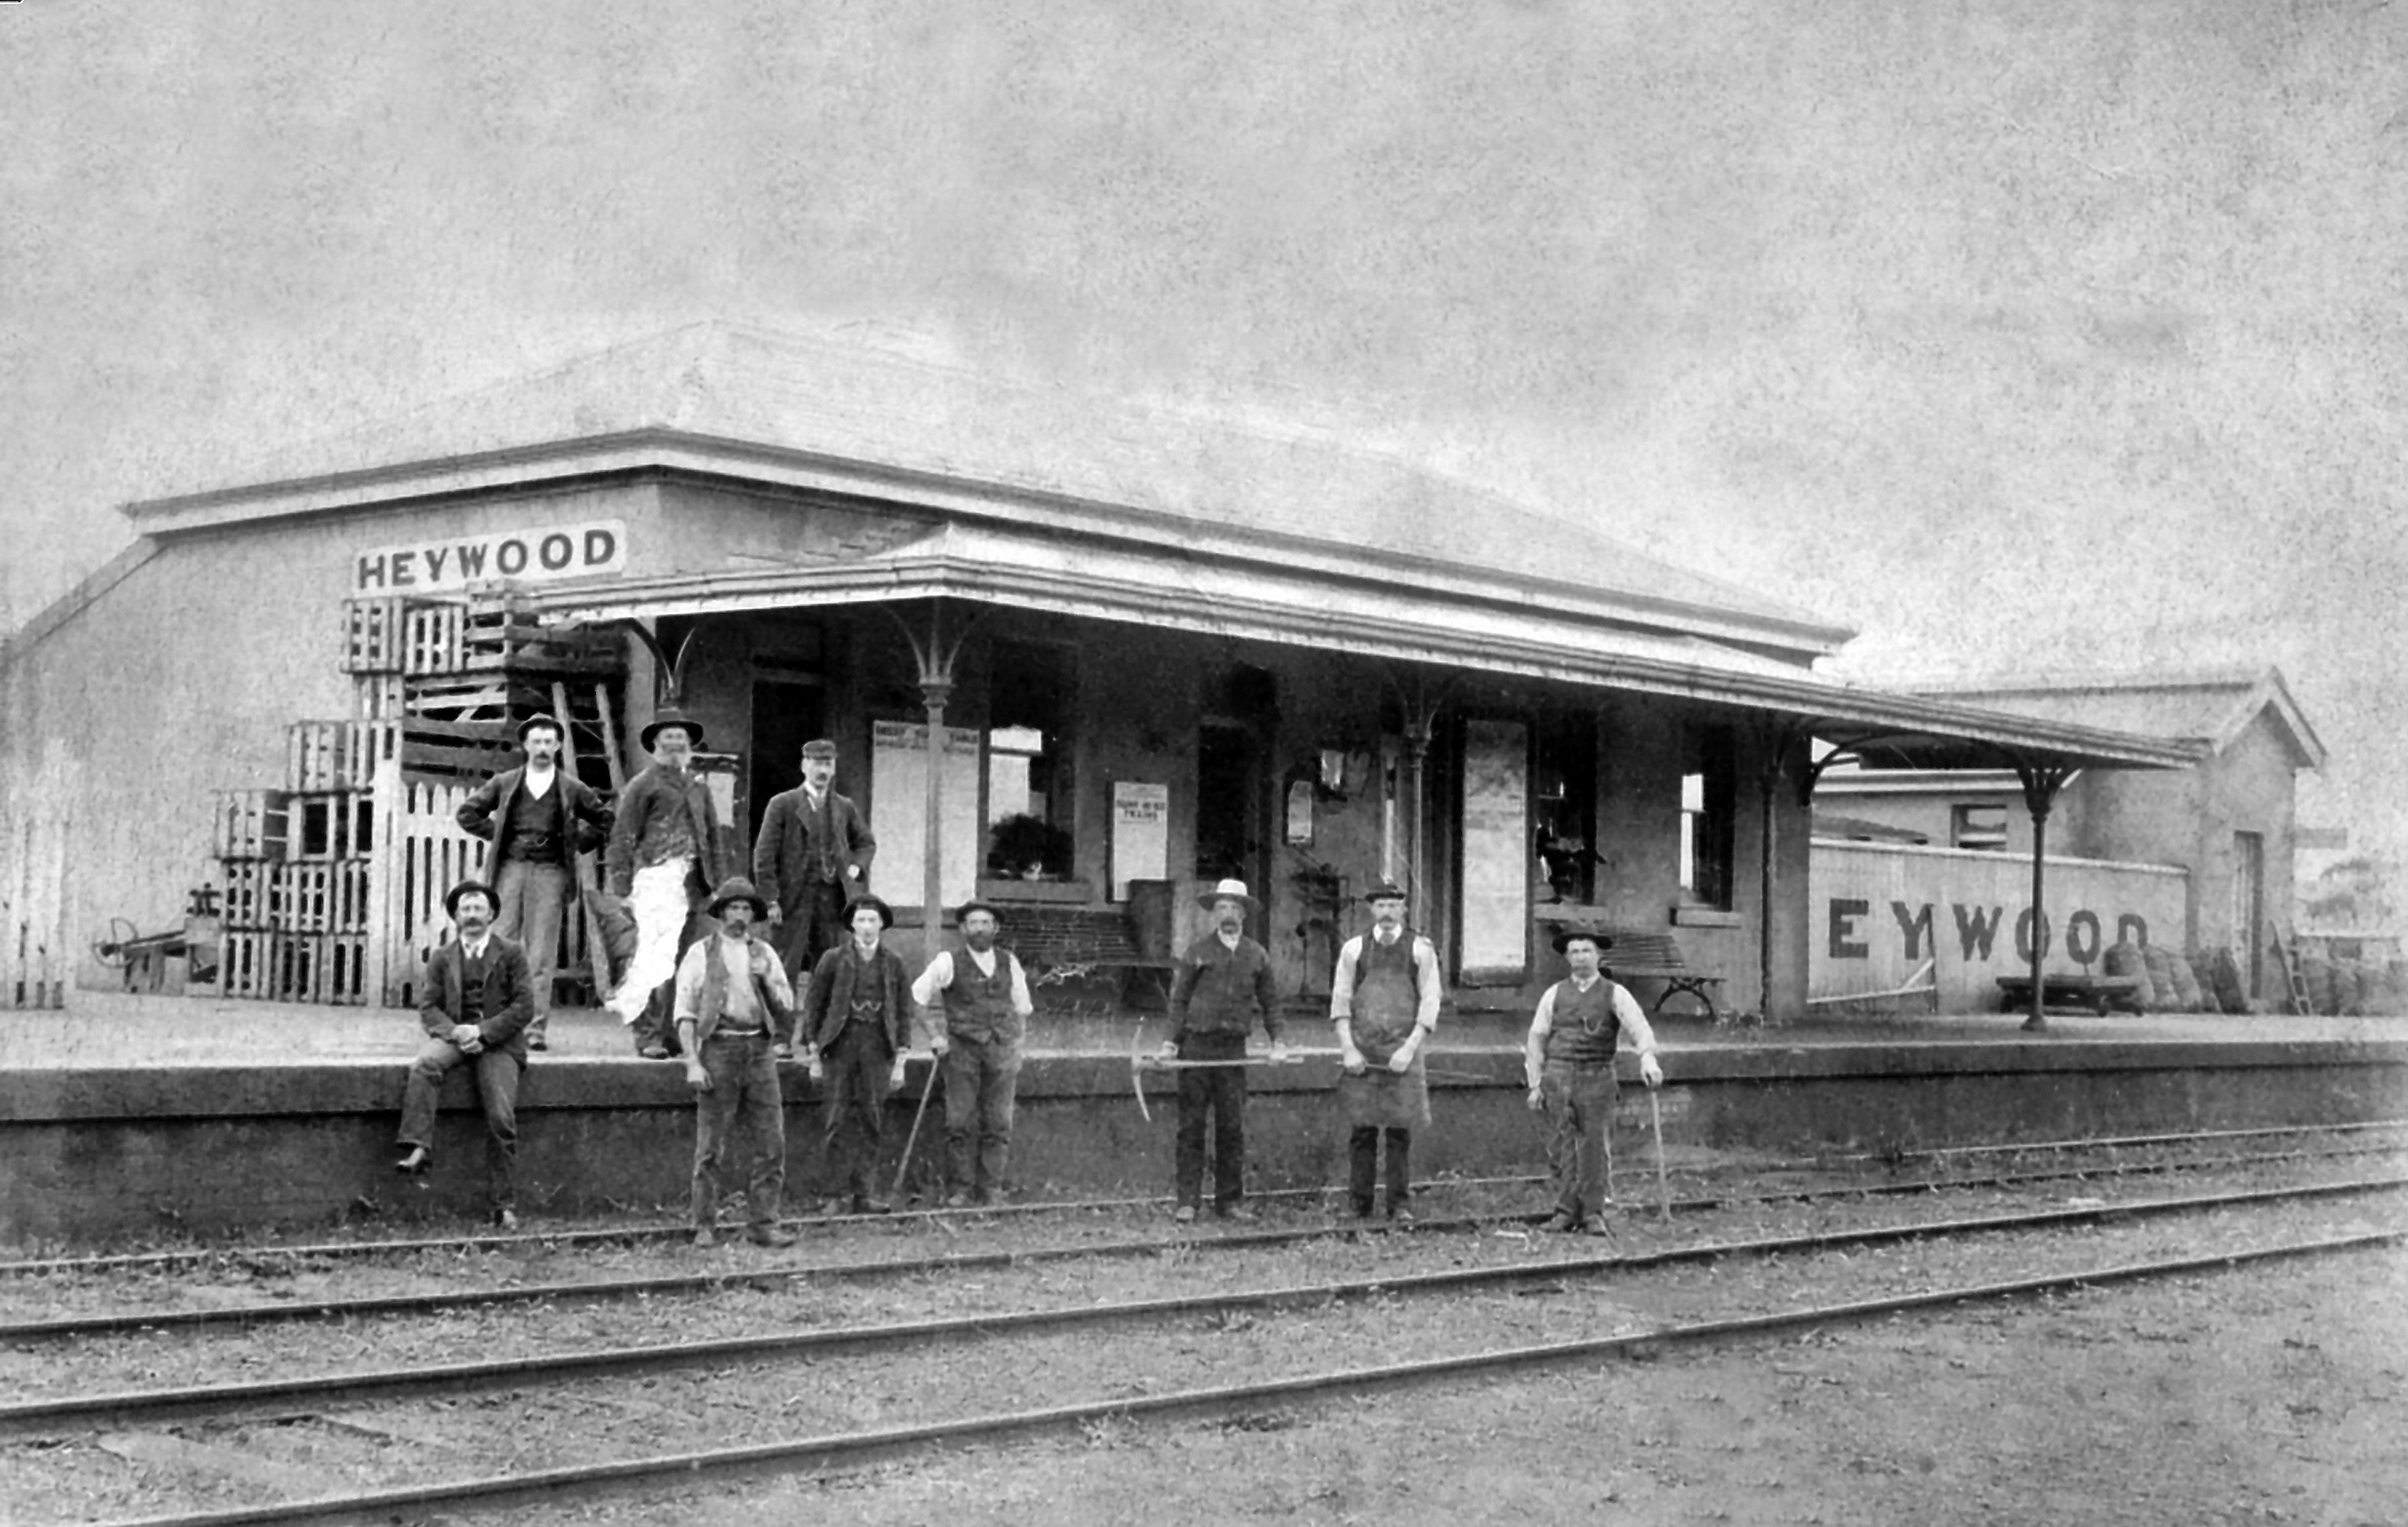
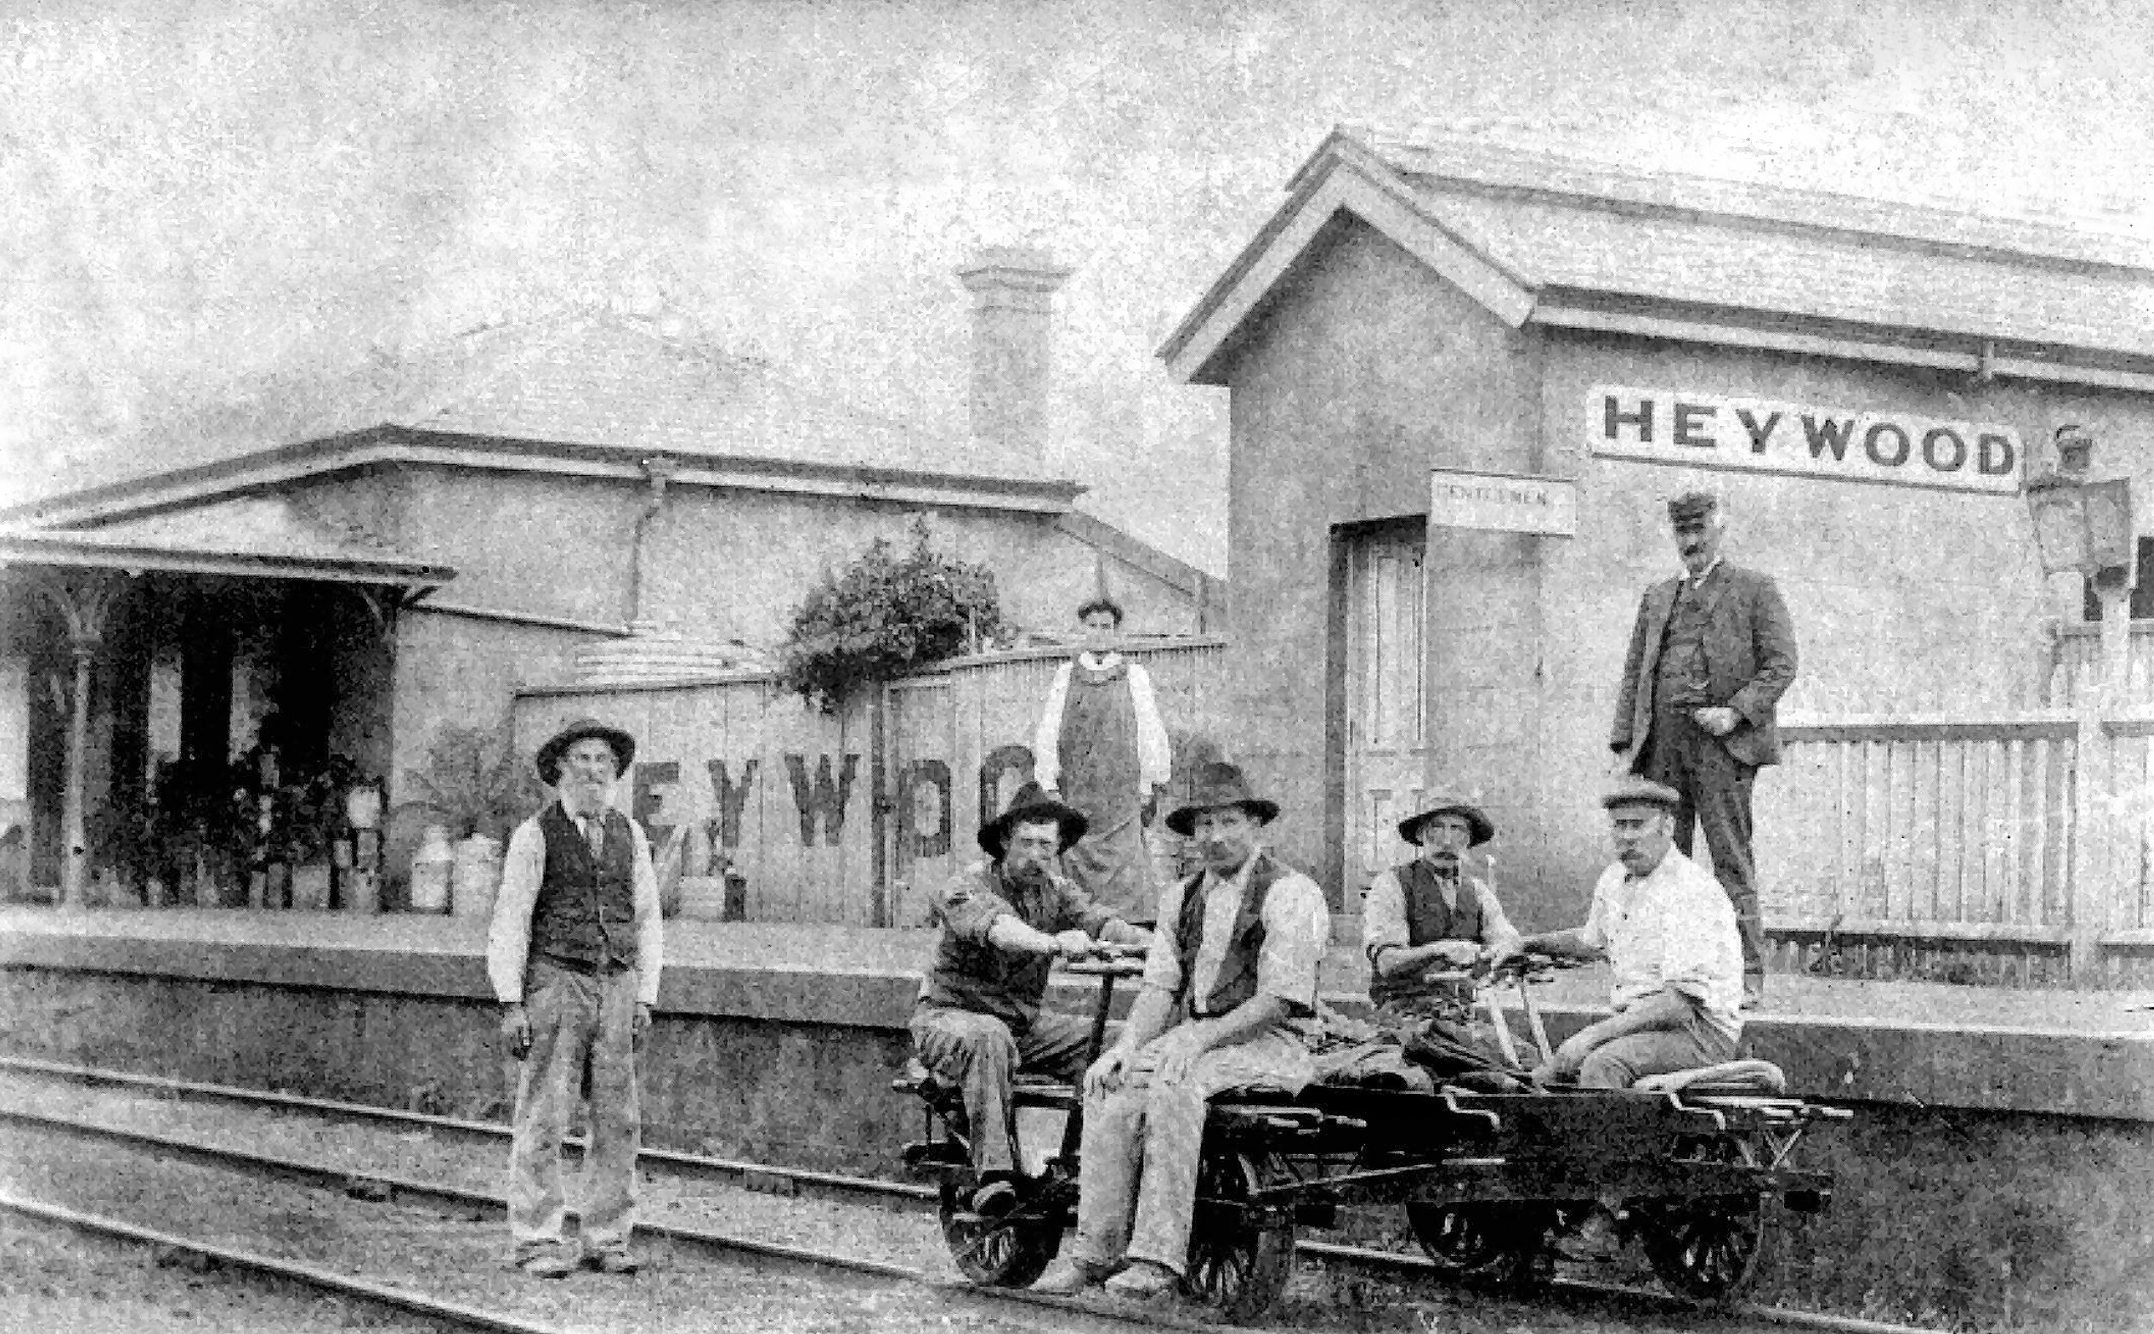
Heywood
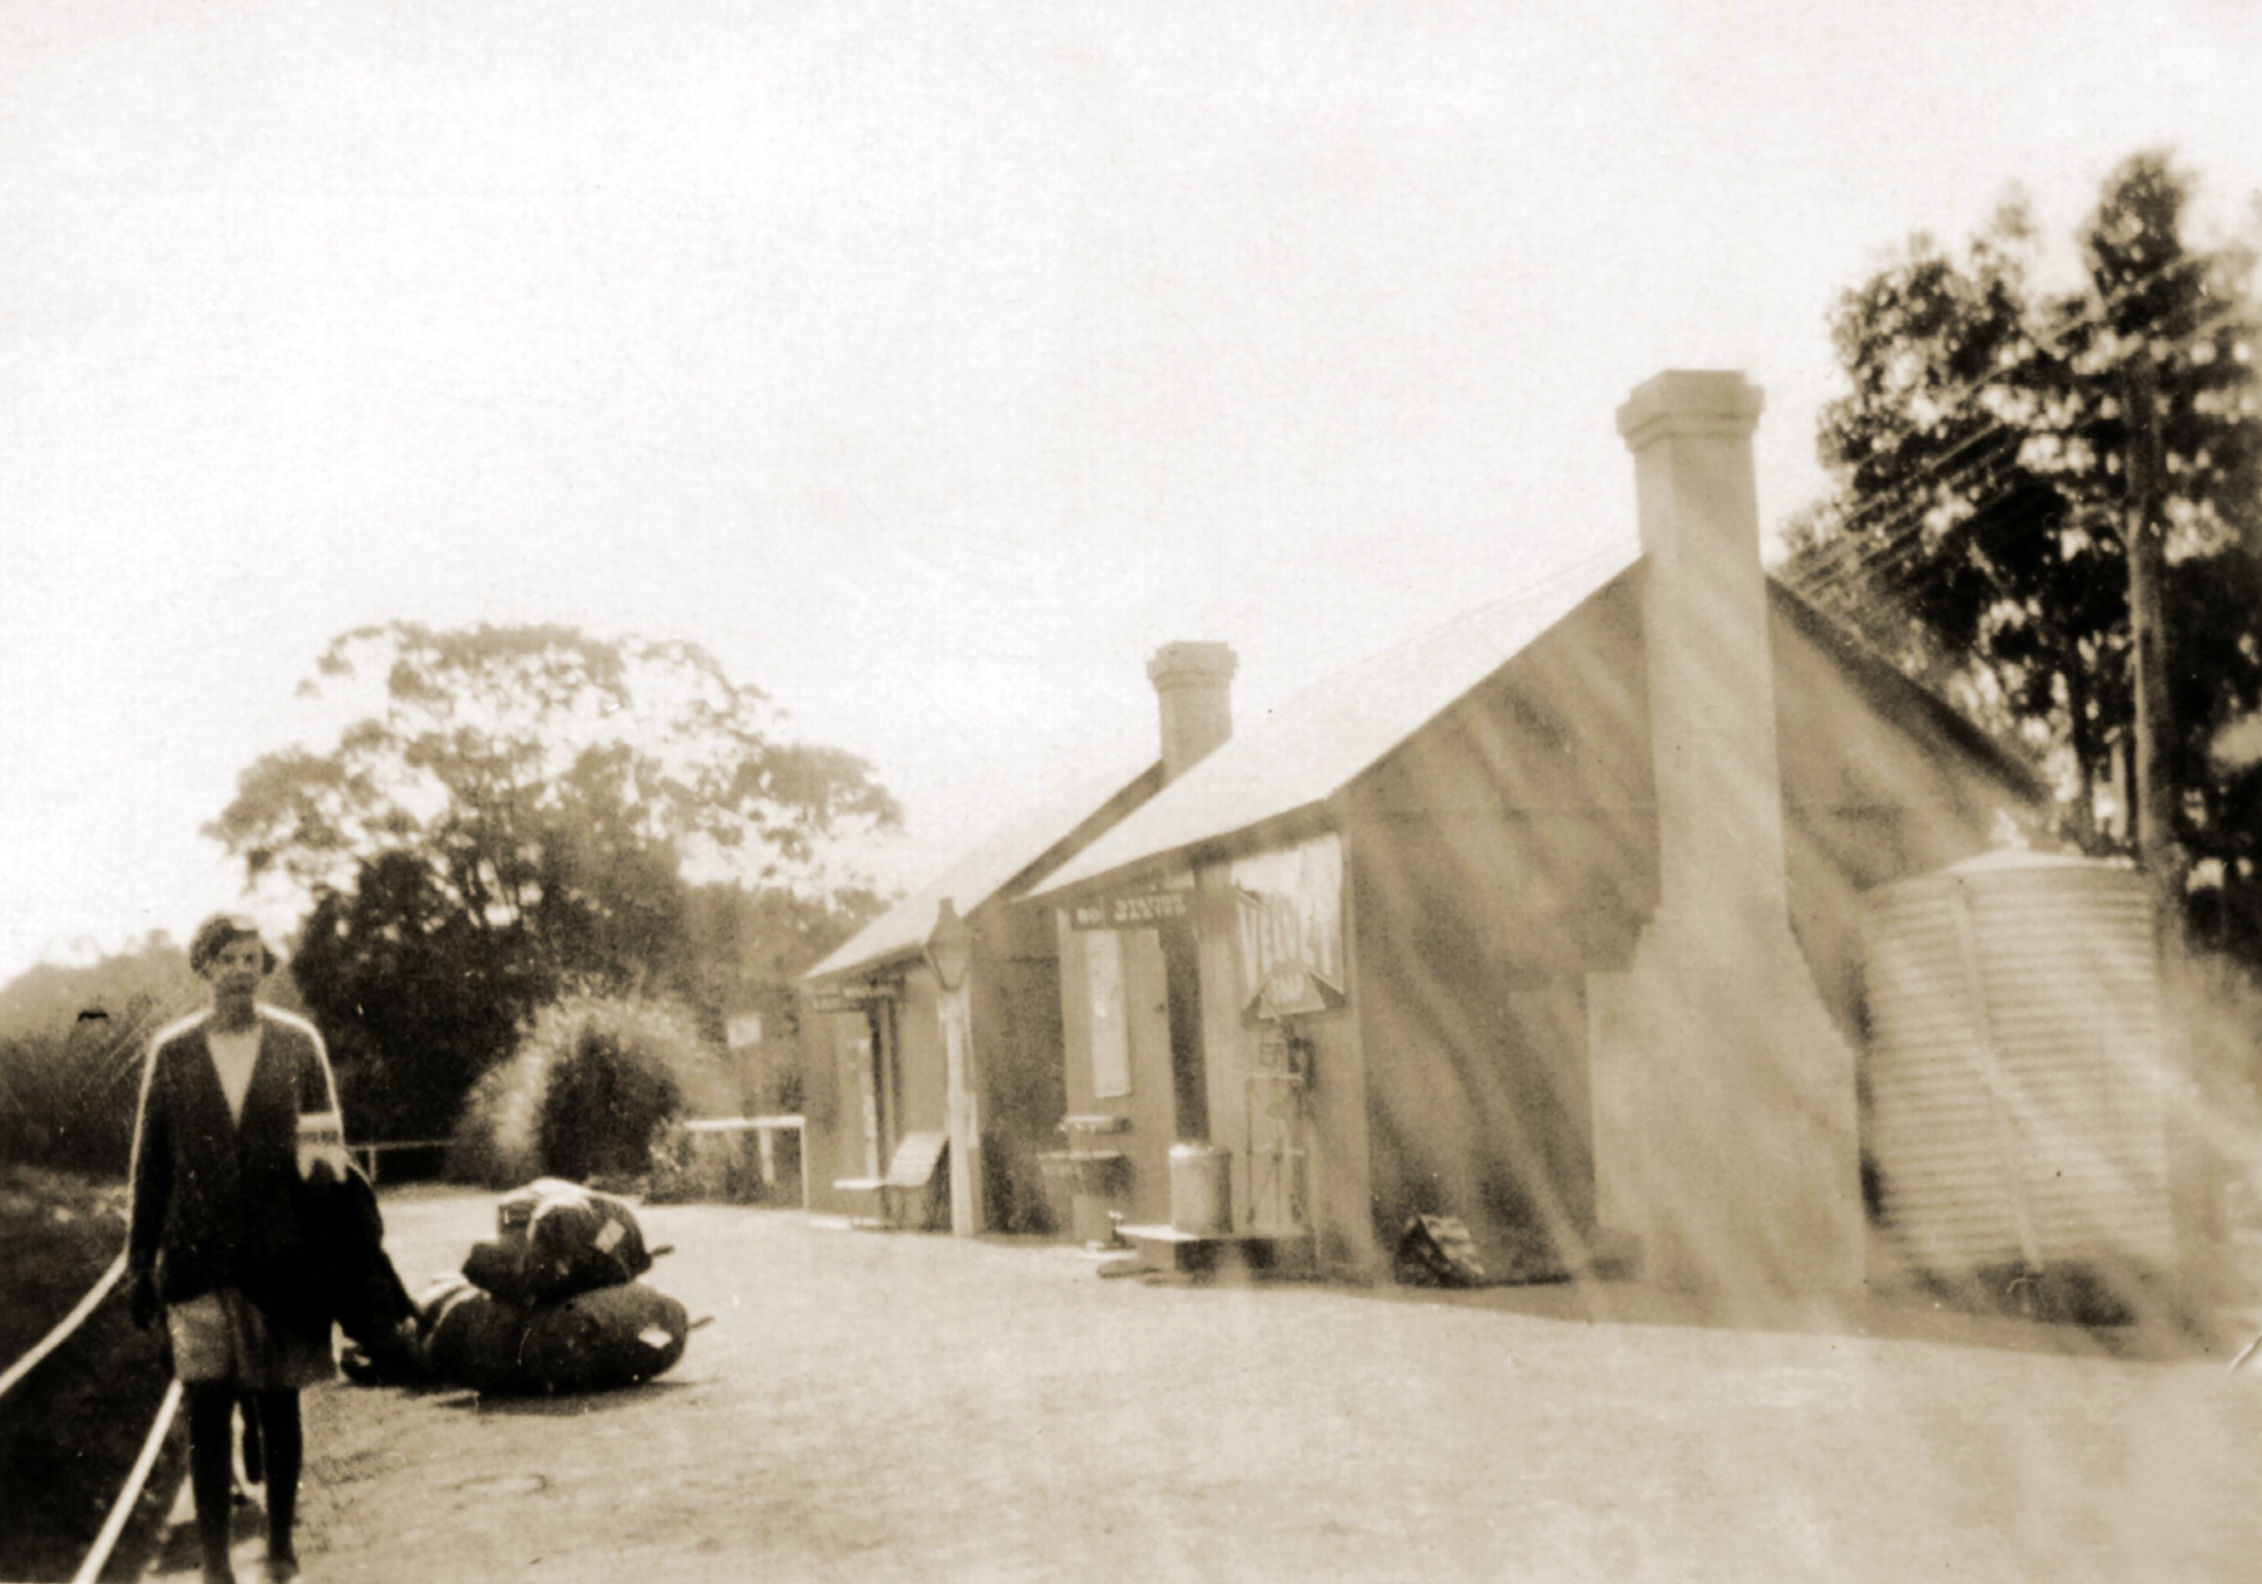
ABOVE: Circa 1910 photo of Heywood looking towards Hamilton. BELOW: A few years later, looking towards Portland, a door has been cut into the fence. both photos Vern McCallum Collection
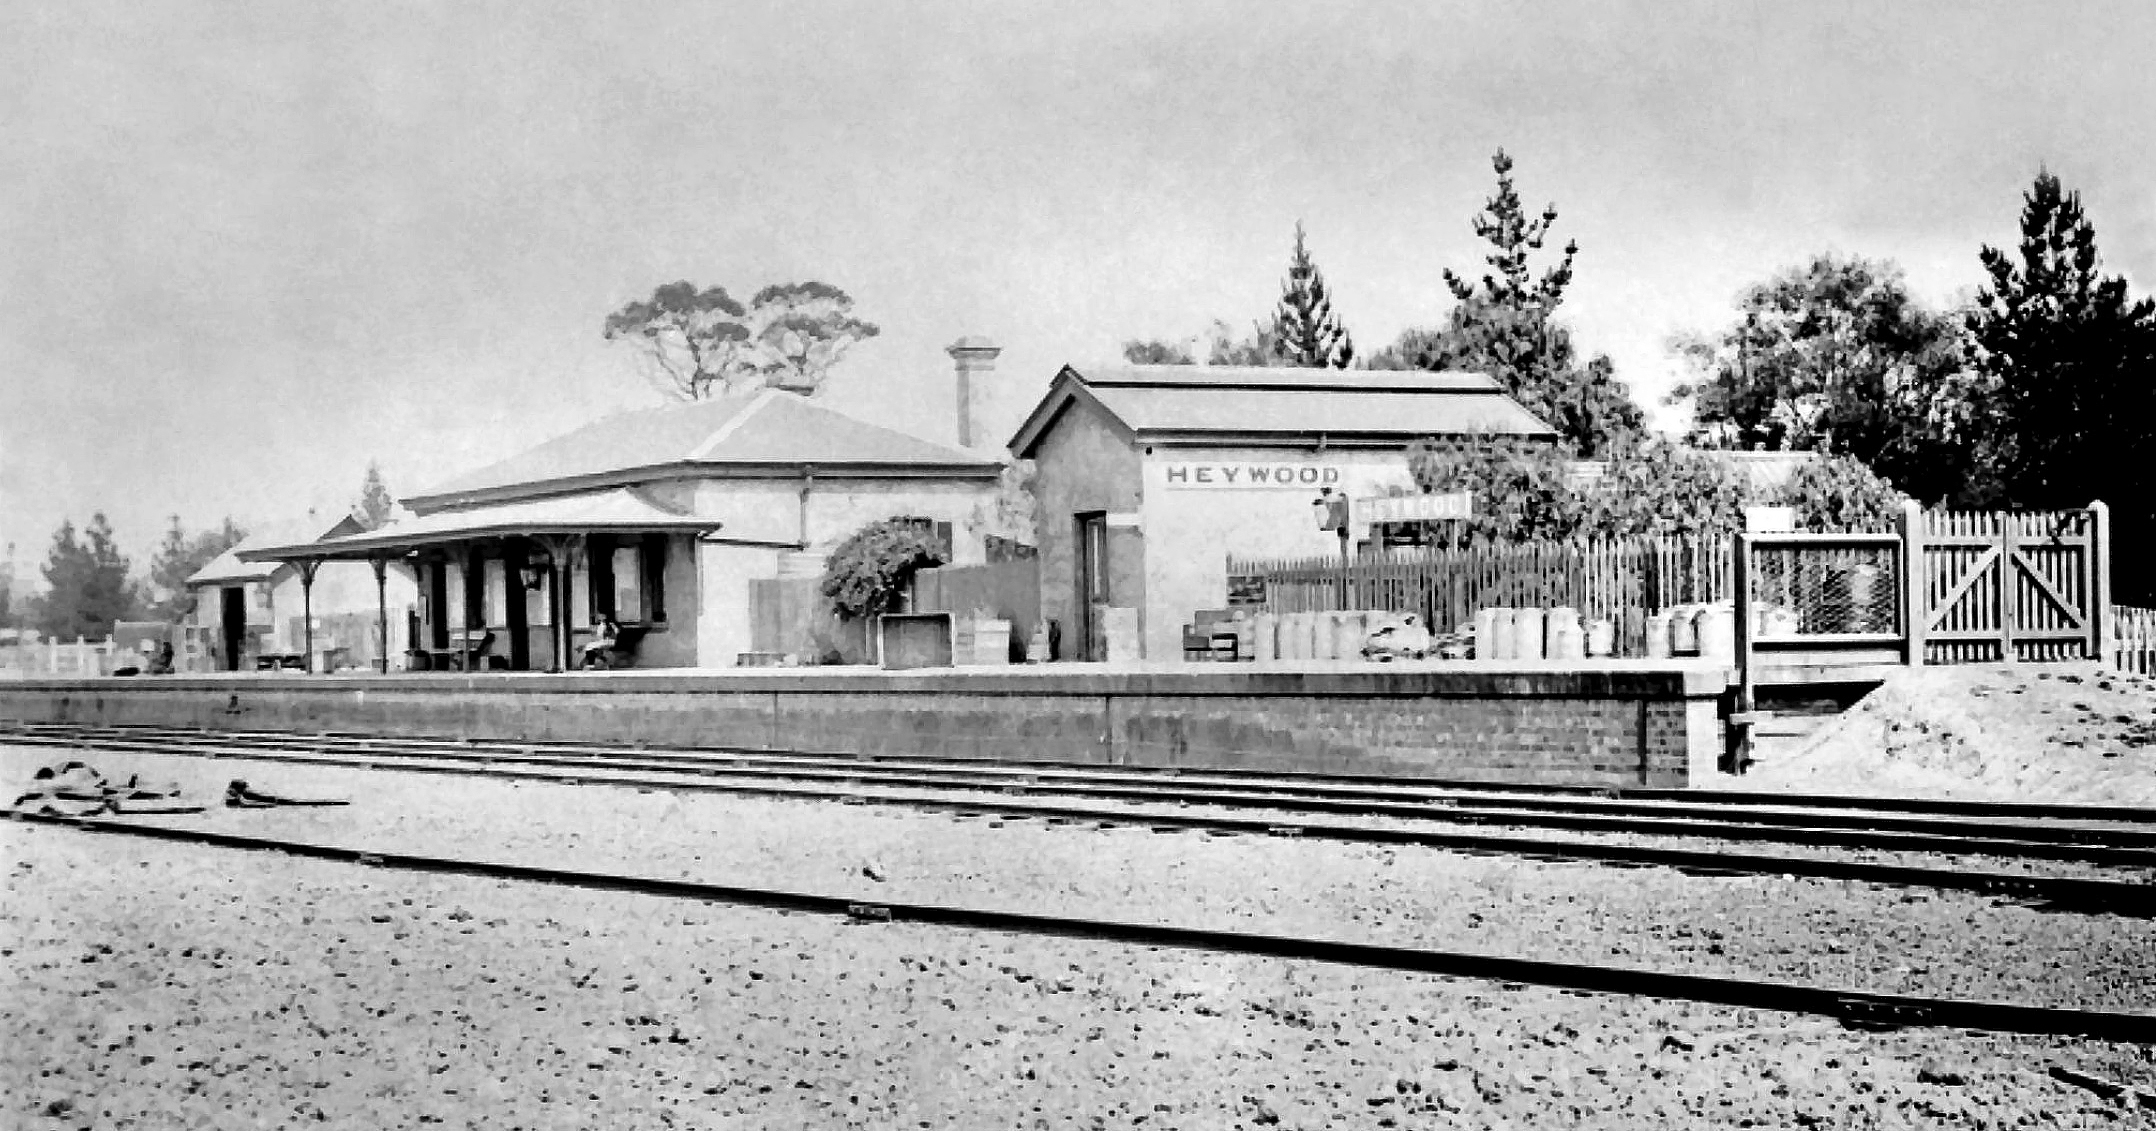
ABOVE: Similar view to the photo above, the station name on the fence has been painted over.
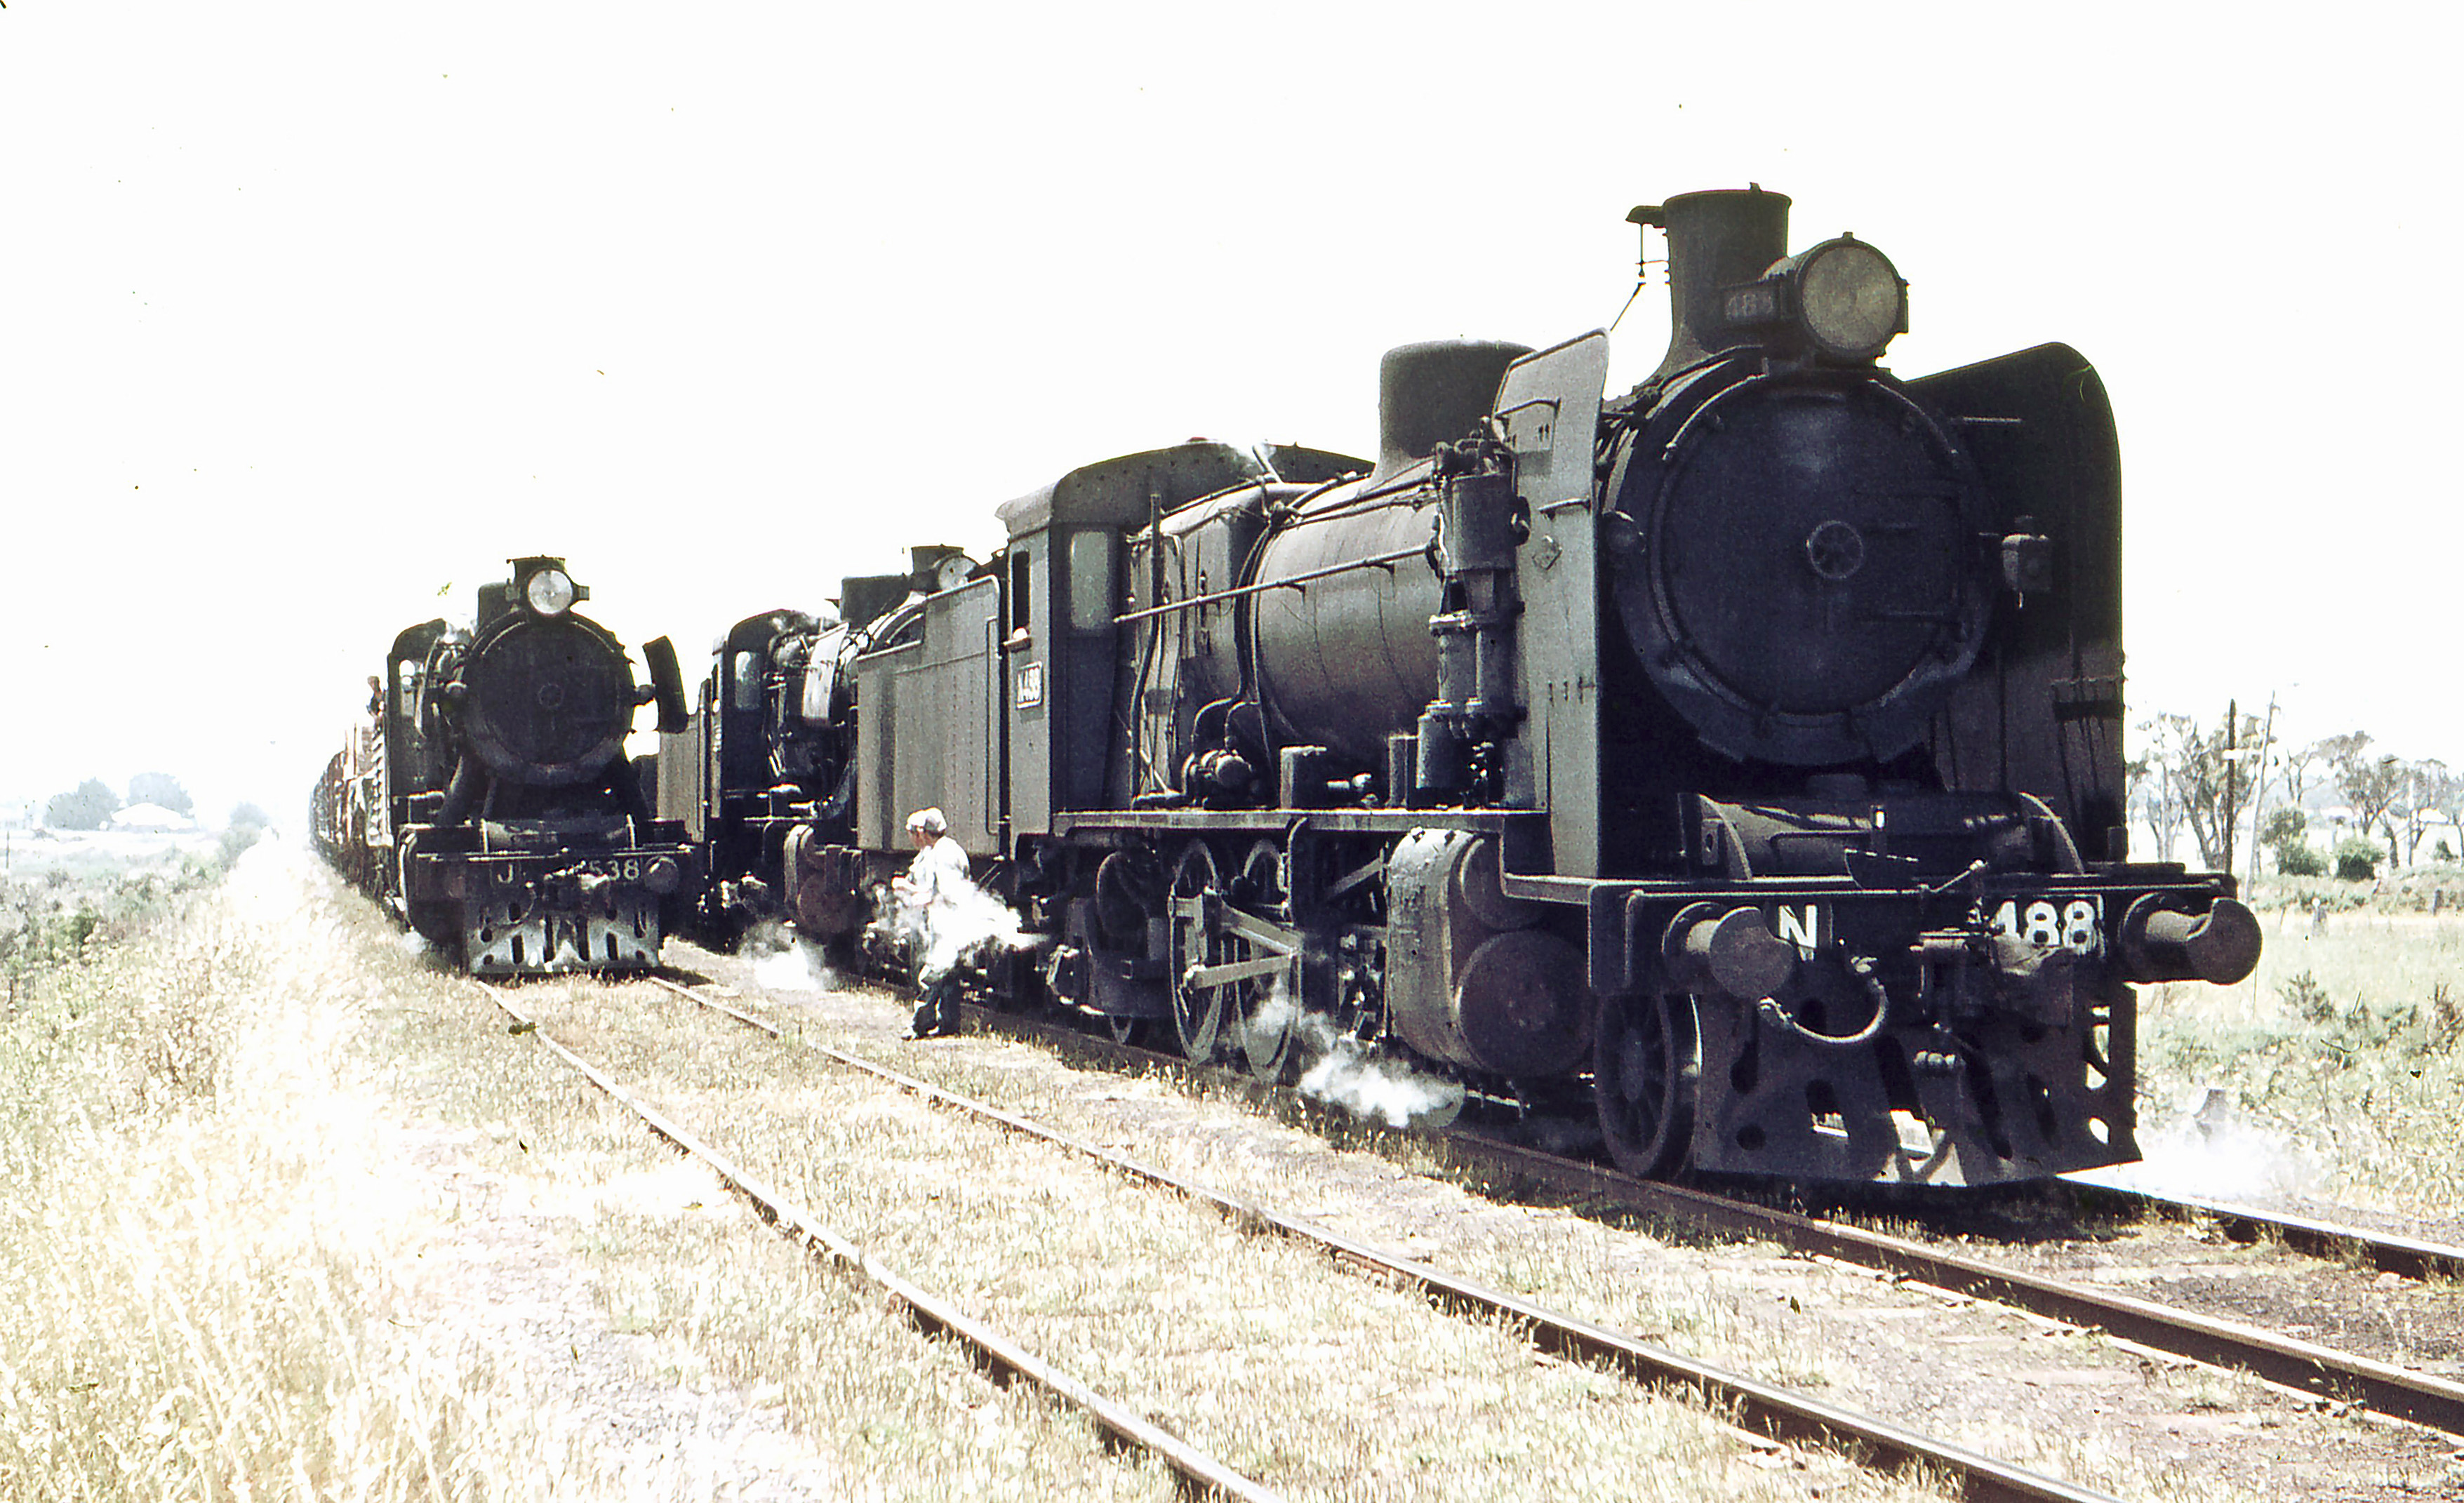
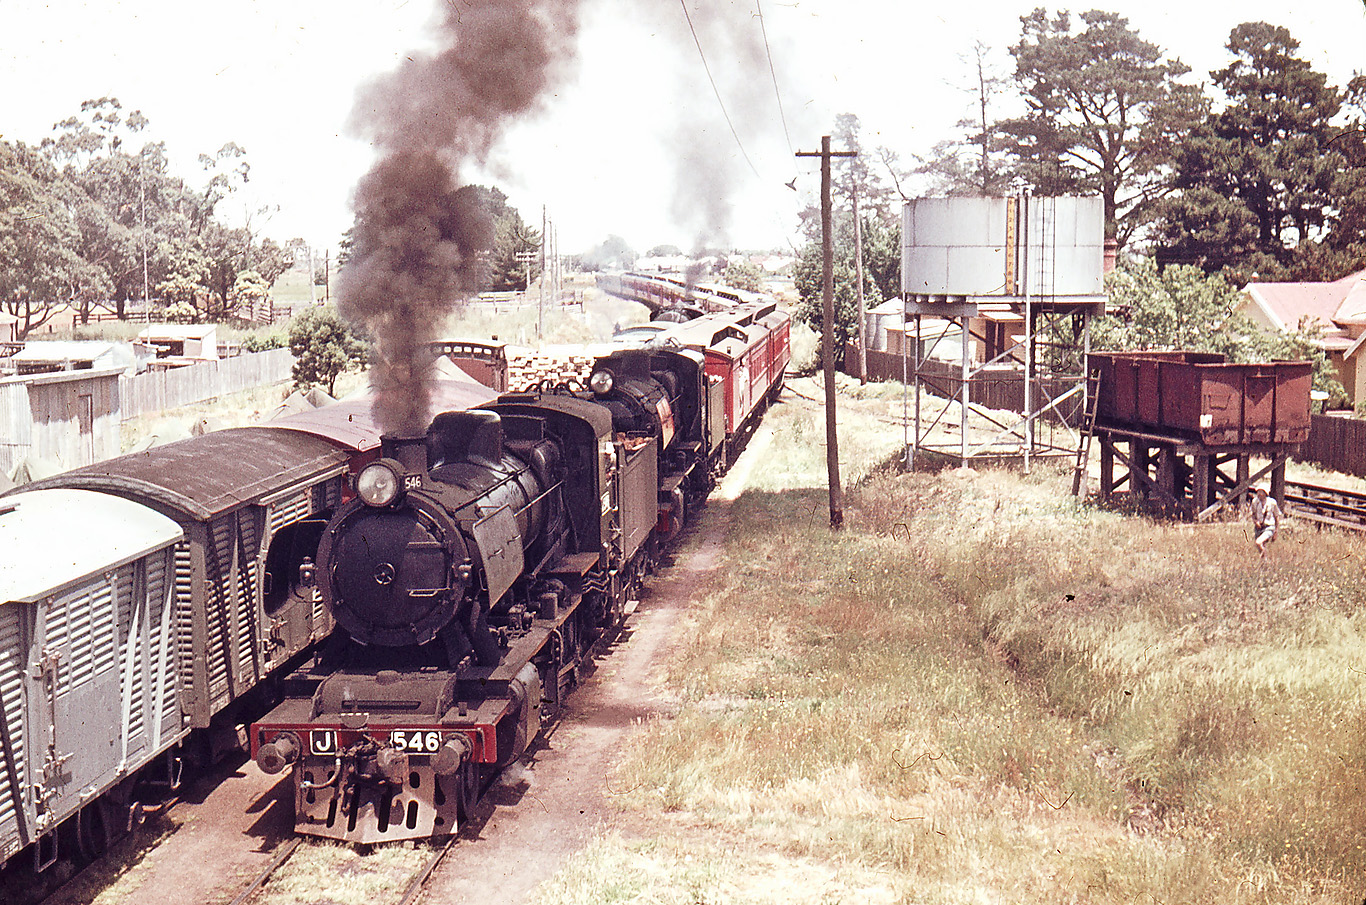
ABOVE: Heywood was the junction for trains going to Mount Gambier (SA). Curiously the junction faced trains from Portland, this meant that trains from Ararat/Melbourne had to reverse direction. Here we see an up Mount Gambier train on the left with J 538 and and down goods with N 488 and J 555 waiting to arrive at Heywood. Dec 1 1962. (photo courtesy Weston Langford)
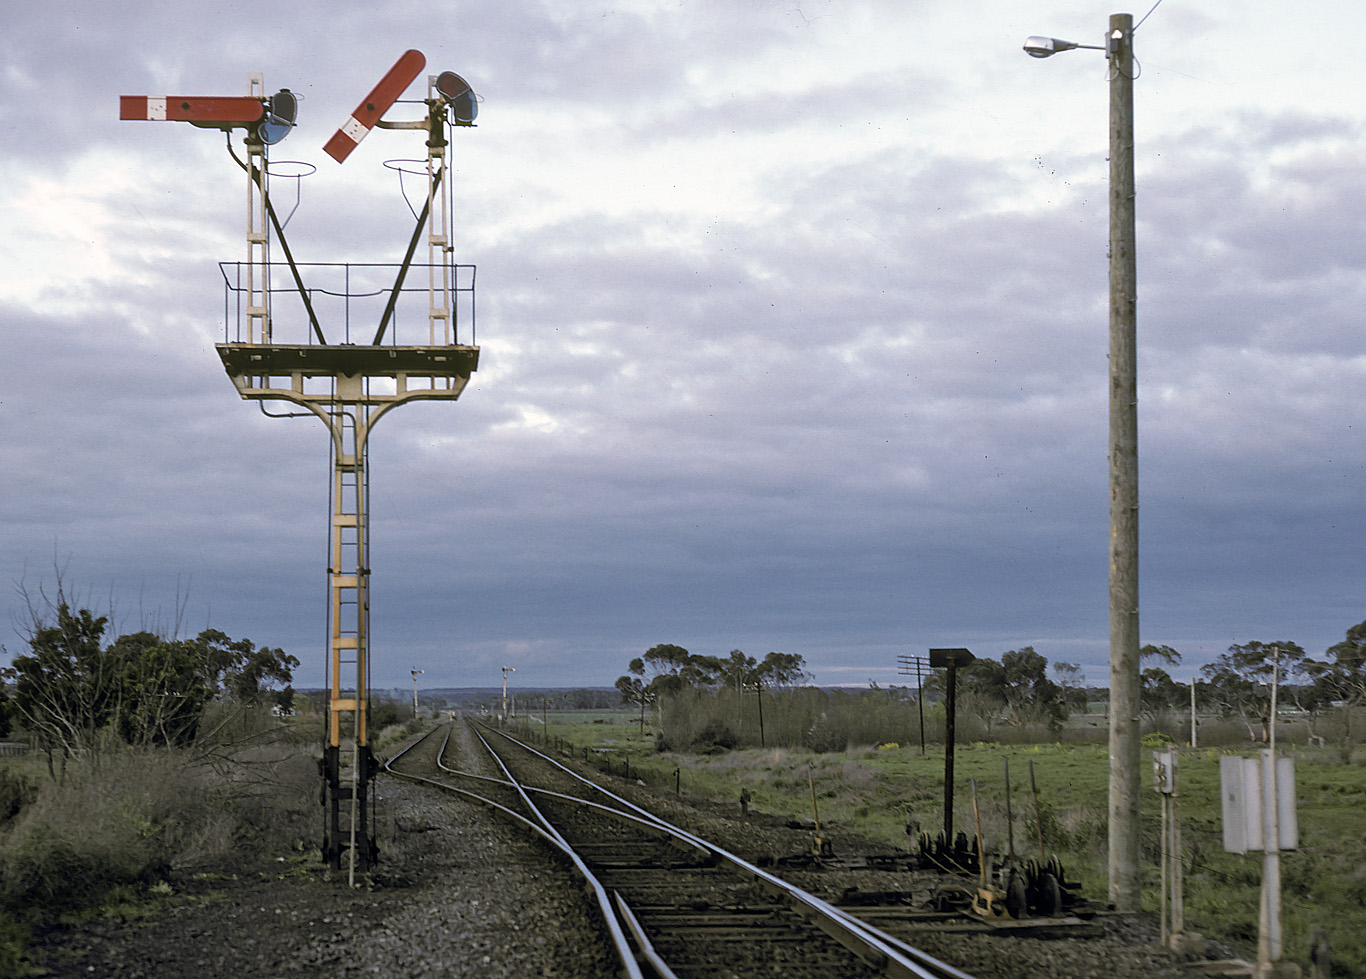
ABOVE: The junction, the track and signal to the left goes to Mt Gambier, the track and signal to the right goes to Hamilton, Sep 1984. This is a rare example of a signal post having an up and down signal on the same post. Moves to Mt Gambier were down moves, moves to Hamilton were up moves. (photo courtesy Noel Bamford)
ABOVE: An up AREA special arrives at Heywood. The track on the right led to the 53 foot turntable, the coal handling infrastructure was rudimentary to say the least, an old Tommy Bent I wagon. Dec 1 1962. The turntable was removed in April 1968. (photo courtesy Weston Langford)

ABOVE: B60 - B 79 on a down loaded wheat train at Heywood, Feb 2 1980. (photo courtesy Geoff Winkler)
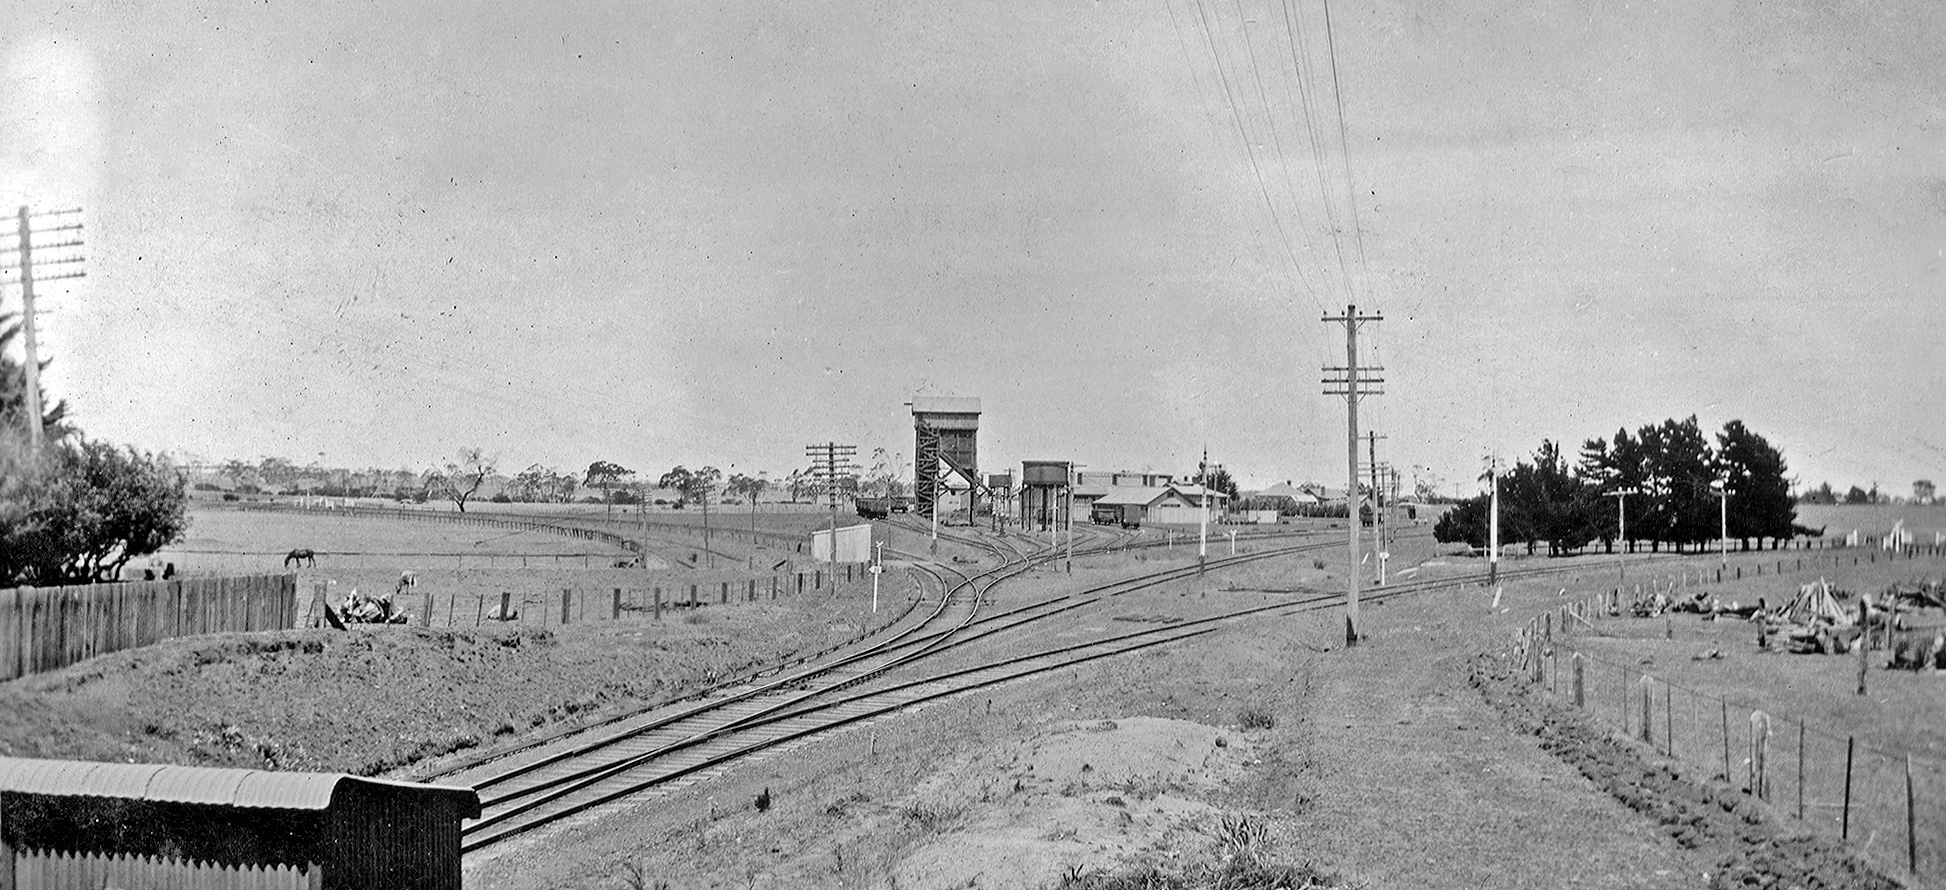
Portland / Portland North
Portland can be confusing as station names changed over the years. When the line opened (Dec 19 1877) the terminus was called Portland, on Feb 19 1897 the name was changed to Portland North, and the station down by the waterside was named Portland. In 1968 when the line from Portland to Portland North was abandoned, Portland North resumed the name of Portland.
In 1983, Warren Doubleday compiled very detailed hand drawn maps of the Portland area as it was then.
Portland North Ampol siding 1956 plan
Portland North Borthwick's siding 1945 plan
Portland North re-location of facilities
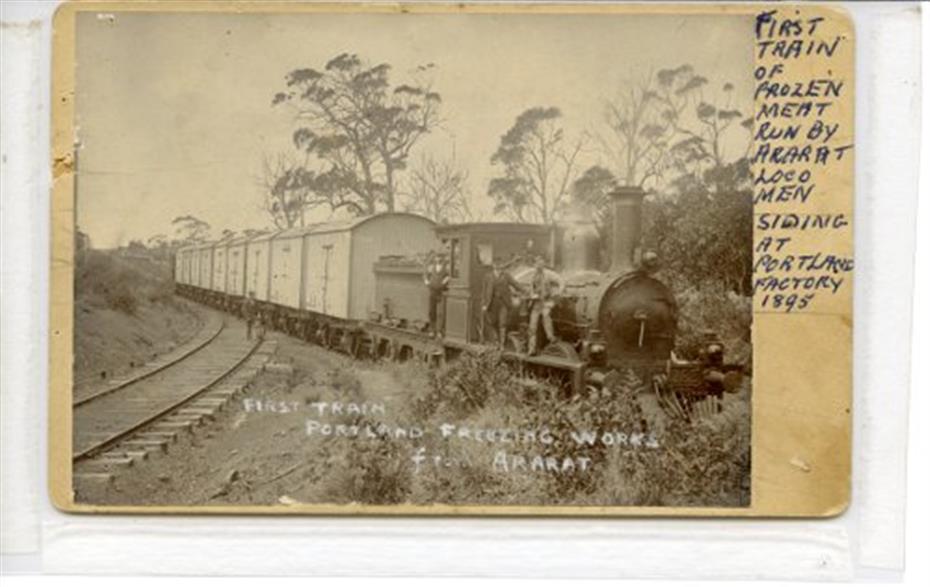
ABOVE: A major traffic on the line was animal carcasses transported in insulated T vans to the Portland Freezing Company's siding at 249m 28ch. From here the carcasses were frozen and then transported to Portland pier for loading onto ships. This photo shows a train arriving at the siding from Ararat in 1895. The sidings opened in 1894.
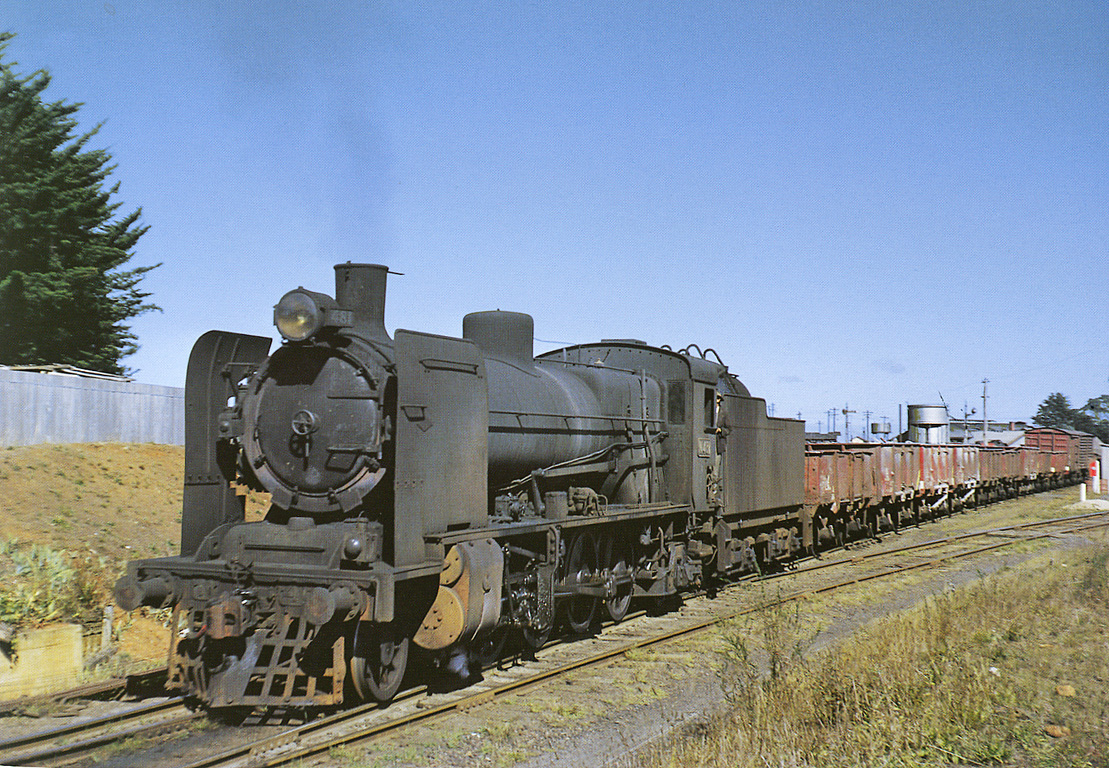
ABOVE: 8 year old T 281 stands in front of the Portland North loco shed in 1898. T 281 was built by the Phoenix Foundry in Ballarat in 1884.
ABOVE: The Portland North Loco shed, March 28 1959. This shed was built by Quayle & Williams and completed on Dec 30 1884. In 1913 as part of the re-arrangement of Portland station yard a new four road radial engine shed was planned for the down end of the station yard. (caption and photo courtesy Des Jowett)
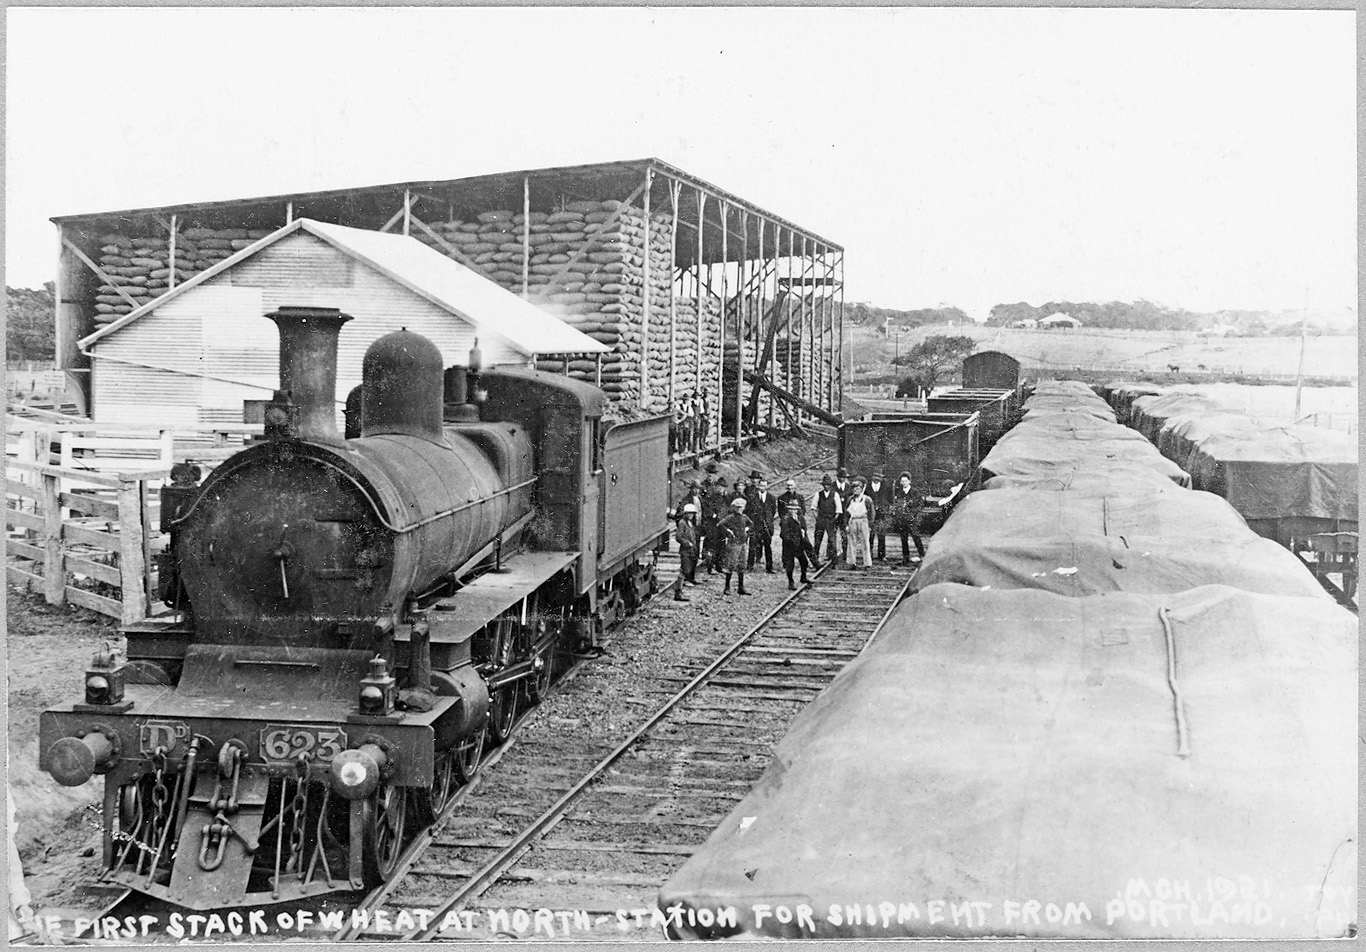
ABOVE: Wheat shipments from Portland did not begin until 1921. This large shed was erected at Portland North to store bagged wheat arriving from the Ararat region. The bags would be stored here until a ship was ready to be loaded with them at which time a train would take them down to Portland. BELOW: Taken in the same year it appears that most of Portland's notable citizens are arranged for this photo at the Portland North loco shed. The start of shipments of wheat from Portland was a big deal to the locals as they hoped it would usher in a new era of prosperity for the town. (photo above courtesy SLV collection, photo below, courtesy PROV collection)
ABOVE: Portland North loco depot looking towards Portland, Dec 1 1962. (photo courtesy Weston Langford)
ABOVE: A down goods arrives Portland North passing the classic old station building (constructed 1882-83) , Jan 1966. (photo courtesy Michael Schrader and THP Neville Gee) BELOW: The old building shown above was allowed to fall into a state of disrepair and was demolished and replaced by this one in 1968.;By this time it had been (re)-named Portland, photo date: Aug 28 1974. Rail passenger service was discontinued Sep 12 1981. (photo courtesy Neville Gee)
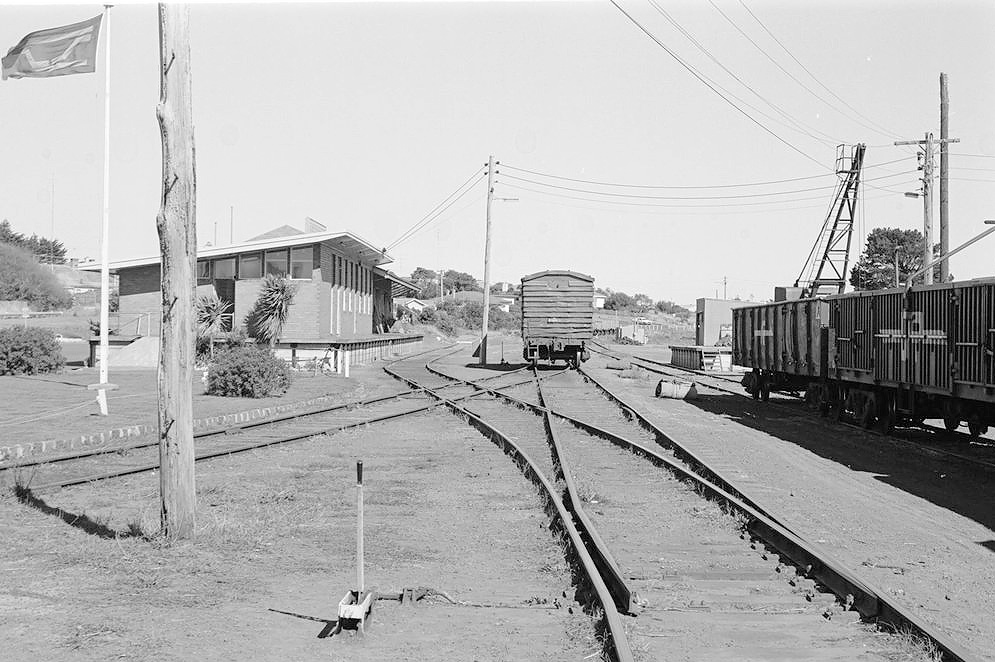
ABOVE: Portland North, looking south, the goods shed and operations depot are on the left. 1978. (photo courtesy Peter J. Vincent)
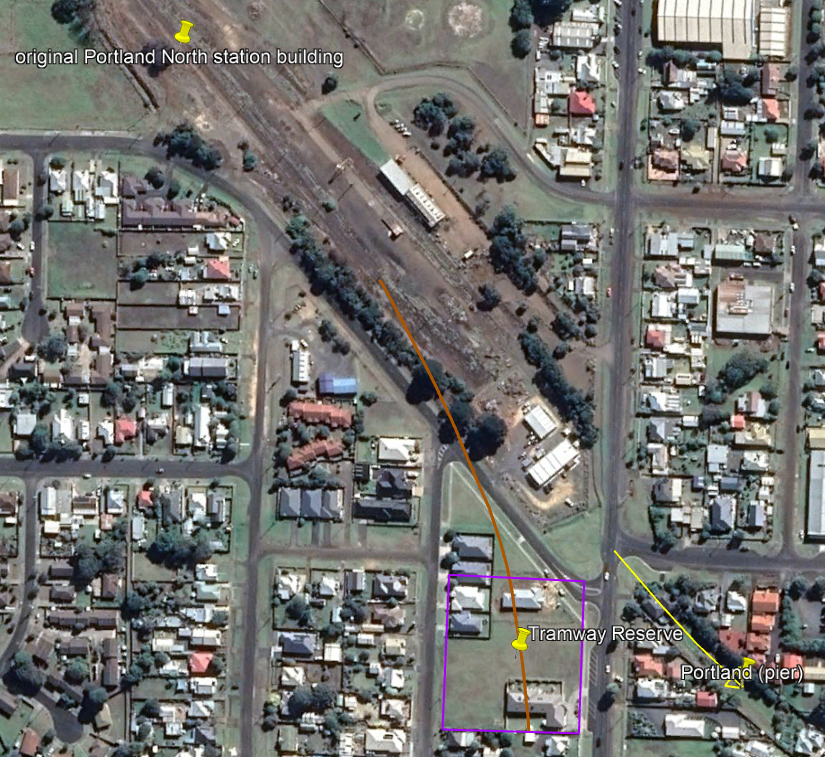
ABOVE: Google Earth photo of Portland North notated by Chris Wurr.
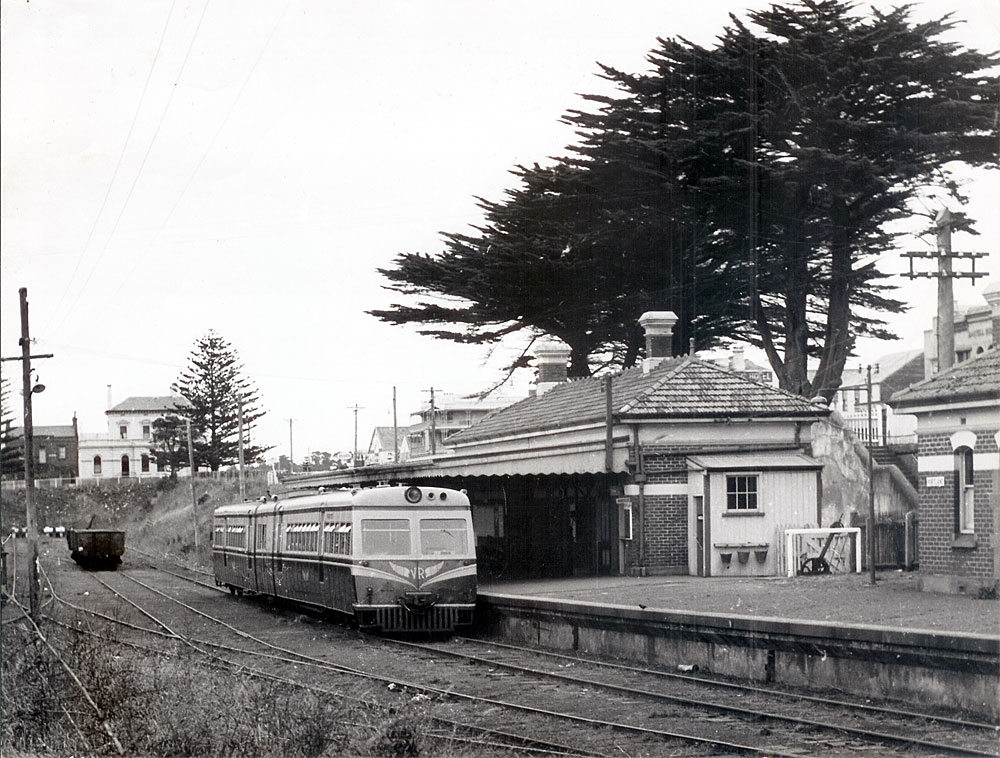
ABOVE: A 280 hp Walker awaits departure at Portland. Mid 1950s. The line to the new pier can be seen curving away from No. 3 road behind the light pole on the extreme left.

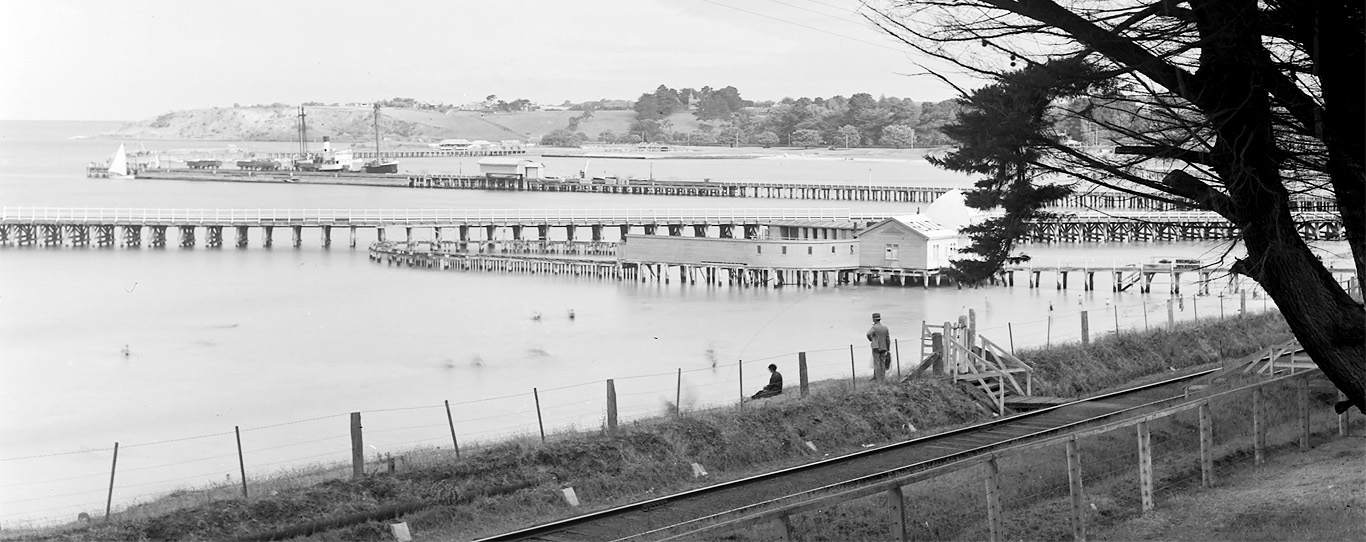
ABOVE: A great aerial view of the station area and the two piers, circa 1920 (photo courtesy Daniel Pratt, SLV collection)
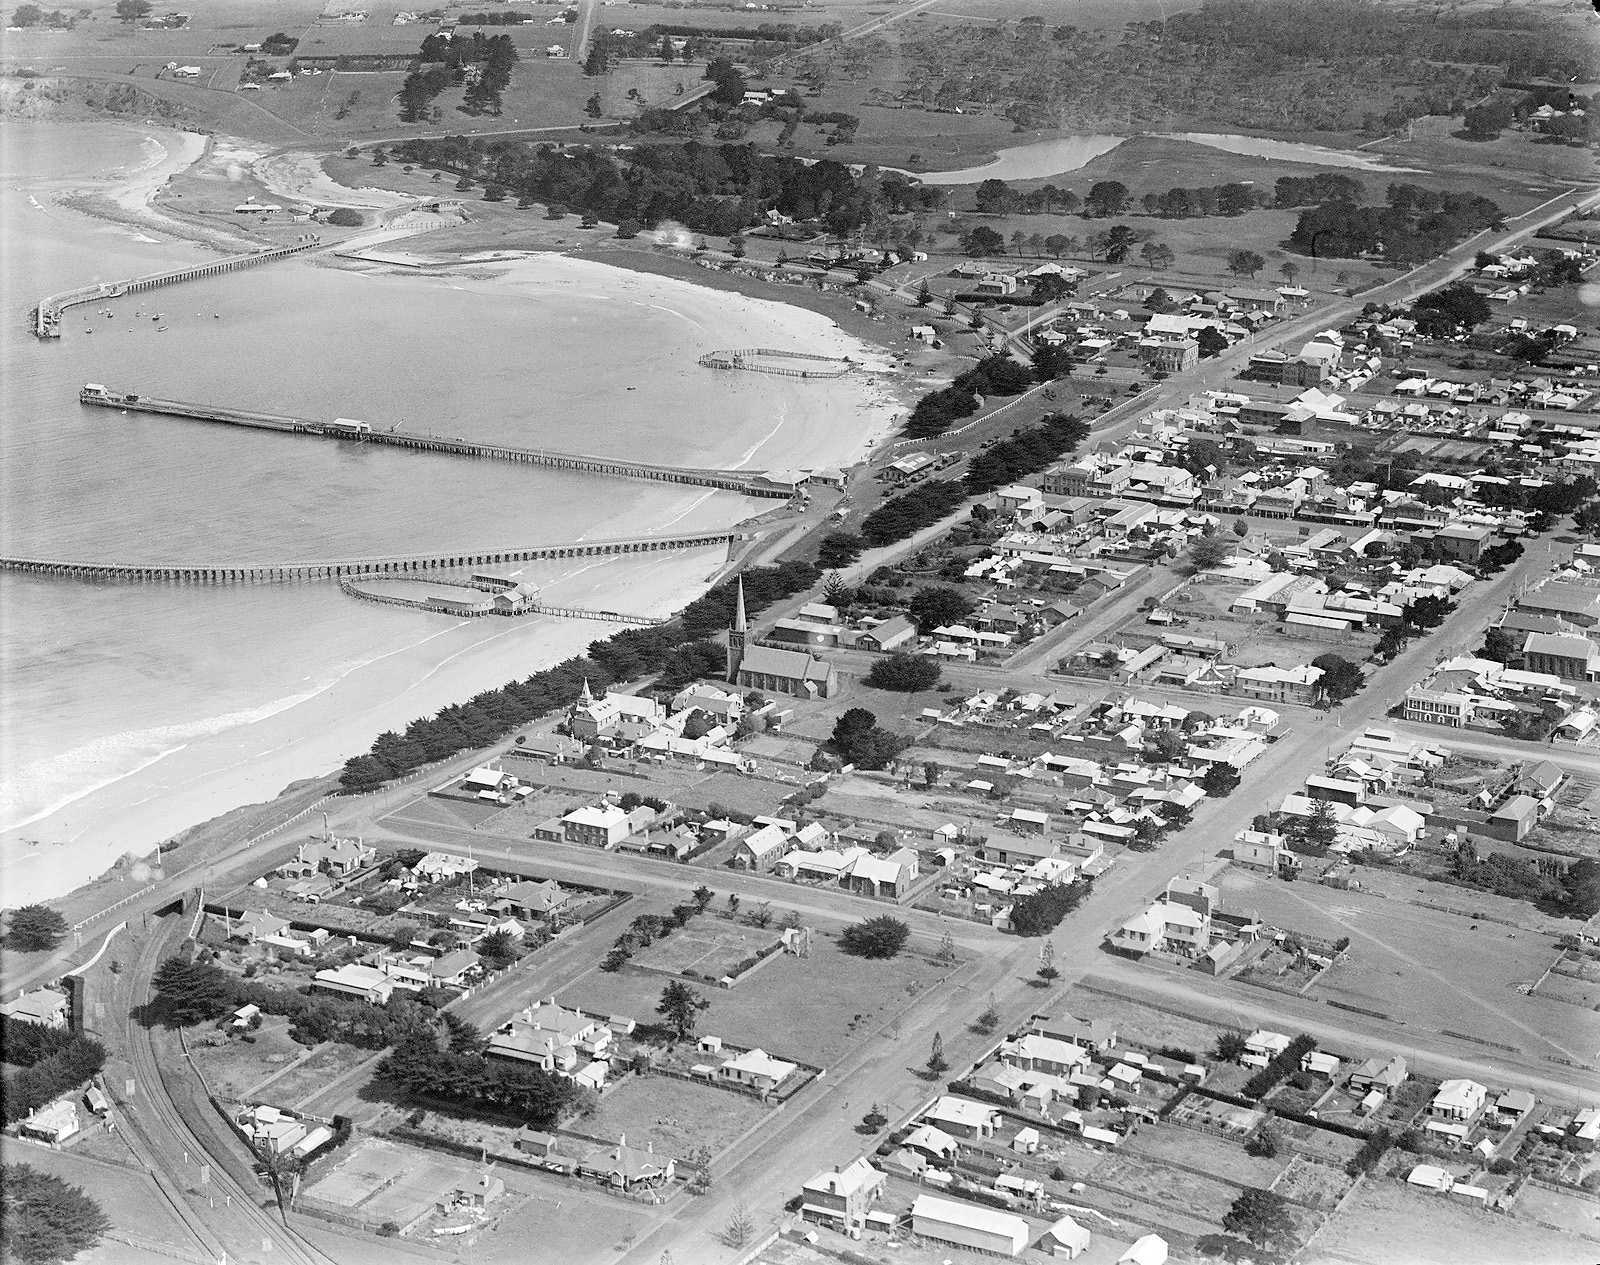
ABOVE: Aerial view of Portland. The new pier has been built (1902). In the bottom left hand corner you can see the line curving down to the water front. Just after coming under the Bentinck street bridge you can see the arrival home signal. circa 1920. (photo courtesy Daniel Pratt, SLV collection)
ABOVE: Dec 26 1960. (photo courtesy Weston Langford)
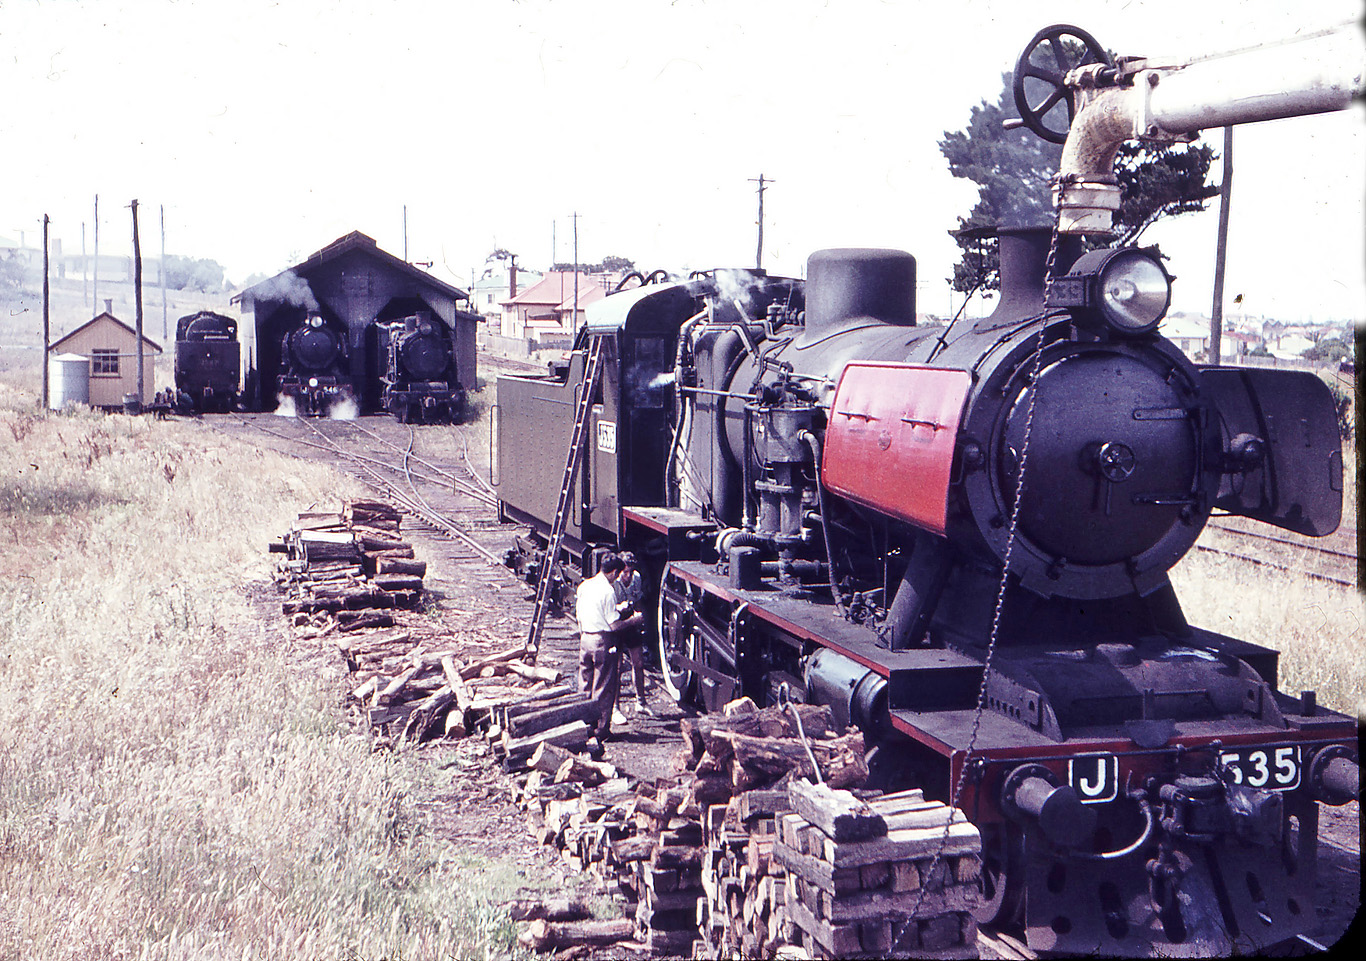
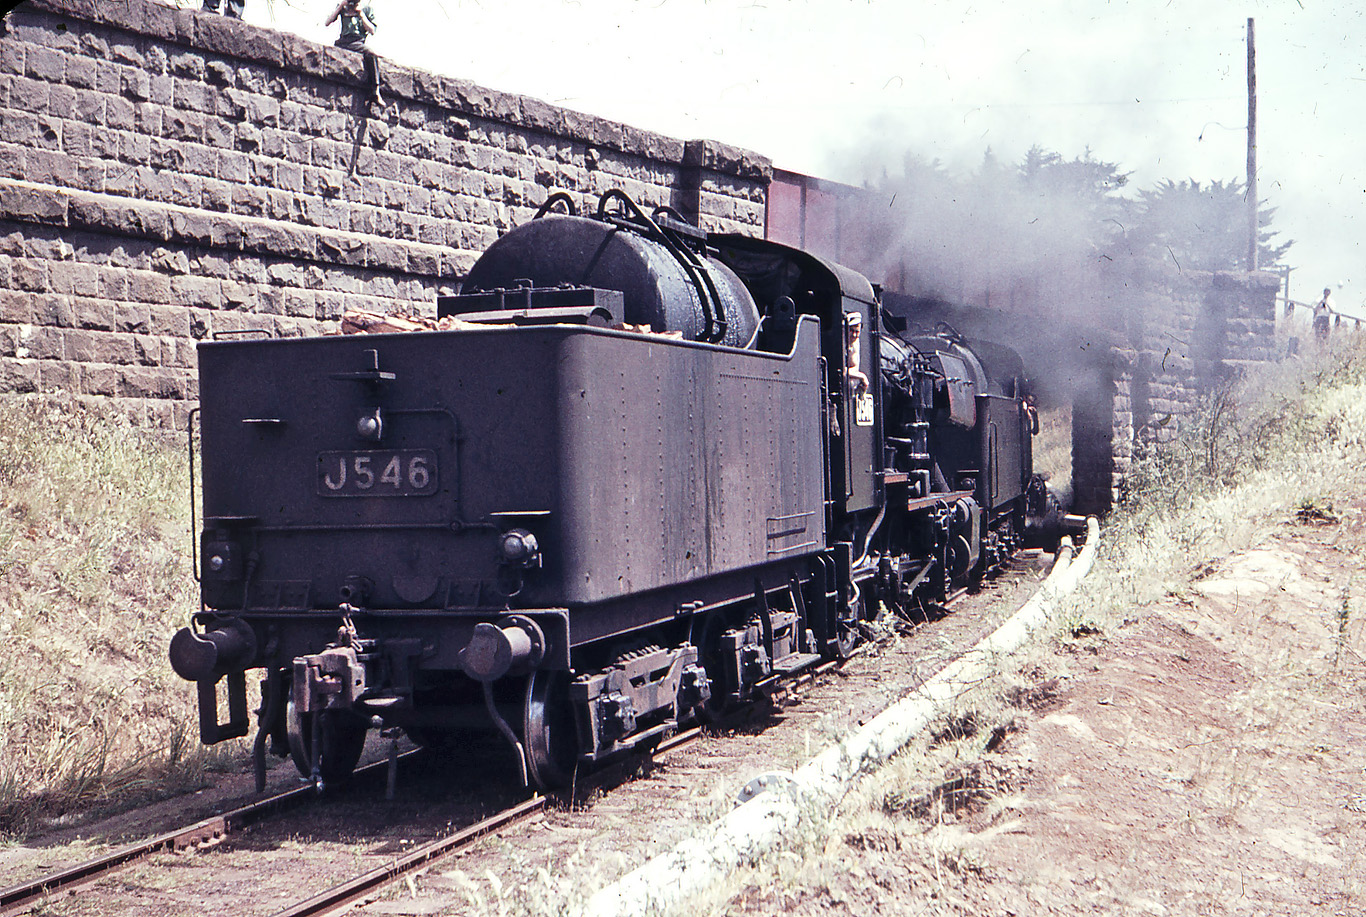
ABOVE: Trains leaving Portland encountered a stiff 1 in 39 grade as soon as they left the platform. Here we see J 535 and J 546 pulling an AREA special up the grade, Dec 1 1962. (photo courtesy Weston Langford)
ABOVE: Not long after leaving the station the track ducked under Bentinck street. At this point a train was going up a 1 in 39 grade around a tight 15 chain curve. Dec 1 1962. (photo courtesy Weston Langford)
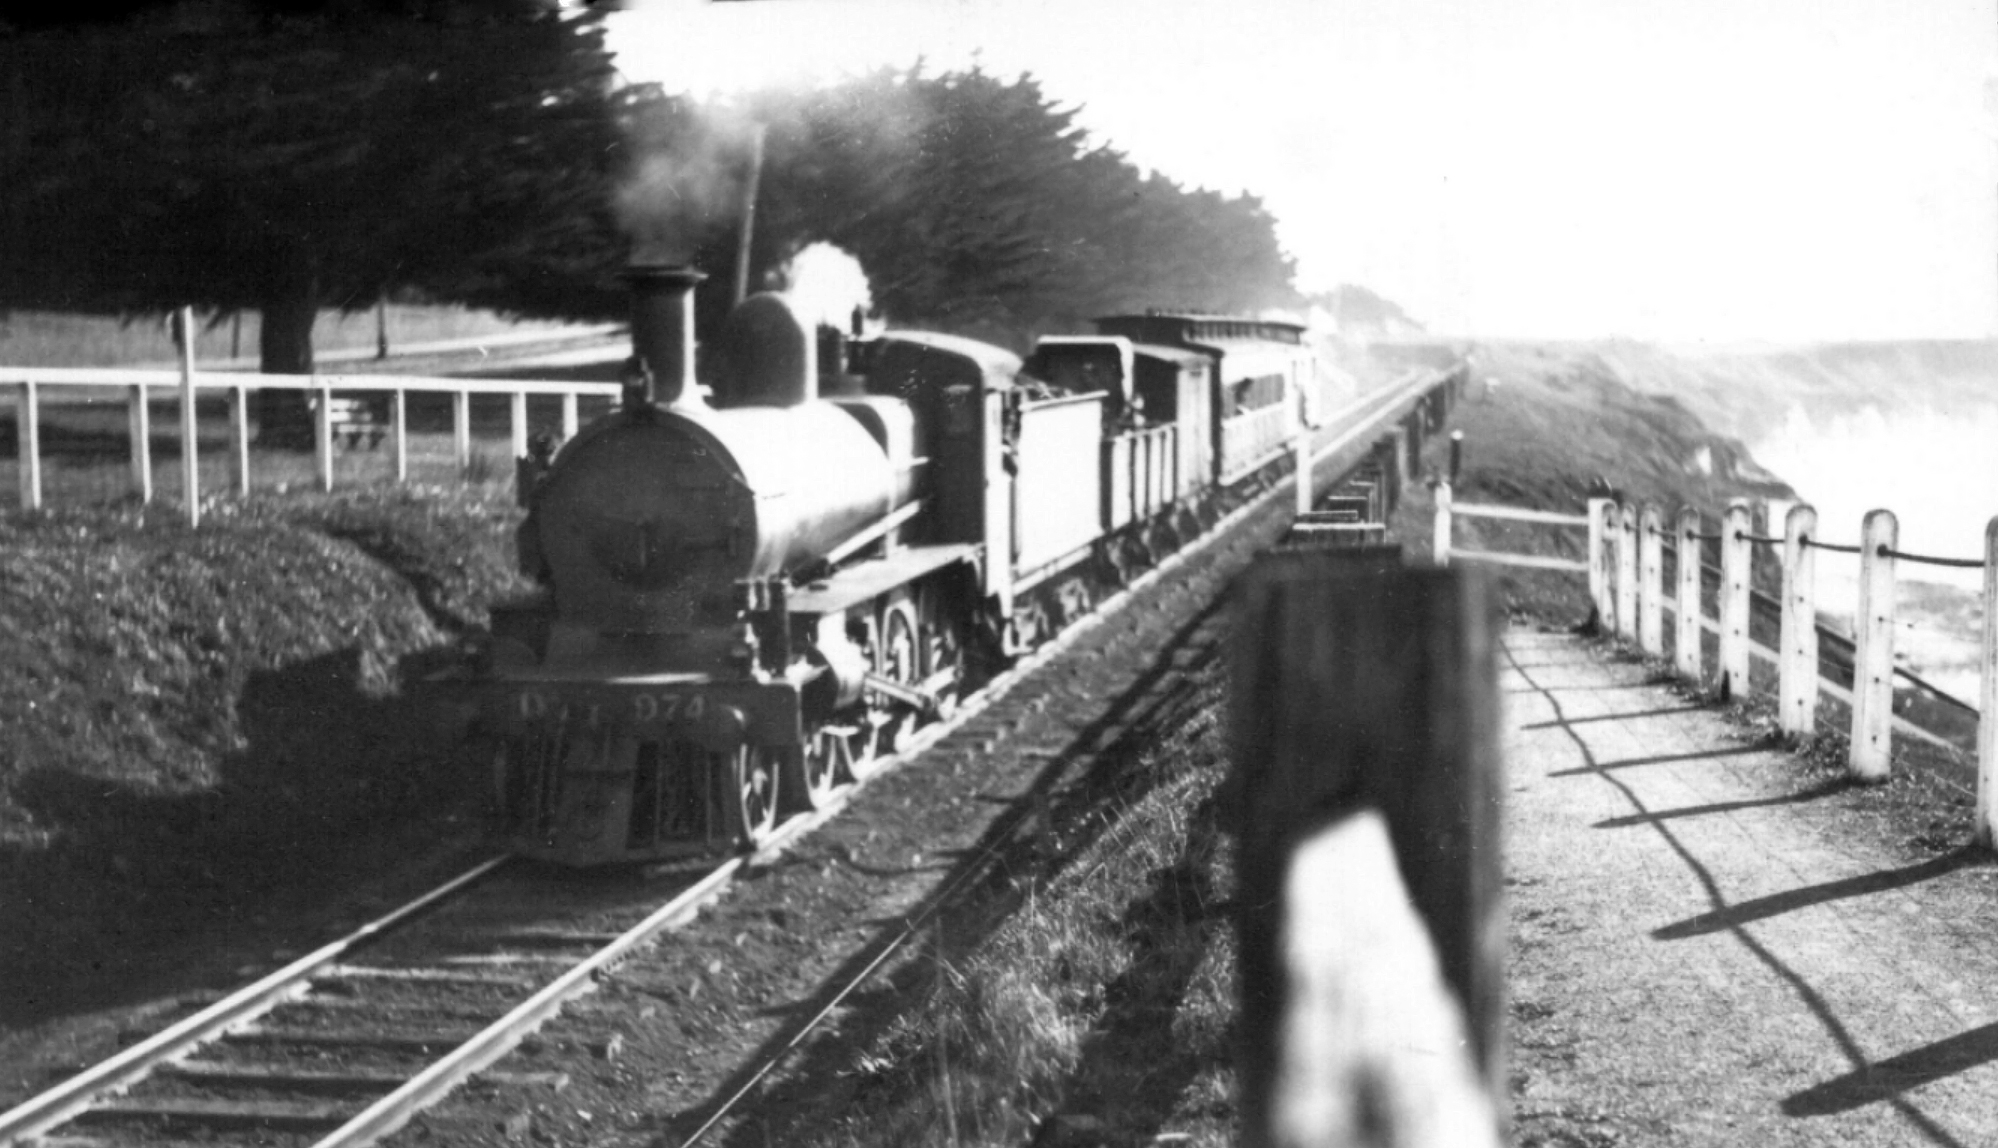
ABOVE: Loco DD 974 drops down the 1 in 39 grade to the terminus at Portland with a mixed train. The oil pipeline that later ran along the side of the railway line from the harbour to the oil tanks north of Kennedy Steet has yet to be built, dating this scene before 1925 - Vern McCallum Collection
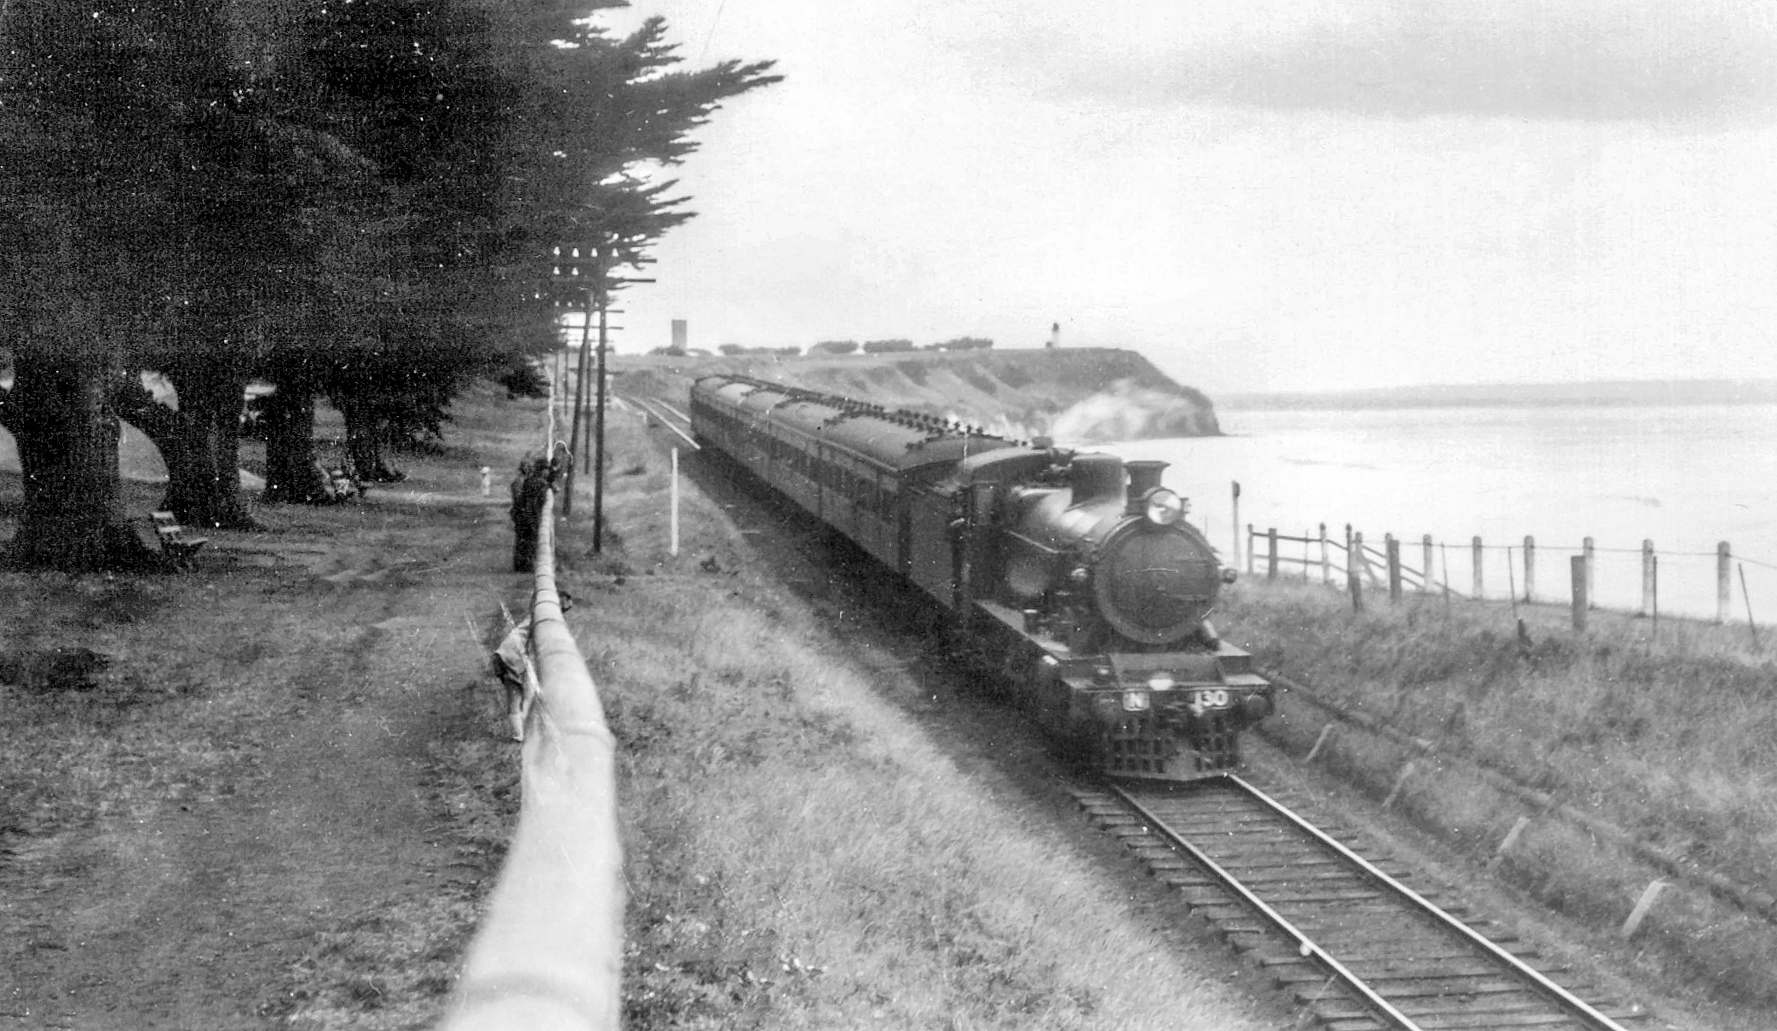
ABOVE: Loco N130 is shown with a passenger train on the 1 in 39 grade between Portland North and Portland in this image taken after 1930. It was later renumbered to N407 - Vern McCallum Collection
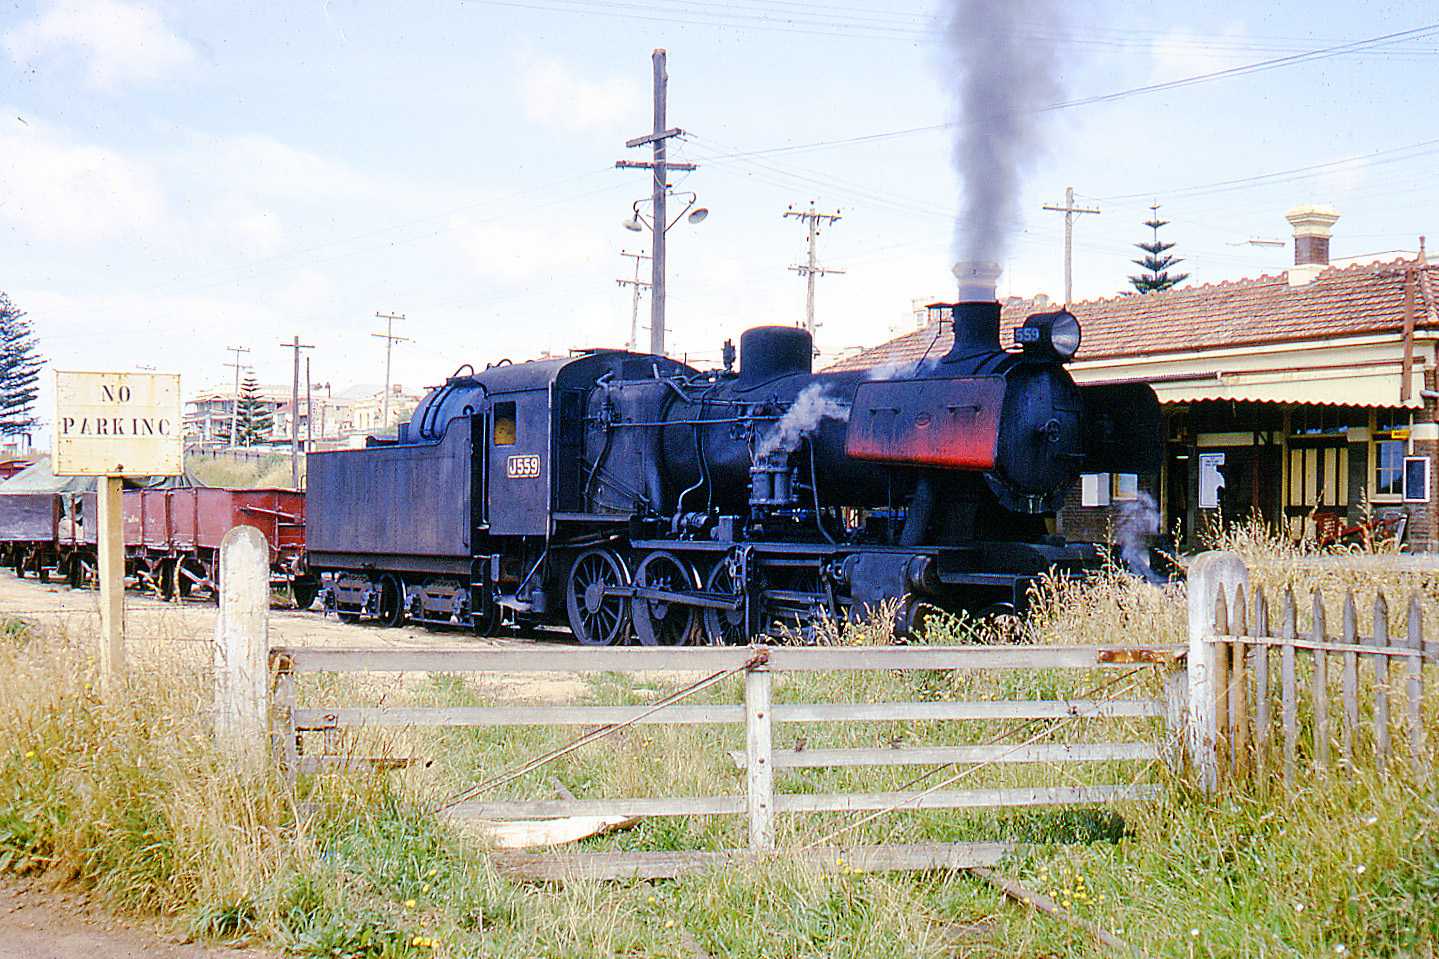
ABOVE: J 559 shunts at the old Portland station in 1963. Neville is standing on the line to the new pier. In May 1962 J 559 caught fire at Murtoa which resulted in a visit to Ballarat workshops to straighten out metal components buckled in the fire. J 559 was the very last steam loco delivered to the VR (photo courtesy Neville Gee)
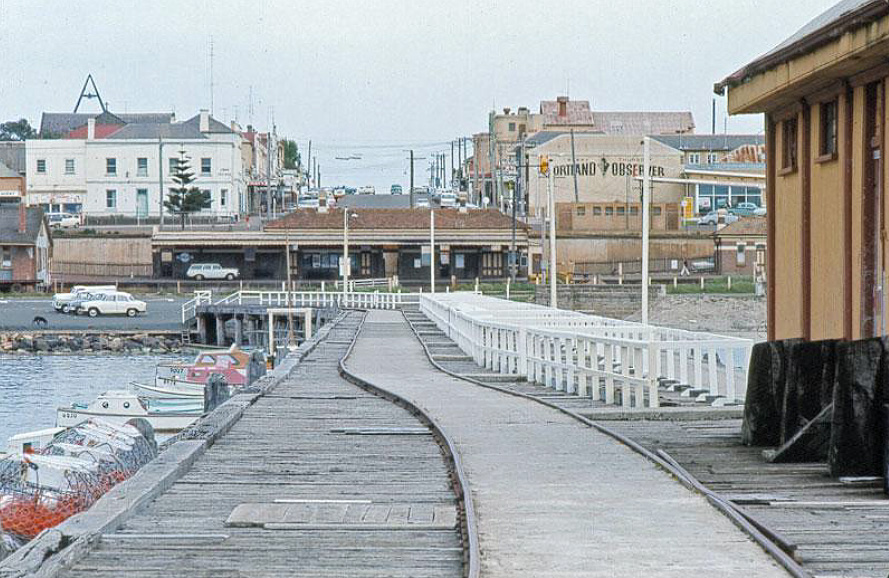
ABOVE: The view from the old pier looking back to old Portland station, the bi-directional derail is interesting. As can be seen, the connection to the yard has been removed. The Weekly Notice says that this connection was dismantled June 1957. (date and photographer unknown)
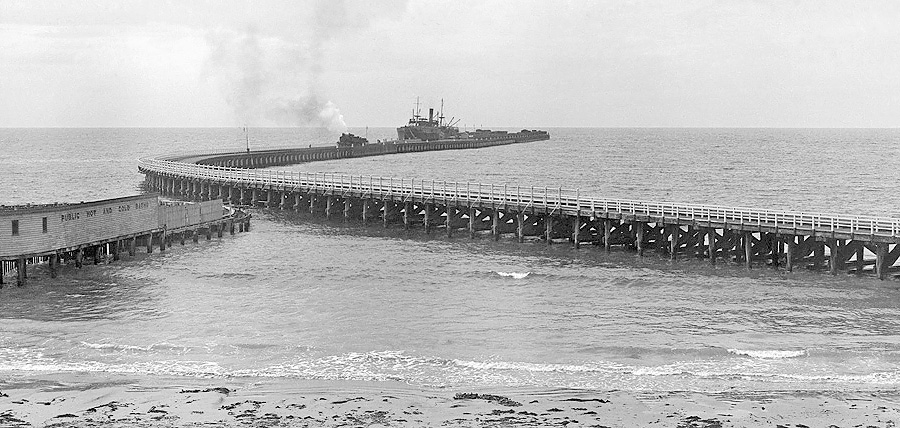
ABOVE: Undated photo of the deepwater pier with a loco on it.
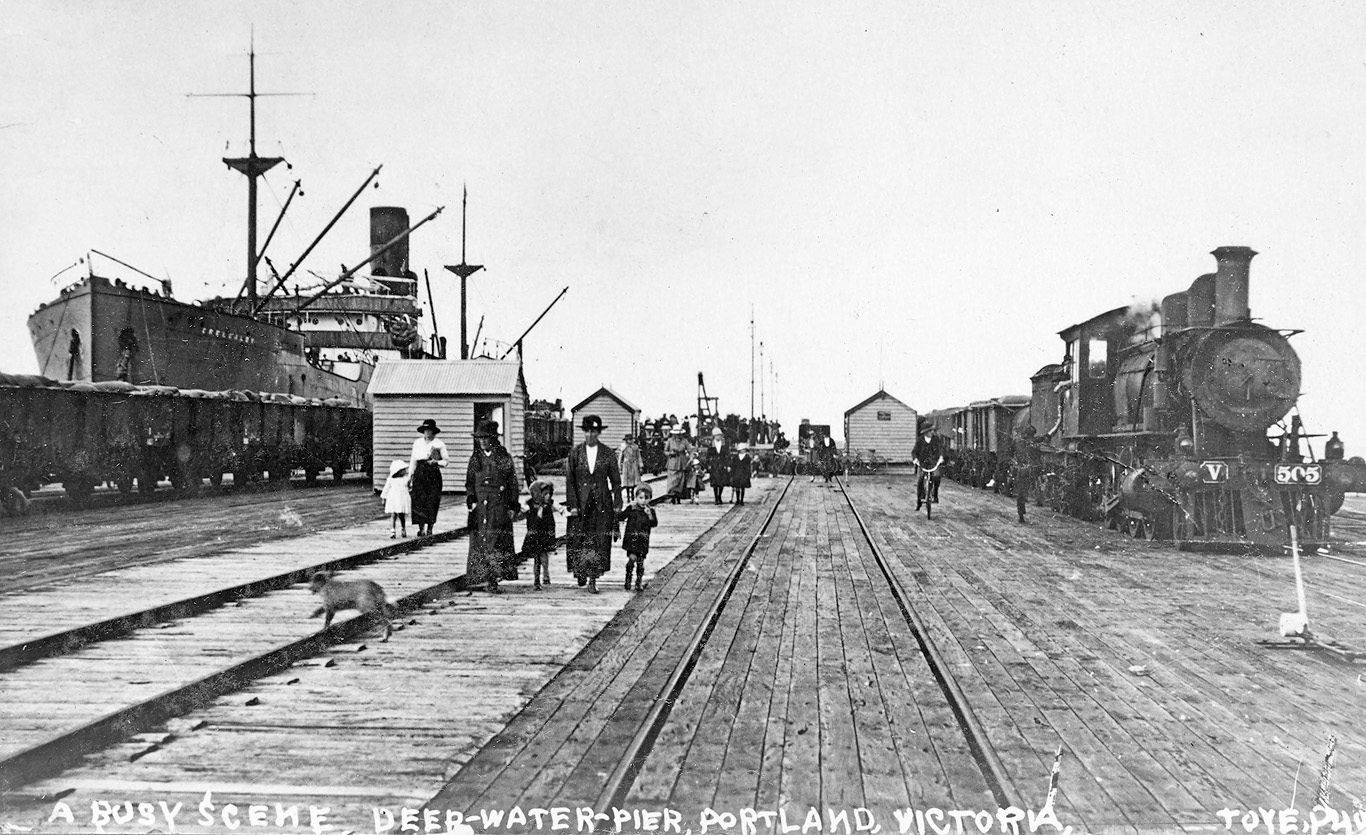
ABOVE: V 505 shunts wagons on the new pier at Portland, circa 1920. (photo courtesy SLV collection)
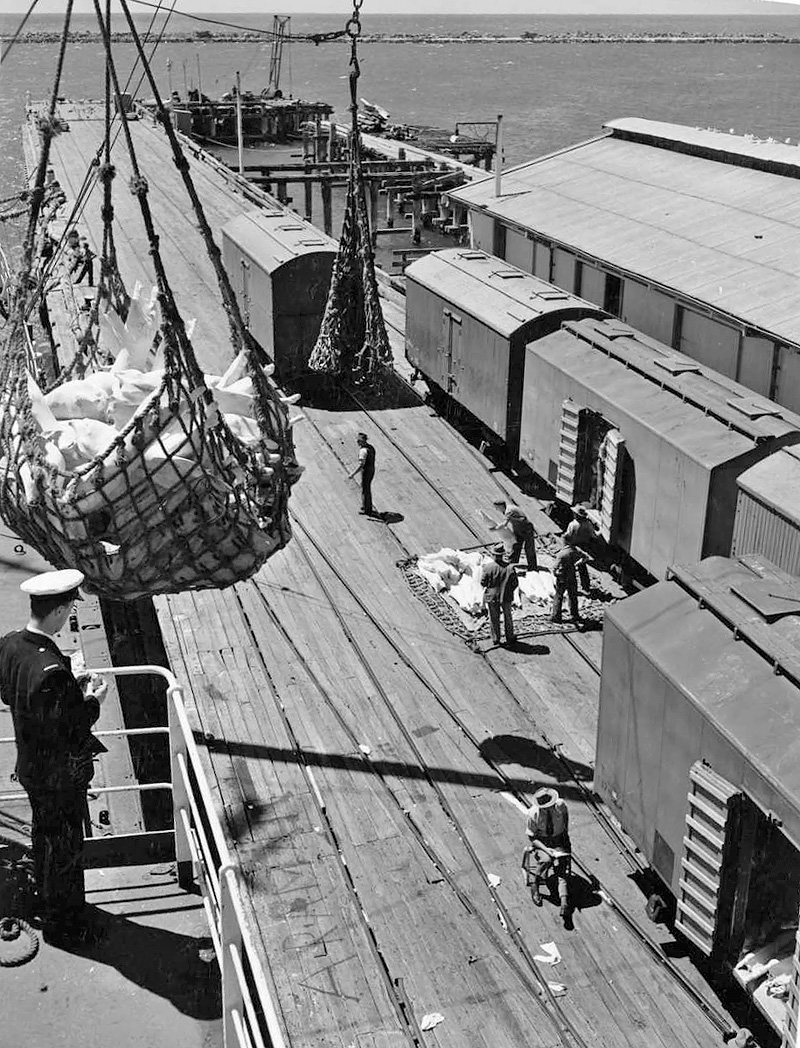
ABOVE: T vans that had ben loaded with carcasses at the Thomas Borthwick & Sons siding near Portland North are unloaded onto the new pier and loaded onto the ship "Pipriki" for export. 1957. (photo by Neil Murray and courtesy National Library of Australia)
ABOVE: This photo is a close up of the photo below but from a different source. It shows the connection from No. 3 road to the new deepwater pier that was opened May 1902. The track to the old pier curves around behind the goods shed.

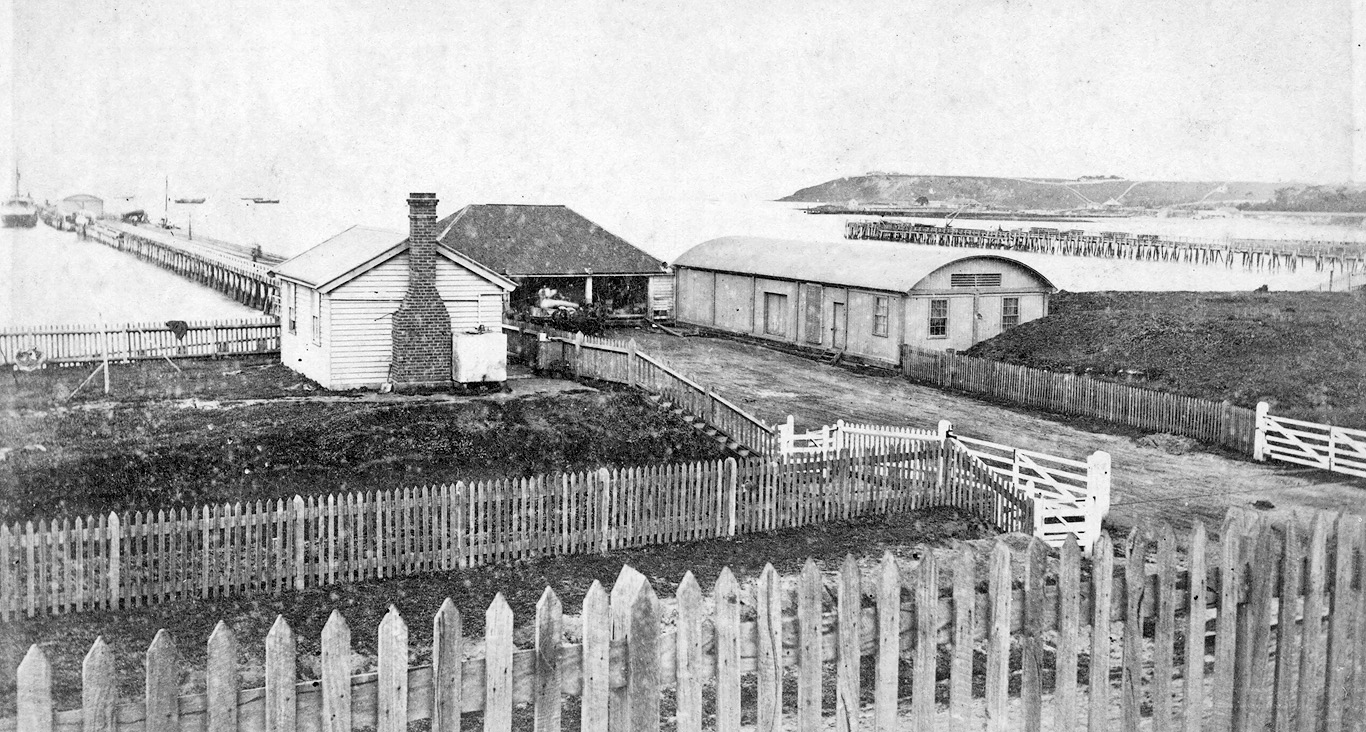
ABOVE & BELOW: Old Portland terminated at a dead end cutting which is below the fence the two men are leaning against. These two views are looking north. A train departing Portland would be going away from the photographer. Circa 1910? I would welcome a car expert dating the car in the photo below.
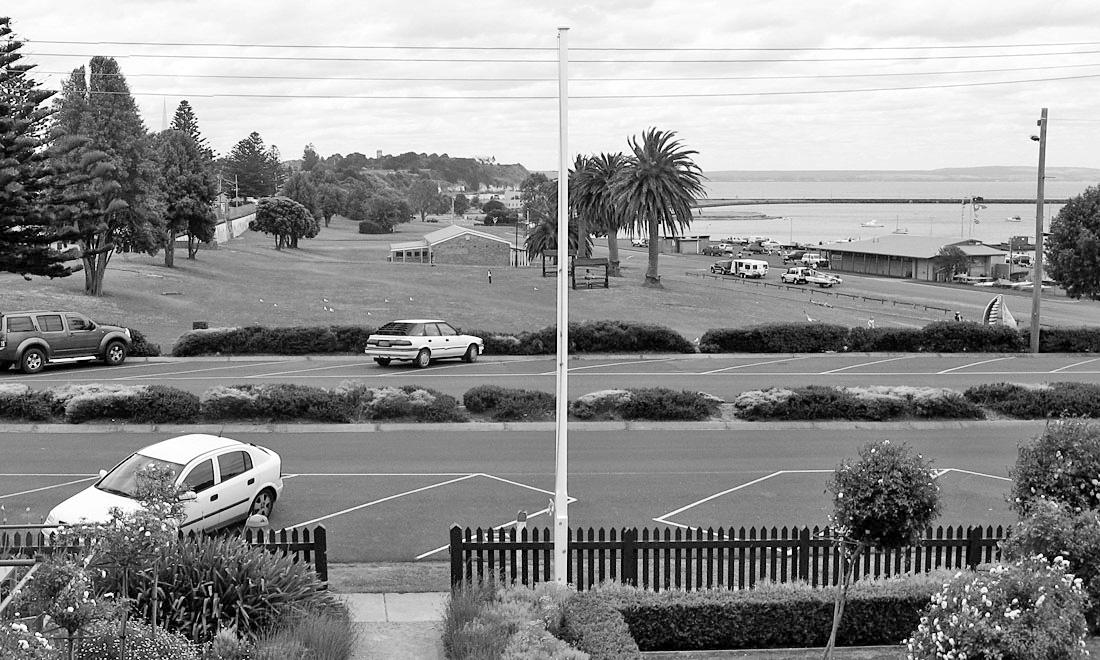
BELOW: Modern day view of the same scene as above. Nov 2008.
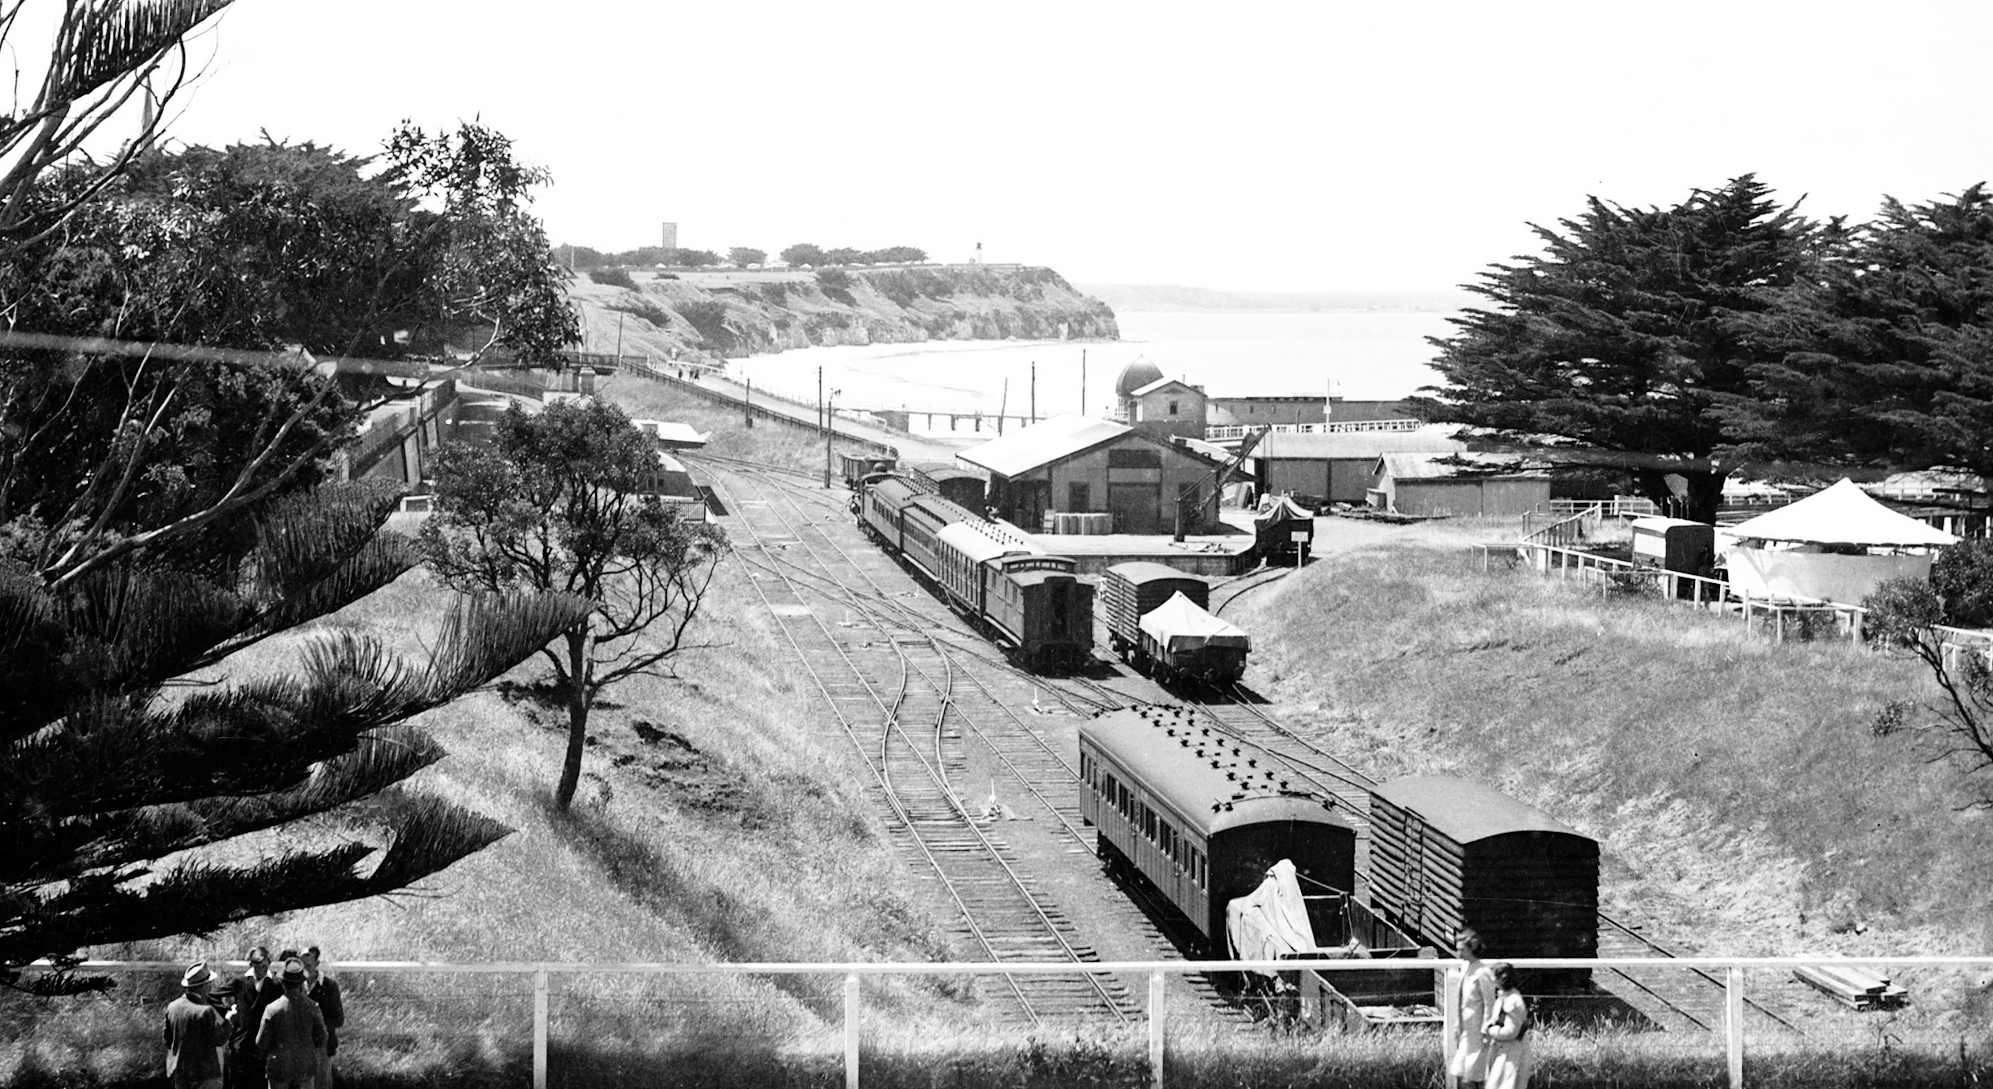
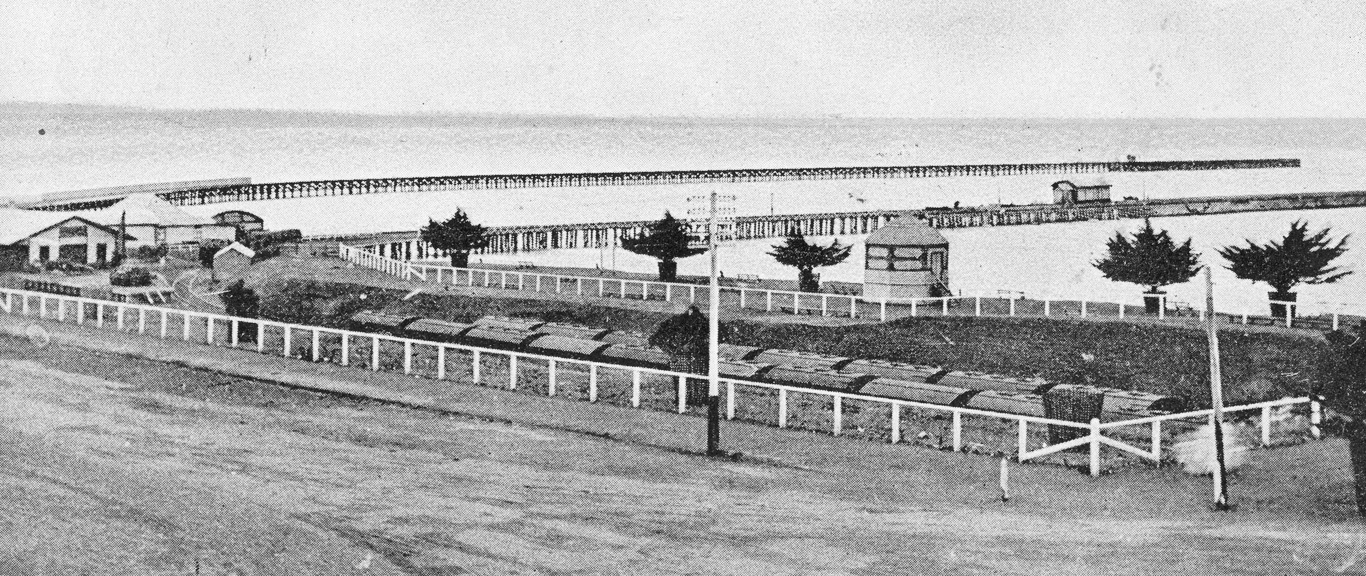
ABOVE: Undated view looking out to the old pier. Judging by the track layout, this photo must have been taken before the yard was enlarged and altered to accomodate the line to the new pier which opened in 1902.
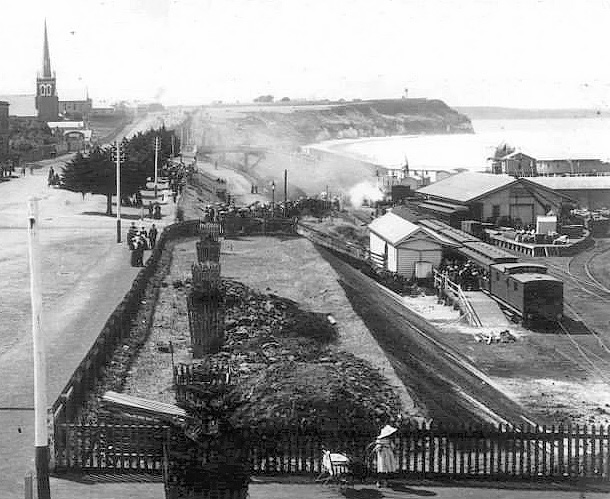
ABOVE: This photo shows Portland prior to the new station and yard re-arrangement that occured in 1902.
ABOVE: Undated view of Portland, Vern McCallum Collection
ABOVE: Undated view, probably 1920s, showing the line coming down the hill into the station with interesting crossing path and gates next to the line. (Rose postcard)
ABOVE: Poor quality photo but I've included it to show the 18 T vans in the Portland yard, possibly being temporarily stored due to there being no ships at the pier. circa 1909. (SLV collection)
