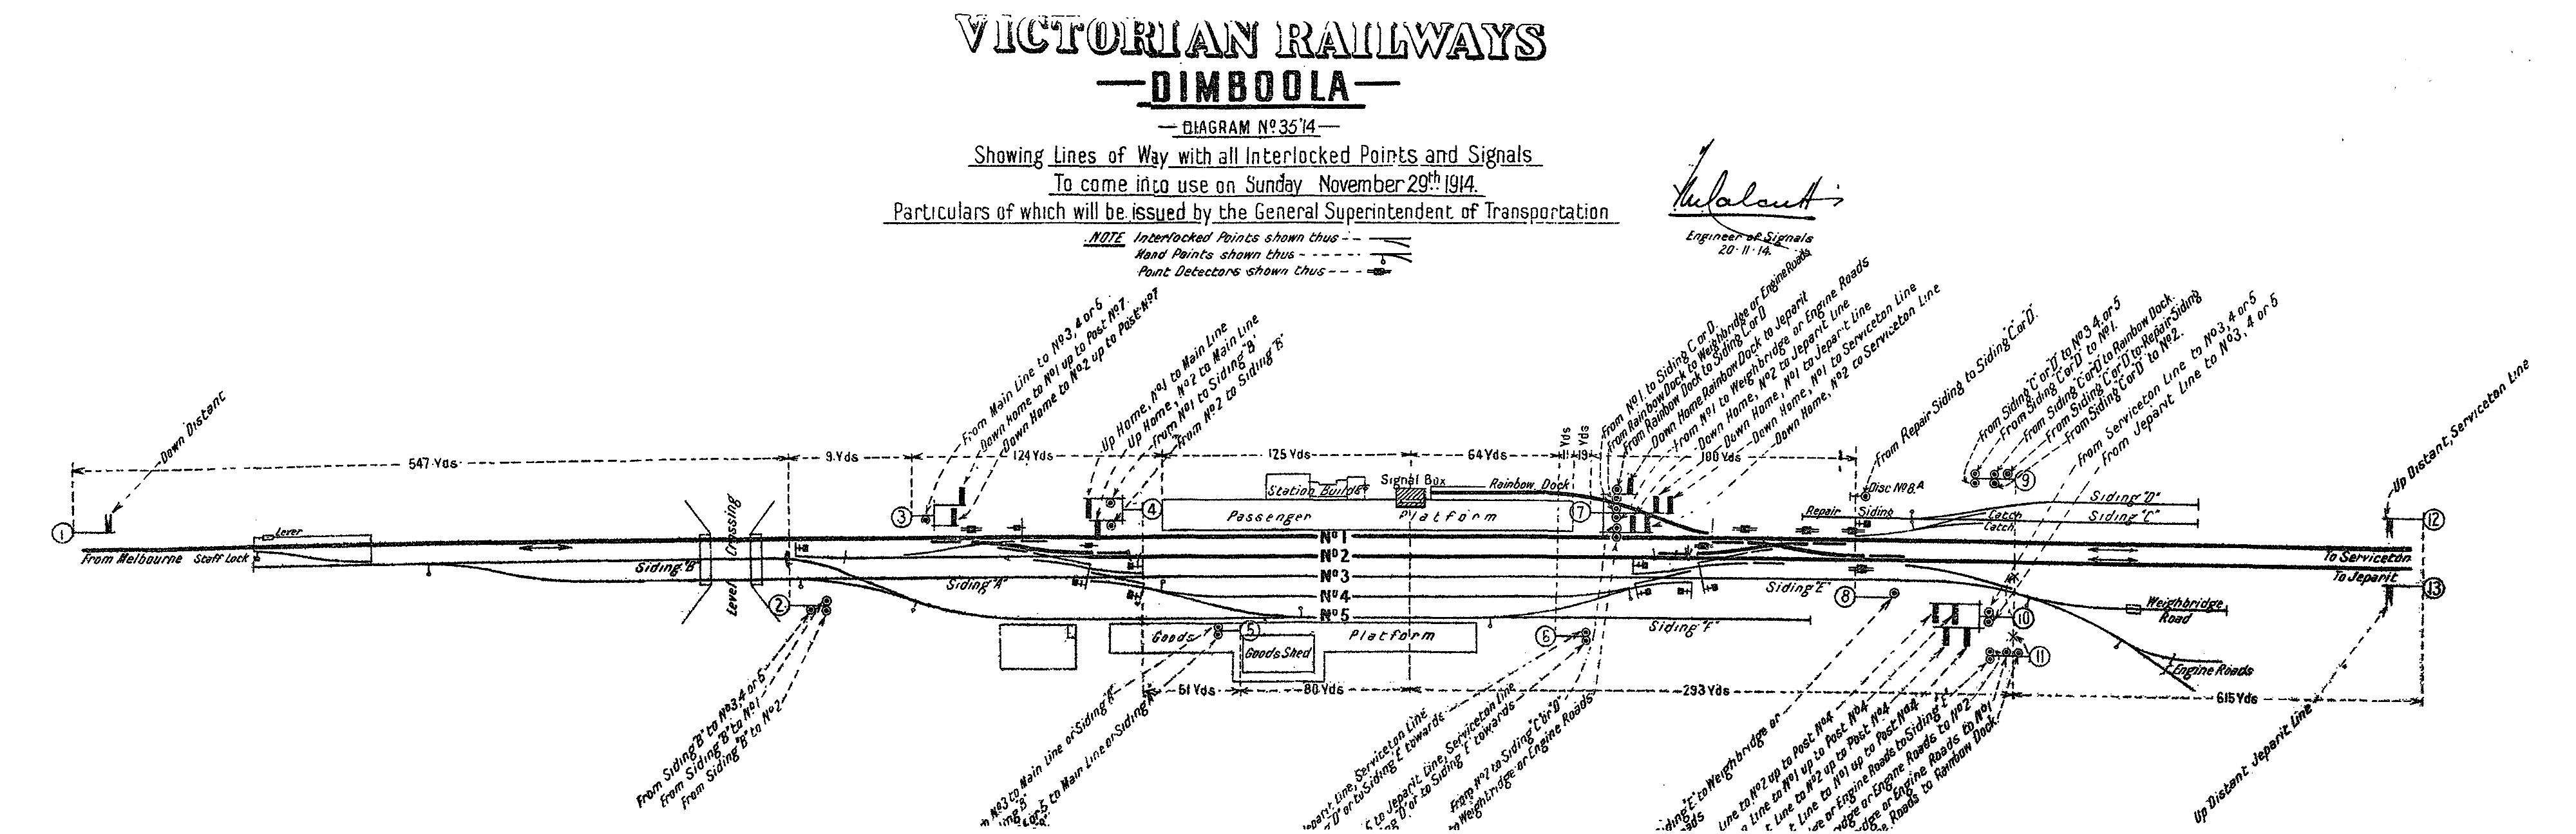
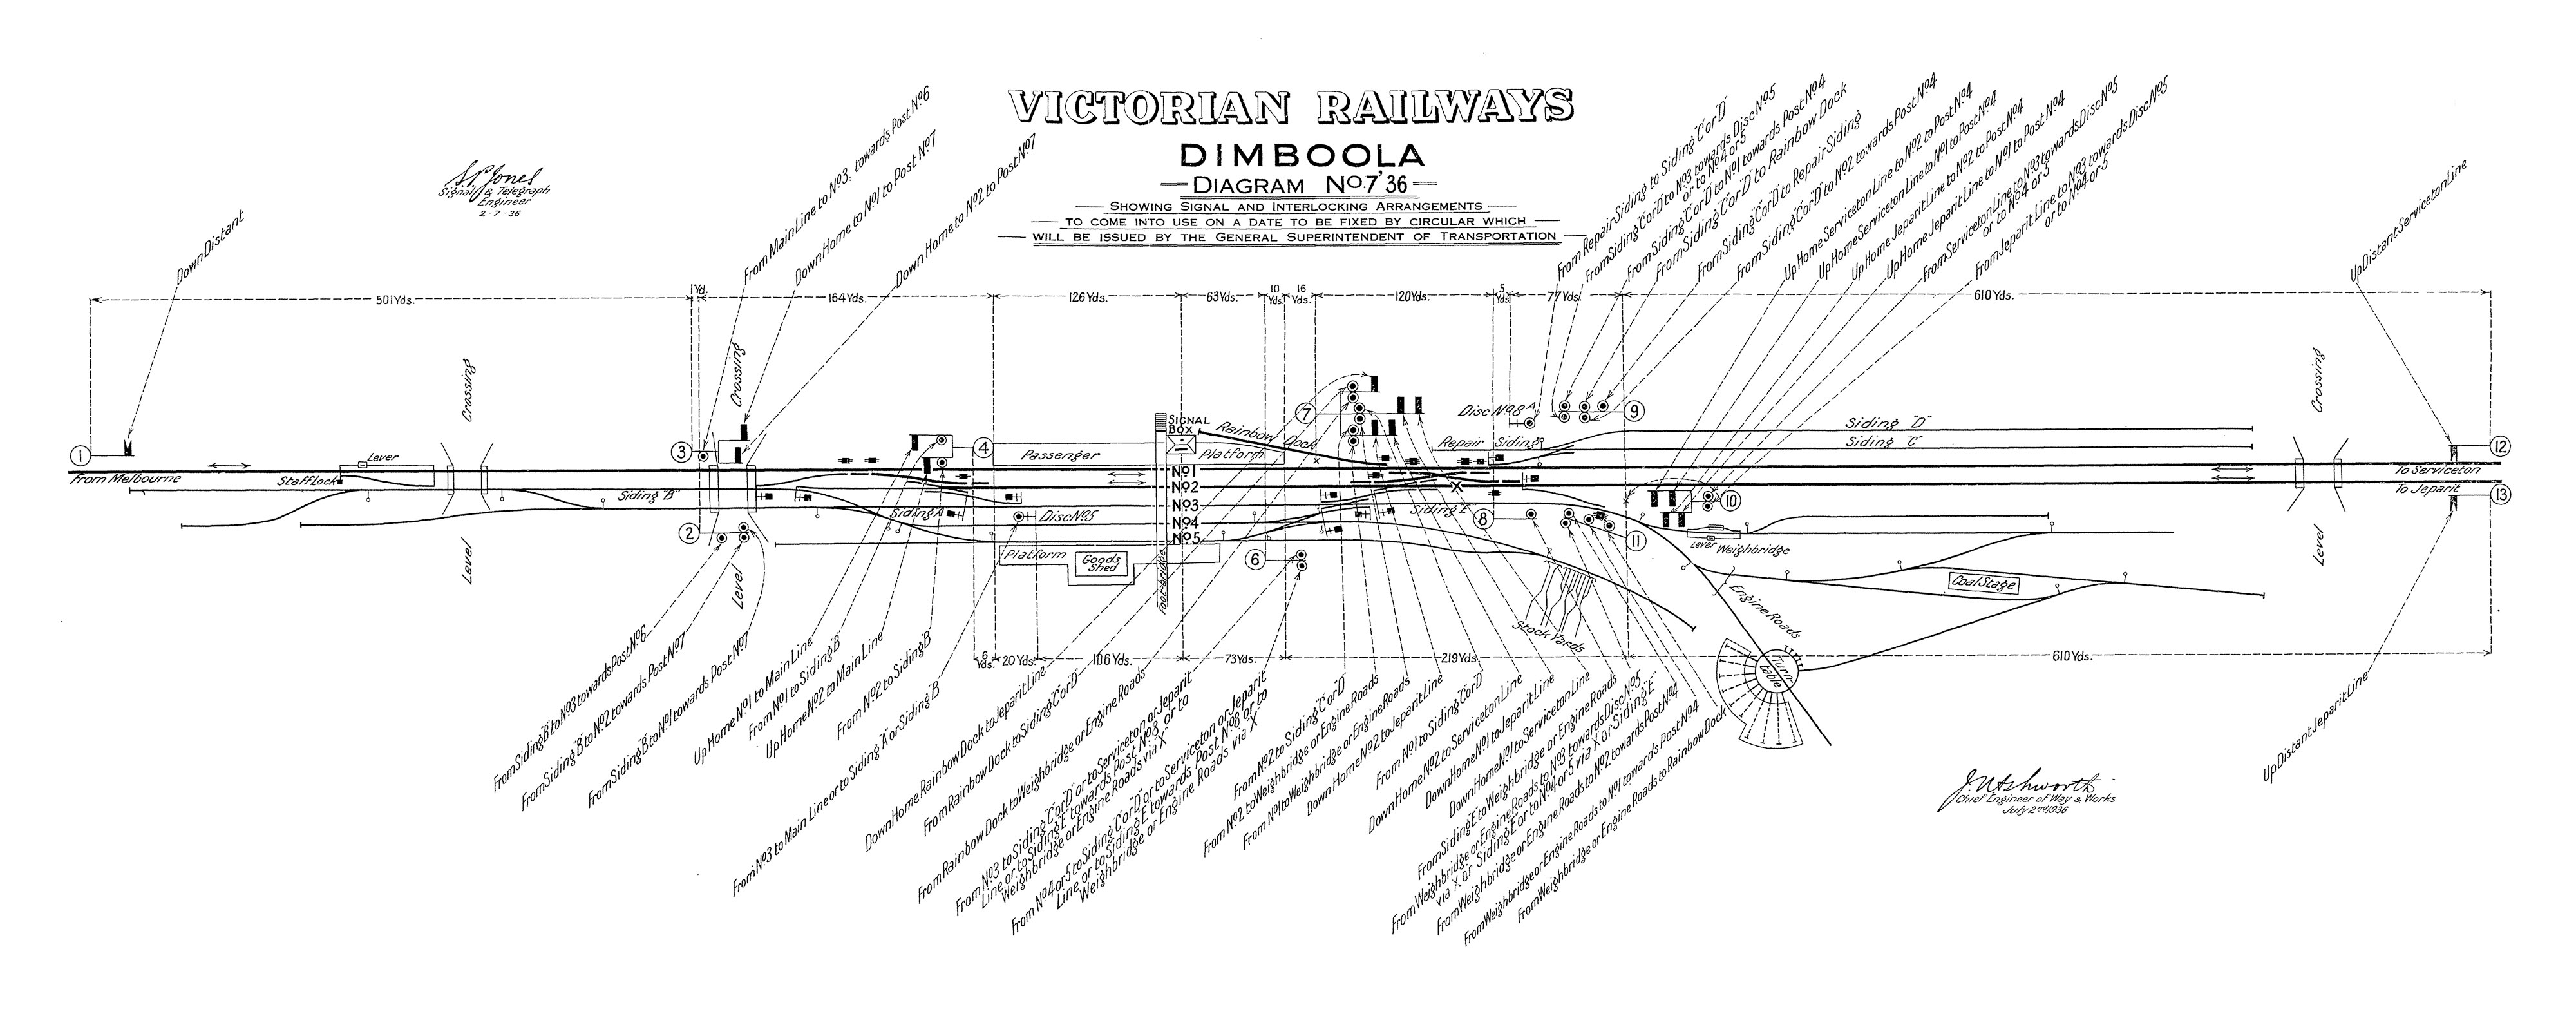
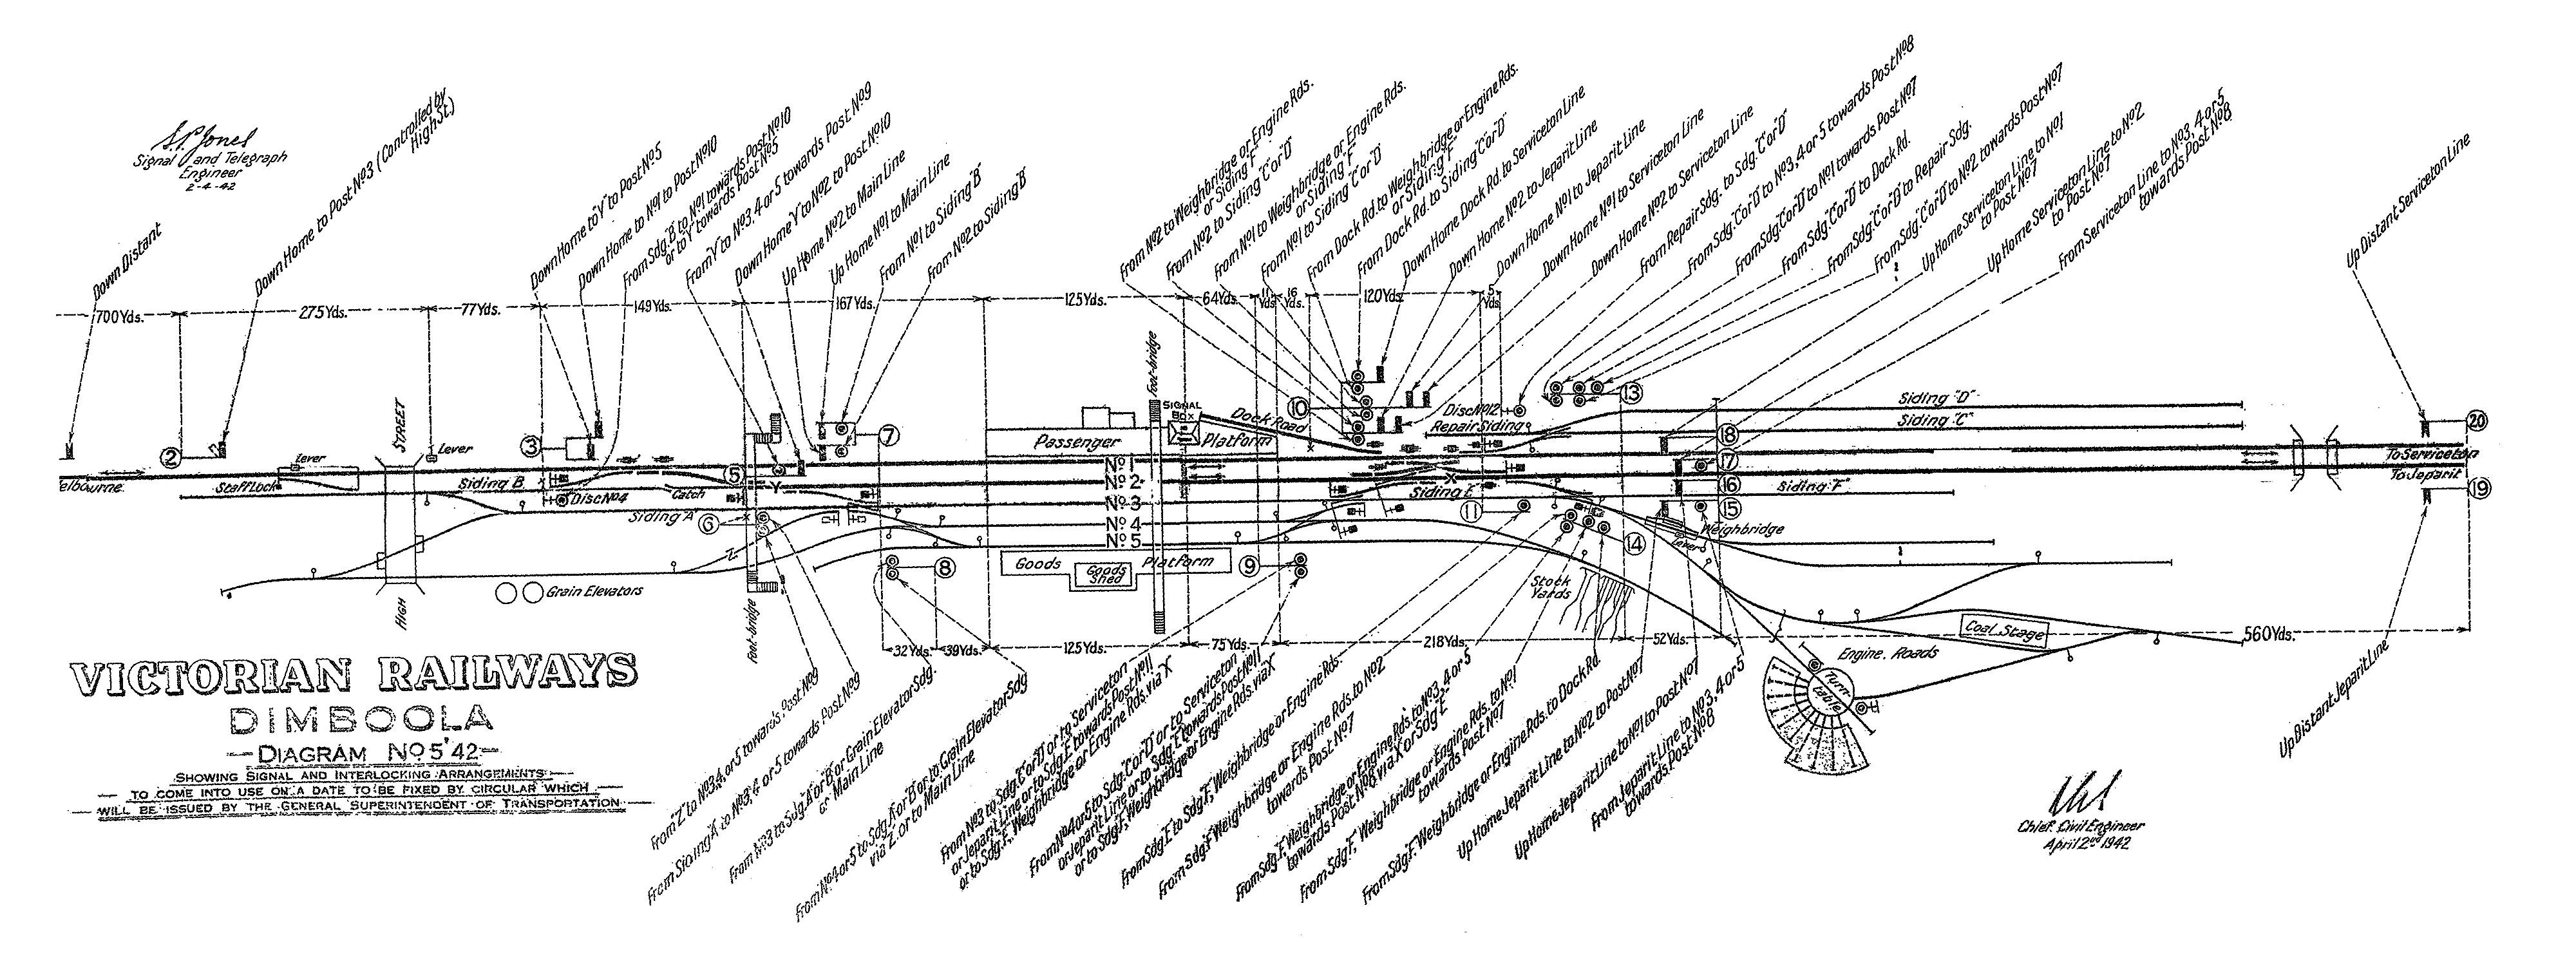
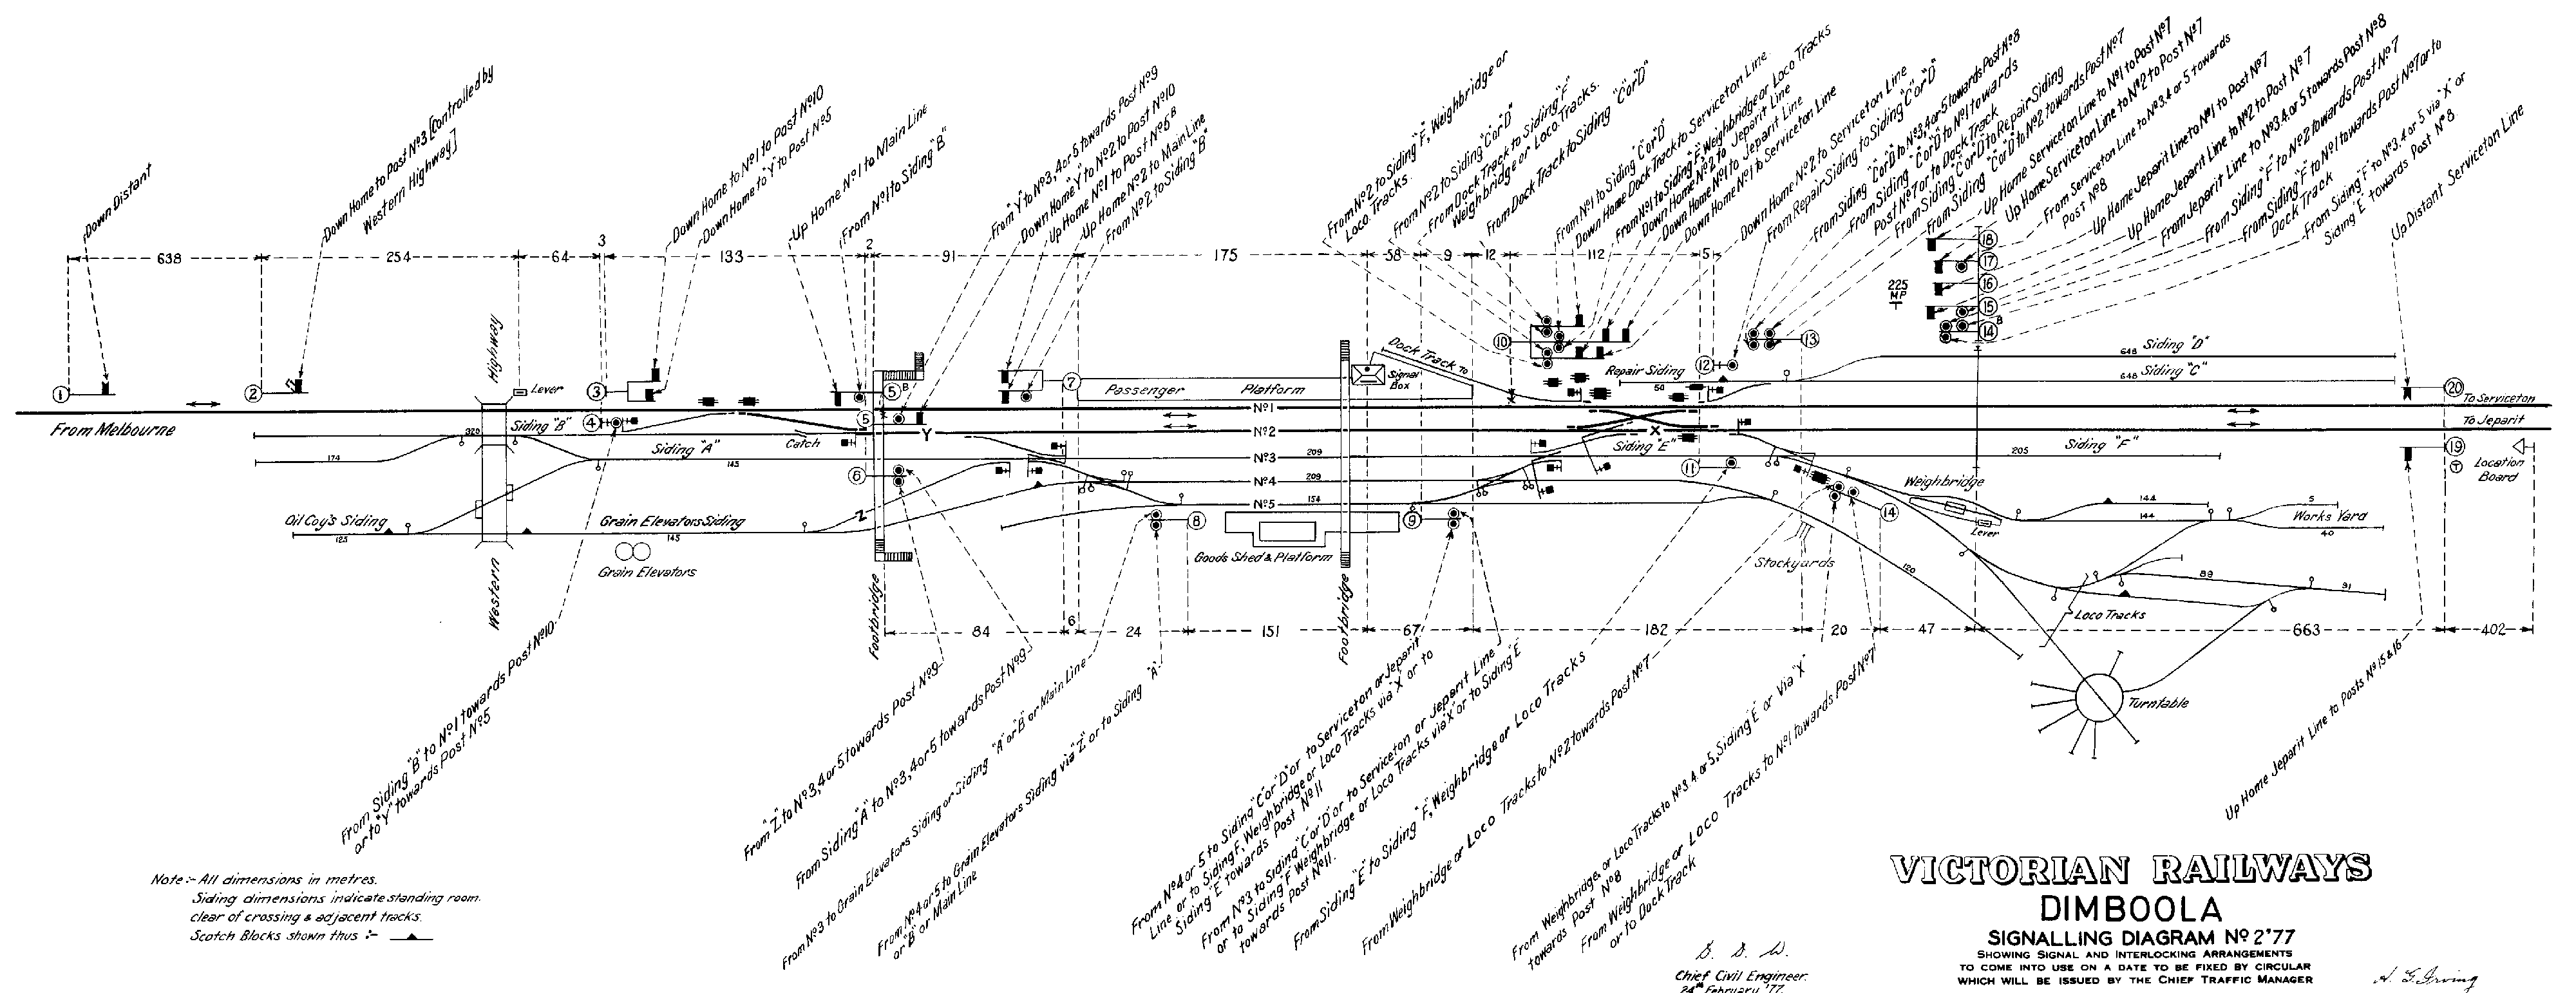
Dimboola - Serviceton

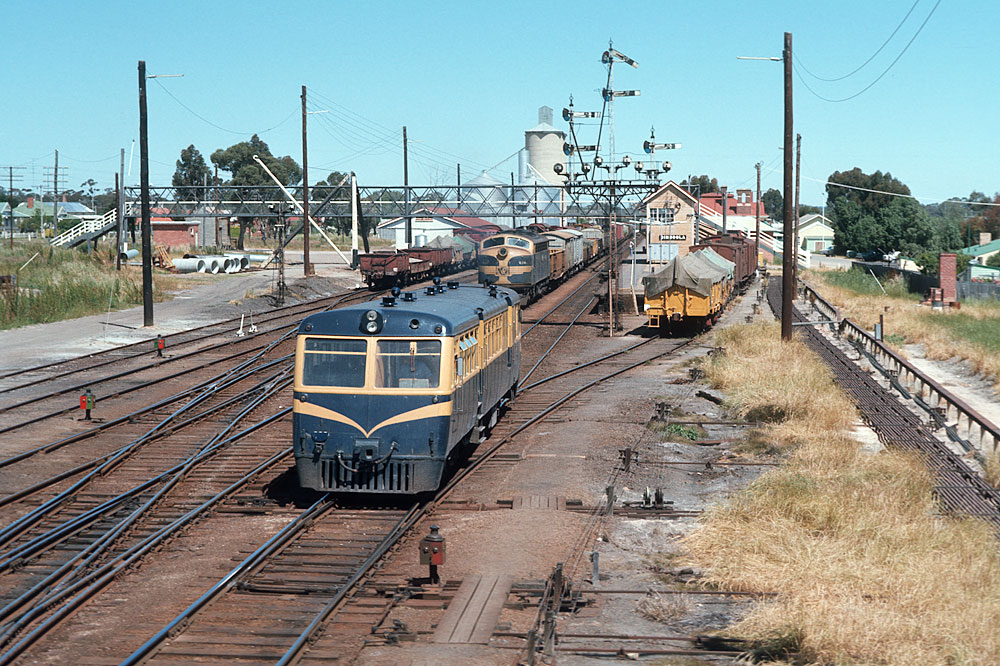
ABOVE: The Horsham to Serviceton Walker railcar departs Dimboola in the afternoon sunshine as B 74 waits to follow on a down goods. 1974. (photo courtesy Trevor Penn)
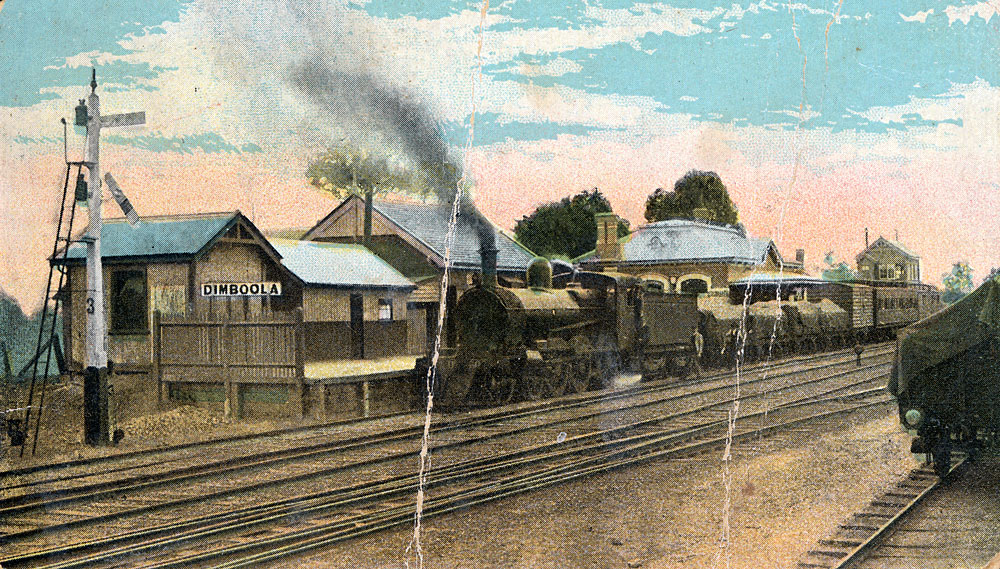
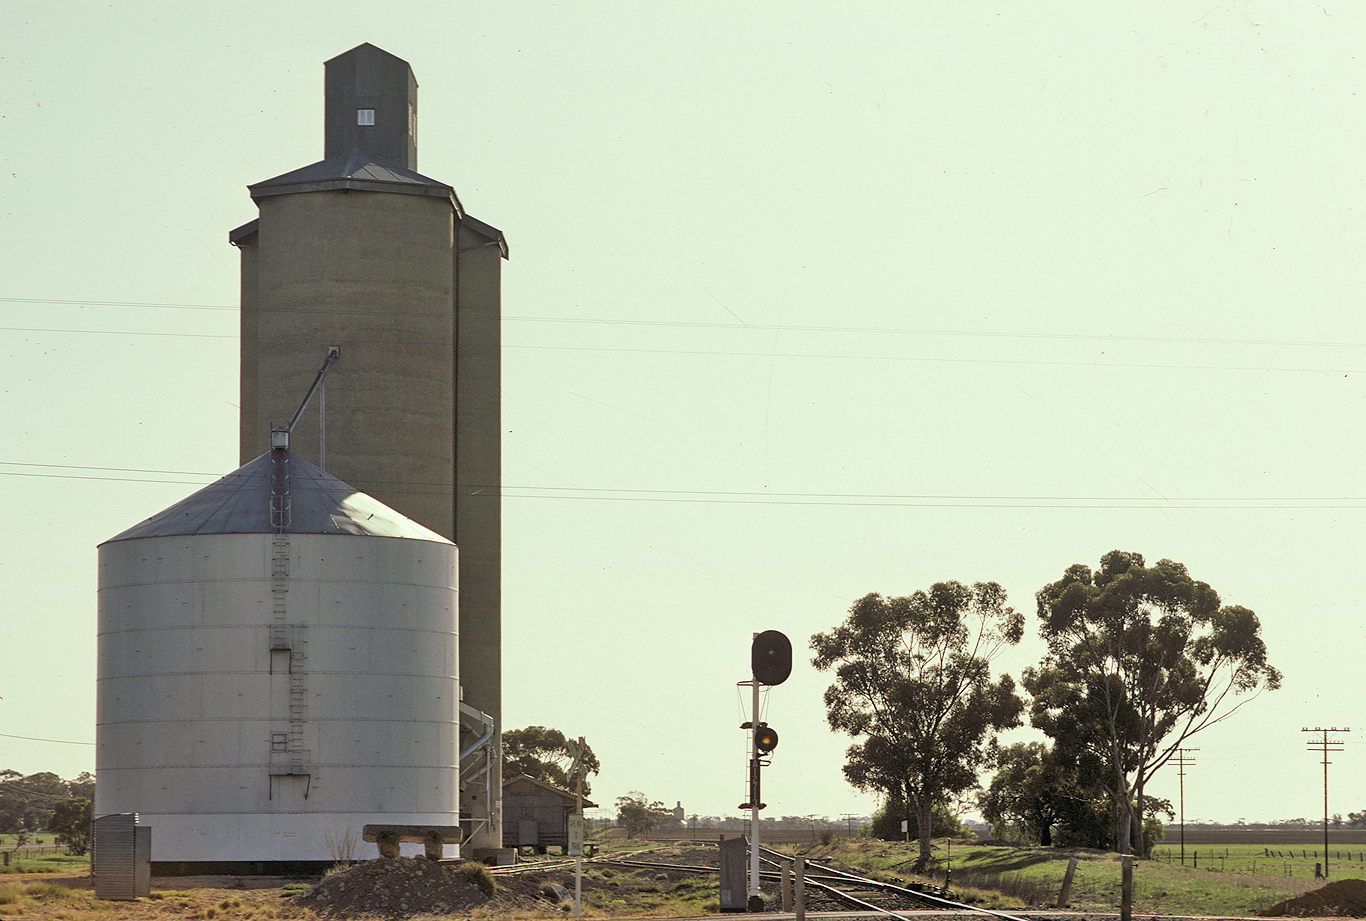
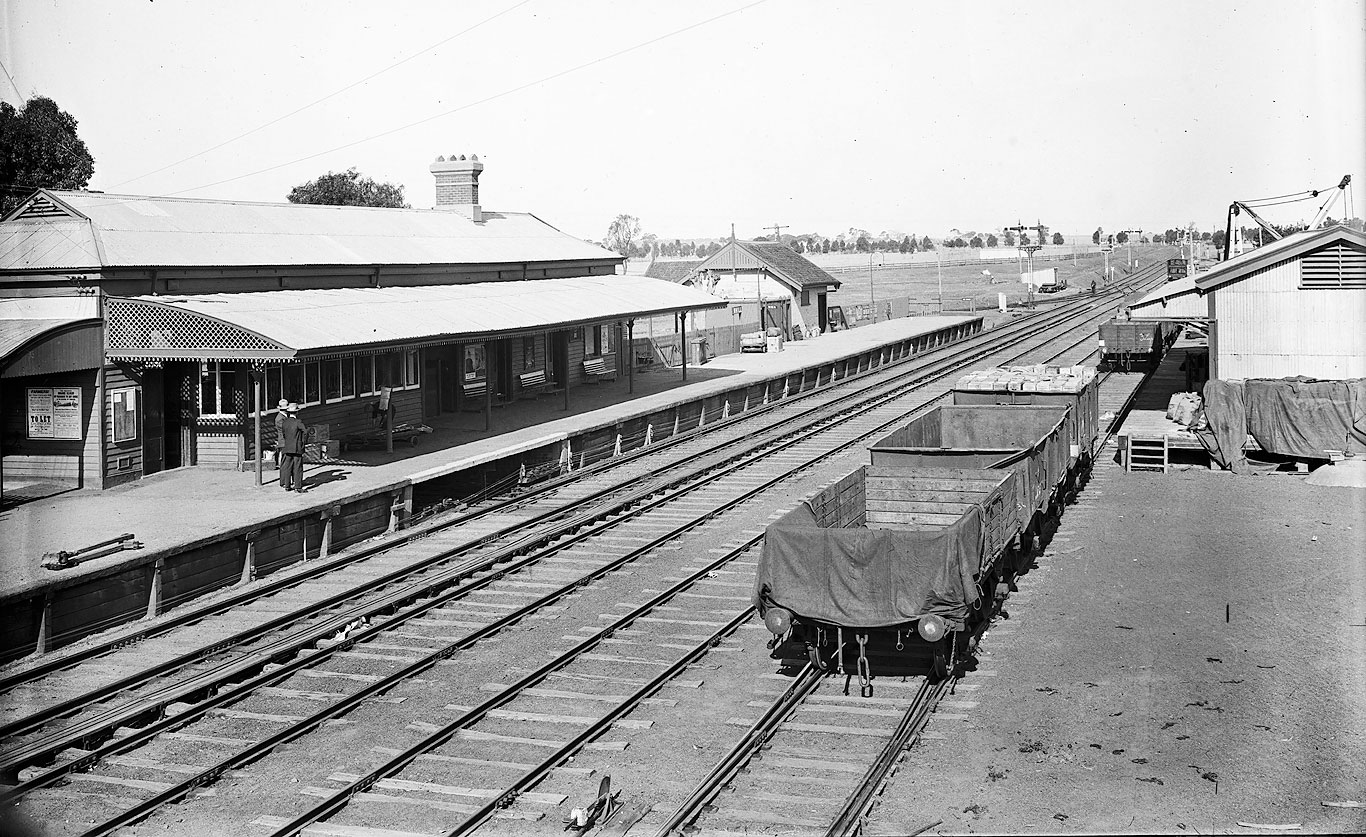
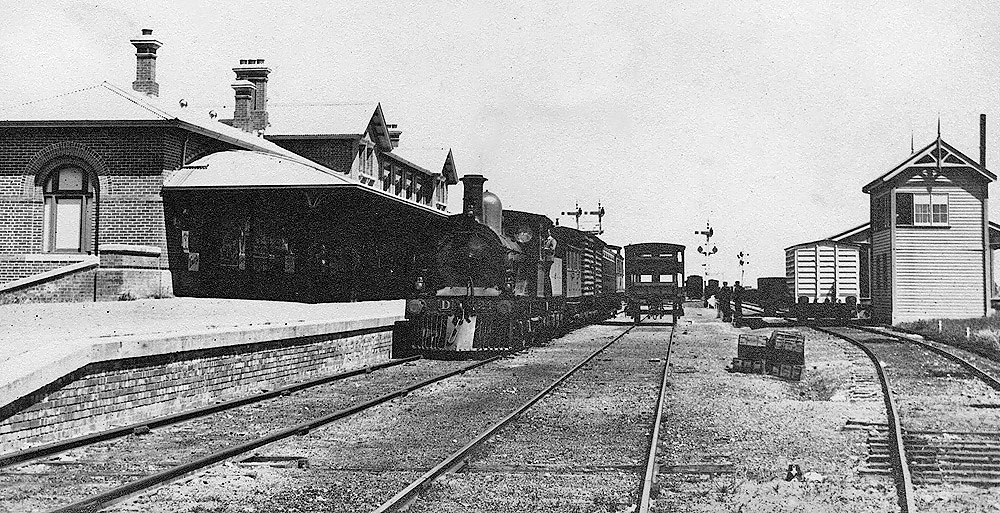
ABOVE: An up mixed train prepares to depart Dimboola circa 1910 (photo courtesy State Library of Victoria collection)
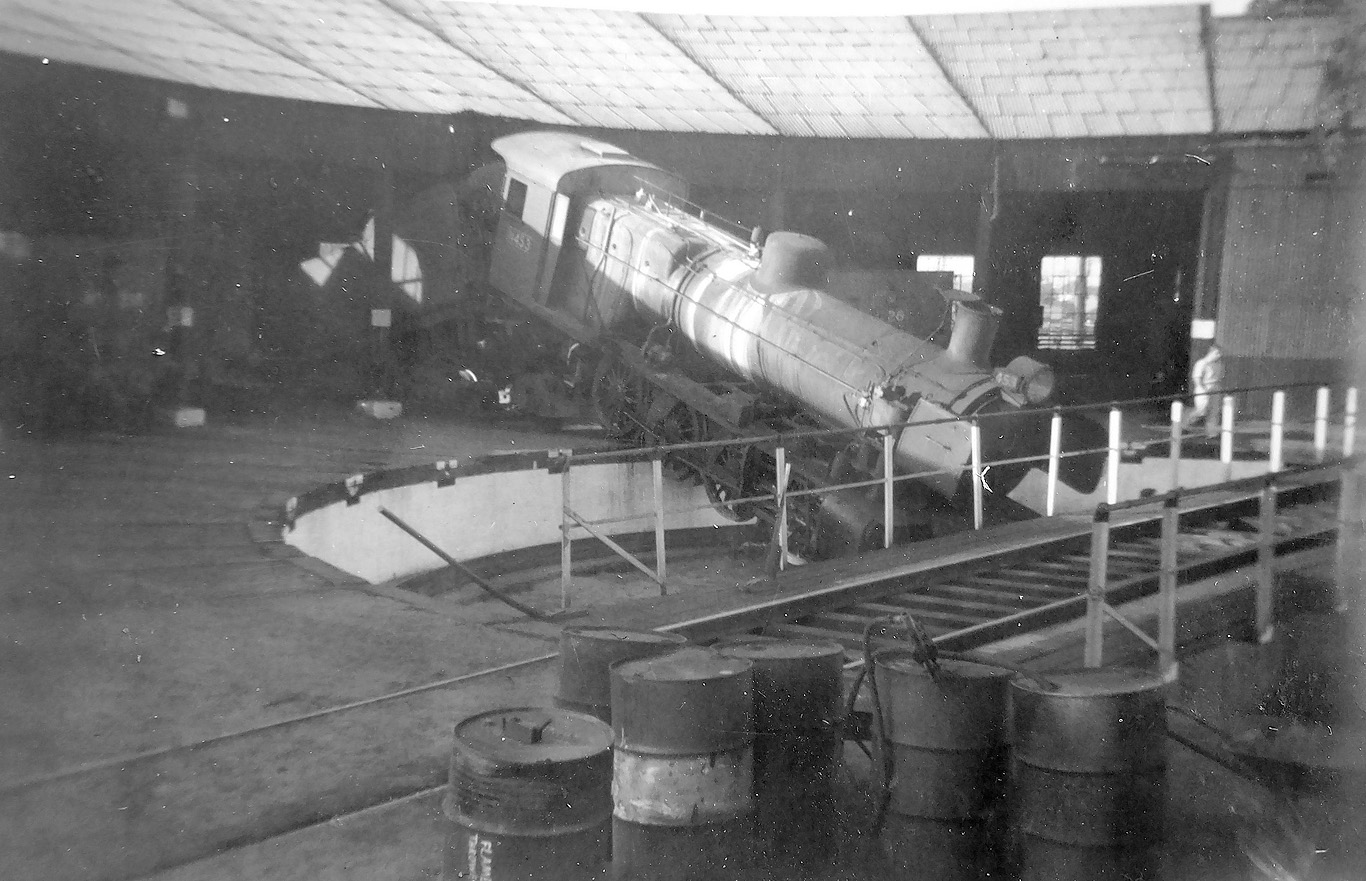
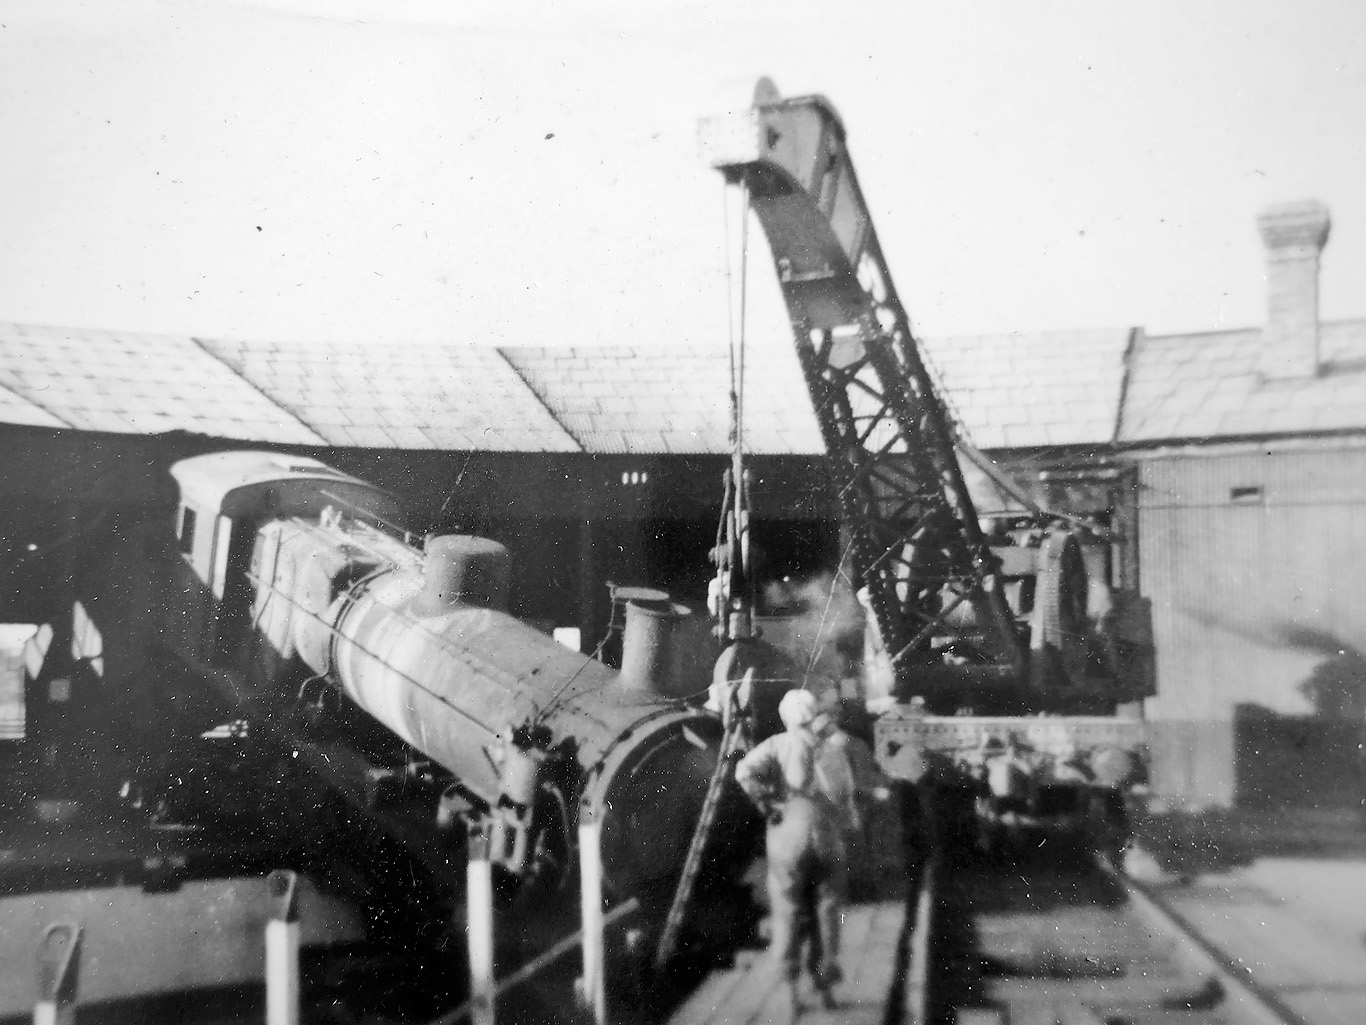
ABOVE: As long as there have been turntables at loco depots, locomotives have found ways to drop into the turntable pit. N 453 is not having a good day and has found itself in a rather embarassing position. BELOW: Alas, help is on its way as the steam crane gets to work. Dimboola Oct 8 1955, (photos courtesy the late Bob Dunn)

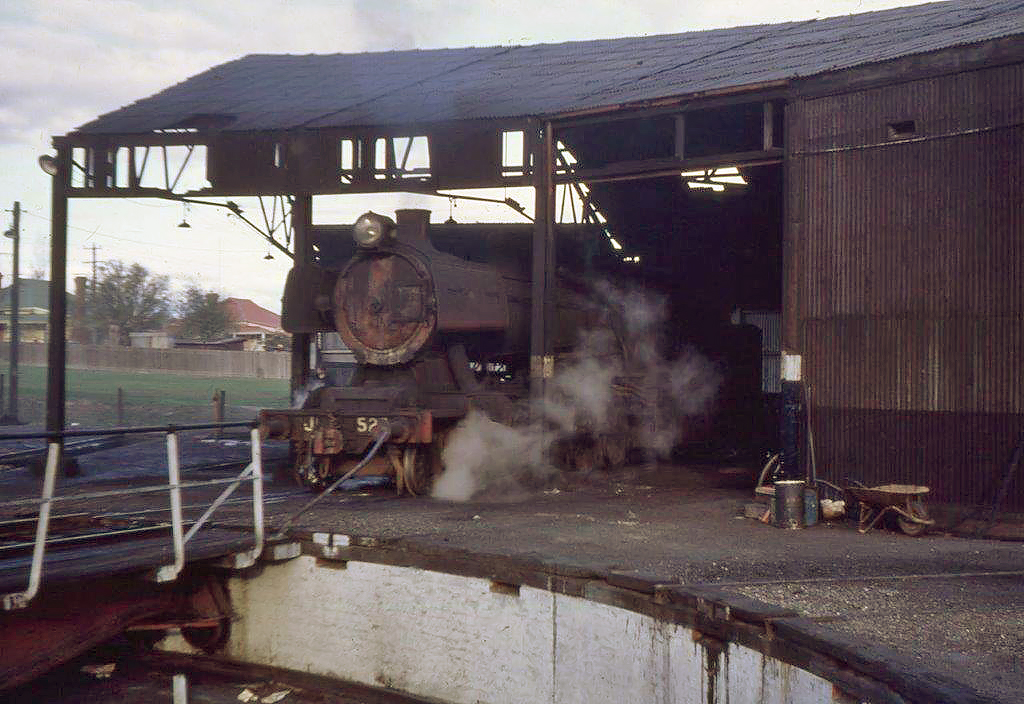
ABOVE: J 525 at Dimboola loco, May 1969. (photo courtesy Doug Miles)
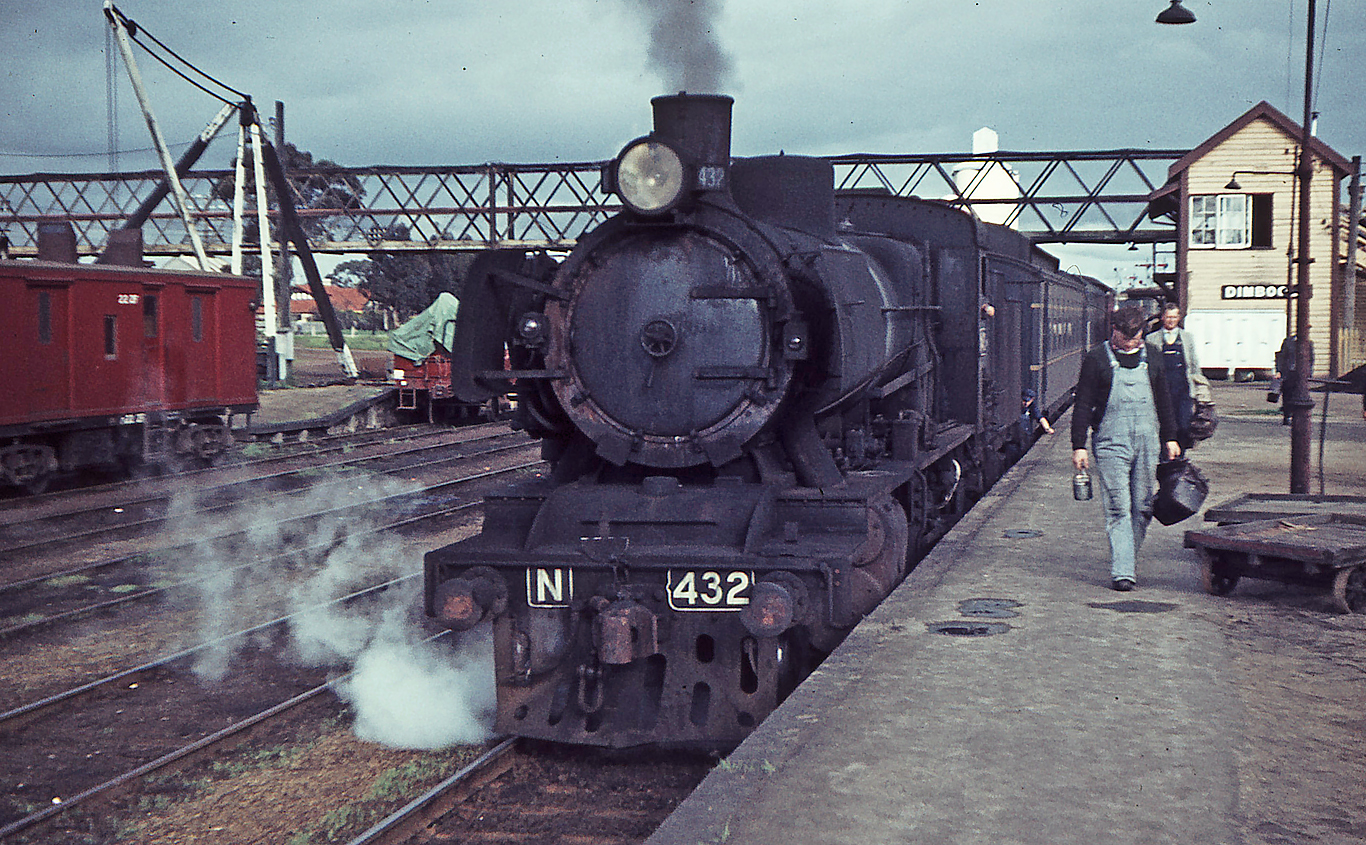
ABOVE: N 432 cuts off the morning pass from Melbourne. The N would most likely have been attached at Murtoa. (photo courtesy Weston Langford)
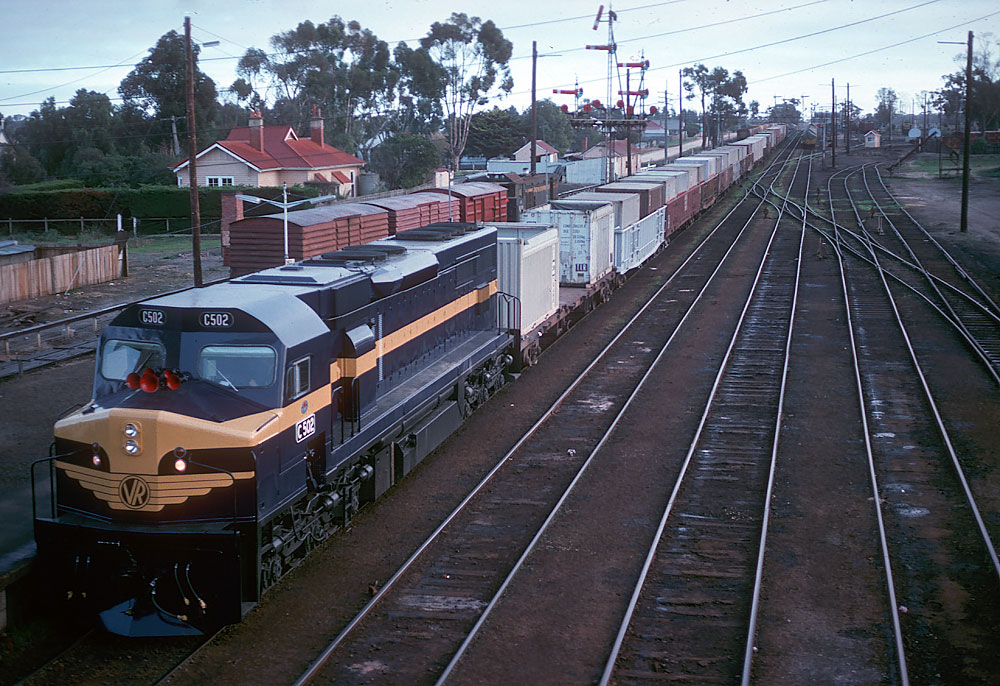
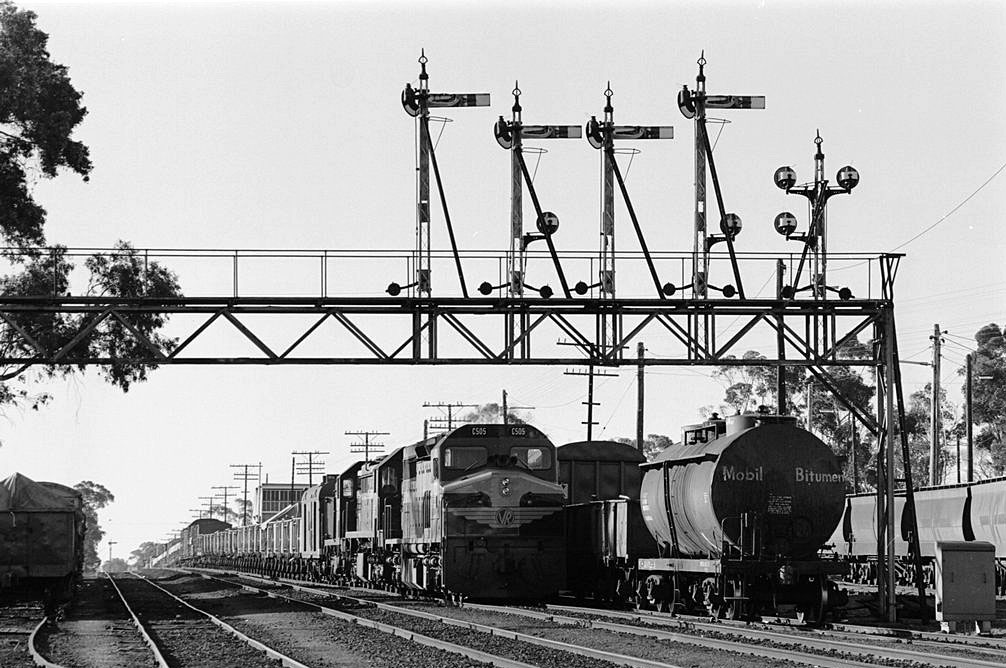
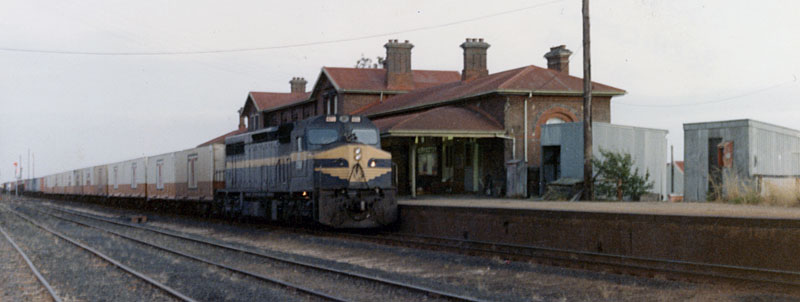
ABOVE & BELOW: C 502 on an up "jet" at Dimboola on its delivery run. June 11 1977. (Note the open wagons near the front of the train carrying containers) (photos courtesy Andrew Hennell)
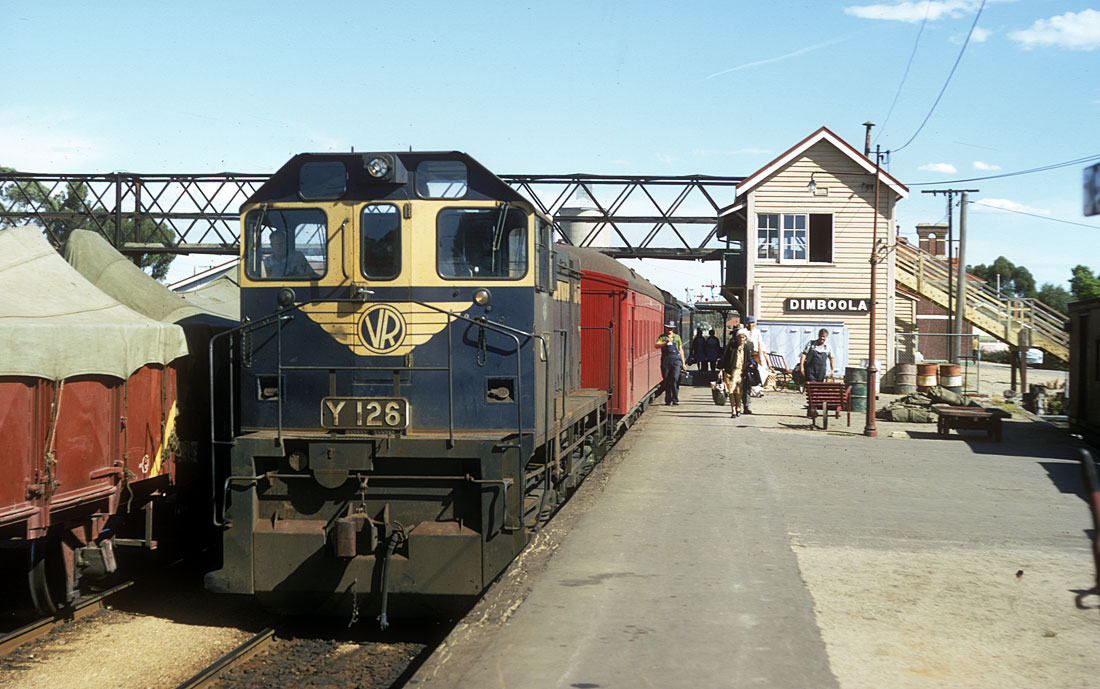
ABOVE: Y 126 at Dimboola on the morning train from Melbourne. This loco would have been added at Murtoa or Horsham to release the bigger loco for wheat traffic. Jan. 6 1971 (photo courtesy Tony Smith)
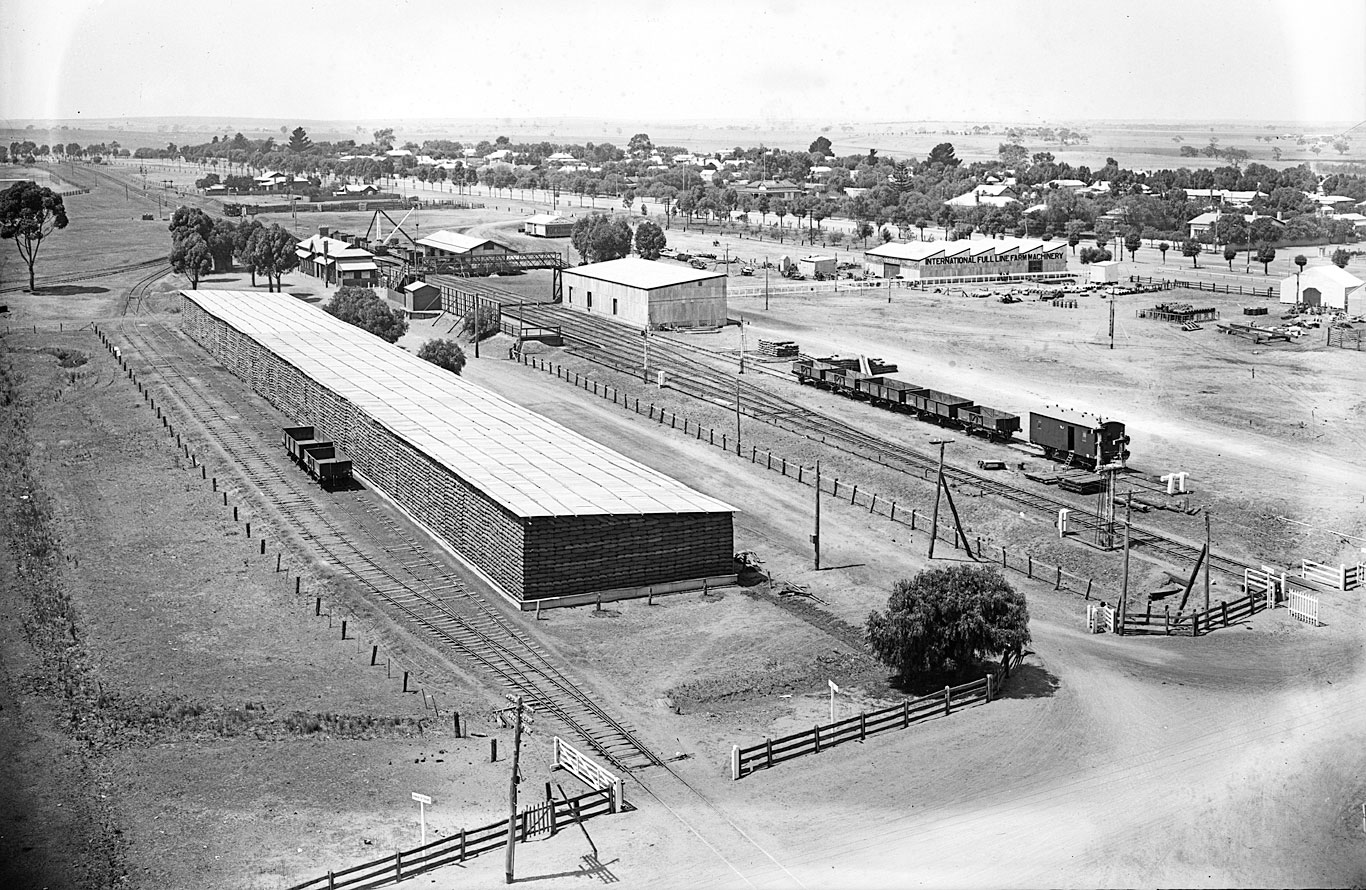
ABOVE: An up goods has been backed out onto the Jeparit line as it awaits departure. In later days trains on the Western line were often too long for the existing facilities. For really long trains there were very few crossing loops where they would fit and often the only way to get long trains out of the way was to put them away on a branch line. May 1978 (photo courtesy Peter J. Vincent)

ABOVE: The Medical Vision & Test Car in the dock track, 1969.
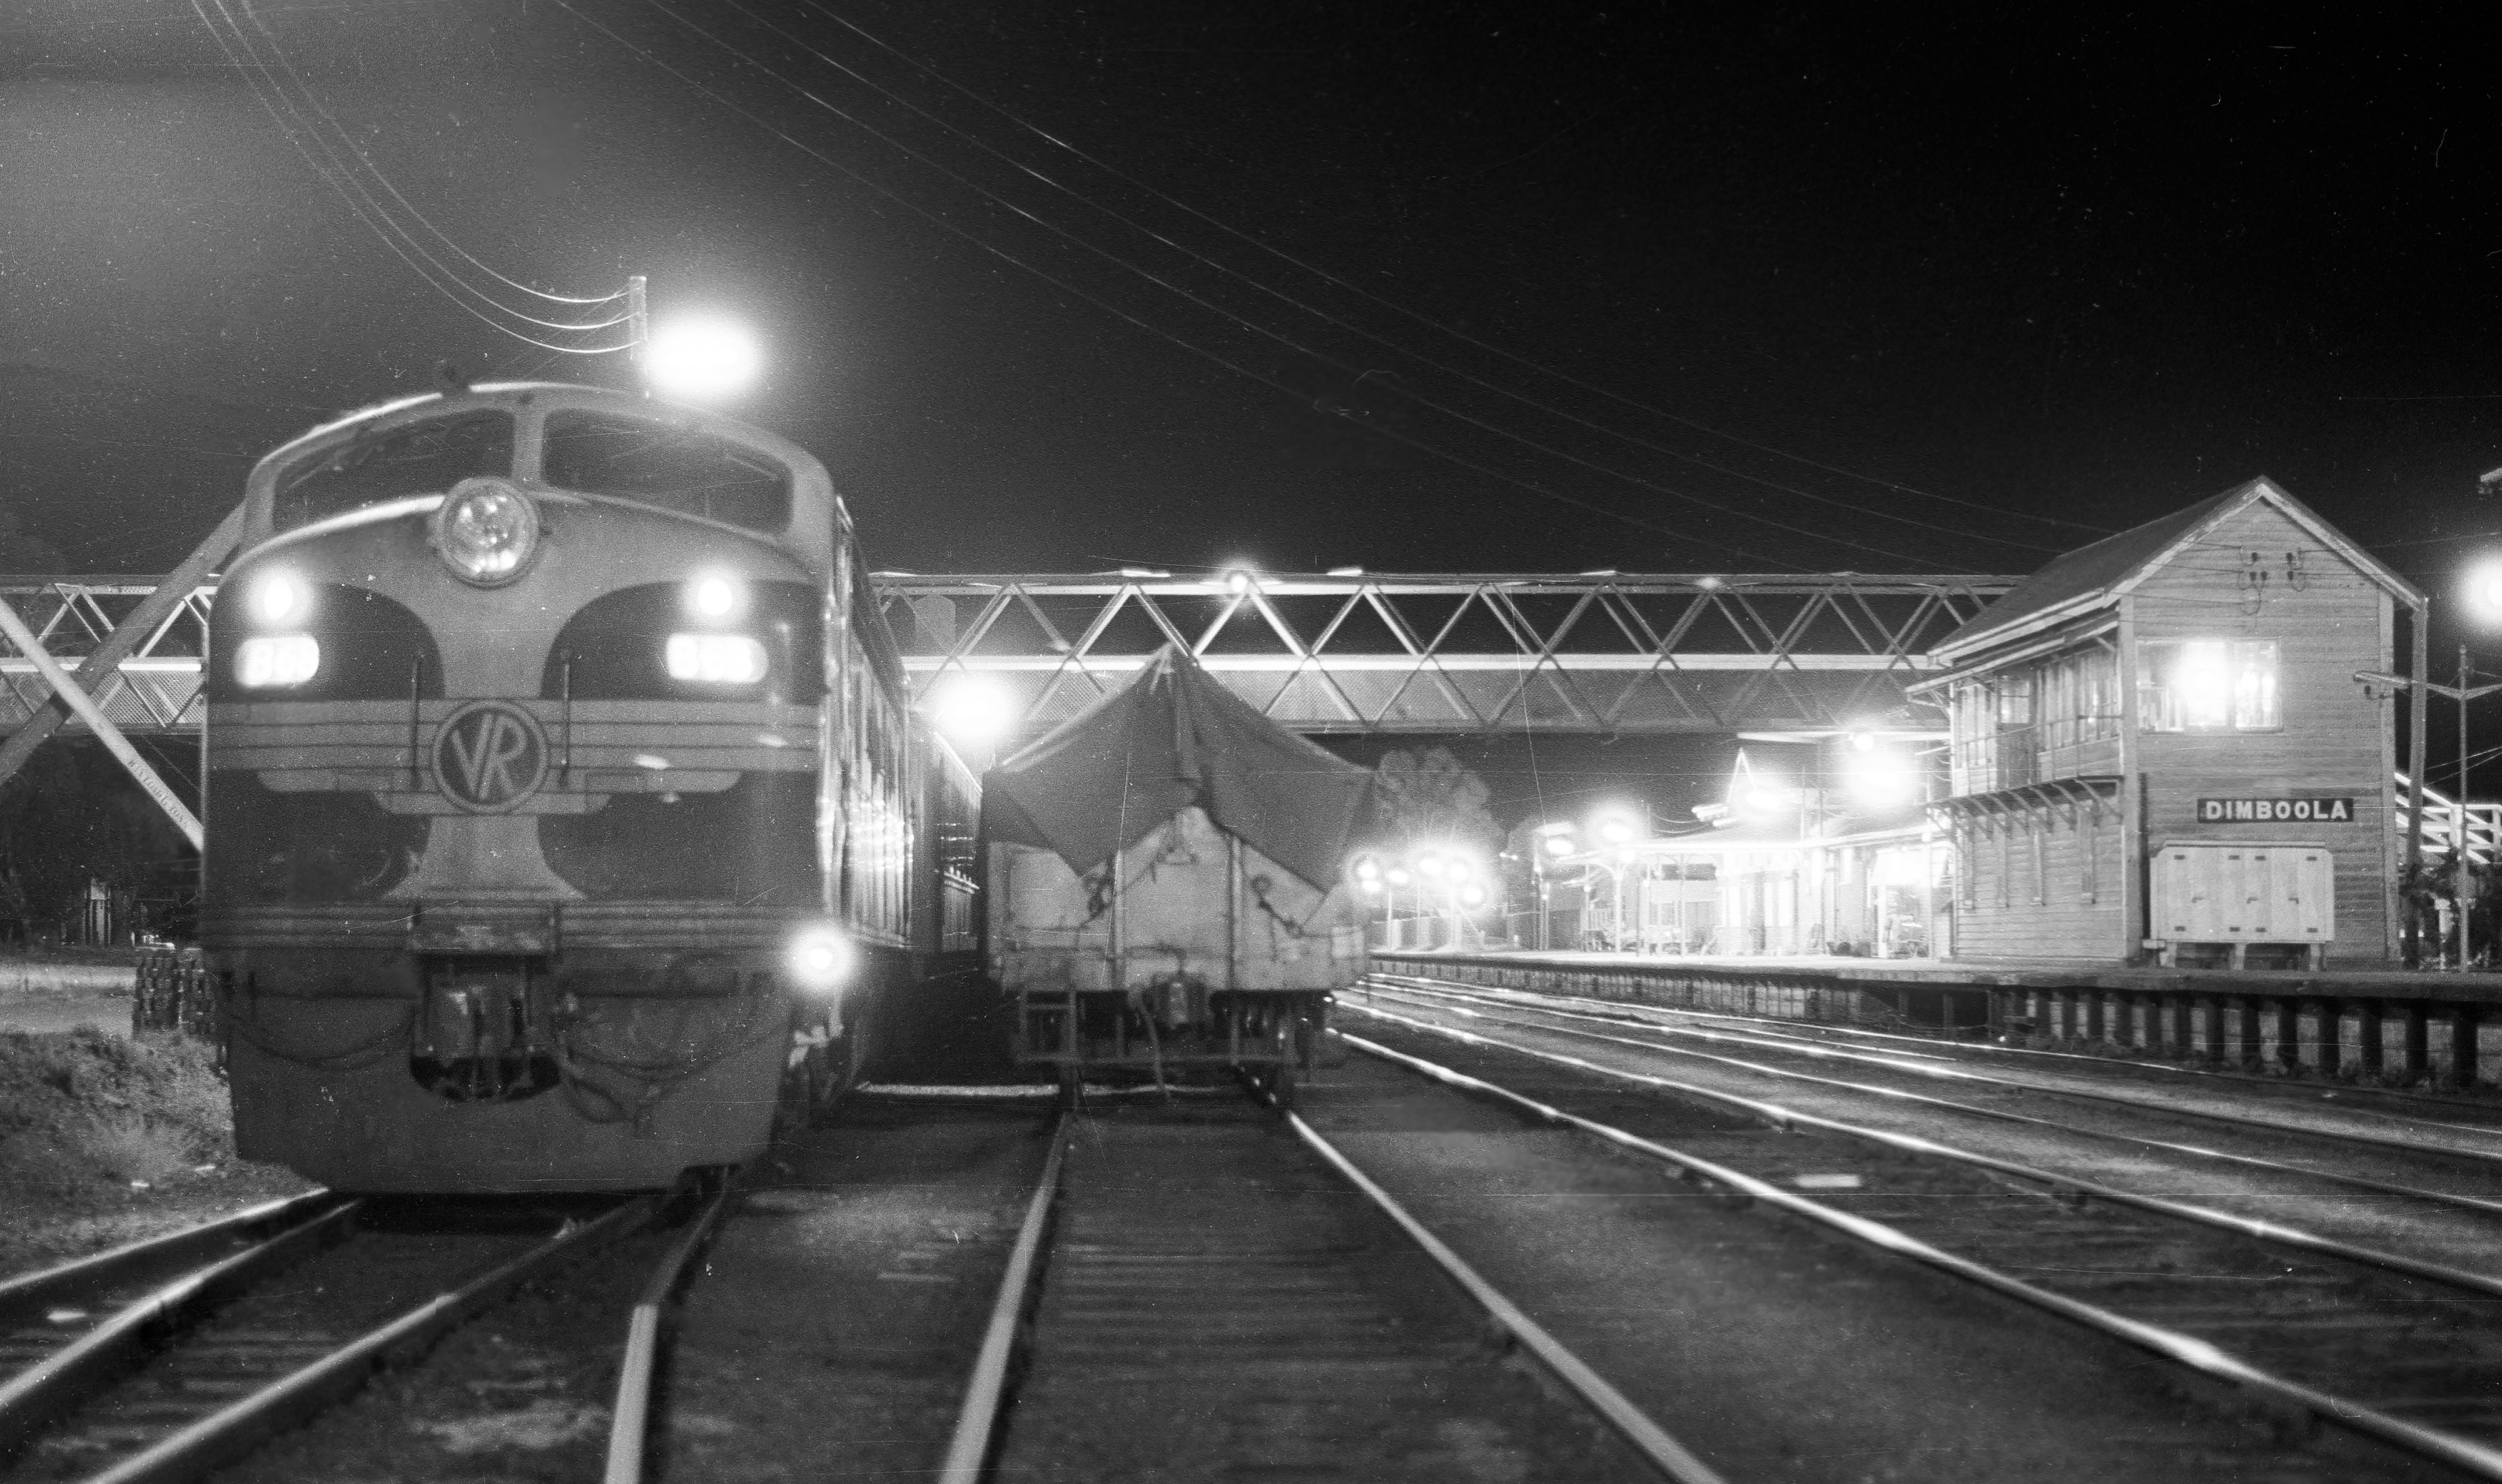
ABOVE: My first night exposure attempt on a flimsy tripod. The B had just brought up the evening pass from Melbourne and is seen shunting the cars into 5 road, the loco would then detach and go over the pit. Jan 1978.
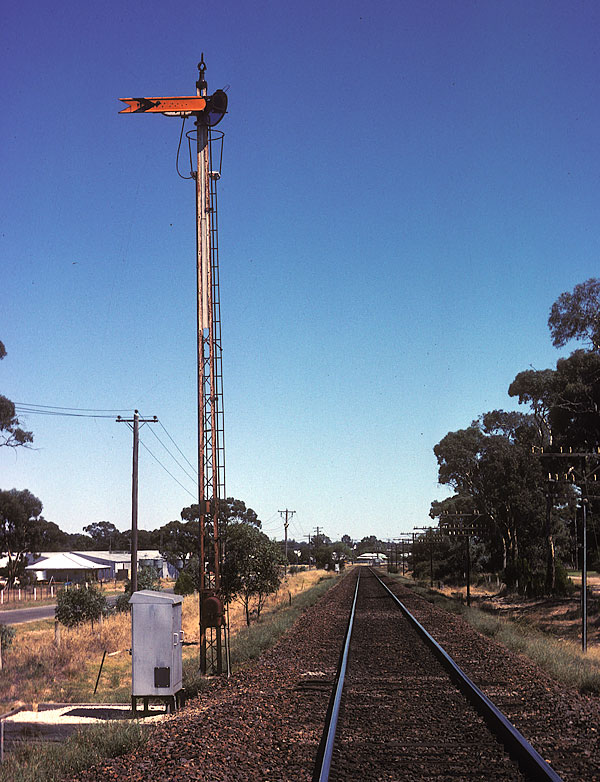
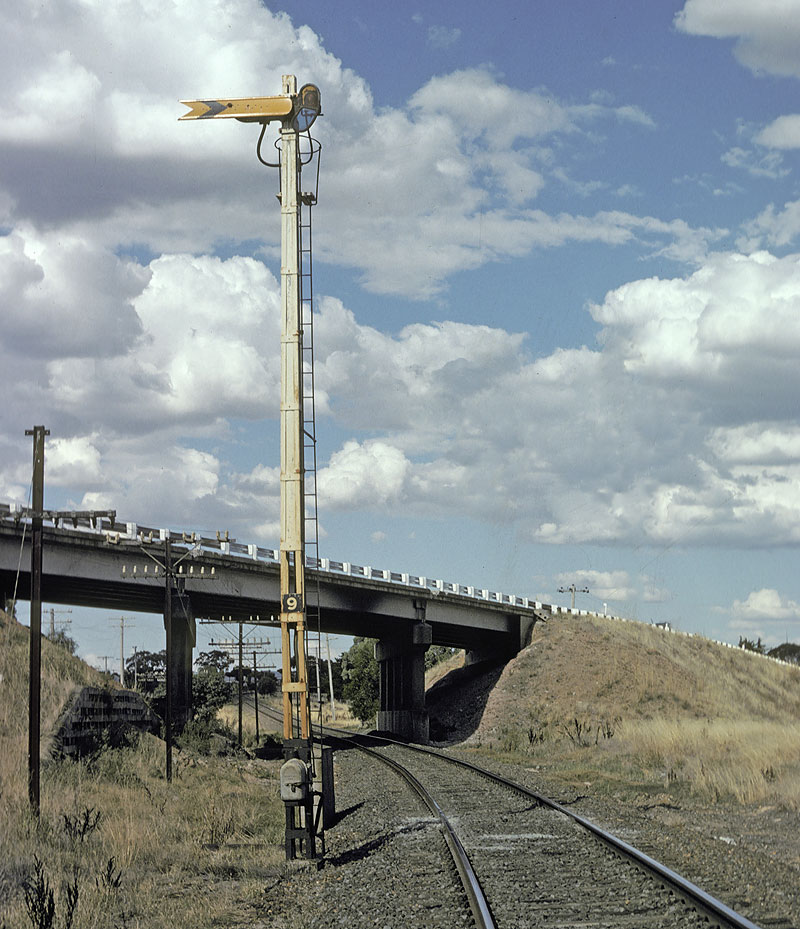
ABOVE: Dimboola's down distant signal. Like many distant signals it was motor operated due to its distance from the signalbox controlling it. 1981.
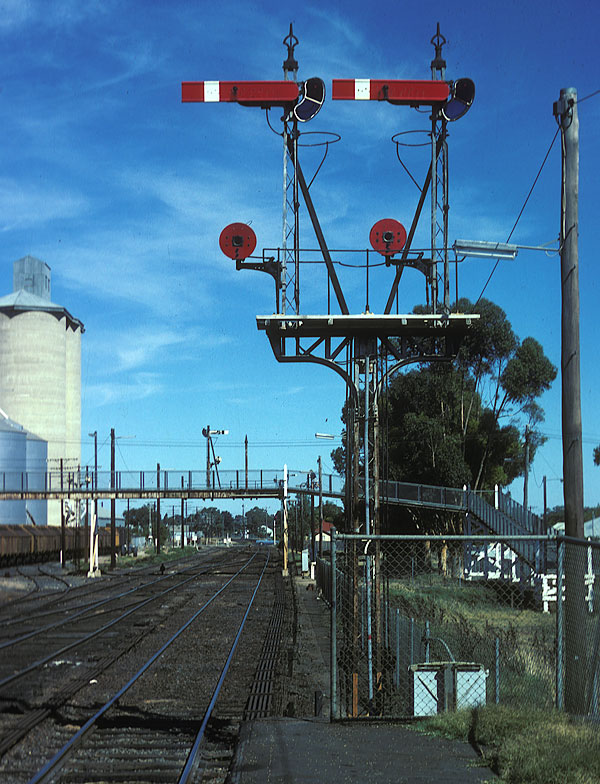
ABOVE: Post 7, the up home departures. The homes were from 1 and 2 road to the mainline, the discs to siding B. 1981
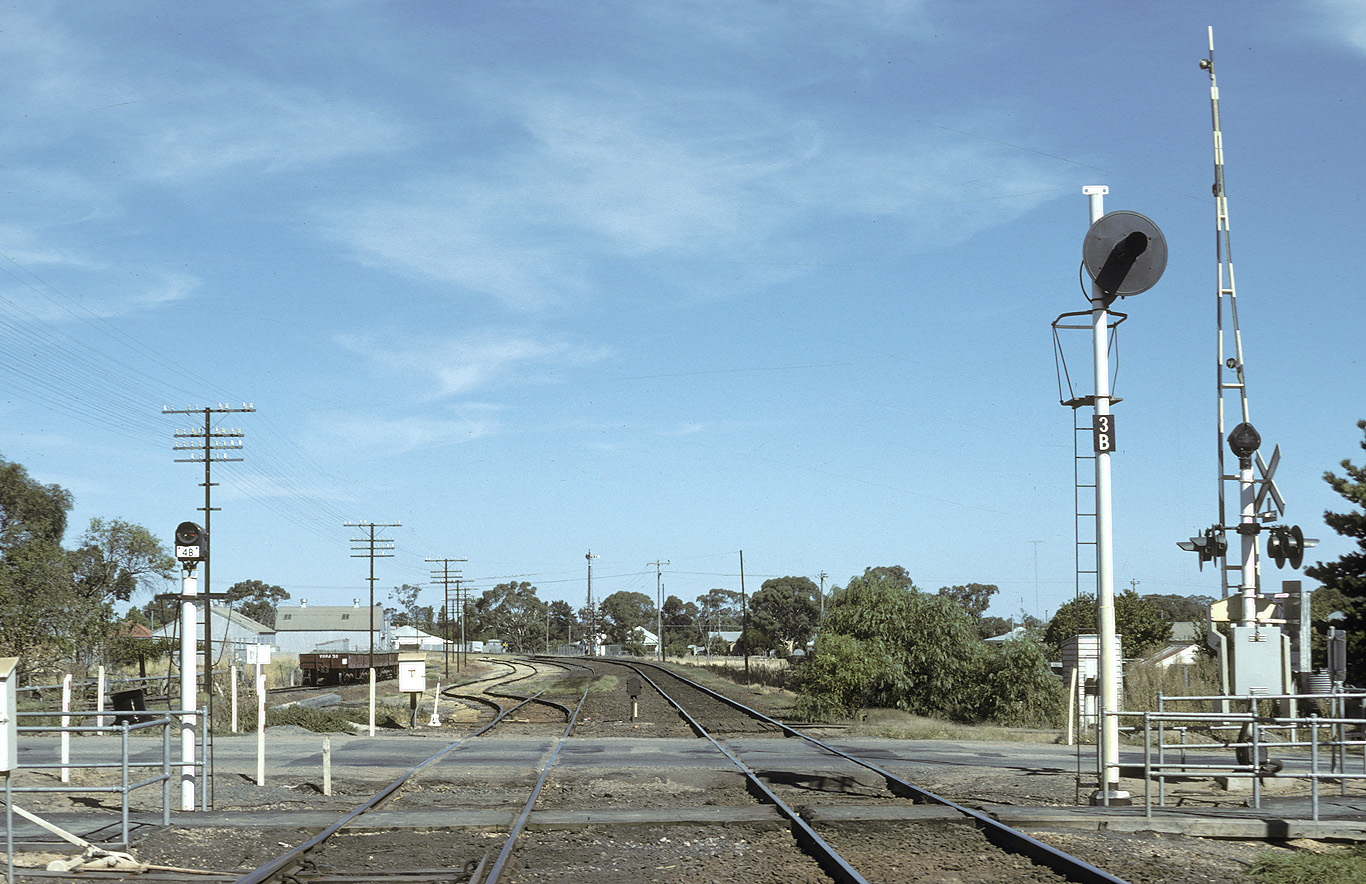
ABOVE: Looking east, posts 3B and 4B were installed on June 26 1980 when High street (old Western Highway) had boom barriers installed, March 1982.
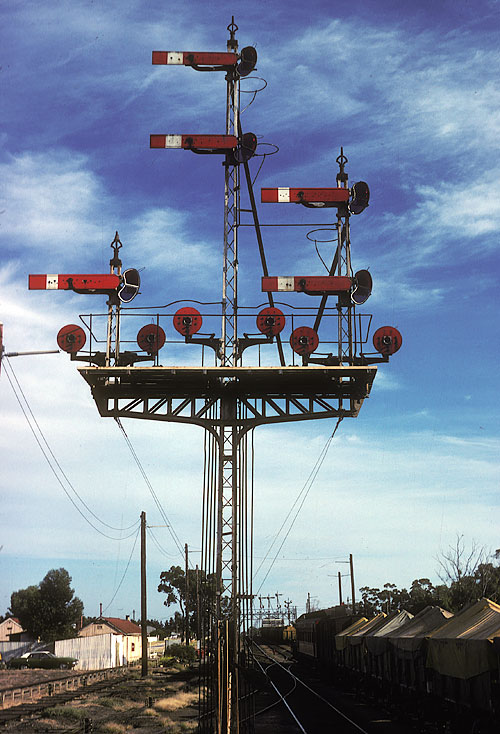
ABOVE: The impressive Post 10. Left hand home from dock to mainline, middle homes from the platform road to Serviceton or Jeparit, right hand homes from #2 road. 1981
ABOVE: Looking west from the footbridge. March 1982.

ABOVE: The discs on post 14 controlled up movements from the weighbridge and loco depot. March 1982.
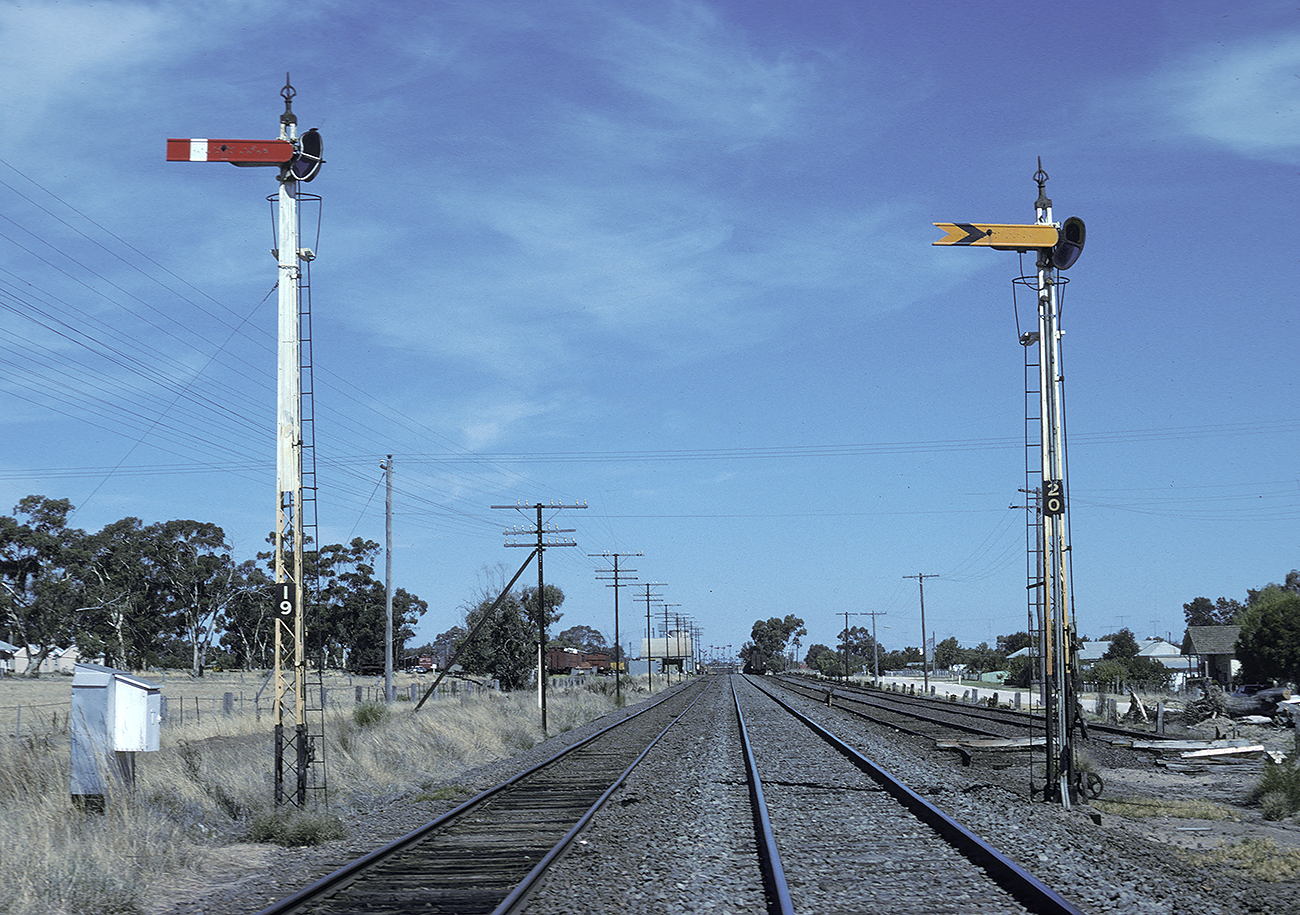
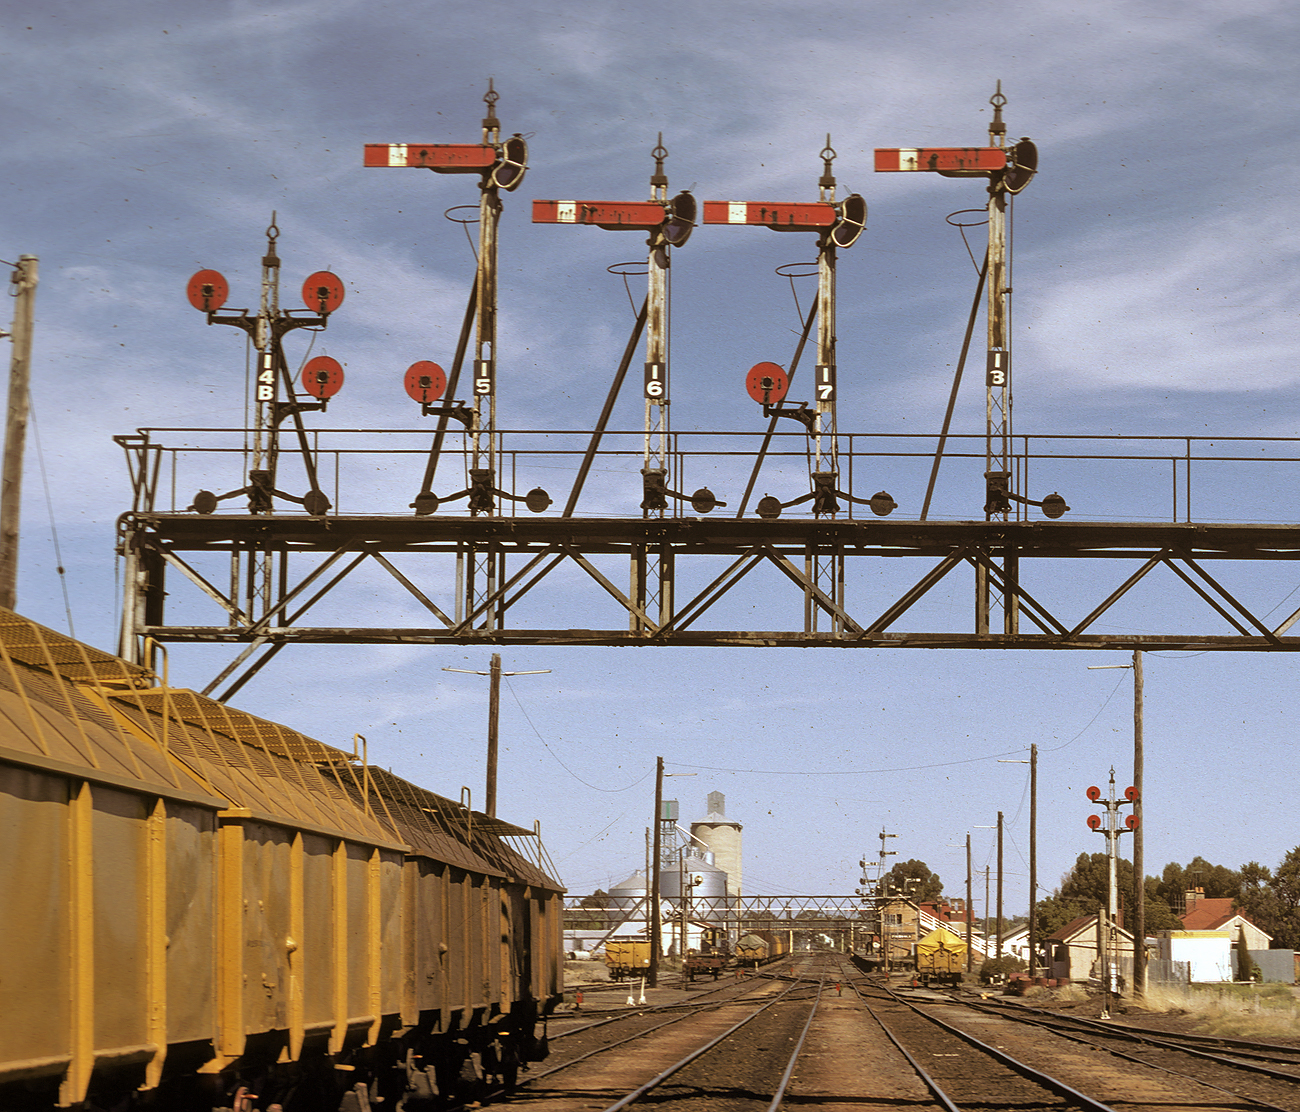
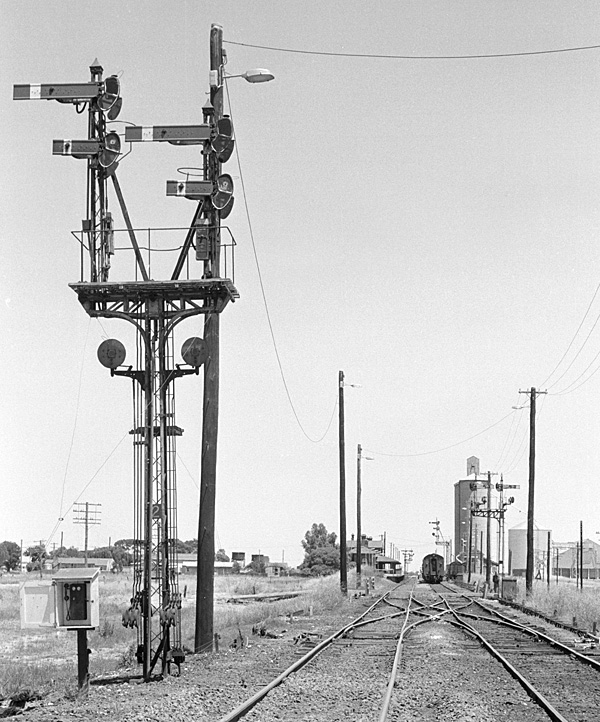
ABOVE: The view looking east. Post 19 was the up home off the Jeparit line, this was a distant signal until it was converted to the outer home signal you see here in 1977. Post 20 was the up distant signal for trains from Serviceton. These signals were 980 metres from signalbox and were NOT motor operated! BELOW: The next signals up trains encountered was this impressive gantry, posts 17 and 18 were for up Serviceton trains, 15 and 16 were for up Jeparit trains, the discs applied out of the siding that the wagons are on. Both photos March 1982
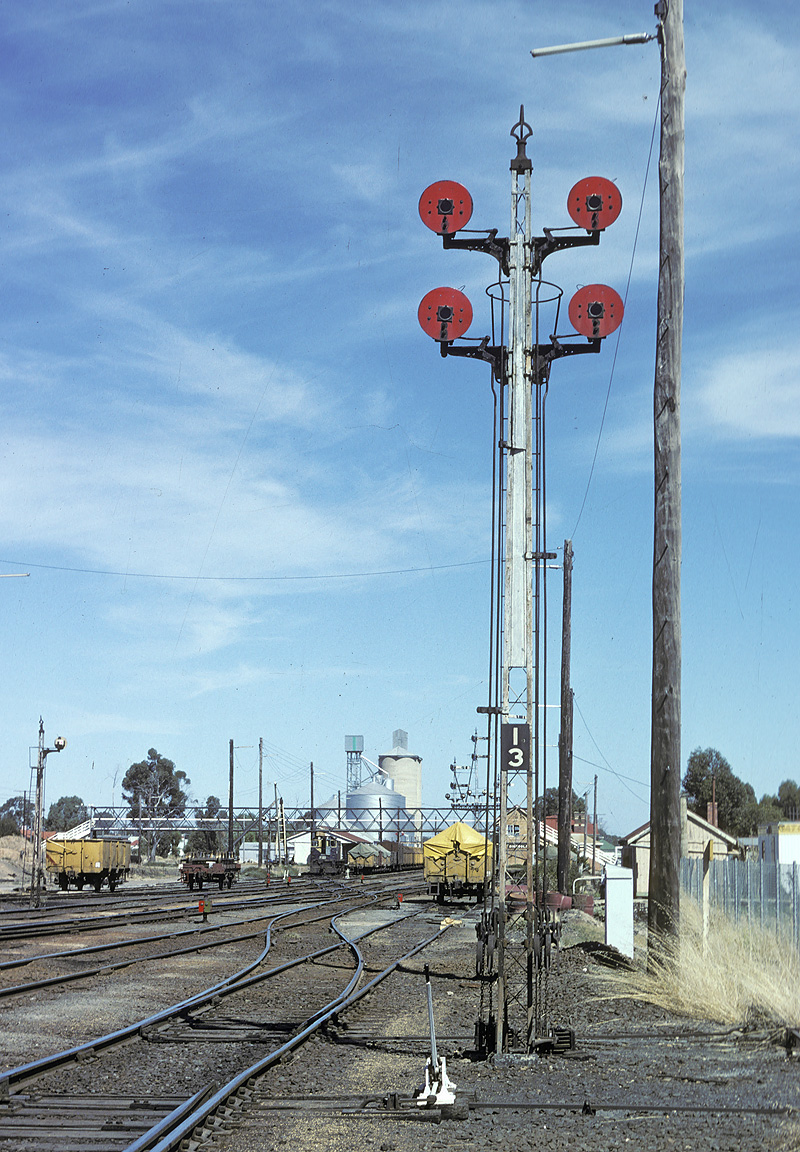
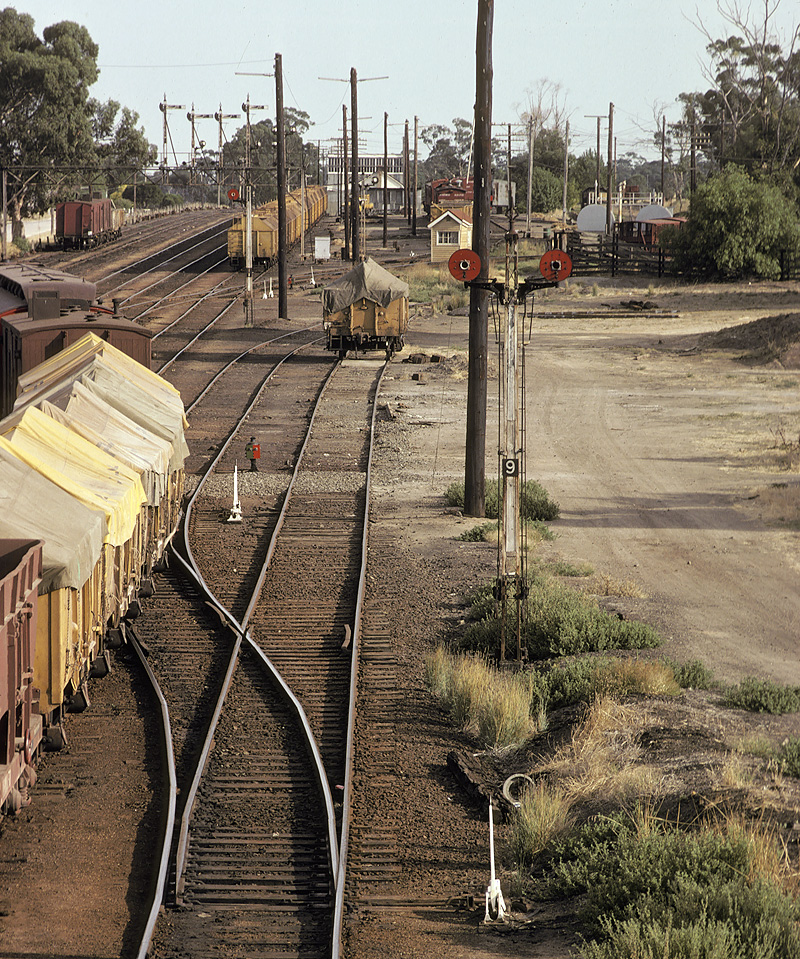
ABOVE: At the down end of the yard, on the down side, there were two very long (648 metres) sidings, D & E, that were usually used to store long rakes of loaded grain wagons. Post 13 controlled up movements out of these sidings. March 1982.
ABOVE: When the up distant from the Jeparit line was converted to a outer home signal in 1977, a location board was provided for up trains arriving off the branch. April 16 1983. (photo courtesy Noel Bamford)
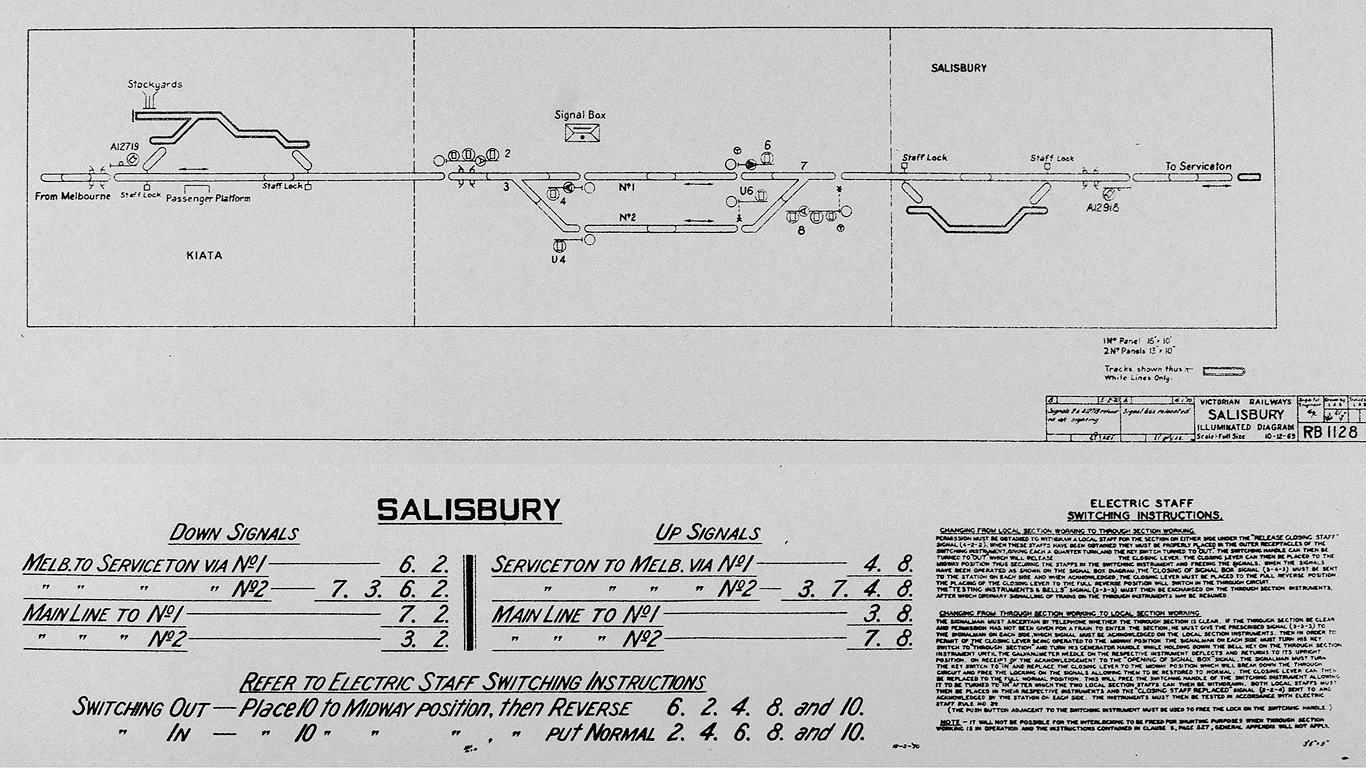
1970 Gerang Gerung signal diagram
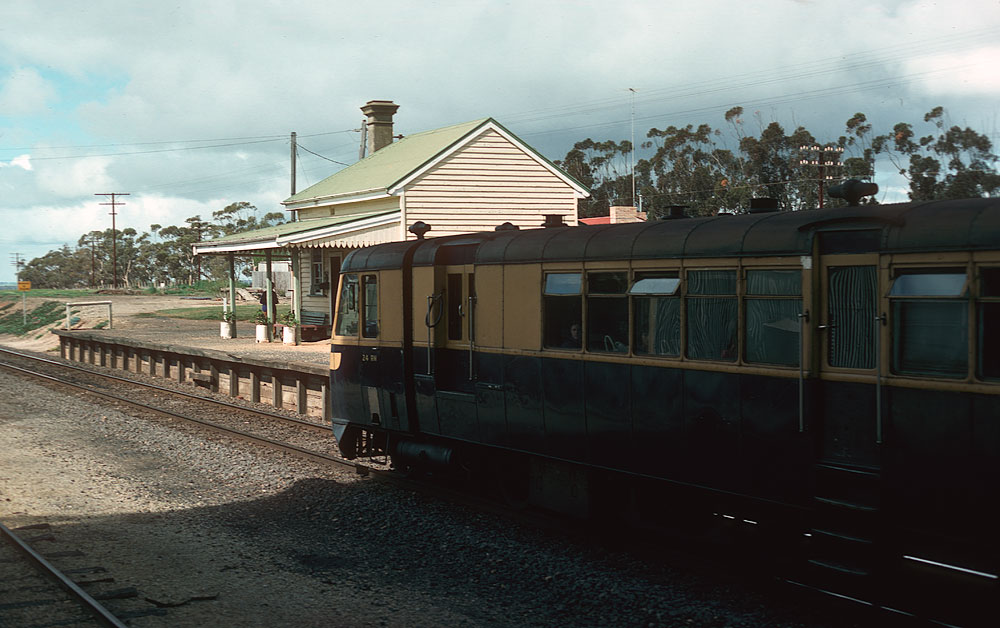
ABOVE: 153 hp Walker # 24 arrives at Gerang Gerung in far western Victoria while running the Serviceton to Dimboola service. At Dimboola this service connected with a Dimboola to Melbourne passenger train. The service ended on Dec. 2 1978. (Photo courtesy Andrew Hennell)
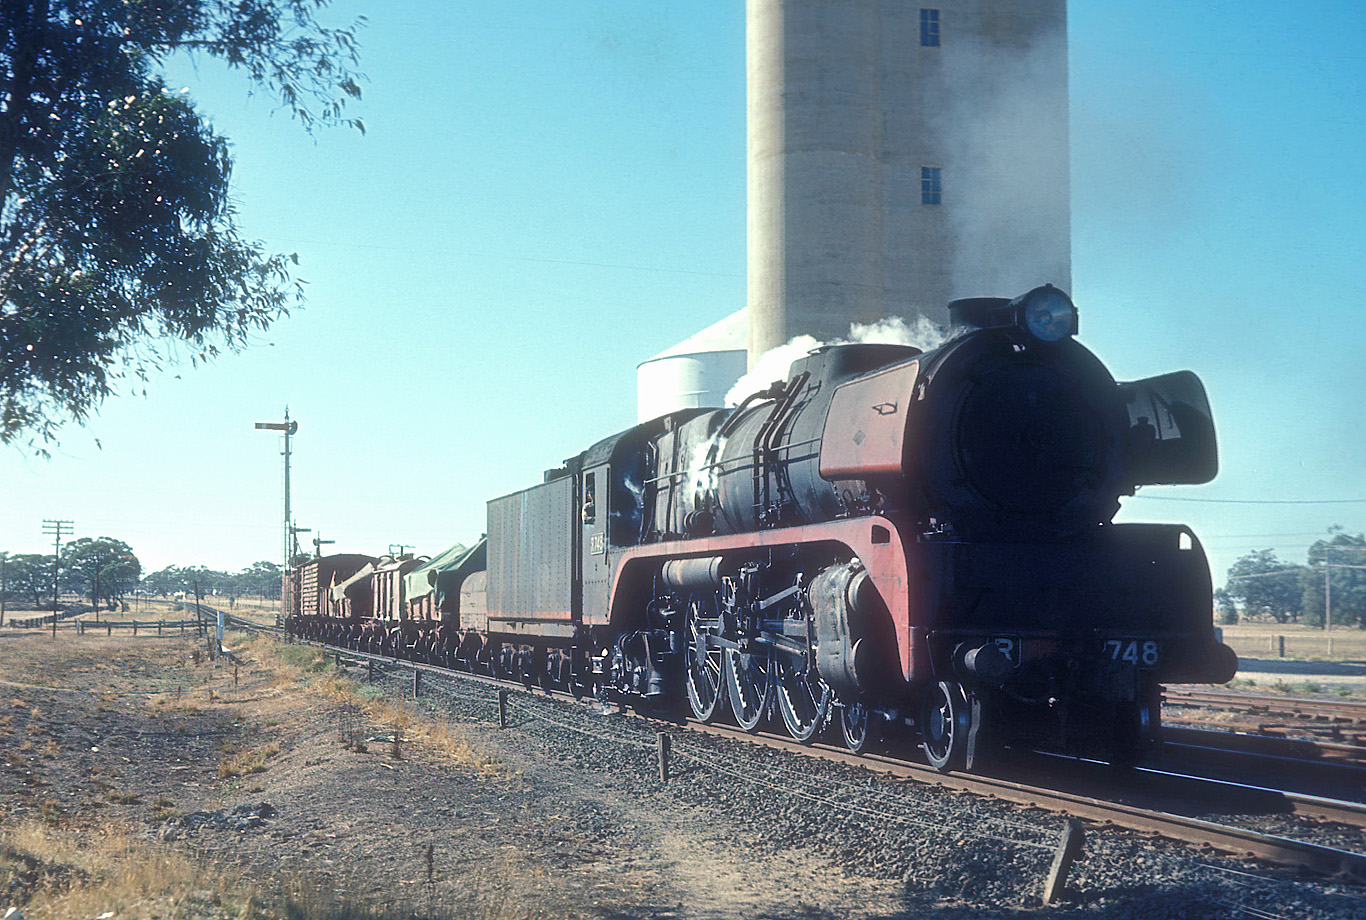
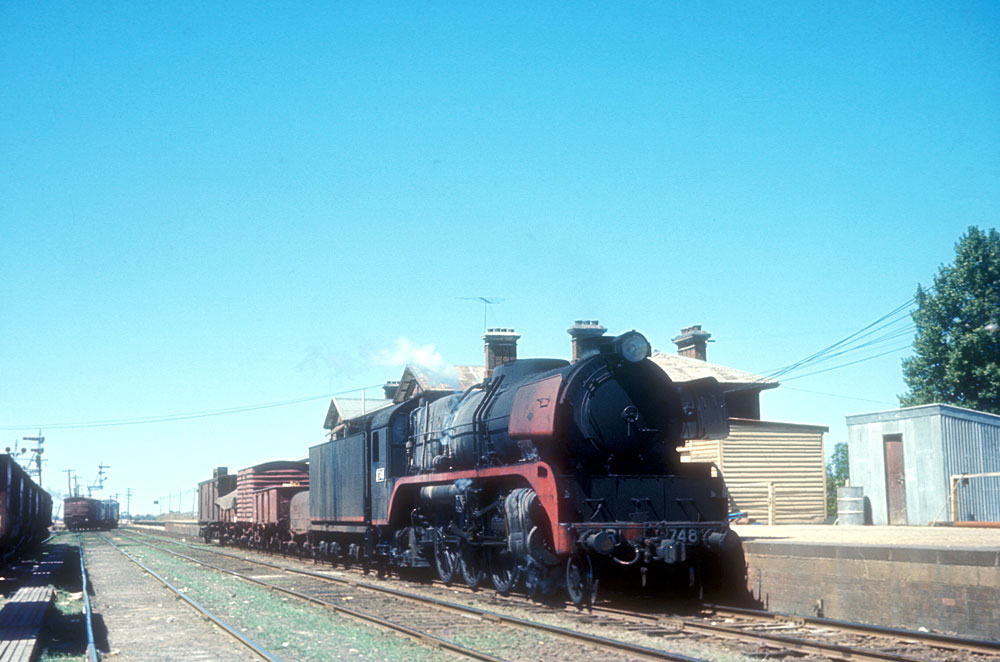
ABOVE: R 748 arrives Kiata on a down goods, April 4 1966. The crossing loop and signals were made redundant in 1970 when the much longer Salisbury loop was built and Kiata was demoted to a lowly staff locked siding BELOW.
ABOVE: Kiata looking west, the signal is the down repeating signal for Salisbury loop. April 16 1983. (photo courtesy Noel Bamford)
ABOVE & BELOW: A down Ararat to Serviceton roadside goods (hauled by an Australian National 930 class) clatters over the Melbourne end points at Salisbury loop. As trains got longer in the late 60's the existing crossing facilities were proving inadequate so in 1970 Salisbury loop was built as a pure crossing loop, having no goods sidings. It was equipped with 3 position signals, the points controlled by motors, not manually, and a signal panel. It was able to be "switched out" in less busy times thus saving on manpower. Photo date 1986
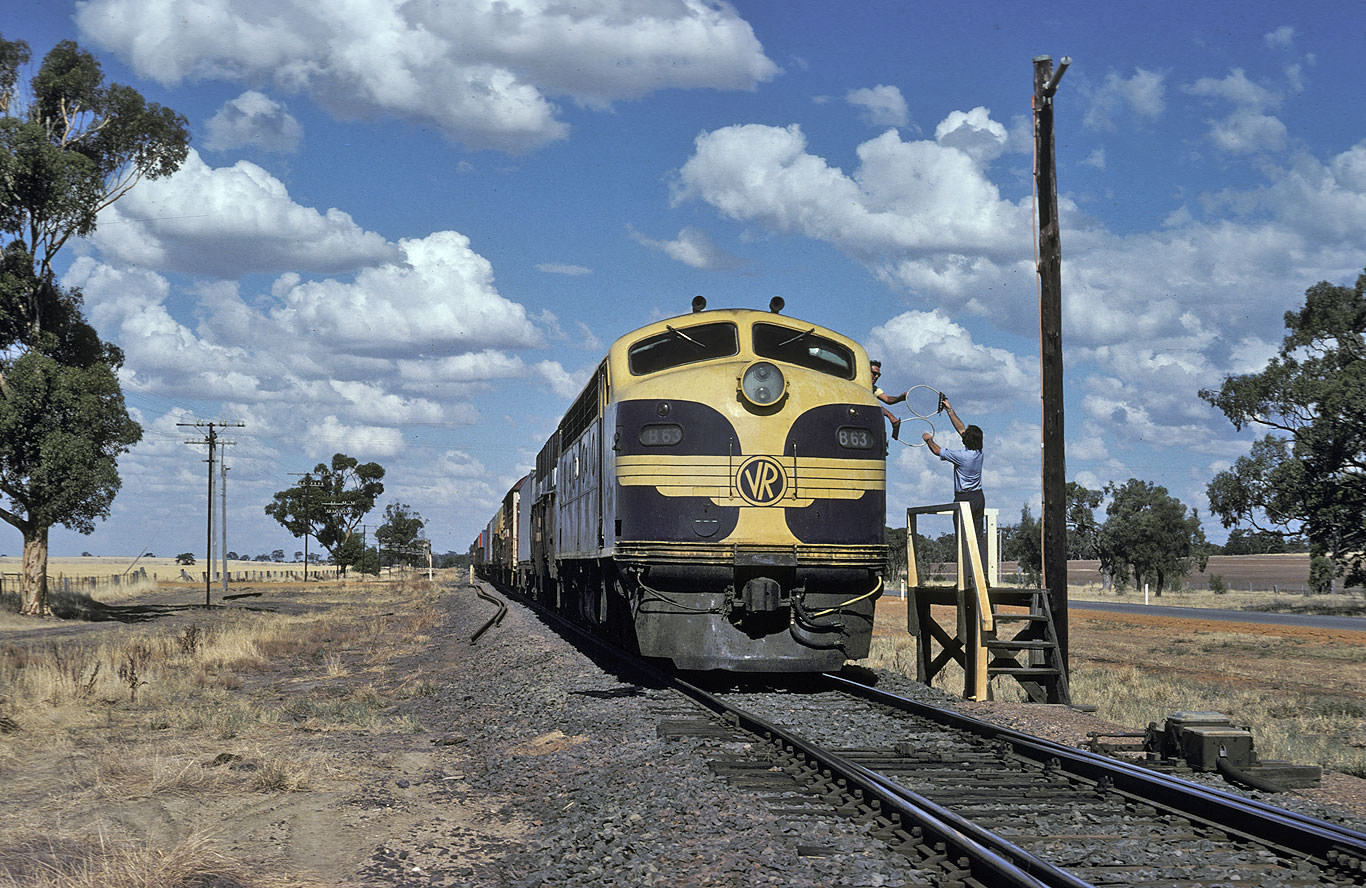
ABOVE: The driver on B 63, on a down goods, exchanges staffs with the signalman at Salisbury loop, March 1982.
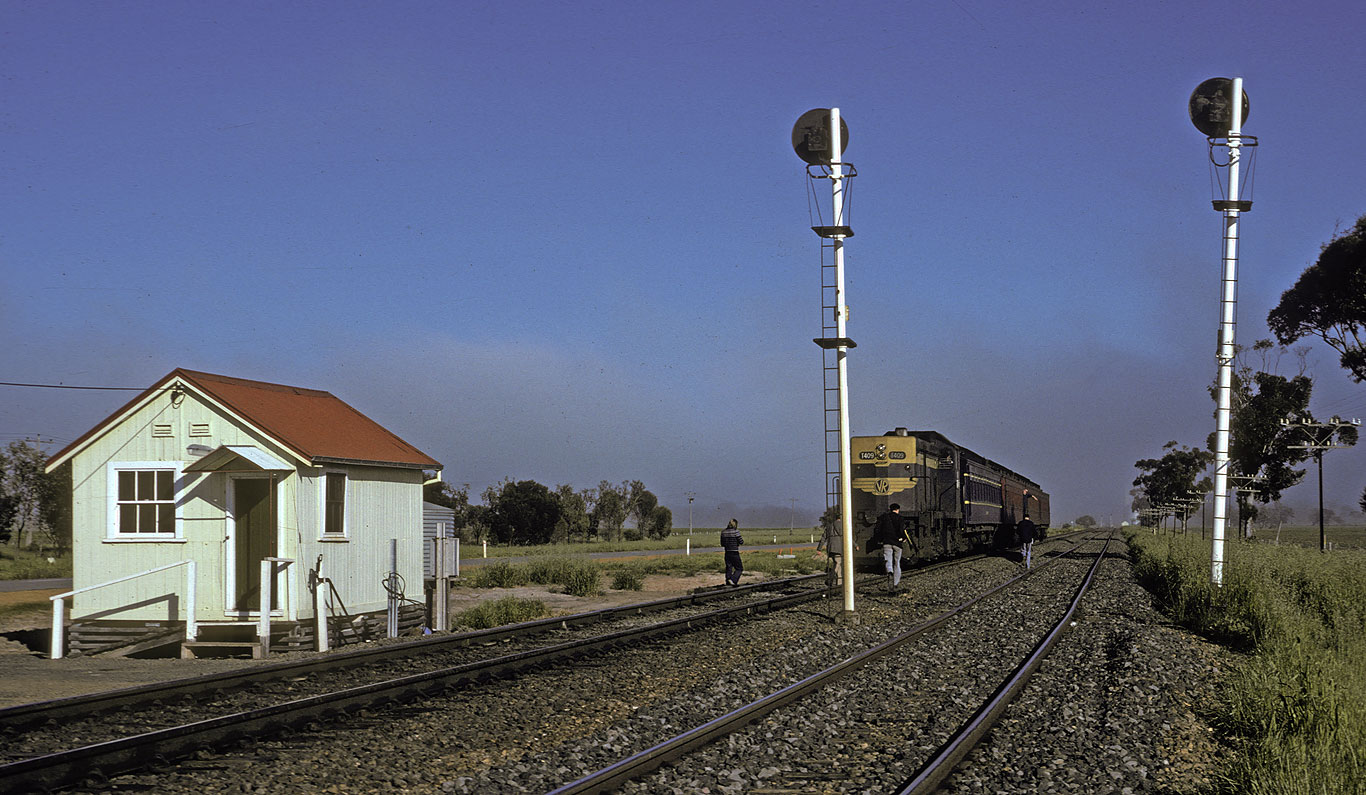
ABOVE: The up departure homes, looking east, at Salisbury loop. Salisbury loop was a little unique, the arrival homes were 3 postion but the departure homes were 2 position. 3 position home departures were associated with CTC/ATC loops and Salisbury loop, at this time, was in electric staff territory. March 1982. BELOW: Looking in the opposite direction (west) at the up departure homes also showing the signalbox. The mainline departure homes were shown on signal diagrams as being equipped with an illuminated letter A which they obviously never received but the extra landing shown on the left hand signal shows that it almost got its illuminated letter A.

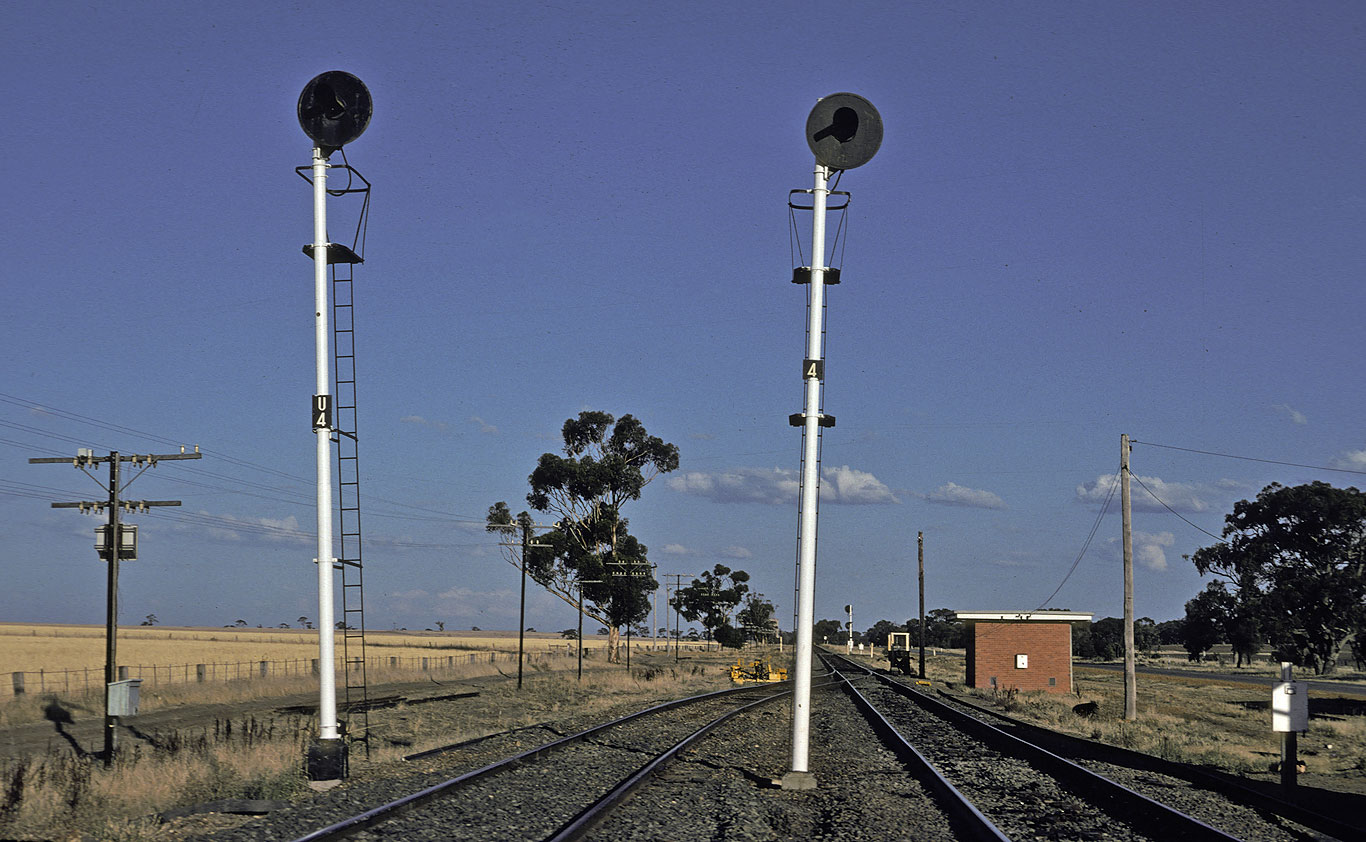
ABOVE: The switching out apparatus at Salisbury loop. The Salisbury loop - Nhill and Dimboola - Salisbury loop staff are locked into the apparatus allowing the signals for both directions to be placed to proceed and the through circuit from Dimboola to Nhill to bypass Salisbury loop. 1981.
1960 Nhill signal diagram and box diagram
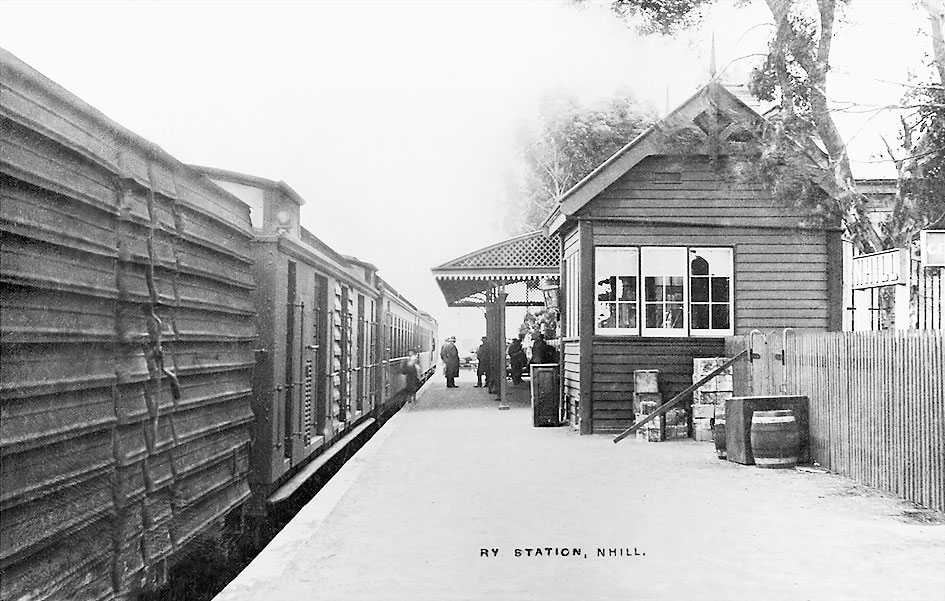
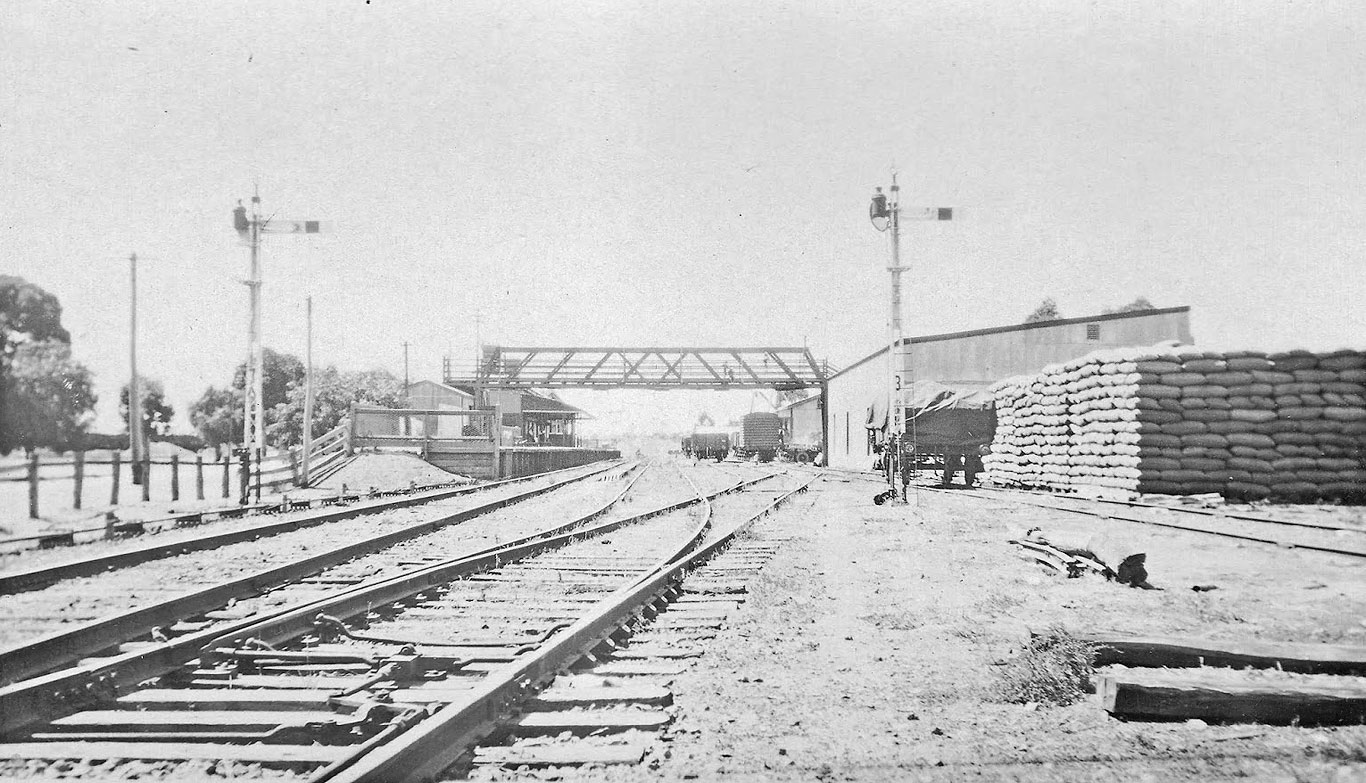
ABOVE: In 1927, Nhill's yard was extended which necessitated a new signal box. This photo, taken from the footbridge, looks like it was taken not long after completion of the work. A staff exchanger lies on the platform, about to be installed, which occured between March and May 1927. BELOW: Probably taken at the same time as the photo above. Note the huge stack of bagged wheat.
ABOVE: Looking east from the Davis street level crossing. This photo must have been taken after Nov 1916 when the separate signal posts shown here were installed.
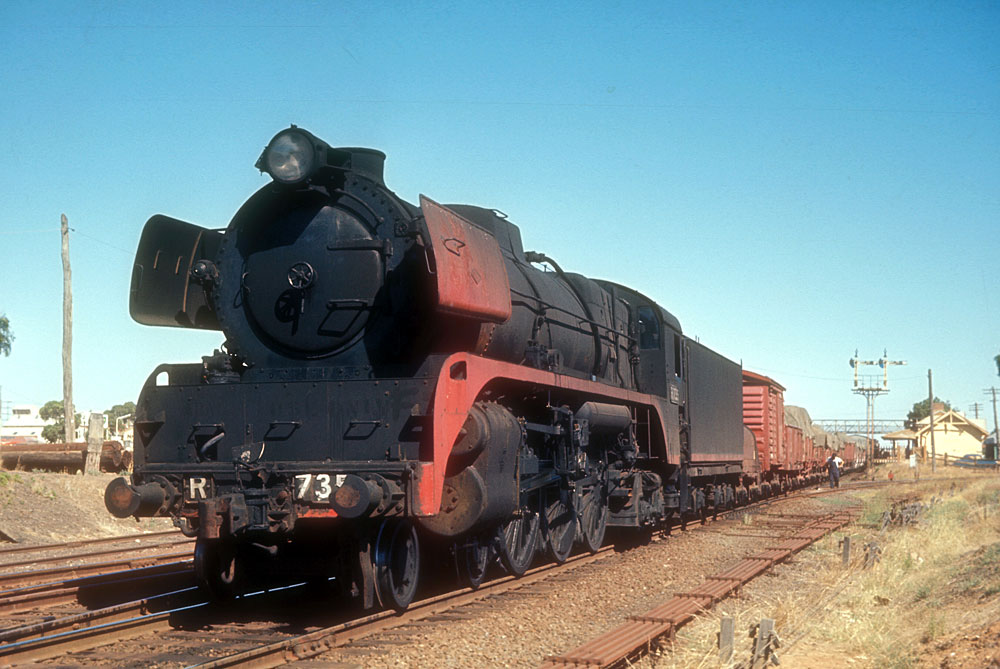
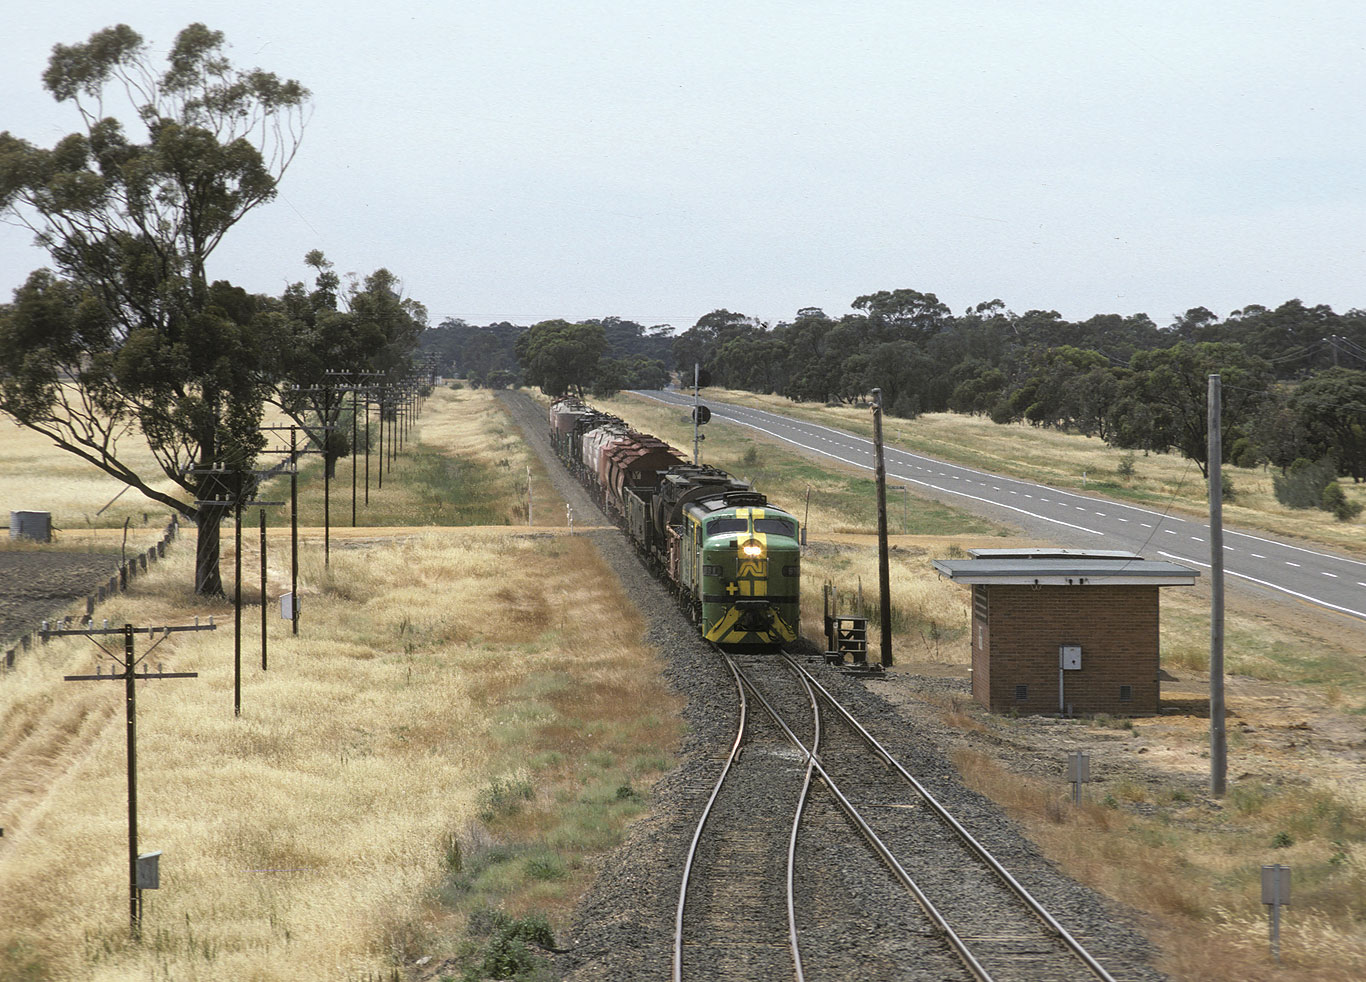
ABOVE: R 735 at Nhill running No 50 up goods which was a 4.40 am Serviceton to Dimboola roadside goods. March 6 1967 (photo courtesy John Ward)
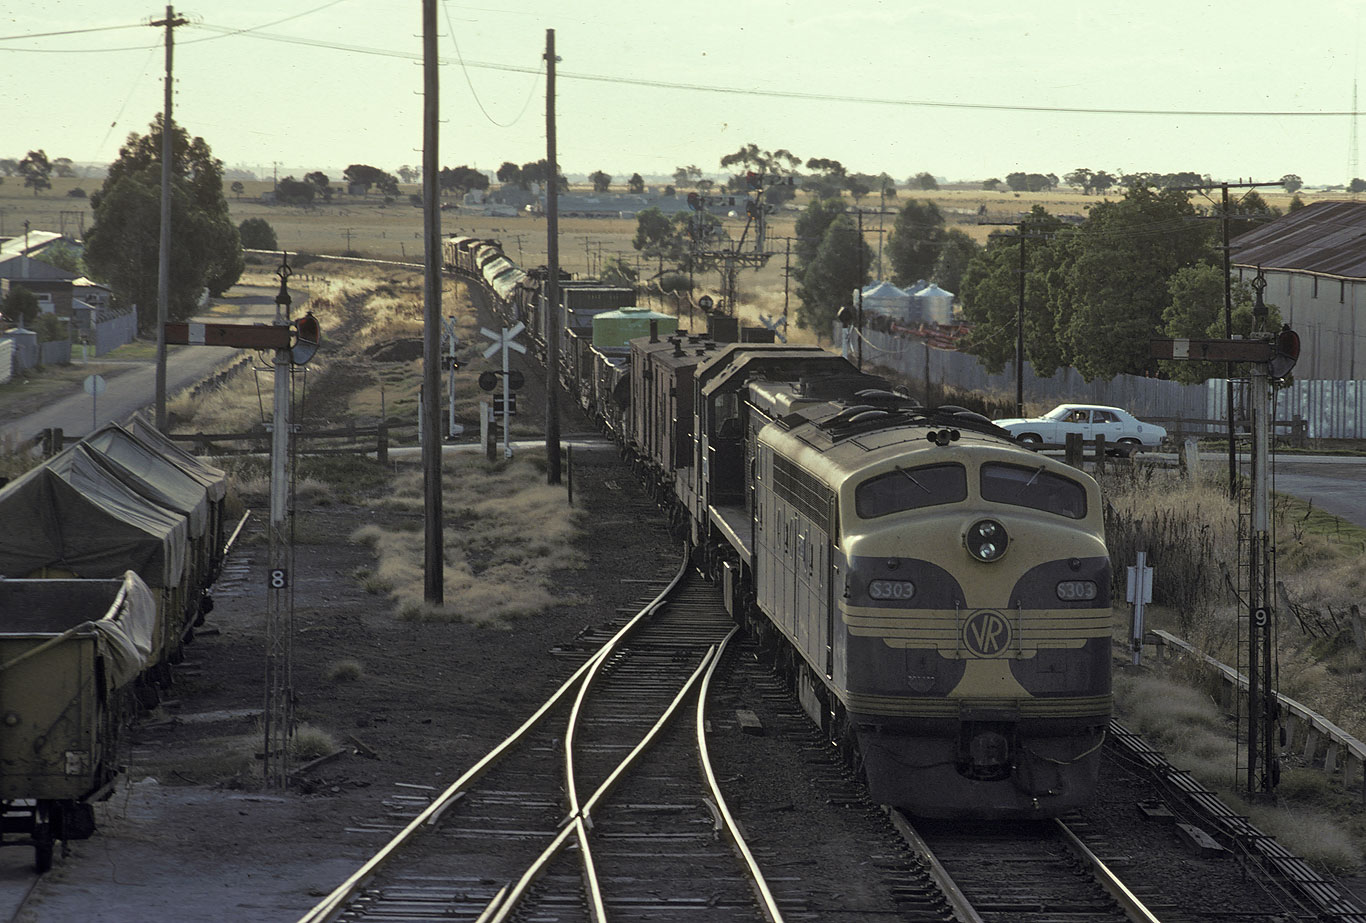
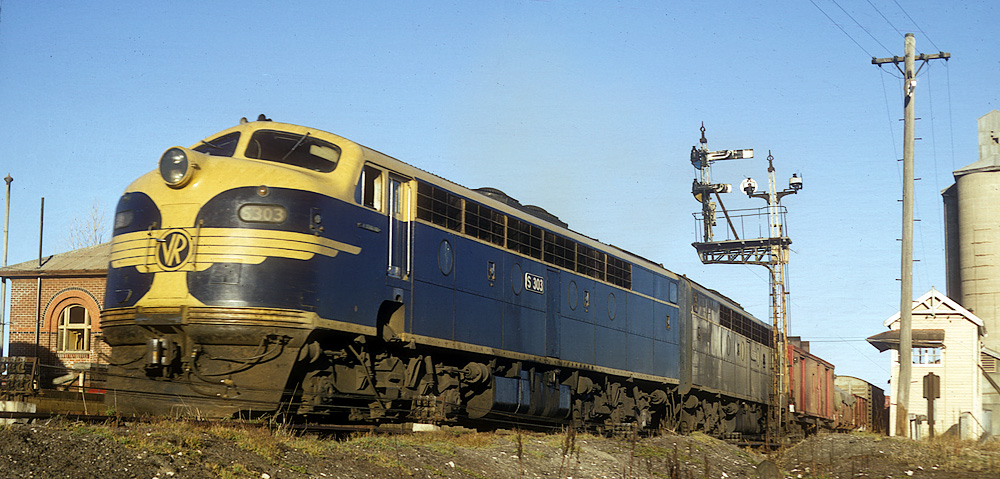
ABOVE: S 303 and X - T arrive Nhill in far west Victoria on a Serviceton to Dimboola goods. Moments before I took this photo the scene was bathed in full on, backlit, sun. Just before the train came a cloud arrived to save the day. Feb. 1982.
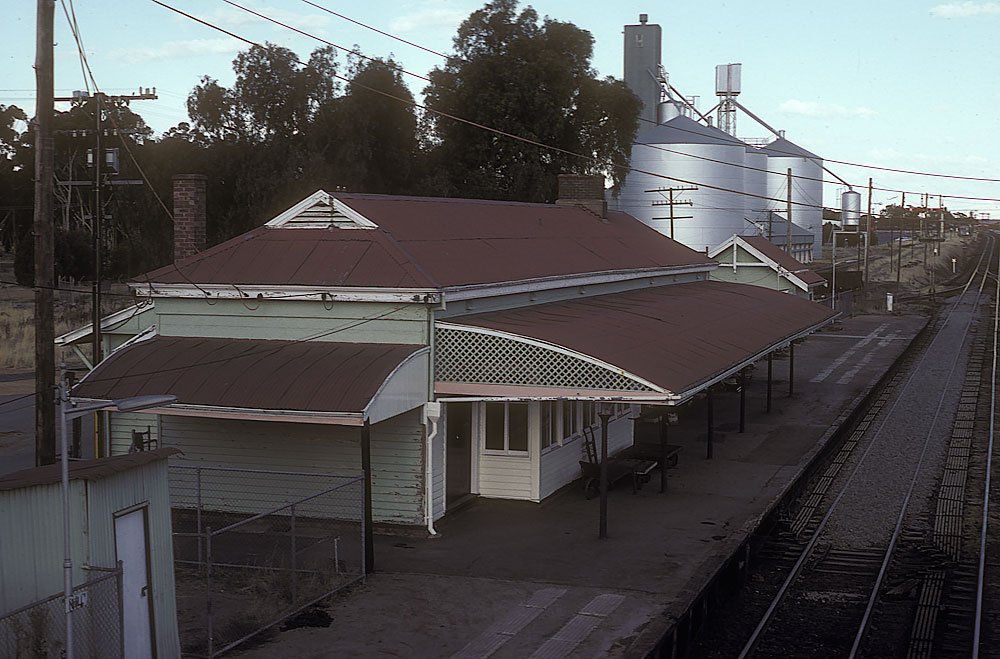
ABOVE: Nhill station building looking towards Dimboola from the footbridge. Feb 1982.
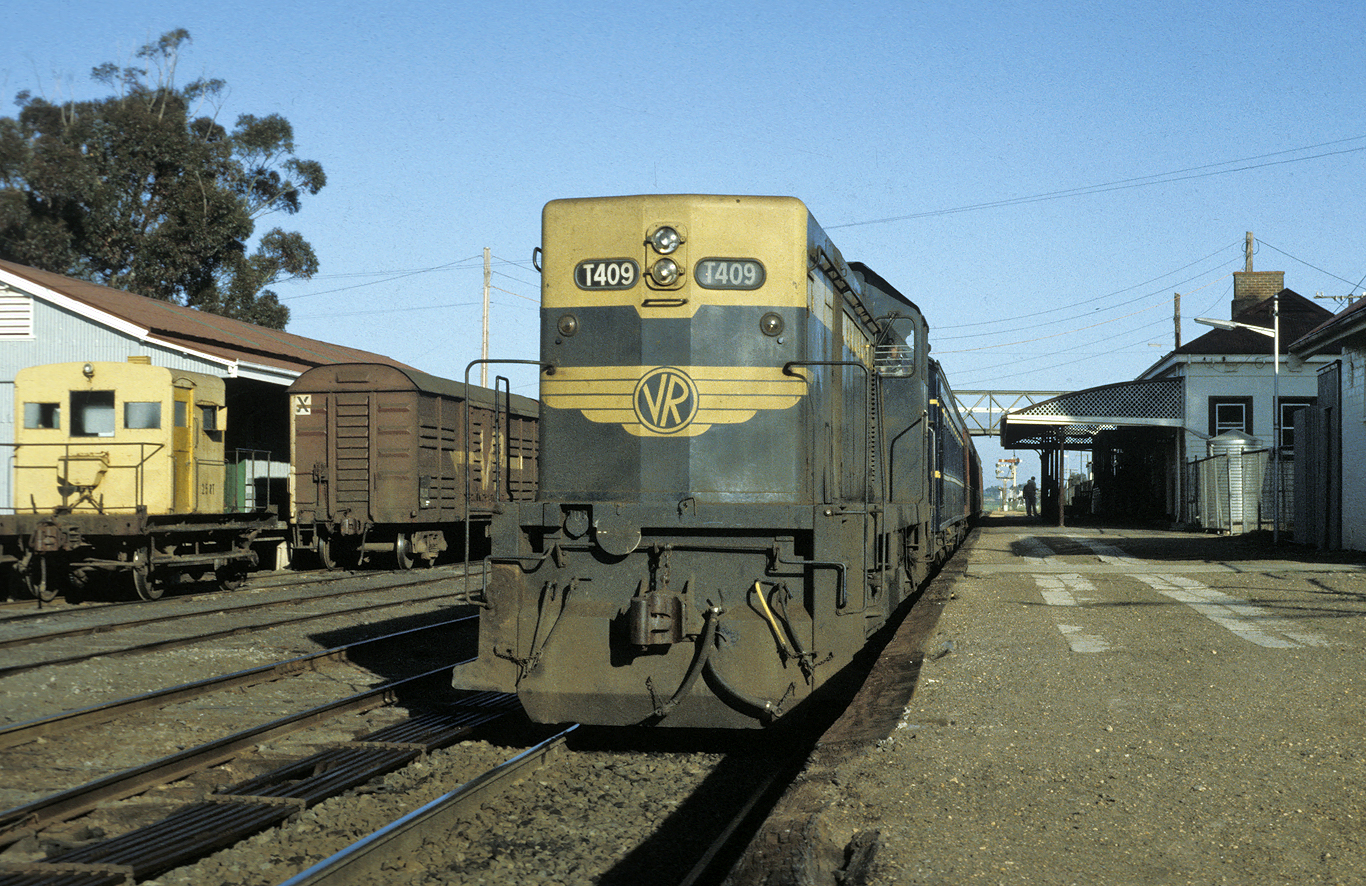
ABOVE: T 409 on an up enthusiast special at Nhill, Oct 1983. This special was run to view the line just before it was converted to CTC.
ABOVE: Post 10 at Nhill, the up home arrival. The mainline signal is at proceed and the staff exchanger is set up for an up train. April 16 1983. (photo courtesy Noel Bamford)
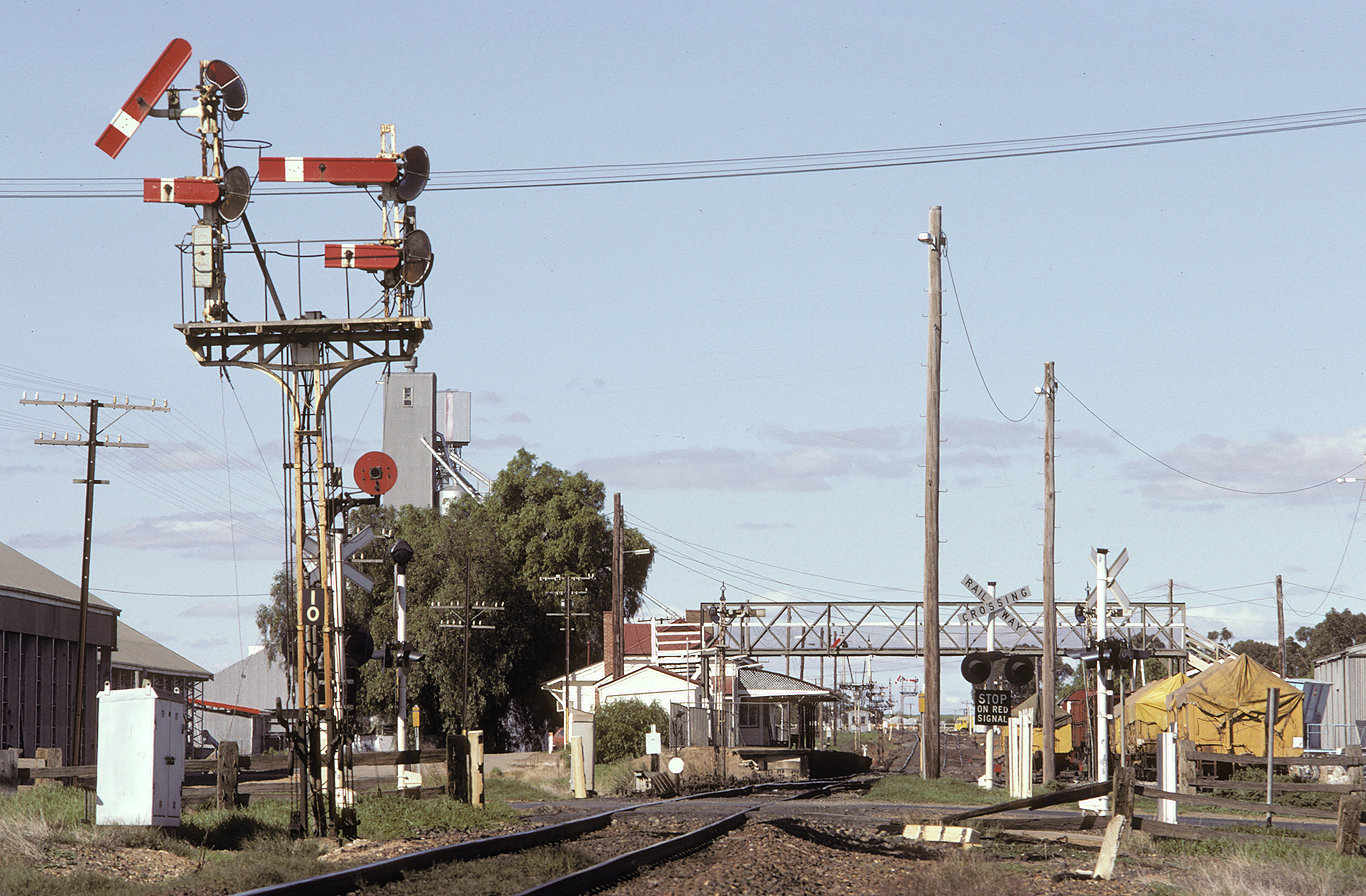
ABOVE: : The up distant signal for Nhill, motor operated because of its great distance from the signalbox, almost 3 km. The pipe mast was quite unusual.
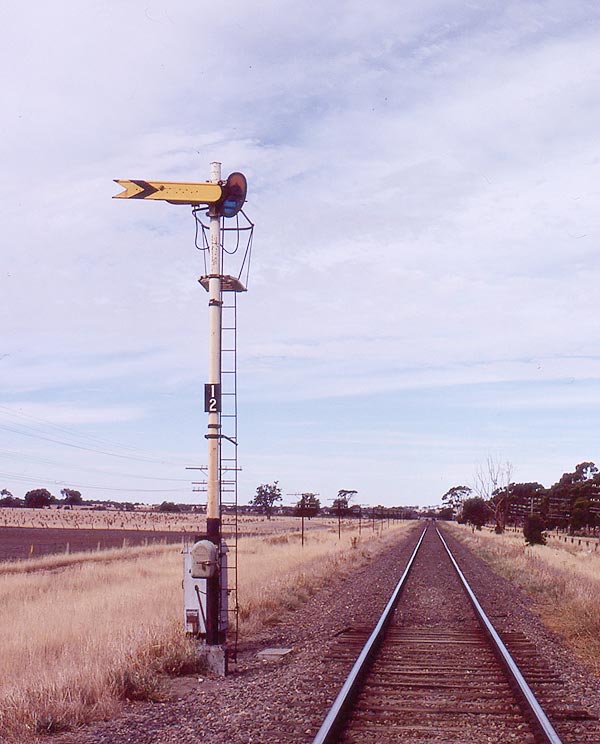
ABOVE: Diapur looking east. 1981. Although Diapur was a pretty nondescript Western line crossing station, it did have one claim to fame, it was where the down and up Overlands were timetabled to cross for many years.
ABOVE, the up home arrivals at Kaniva. BELOW: a down goods at the same location, 1982.
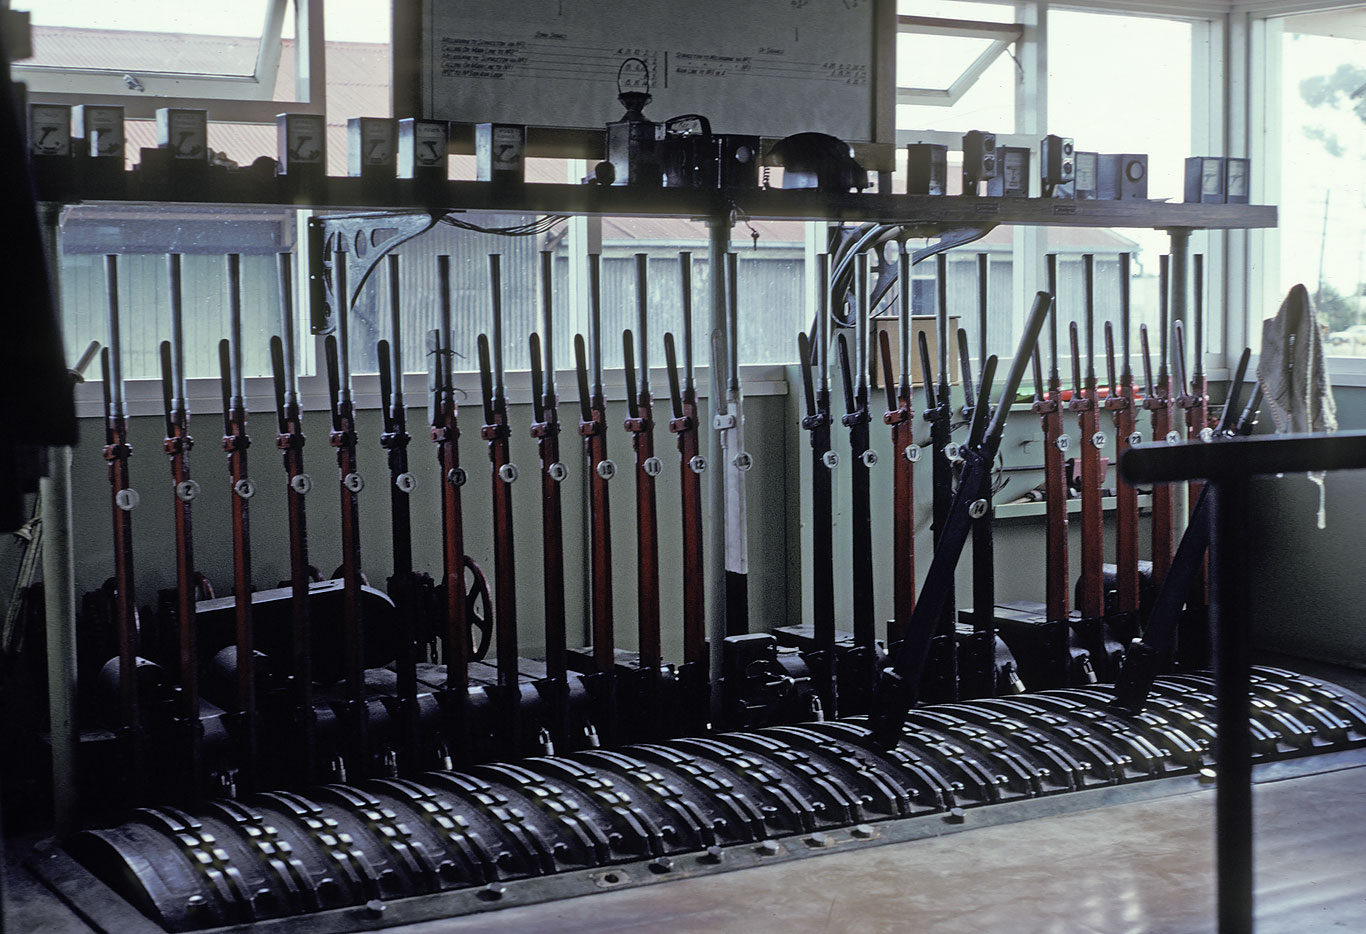
ABOVE: The interlocking frame at Kaniva, this 25 lever frame was installed in Nov 1966 and was one of the last new installations in Victoria, it replaced a 20 lever frame dating from 1889. photo March 1982
ABOVE: Post 9, Kaniva's up distant signal. The overbridge is the Western Highway. This distant was moved 367 yards further out from its original location in 1966 to the location seen here.
ABOVE: D 224 on an up mixed at Serviceton, circa 1905. Mort Clark collection
ABOVE: S 303 - S 302 appear to be doing a bit of shunting at the VR/SAR crew change station, ServicetonMarch 30 1970 Photo courtesy Tony Smith.
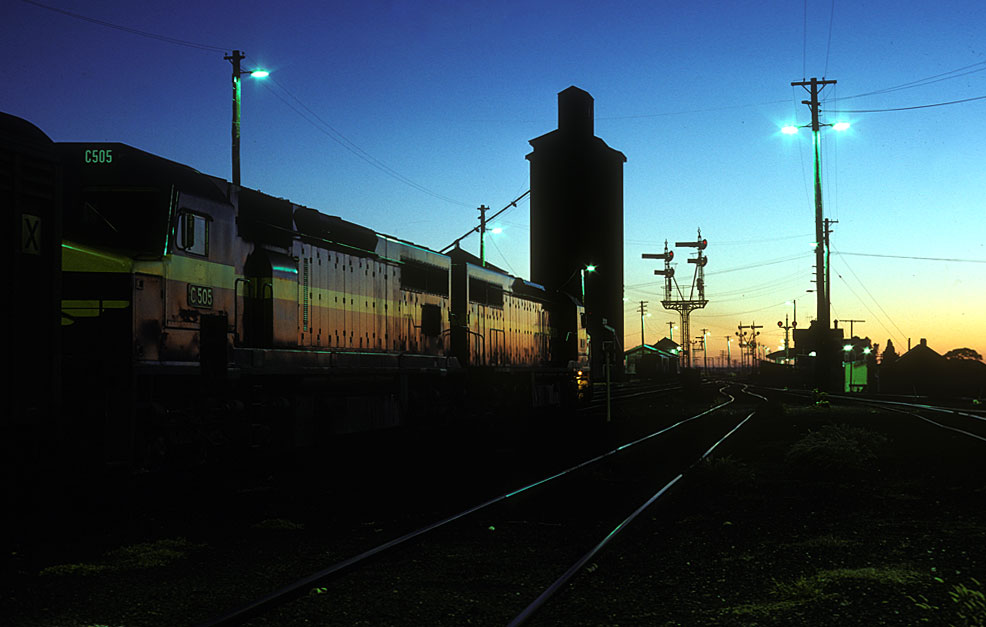
ABOVE: When viewed from the warm bed on The Overland in the middle of the night Serviceton looked somewhat mystical through the inky darkness. Here we see two very new C class, just before sunrise, that have just attached to 9144 "jet" awaiting departure for their run east to Melbourne. Oct 1977. Photo courtesy Warren Banfield
ABOVE: C 509 on a Melbourne to Adelaide "Jet" pauses at Serviceton, Jan 1985. Serviceton was the "border station between the Victorian Railways and the S.A.R, (South Australia Railways) It was here that locos and crews were changed on all interstate trains. With through working of locos starting in the early 1980's and through working of crews with the advent of National Rail in the mid 1990's, "Servi" as it was usually known, became barely a speck on the map. Tony Tuccio collection
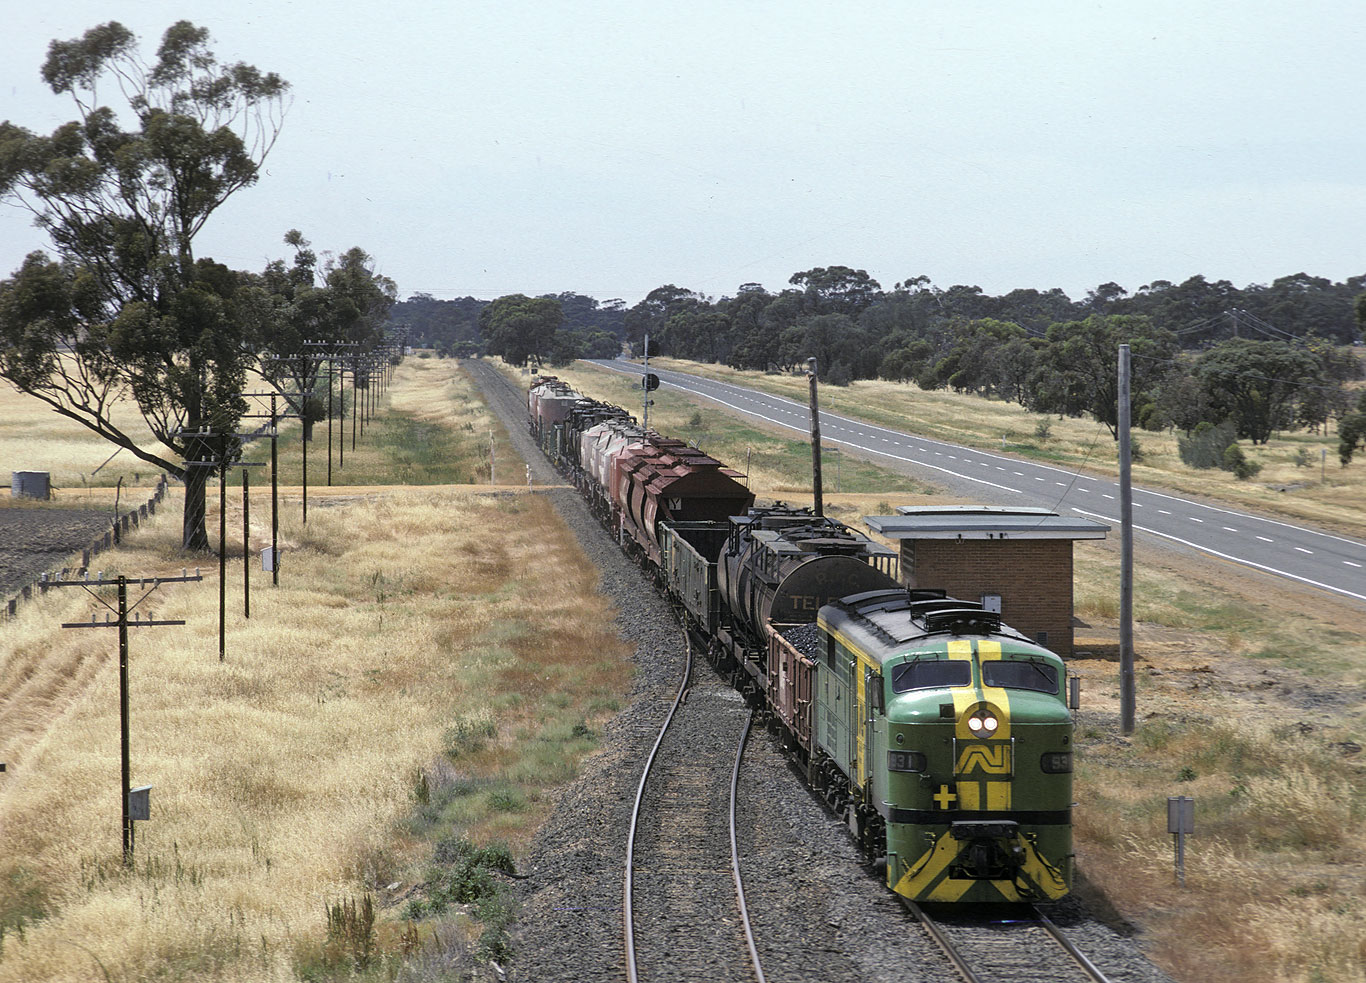
ABOVE: R 748 at Serviceton having run No 81 goods which was a 7.30 am Dimboola to Serviceton roadside goods March 8 1967 (photo courtesy John Ward)
ABOVE: Looking west, the down home arrivals. 1981
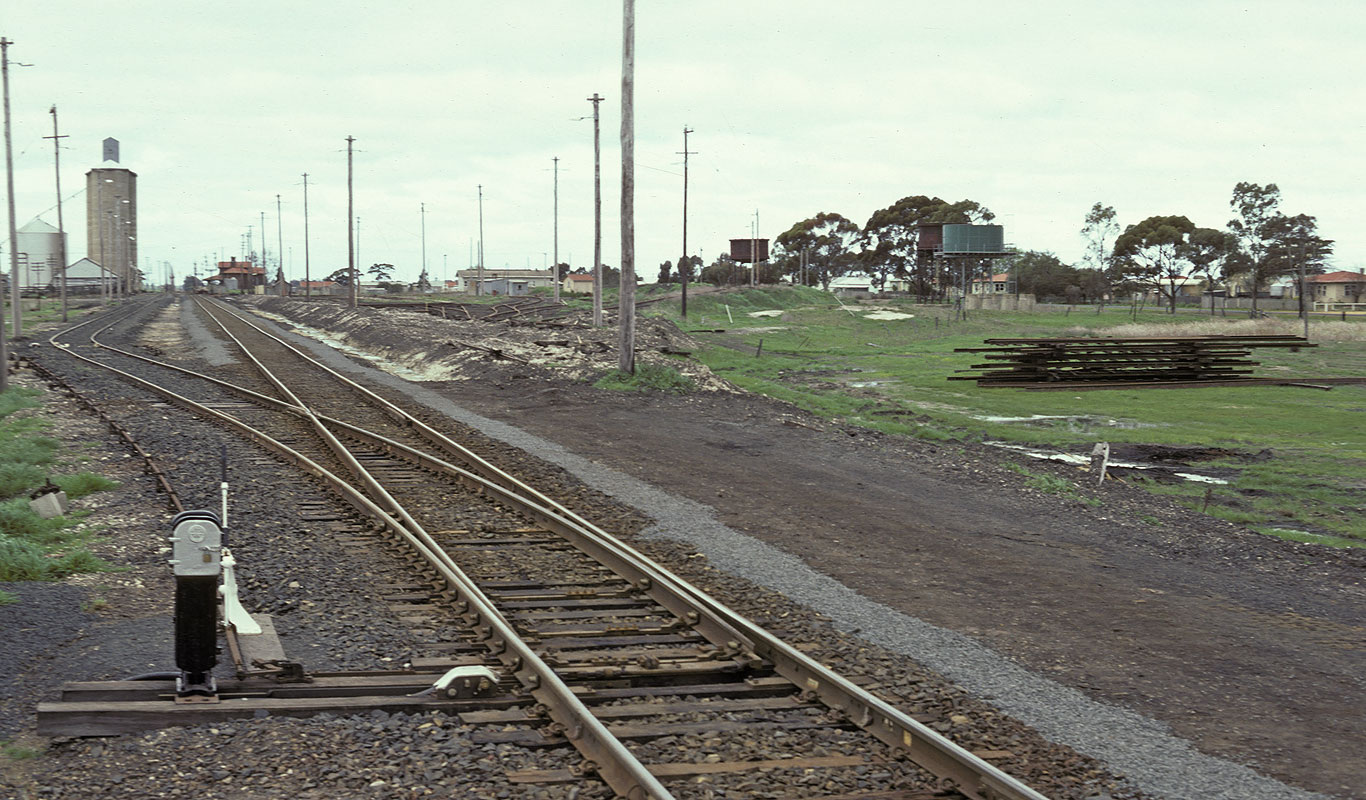
ABOVE: The view looking east from the west end of the yard, all connections to the down side yard have been removed and this turnout has been changed from staff locked points to a electric switch lock as a consequence of CTC being commissioned through the station on May 1 1984, photo date Sep 1 1984. (photo courtesy Noel Bamford)
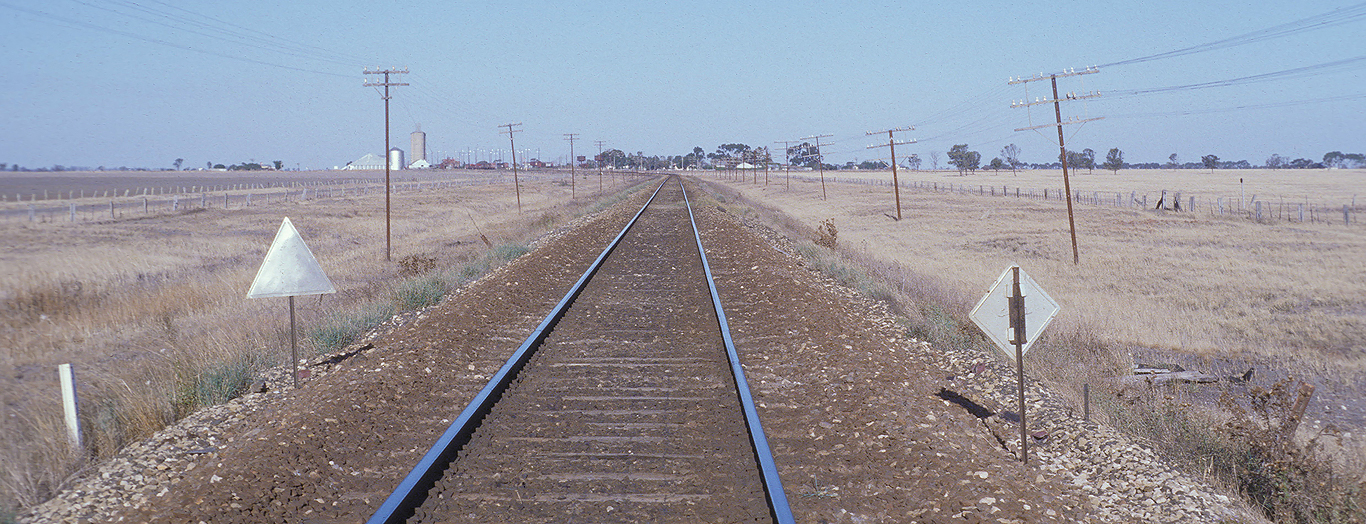
BELOW: The border between South Australia and Victoria look towards Victoria. Serviceton can be seen on the left. March 17 1978. (photo courtesy Geoff Winkler)
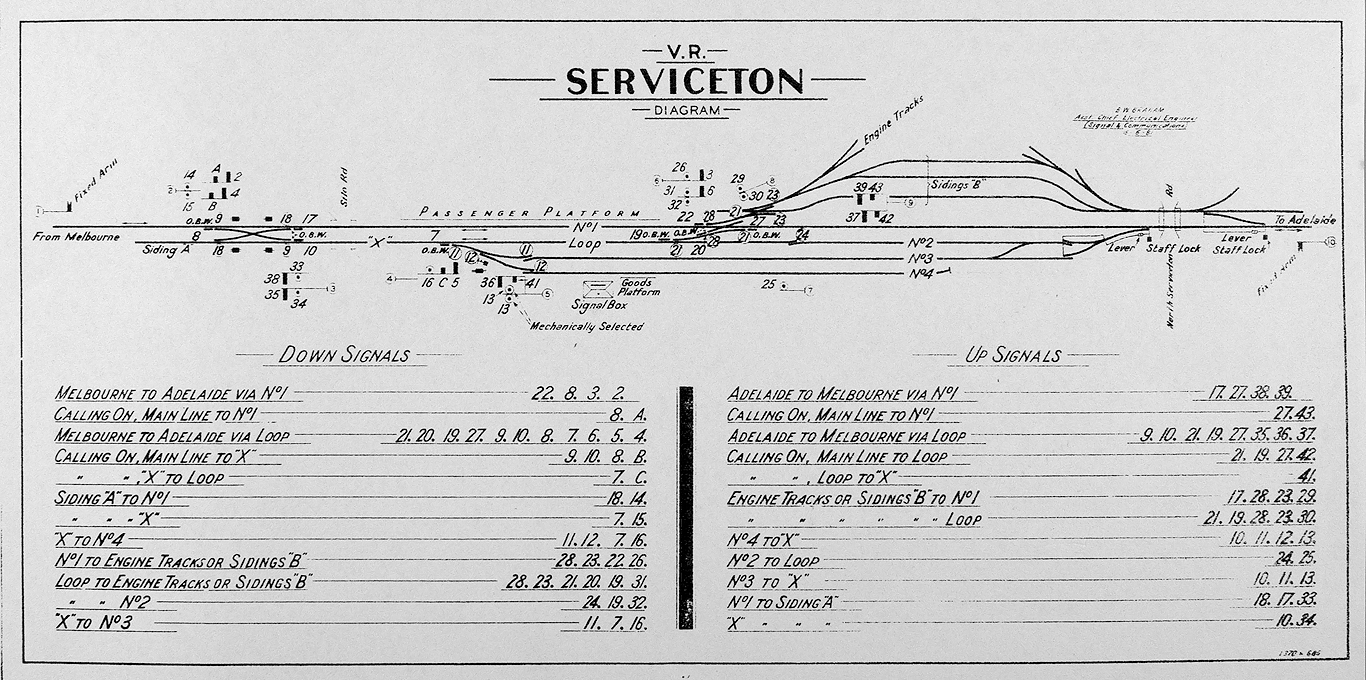
1890 Serviceton signal diagram
1919 Serviceton signal diagram
1942 Serviceton signal diagram
 .
.
