Train Section Order Working
Article written by Chris Wurr with assistance from Des Jowett.
A now largely forgotten safeworking system was Train Section Order working. Last used in 1952, there are few (if any) railwaymen or enthusiasts, who would have had first-hand dealings with it. The system provided easier flexibility for advancing and crossing trains than that provided by TS&T, especially in times of varying traffic loads, for example wheat seasons. Crossing trains at locations not normally used for such, was easier under TSO working, than establishing and then dis-establishing Temporary Train Staff stations under TS&T.
Working of Single Lines by Train Section Orders. C12/26 announced in W.N. 40/26 issued 5th October 1926.
The Train Section Order system of safeworking was devised by V.R. Safe Working Officer Mr T Edwards, under orders from General Superintendent Mr M J Canny. It was trialled on the Balranald line before being declared a success and officially implemented at the start of 1927. It eventually covered 722½ miles of single line railway scattered across the state. It was a mind-numbingly convoluted, paper-based system which appears to have been based on the South Australian Railways system called Permissive Block, which involved the issue of Crossing Orders and Proceed Orders. Train Section Order working bore no resemblance to Train Order working introduced by the SAR in 1926, and the Victorian adaptation of the 1980s. The basis of TSO working was the Working Time Table, although this was not an authority for trains to enter sections in itself. Trains were advanced through sections and crossed other trains on the issue of four differing Section Orders, depending on the circumstances. The line of railway working under TSOs between administering stations, was termed a Division and train movements through Divisions were controlled by Control Officers. These employees were not Train Controllers, but Stationmasters located at nominated Control Stations at the ends of Divisions. The Control Officers issued an appropriate Section Order for the circumstances, after a joint telephone or telegraphic conference. After conferring with each other, the Control Officers filled in the details in hand-written indelible pencil, required on the printed form, nominating the train/s to which it applied and which train was to be crossed and where. If there was no scheduled cross to be made, that part of the wording was struck out on Form A. Forms were duplicated by means of carbon paper and one kept at the Control Station and copies given to Drivers and Guards.
Section Orders used were:
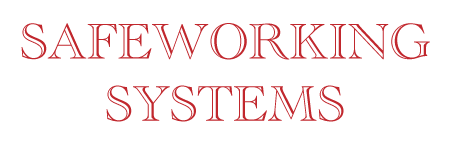
Form A. Used to advance a train which was running according to the WTT, through a Division and, if the WTT showed a cross with an opposing train at an intermediate station, the order also conveyed this information as a reminder to train crews. The form was printed on white paper in black ink with a large X in red ink superimposed across the whole face. If a timetabled cross was to be made somewhere in the Division and both trains were running to their schedules as laid down in the WTT, Form A was issued to the crews of both trains.
========
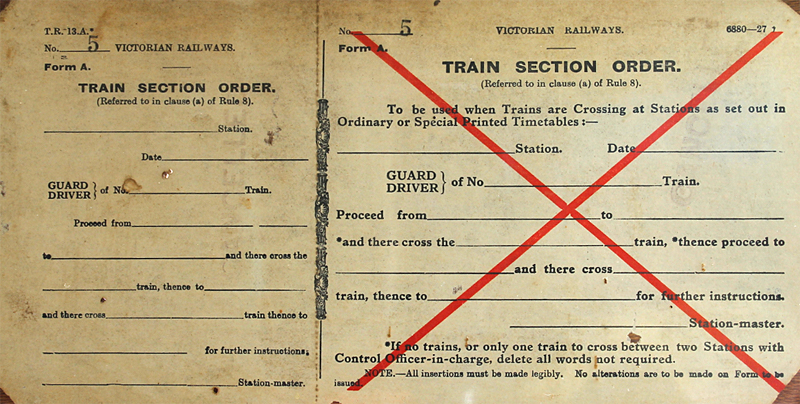
Form B. This form was issued when the scheduled place of a cross shown in the WTT was altered to a different location in the Division for whatever reason --- late running, etc. The form was printed in black ink on pink paper with a large X in red ink across the whole face.
========
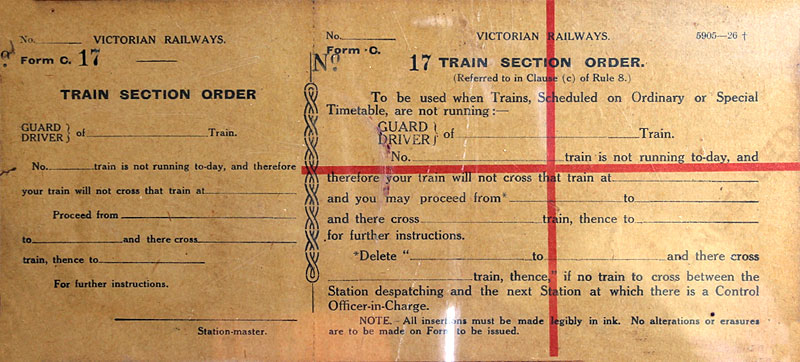
Form C. Was used when a scheduled cross was not to occur due to the cancellation of one of the trains. It was printed in black ink on blue paper with an elongated + in red ink across the whole form.
========

Form D. This form was issued by the Guard of a train which was at a location where a scheduled cross was to have taken place, but could not now be effected due to late running, last minute cancellation, breakdown or the like. Guards working over TSO territory were required to have a book of these forms in their kits. The form was printed in red ink on white paper with an elongated + in red ink across the whole form.
========
Trains could cross at unattended locations, with the Guard of the first train to arrive, taking charge of proceedings. Staff locked points at unattended sidings, were unlocked by the use of a Master Key issued at the time of deliverance of the appropriate Section Order.
It would appear that Section Order working took place on lines where Selector phones (direct phone line to the Train Controller) had not been installed, but this is yet to be confirmed or refuted.
The Achillies Heel of the system was that locomotive numbers were not indicated on any of the forms and this lead to a near head-on smash between Heywood and Portland North in January 1930. Two opposing trains were to cross at Heywood. The Down arrived into Heywood, and seeing an Up train in clear on the platform road, understandably thought this was the train he was either scheduled in the Working Time Table or on a Train Section Order form to cross there. As the points were set for the straight road, the Down train continued unaware and on into the Heywood - Portland North section. However the train standing at the platform was a Mt.Gambier special and the other Up train was still heading towards Heywood from Portland North. The errant Down train had proceeded about 6½ miles into the Portland North section without authority and had just passed through Heathmere when both Drivers saw the opposing trains. Due to extremely good luck, a head-on collision was narrowly avoided. Both trains had been travelling slowly apparently and the fact that the section of line in the locality was straight, prevented a disaster. Half a mile further towards Portland and the outcome would have be different, as the line enters two miles of uphill and downhill, reverse curves where forward visibility would not have been sufficient to stop either train in time. At the time of the incident, Heywood was designated a Crossing Station (X) only. The near-collision was the reason Heywood was altered to be a Control (C) location from 3rd February 1930.
Locations in the Divisions where trains could cross, were nominated X and shown as such in the WTT. Control Stations were indicated by C. As the points at intermediate sidings (and some crossing stations) were secured with staff locks, a Master Key was issued (presumably) for every train passing through a Division.
Perhaps one reason for the superceding of TSO working with Train Staff & Ticket was that the Train Staff itself was the key which unlocked the points (Master Key only used when a train was running on a Staff Ticket), so the system might just as well revert to TS&T.
The imposition of TSO working over the top of what later became known as Automatic & Track Control system on the Upper Ferntree Gully – Belgrave line, remains a mystery, as A&TC is a safeworking system in itself and had been used alone as such for many years prior on the Geelong line. Details of the various Divisions, stations, implementation and conversion dates are shown in the following table.
========
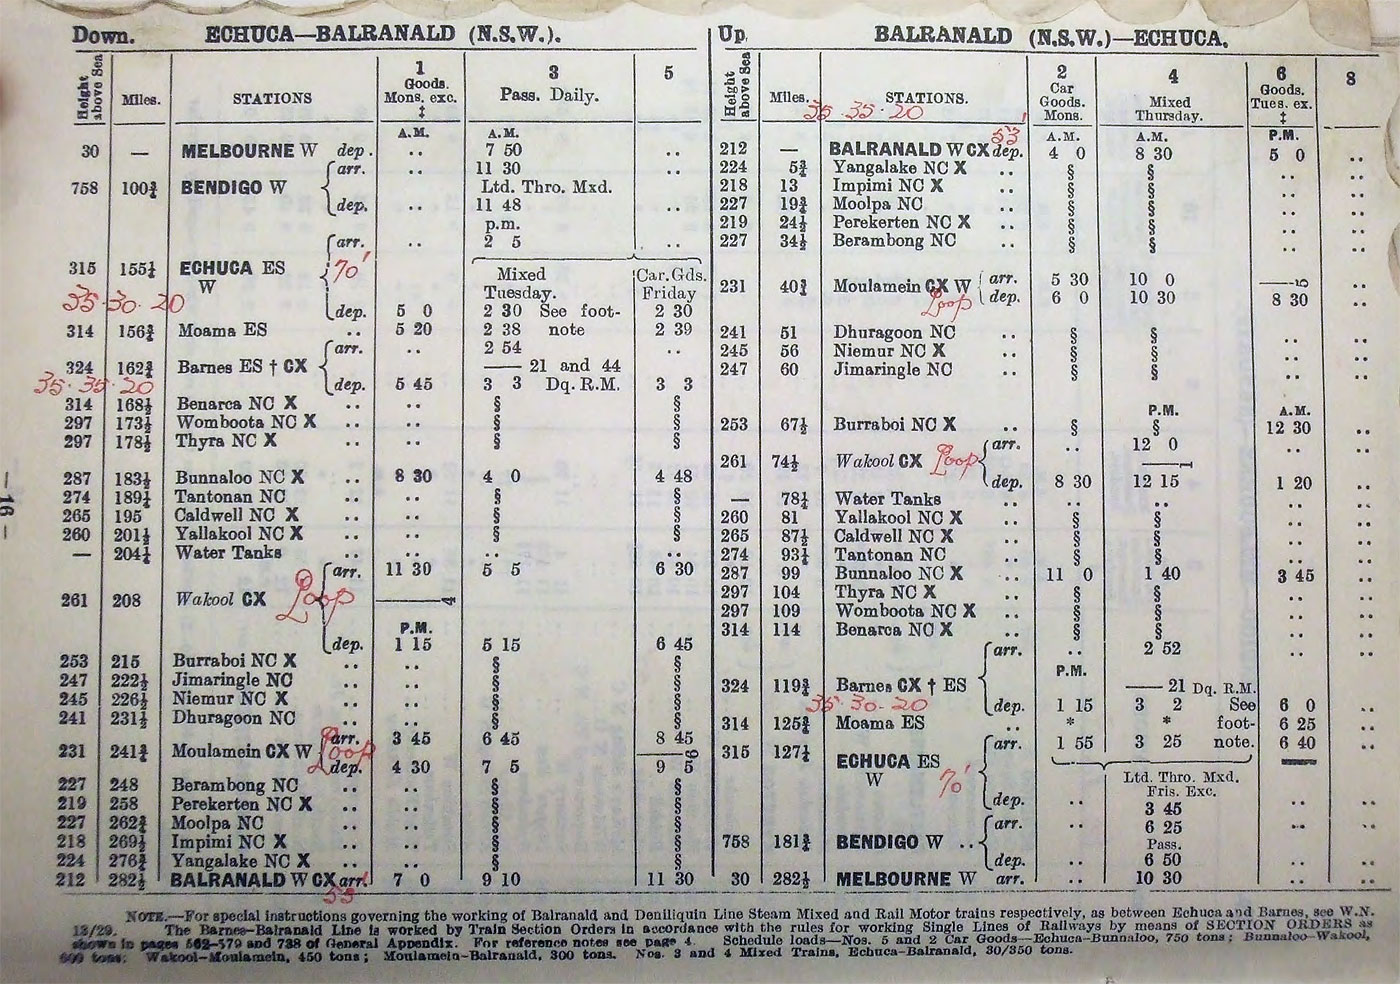
BARNES – BALRANALD.
Introduced 11th January 1927. 119½ miles.
Barnes-Wakool Division. Barnes and Wakool C. Benarca, Womboota, Thyra, Bunnaloo, Caldwell, Yallakool all X.
Wakool-Moulamein Division. Wakool and Moulamein C. Burraboi, Niemur both X.
Moulamein-Balranald Division. Moulamein and Balranald C. Perekerten, Impimi (until 21st April 1942), Yangalake all X.
Moulamein to Balranald reverted to TS&T 5th October 1943. Barnes to Moulamein reverted to TS&T 10th April 1945.
========
COLAC – CROWES.
Introduced 17th January 1927. 44 miles.
Colac-Beech Forest Division. Colac and Beech Forest C. Barongarook, Kawarren#, Lovat#, Gellibrand, Banool#, Dinmont# all X. # unattended crossing station for Postal Motor and train.
Beech Forest-Crowes Division. Beech Forest and Crowes C. Weeaproinah, Wyelangta both X.
Colac to Crowes reverted to TS&T 11th December 1939.
========
HORSHAM – HAMILTON.
Introduced 13th February 1927. 102 miles.
Horsham-Balmoral Division. Horsham and Balmoral C. East Natimuk (C), Noradjuha (until 26th June 1941),Toolondo, Kanagulk all X.
Balmoral-Hamilton Division. Balmoral and Hamilton C. Vasey (until 8th August 1944), Cavendish both X. Horsham-East Natimuk reverted to T. S & T 27th April 1939. East Natimuk-Balmoral-Hamilton reverted to TS&T 9th November 1944.
========
BRANXHOLME – PORTLAND NORTH.
Introduced 13th February 1927. 37½ miles.
Branxholme-Portland North Division. Branxholme and Portland North C. Condah, Heywood both X. Heywood became C 3rd February 1930.
Heywood-Portland North reverted to T. S & T 16th October 1941. Branxholme-Heywood reverted to TS&T 31st December 1952.
========
UPPER FERNTREE GULLY – BELGRAVE.
Introduced circa October 1927. 3 miles.
Upper Ferntree Gully-Belgrave Division. Upper Ferntree Gully and Belgrave C. Upwey X. Train Section Order working was superimposed on Automatic and Track Control as it later became called. Technically Absolute, Permissive Block.
Upper Ferntree Gully-Belgrave reverted to TS&T 28th August 1930 at the same time as A.T.C was abolished.
========
BAXTER – STONY POINT.
Introduced circa March 1927. 14 miles.
Baxter-Bittern Division. Baxter and Bittern C. Somerville, Tyabb (until circa October 1929, thence Block Post), Hastings until circa October 1941. (May be Block Post from circa October 1929), all X.
Bittern-Stony Point Division. Bittern and Stony Point C. Crib Point X (May be Block Post from circa October 1929).
Baxter-Stony Point reverted to TS&T 10th October 1941.
========
YARRAWONGA – OAKLANDS.
Introduced 15th August 1938. 38 miles.
Yarrawonga-Oaklands Division. Yarrawonga and Oaklands C. Warragoon, Rennie, Sanger all X.
Yarrawonga-Oaklands reverted to TS&T 16th August 1948.
========
BELOW: Page from the 1932 Northern & Midland Working Time-Table. The timetable shows the use of the Control station (C) and crossing station (X) symbols as described in the text above.