
| Chewton | 77Miles 77Chains 78Links / 125.484km | (Barkers Creek) |
| Harcourt |
| Campbell |
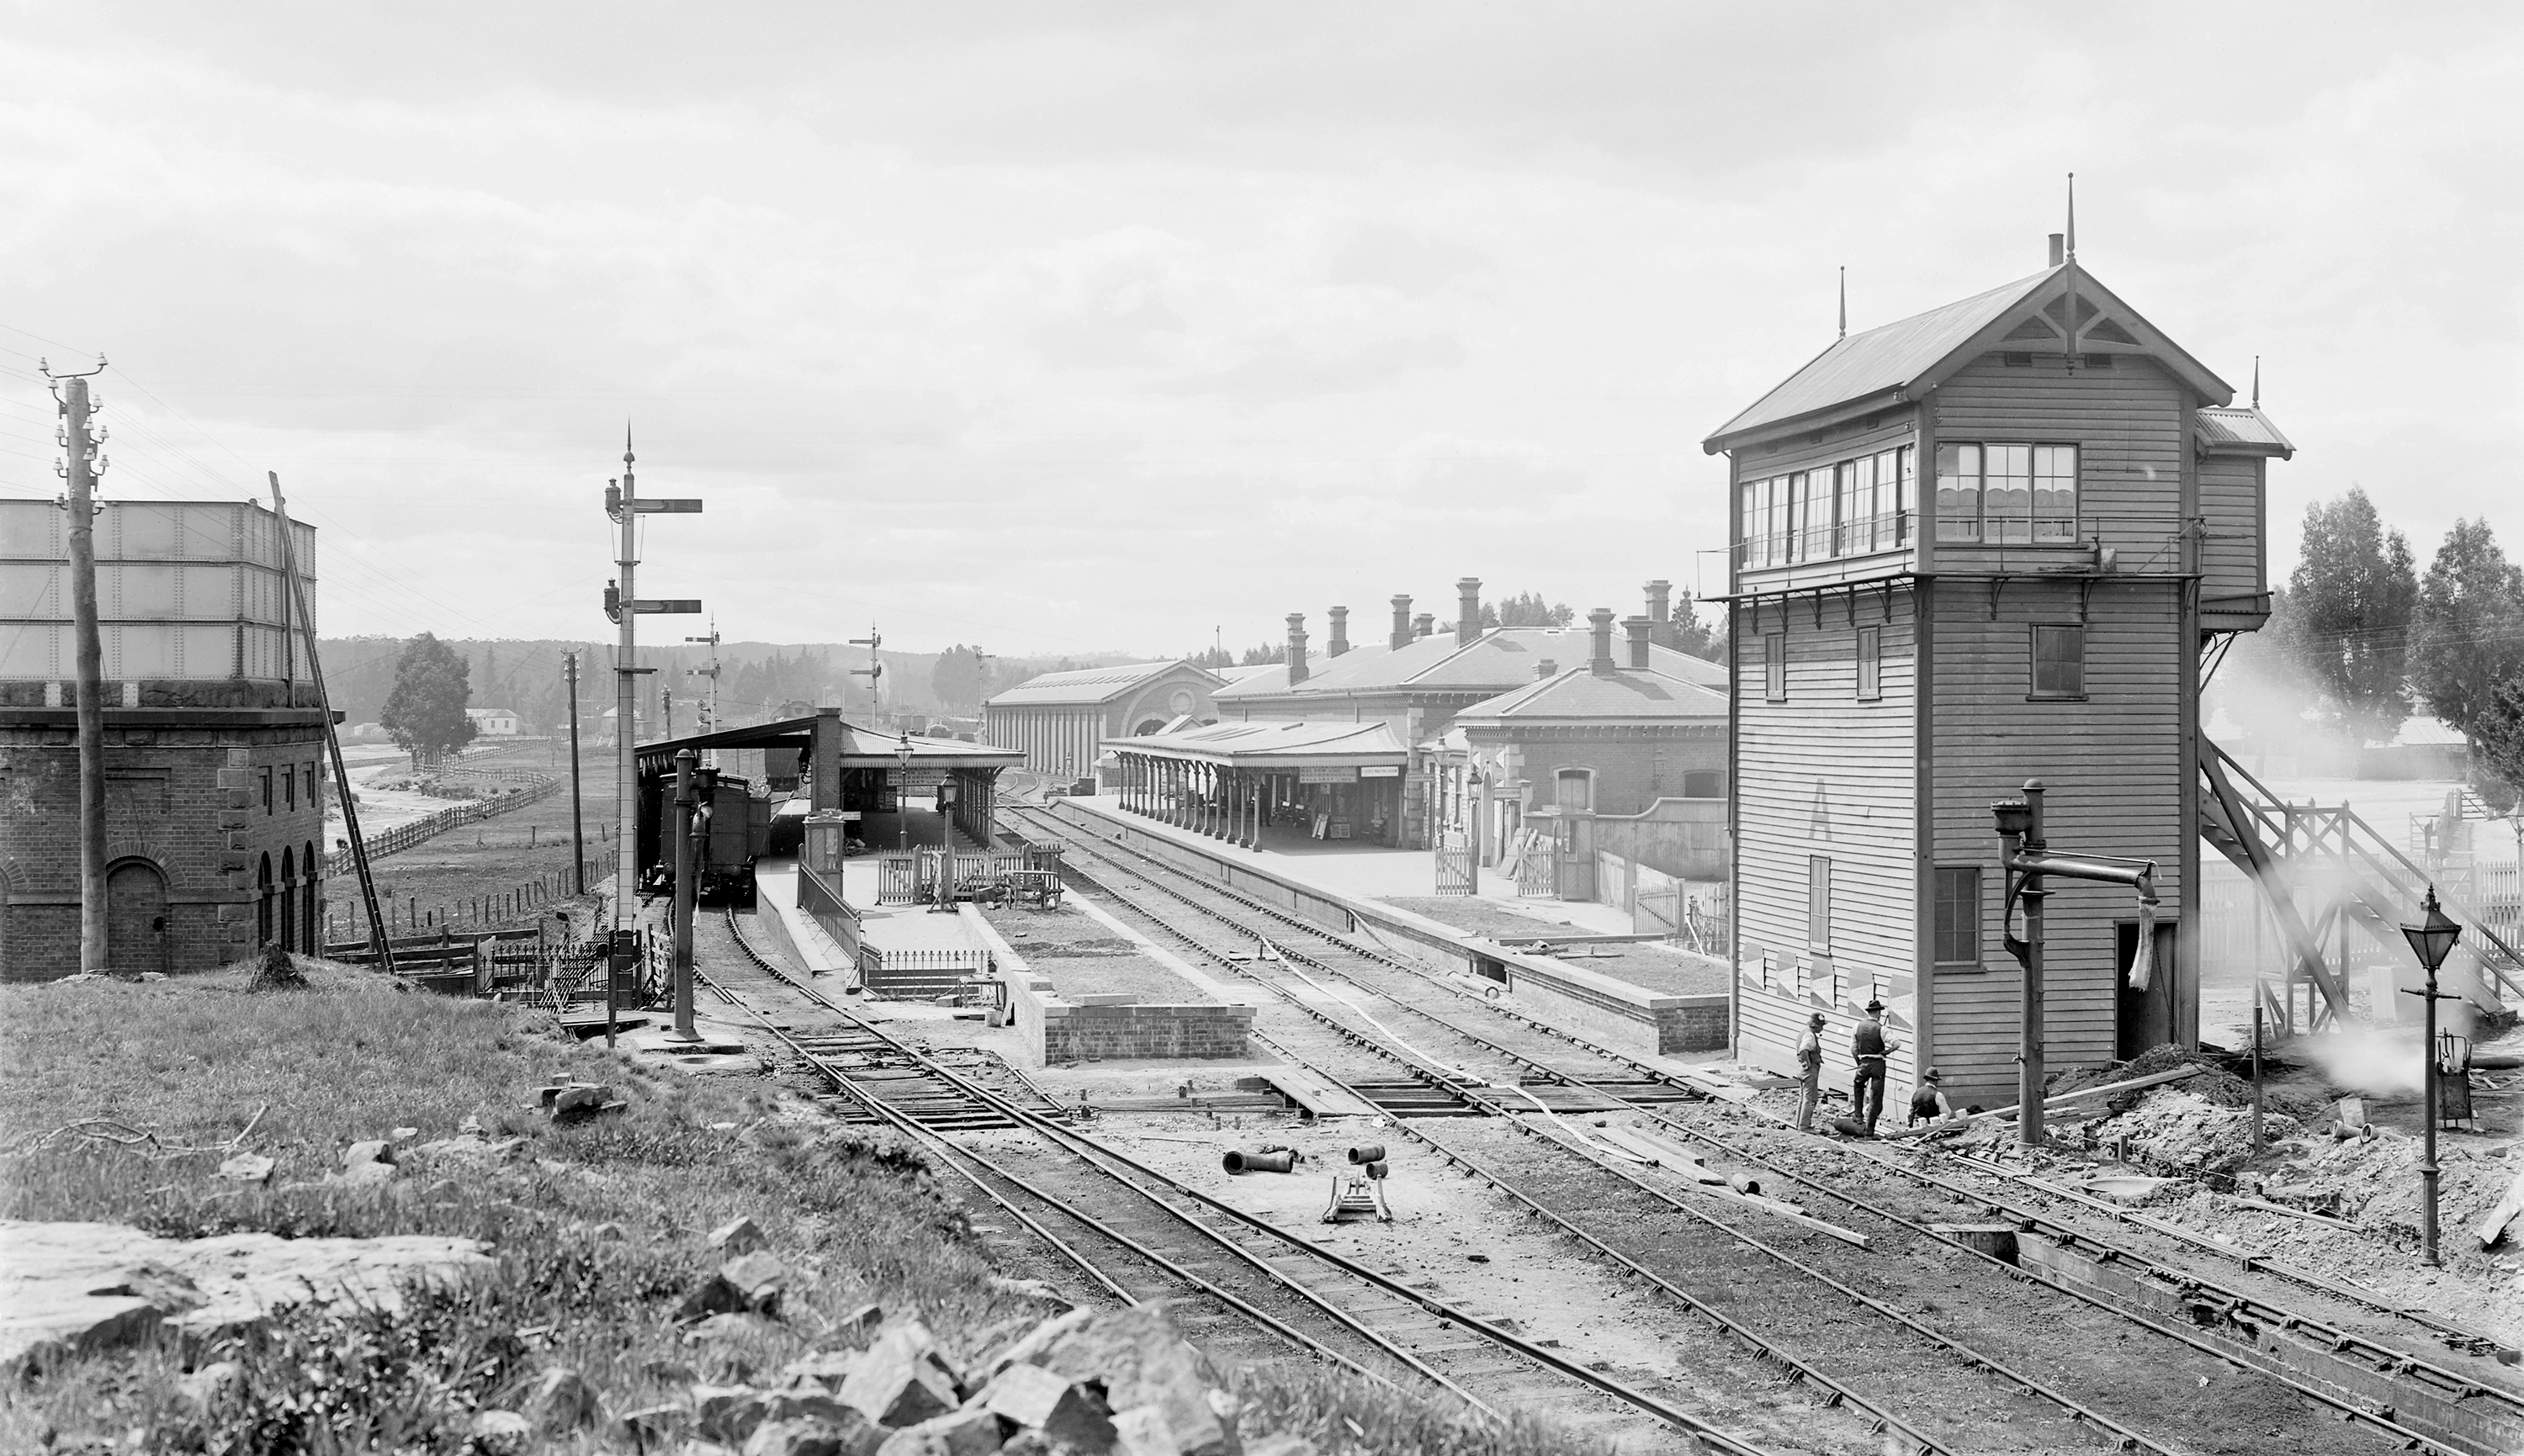
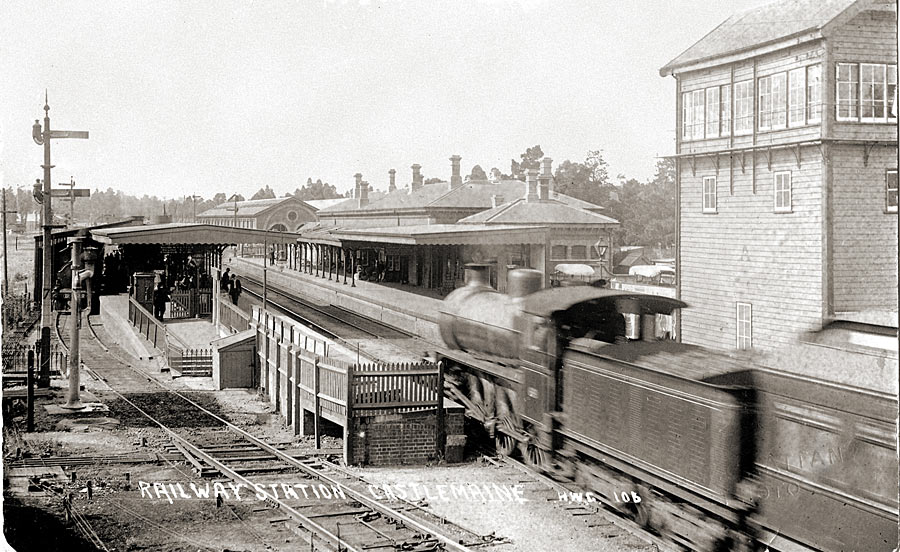
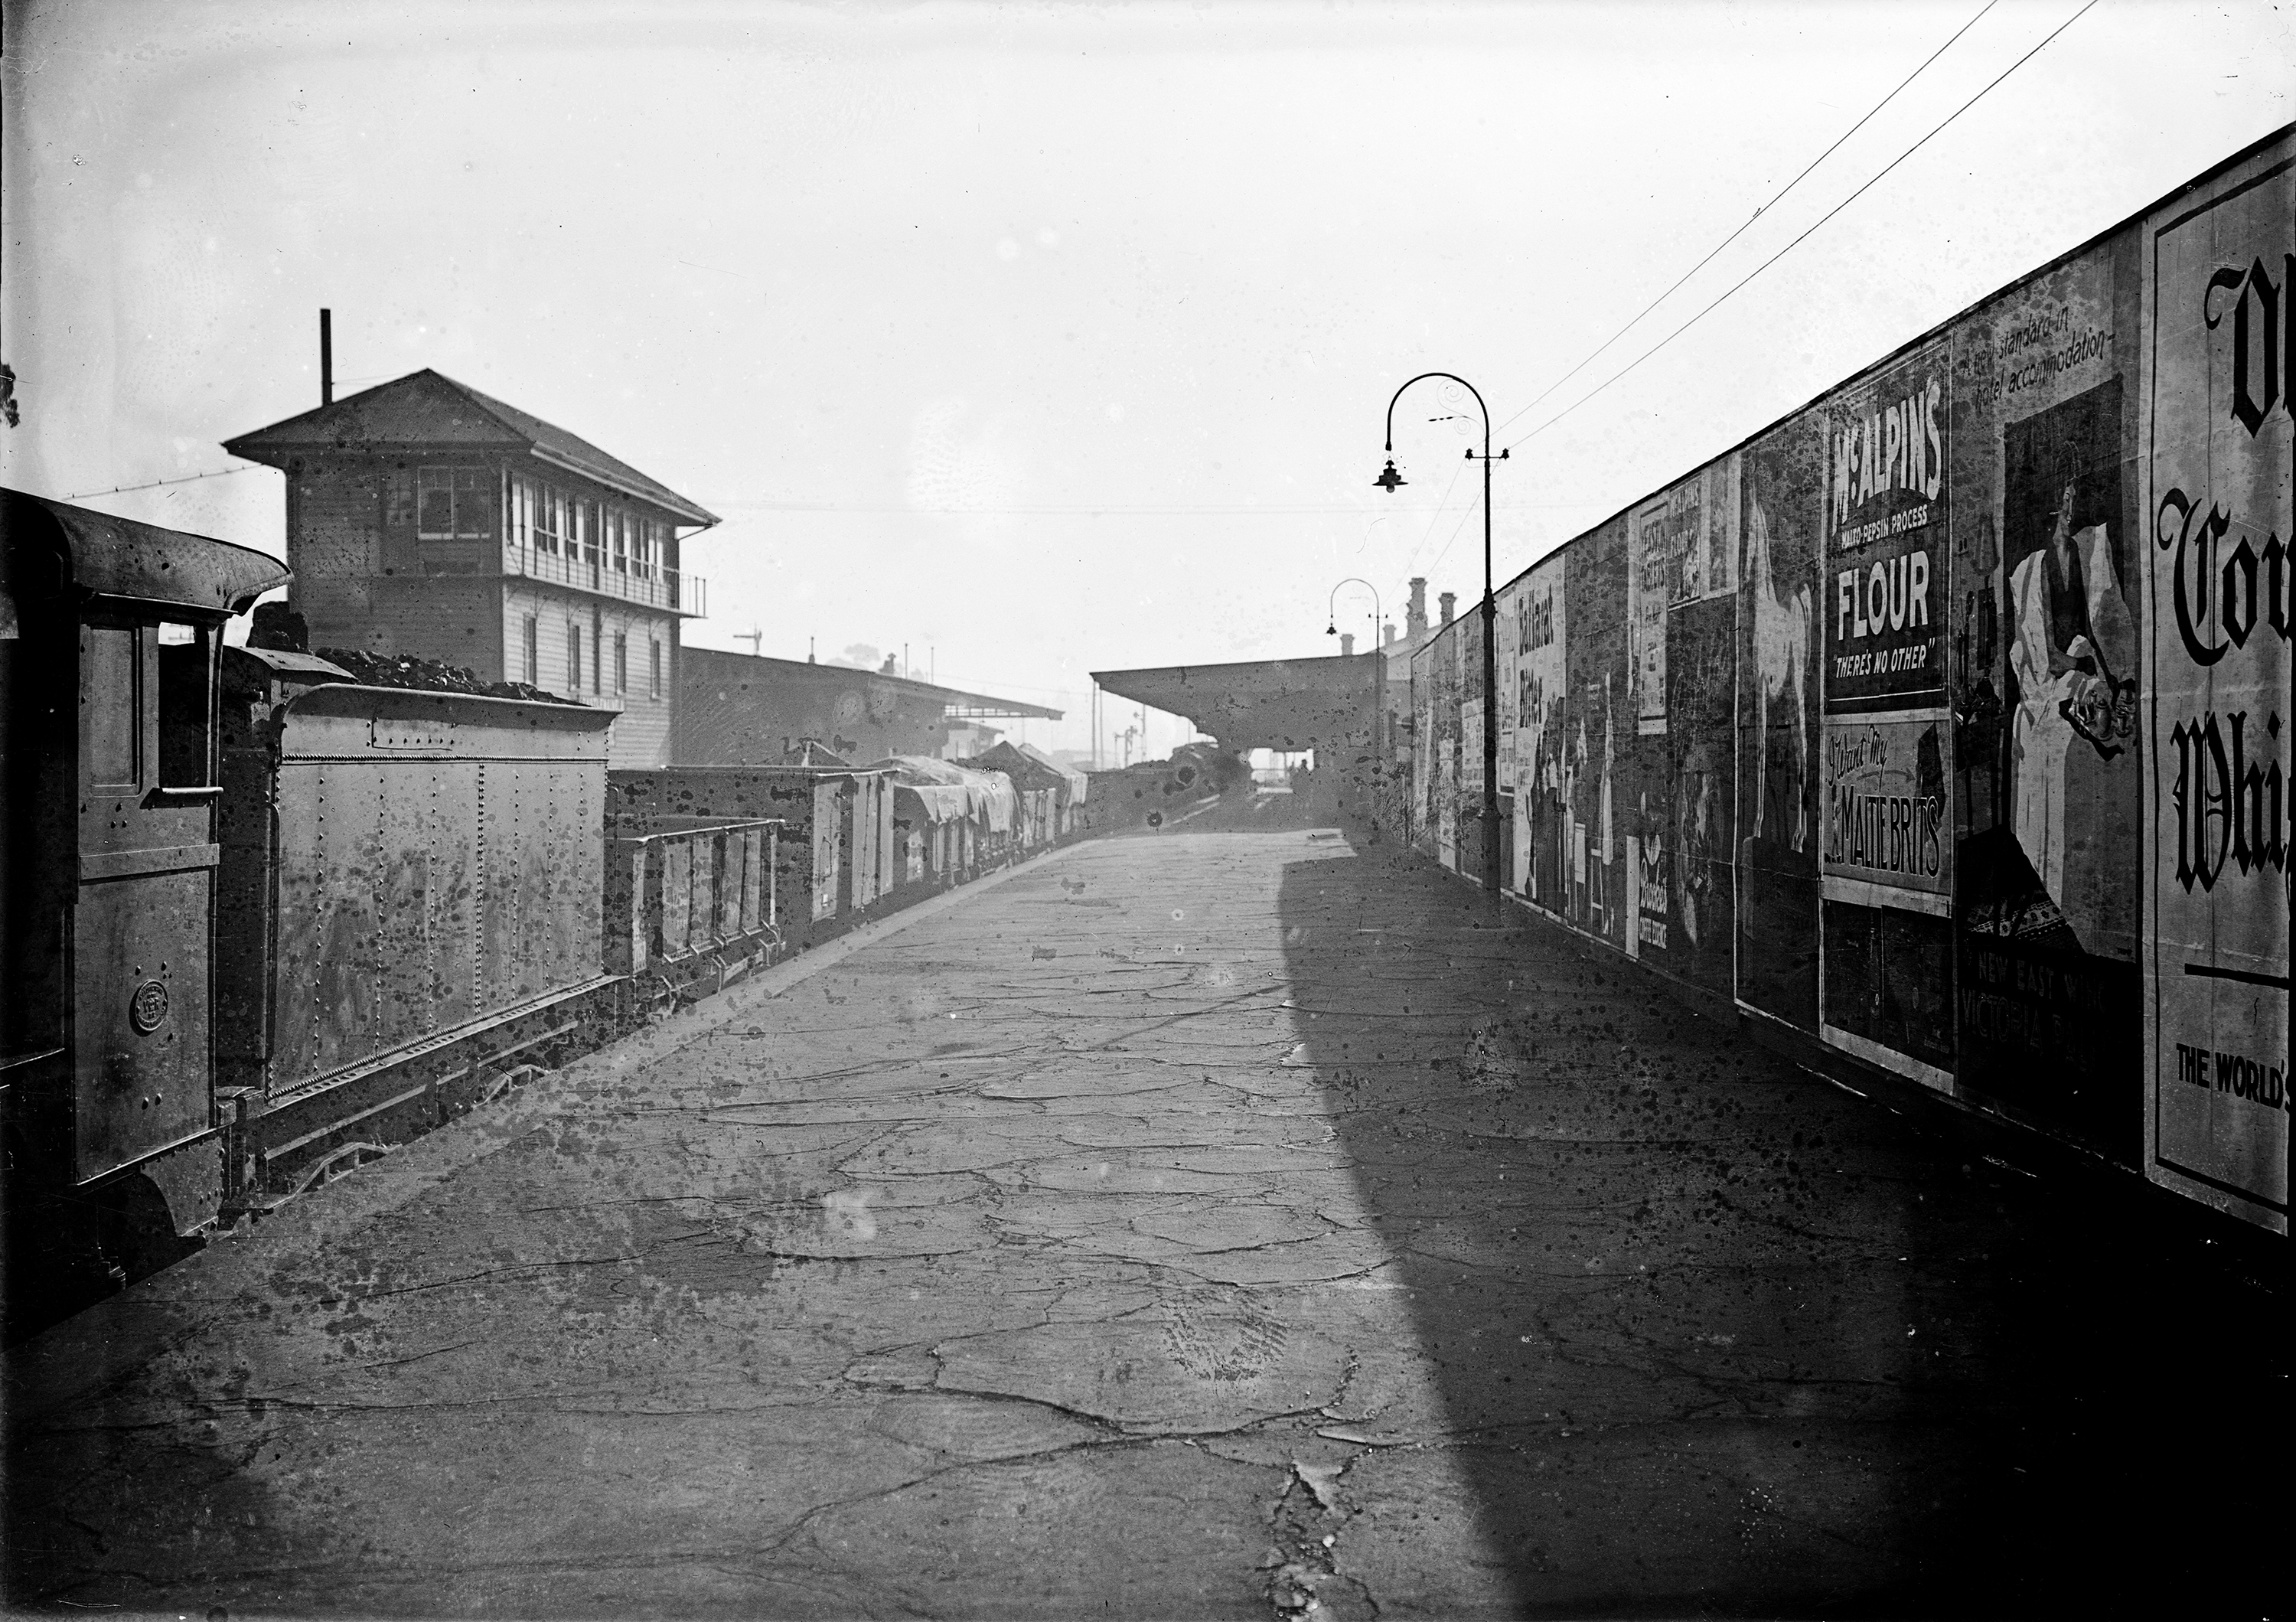
ABOVE: A wonderful photo showing the original A box, which was replaced with a new one on the island platform in 1915. Both platforms are being extended, possibly in anticipation of the introduction of the E cars.
A contract was gazetted for the construction of buildings and other works for a passenger station at Castlemaine on May 23, 1862. The substantial brick station offices incorporated granite quoining.
On August 14, 1862, a contract was let for the construction of the Slate roofed, Brick and Granite Goods shed. The scope of works for this also included the provision of inside & outside platforms, a weighbridge and weighbridge office, a 10 ton crane, the foundations for six, 15 foot turntables and all associated drainage.
The line from Kyneton through to Castlemaine was opened on October 15, 1862. 5 days later, it was opened through to Sandhurst, (Bendigo).
On September 6, 1872, the contract was let for the construction of the railway from Castlemaine to Newstead. On August 7, 1874, that line was opened right through to Maryborough.
The Maldon line opened on June 16, 1884, and a Signal Box, (Later referred to as Castlemaine 'C'), was provided at a newly created junction with the Maryborough line. This was situated about 46 Chains from the latter's divergance at Castlemaine and the Signal Box was provided with 9 lever No 5 Pattern Rocker frame.
A brick lined subway, with stone steps and capping was constructed at the up, (south), end of the station during late 1887. This provided for pedestrian access between platforms as well as from the town centre to a footbridge over Barkers Creek.
On April 20, 1888, as part of an expansion of the Castlemaine yard, a contract was let for the erection of a signalbox, adjacent to the Parker Street level crossing, at the Down end of the station. This was referred to as Castlemaine 'B'. Four weeks later, on May 18, a further contract was let for the construction of a signal box at the Up end. This was on the Up side of the line an was referred to as Castlemaine 'A'. One year later, on May 26, 1889, 'A' Box was interlocked with a 35 lever Rocker frame, and 'B' Box, with 25 lever Rocker frame.
On November 19, 1895, a contract was let for new steel and iron girders and fixings for the Forest St bridge and the Forest Creek viaduct. Both of these structures are situated between the Station and the point of divergance of the line across to Maryborough. It appears however, that the work was only for strenghtening purposes, as they had already been widened for the third track prior to the interlocking of the station in 1889.
On May 20, 1908, a contract was let to provide verandah extensions over the island platform. A further contract to do this work was also let to the same Firm on June 1, 1910.
On June 25, 1912, a 'staff carrier' (flying fox) was provided to carry the Maryborough Line staff from the signal box across to the island platform. This was short lived and was removed on December 7, 1914.
By June 1914, the island platform had been widened, and on August 29, 1914, a further contract was let to provide a single replacement verandah across the full width of it.
Commencing in 1914, works were undertaken for the expansion of the goods yard. On July 6, Signalbox 'B' was relocated further away from the running lines. On May 12, 1915, a new replacement for signal box 'A' was provided. This was on the opposite side of the main lines, positioned on the island platform, and had an 88 lever frame installed. By 1915, half of the goods shed had been removed and a cantilevered verandah roof was provided over the remaining platform in it's stead. The slate roofing had also been stripped off, and replaced with galvanised corrugated iron.
On November 11, 1926, the Signalbox at Maldon Junction was abolished and the location was, from then, worked from Castlemaine 'A' using remote control and power signalling. This was abolished on March 4, 1952, and the three position signalling used in conjunction with it was removed. After that time, the Junction points were worked from 2 lever ground frame and secured by a Staff lock. This situation remained until 1976 when, on December 3, the Maldon line was closed. The final train to run on the branch had done so on June 17, some six months prior.
The Passenger service between Castlemaine and Maryborough was withdrawn on July 9, 1977, and the Car Dock on the Up side at the Up end was abolished on December 19, 1978.
On May 30, 1989, both Castlemaine 'A' and 'B' Signal box's, along with all mechanical signals and points were abolished. Castlemaine was re-signalled with three position signals worked from a new Panel, which was installed in the station office. The Interlocked gates at Parker Street were replaced with Boom Barriers.
Signalbox 'A' survived demolition and was retained for use by the 'Victorian Goldfields Railway', who now maintain and operate the Castlemaine to Maldon Branch line.
(Includes detail gleaned from Andrew Waugh's 'Victorian Station Histories')
ABOVE: Looking West-South-West across the southern edge of of Castlemaine c1860, and construction of the 'Main Line' through there is well under way. Cornish & Bruce, the principle contractors for the building of the line, have set up shop in the former three storey Flour mill on Barker Street. The foundry they established on this site supplied the ironwork needed for much of the infrastructure along the route. The brick and basalt skew arch bridge spanning Johnstone Street, (centre left), has been erected and the filling in of the extensive bank '143', toward the station has been completed as far as the partially completed brick and granite viaduct over Forest Creek .
(Photo courtesy of SLV).
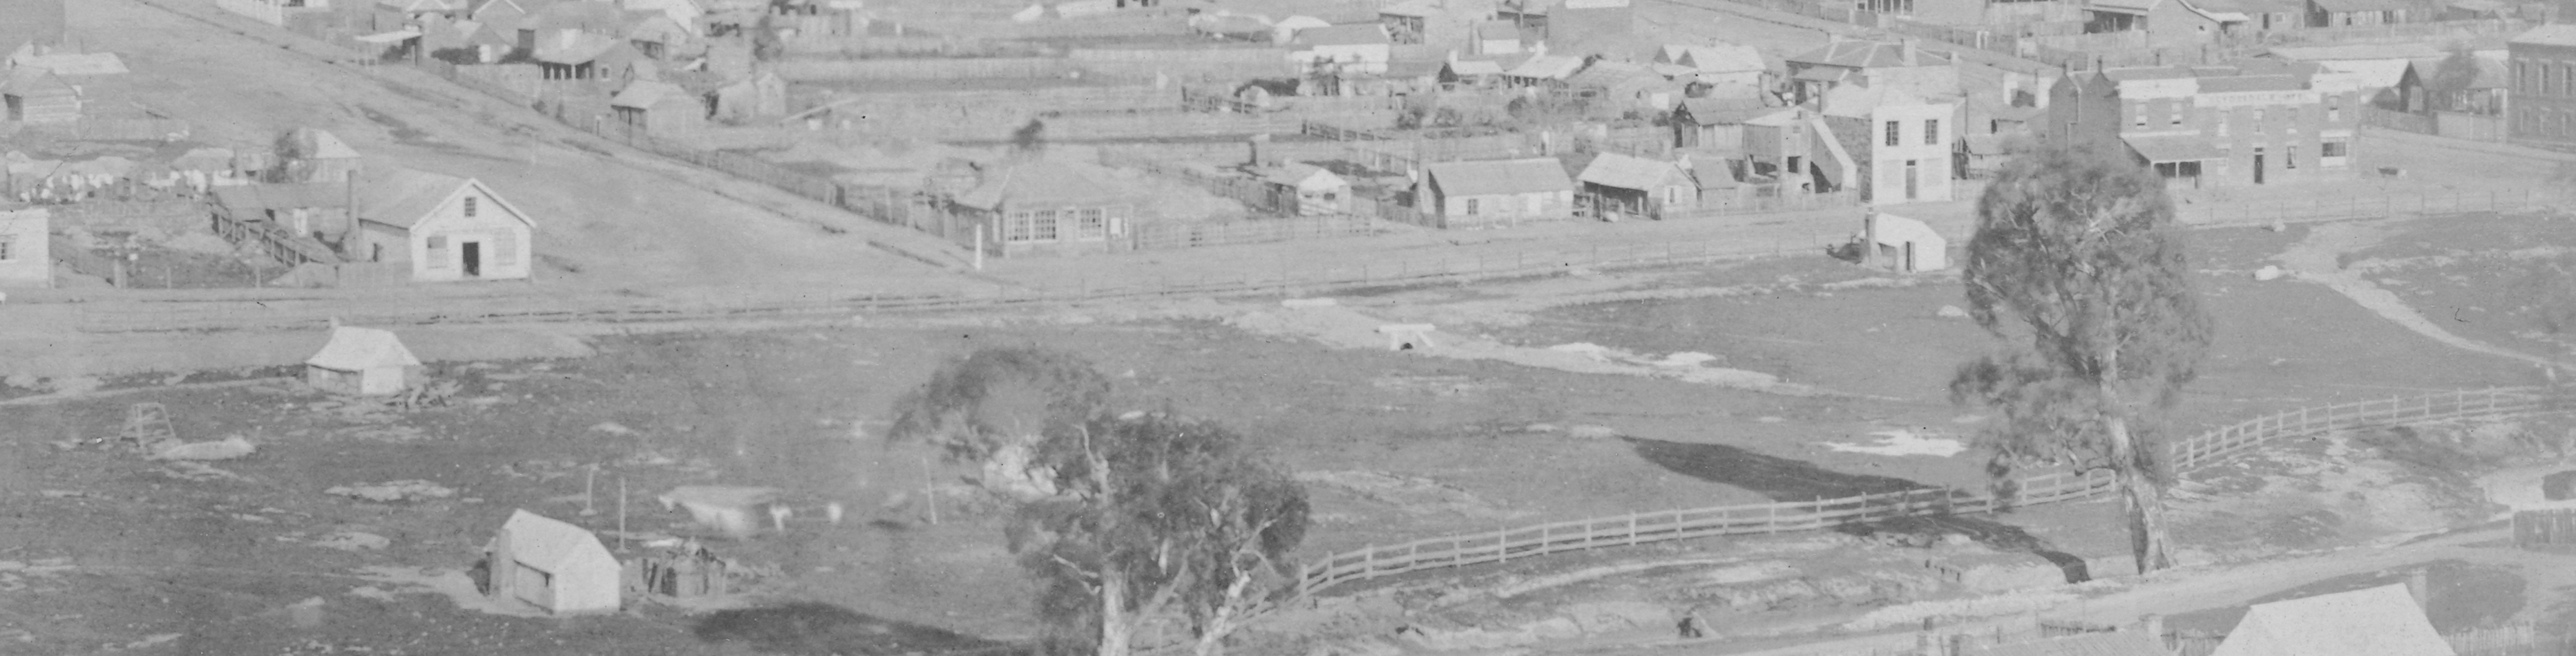
ABOVE: ...meanwhile, to the north of the Station site, and opposite Doveton Street, a new brick and stone culvert has been neatly set in place. It is positioned on the alignment as drawn in the original1856 track plans. Subsequently however, it was decided to divert and straighten the course of Barkers Creek, (seen meandering in the foreground), and dispense with the reverse curves that brought the tracks across to run parallel with adjacent Kennedy Street.
(Crop from photograph, courtesy of SLV).
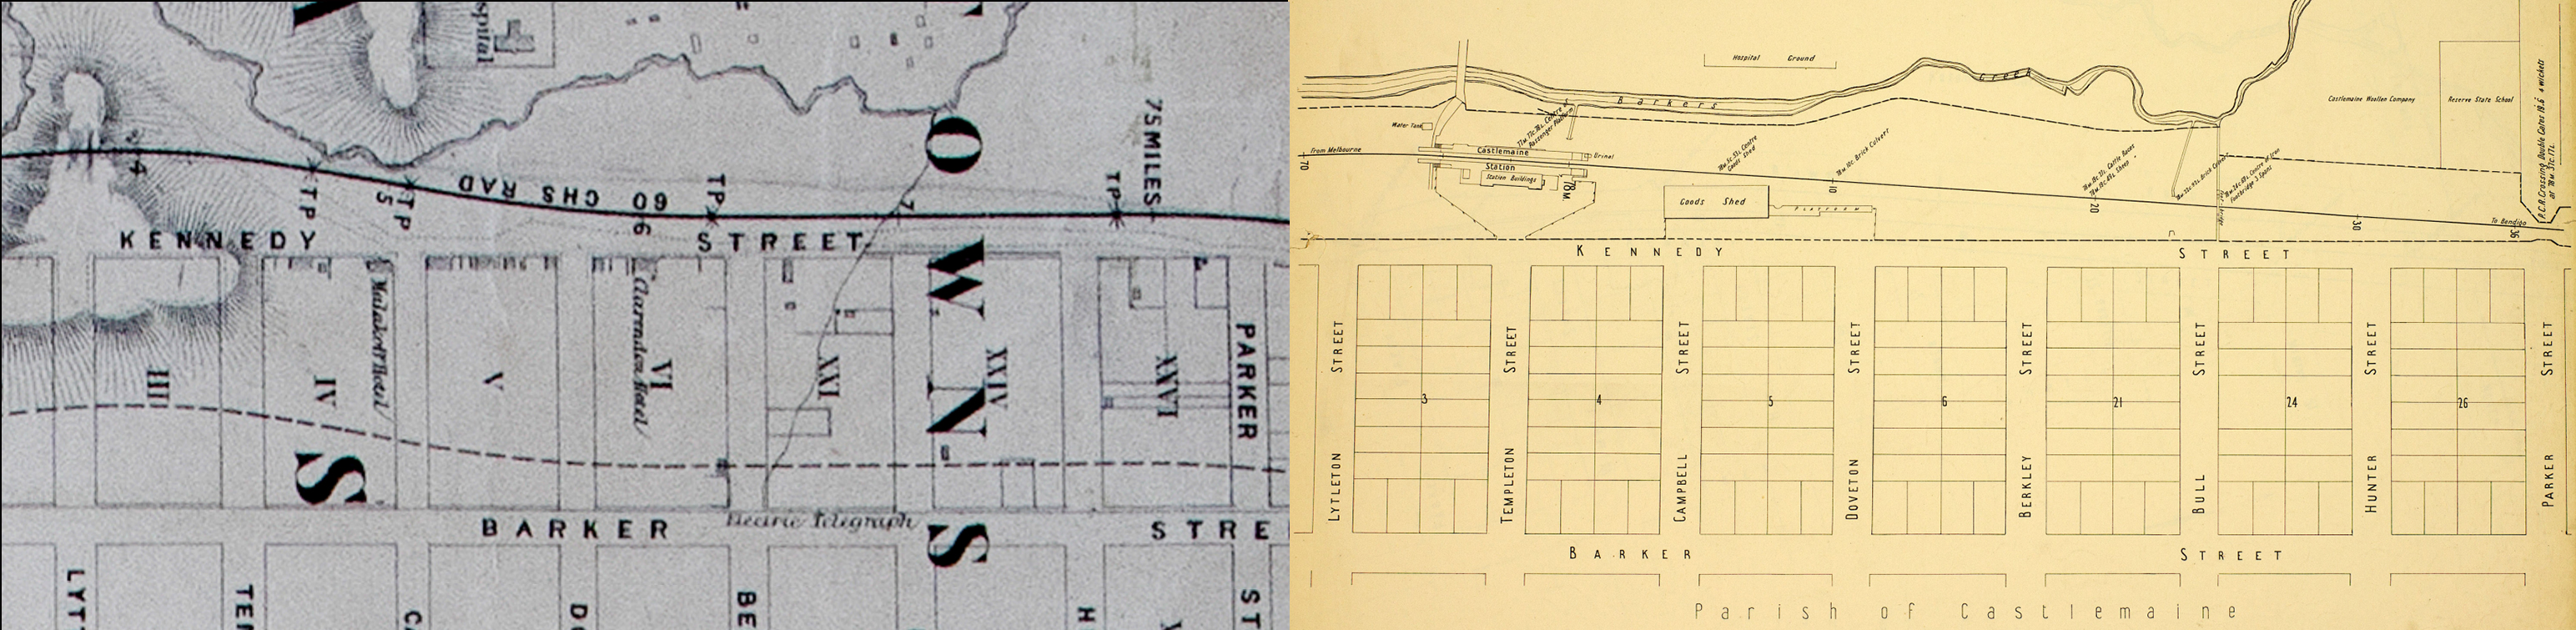
BELOW: Excerpts from 1856 M.M.A. & M.R.R. and 1904 VR track plans.
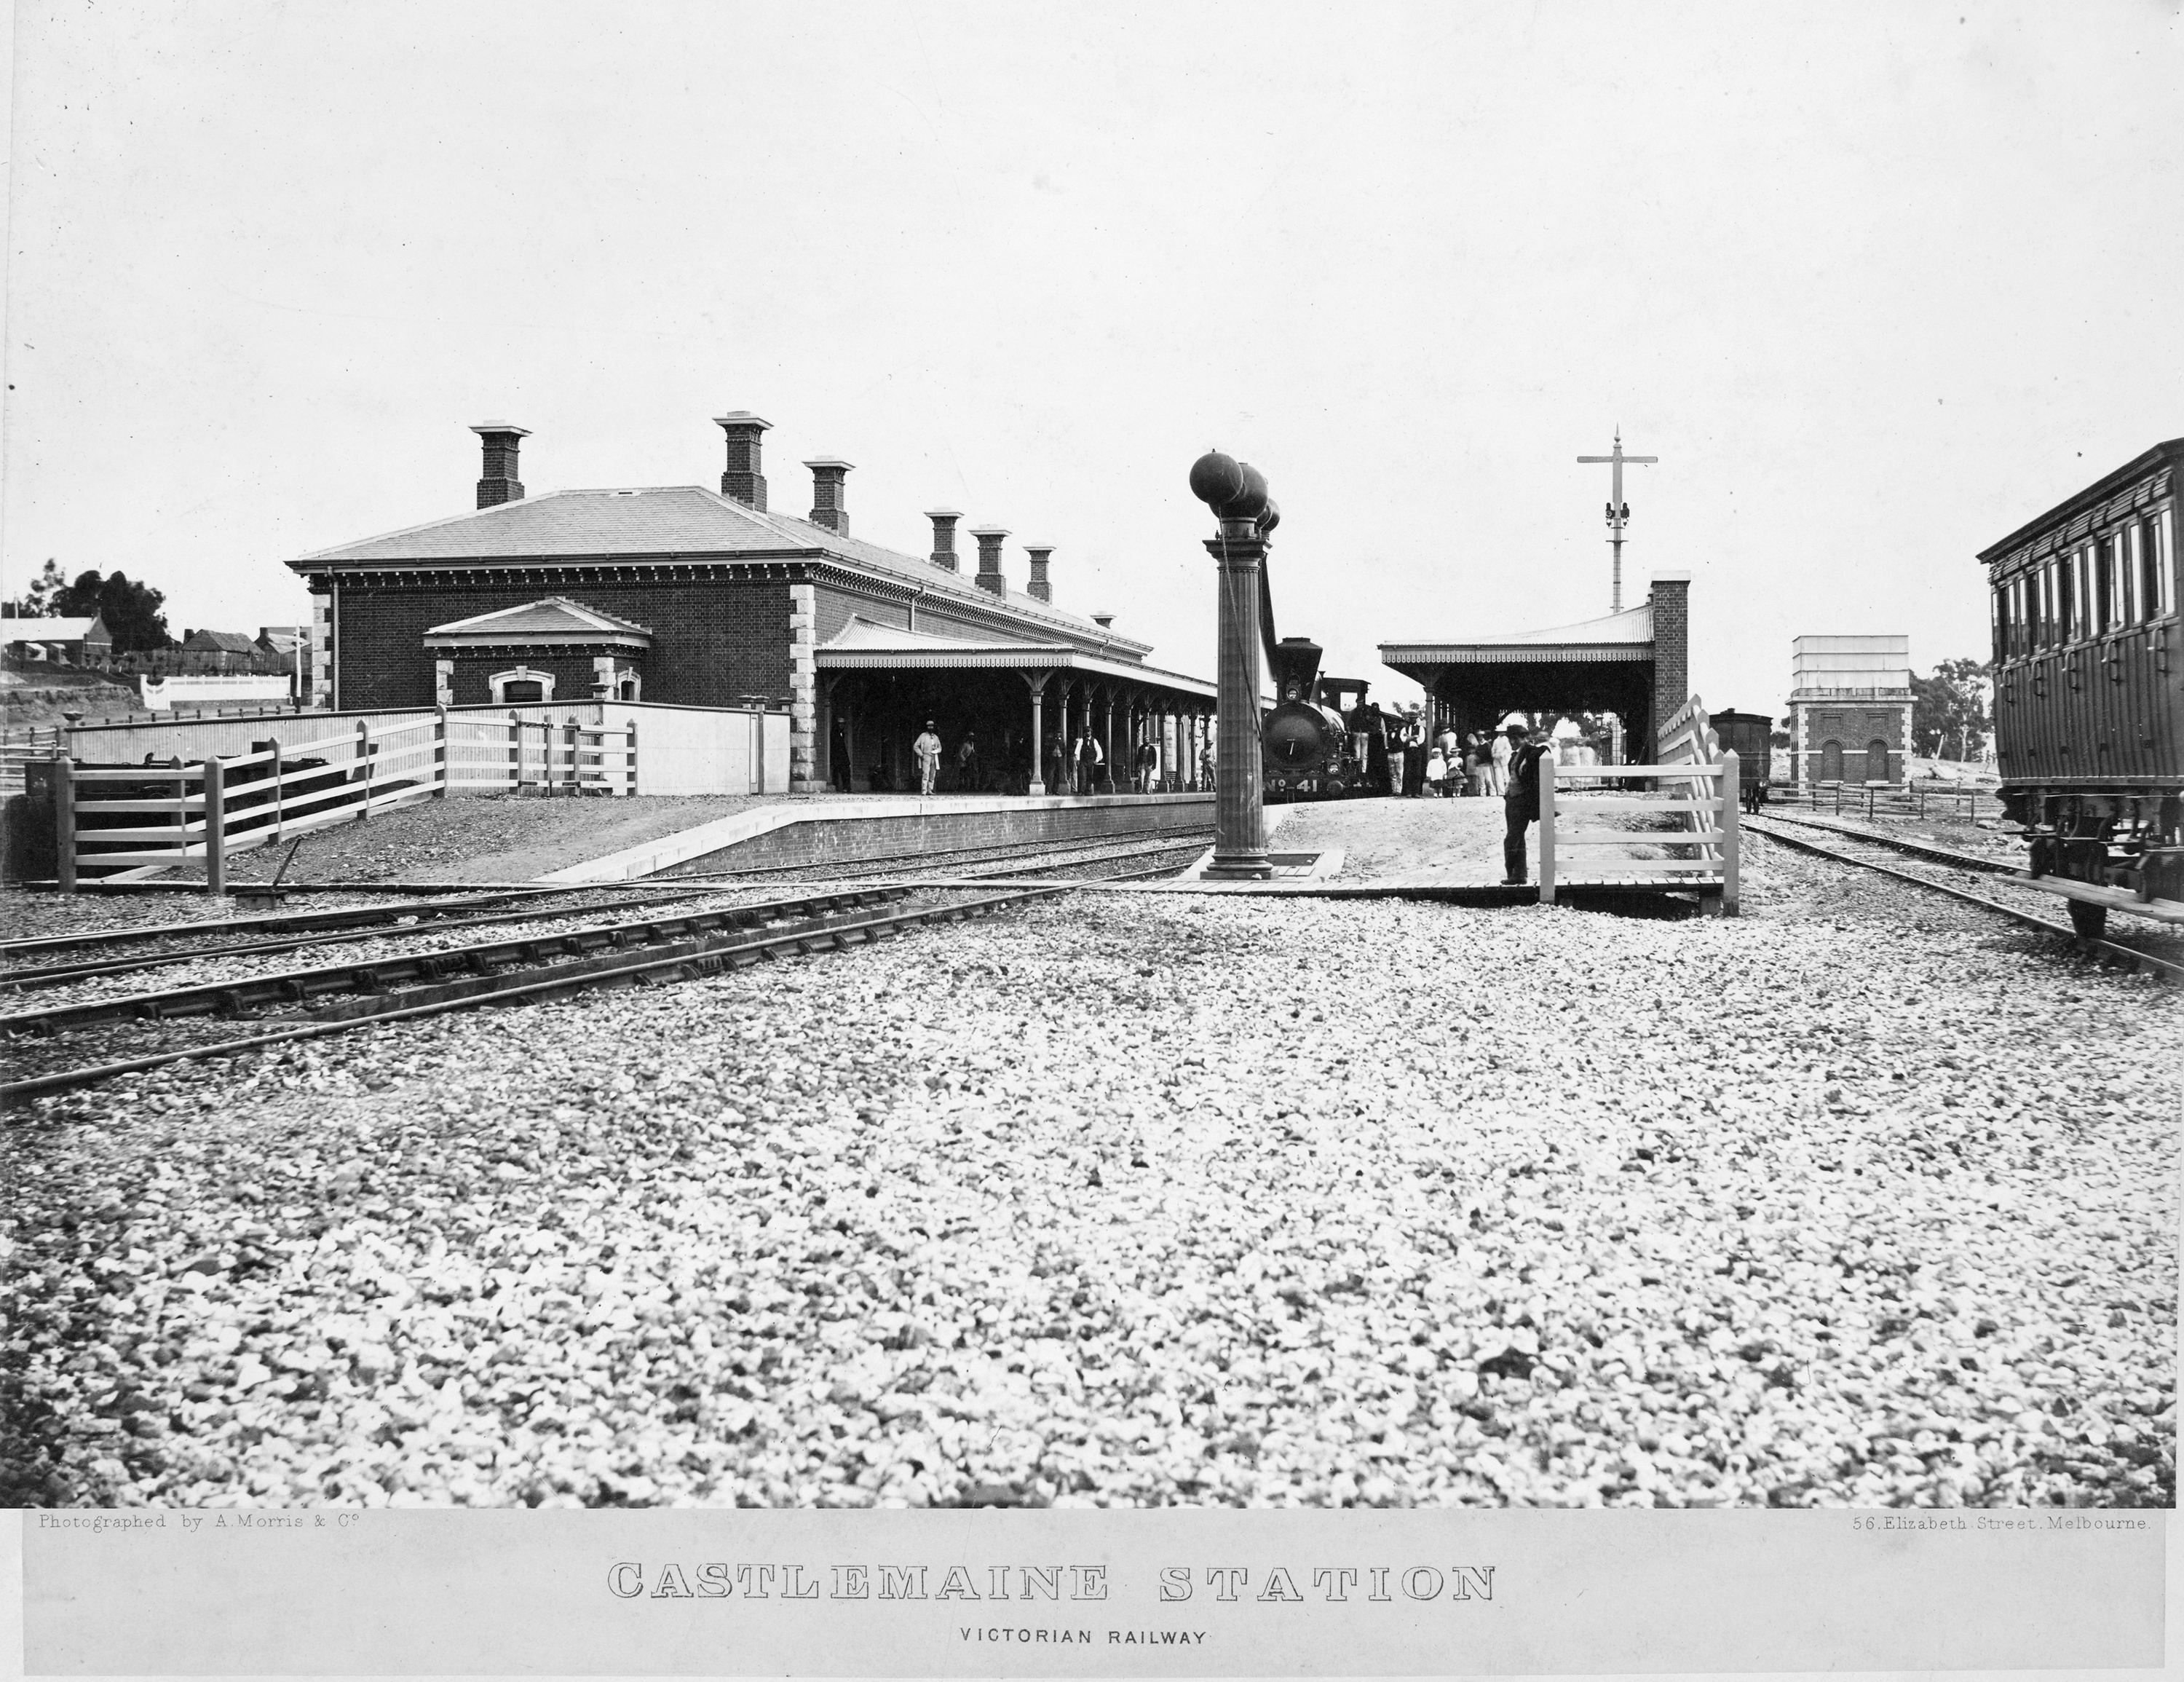
ABOVE: A very early view, taken shortly after the line's opening, looking south towards Melbourne. It likely predates the c1874 opening of the line to Maryborough. As yet, the Down side loop, (on the right), does not have a platform and has not been roofed.
(Photo courtesy of SLV).
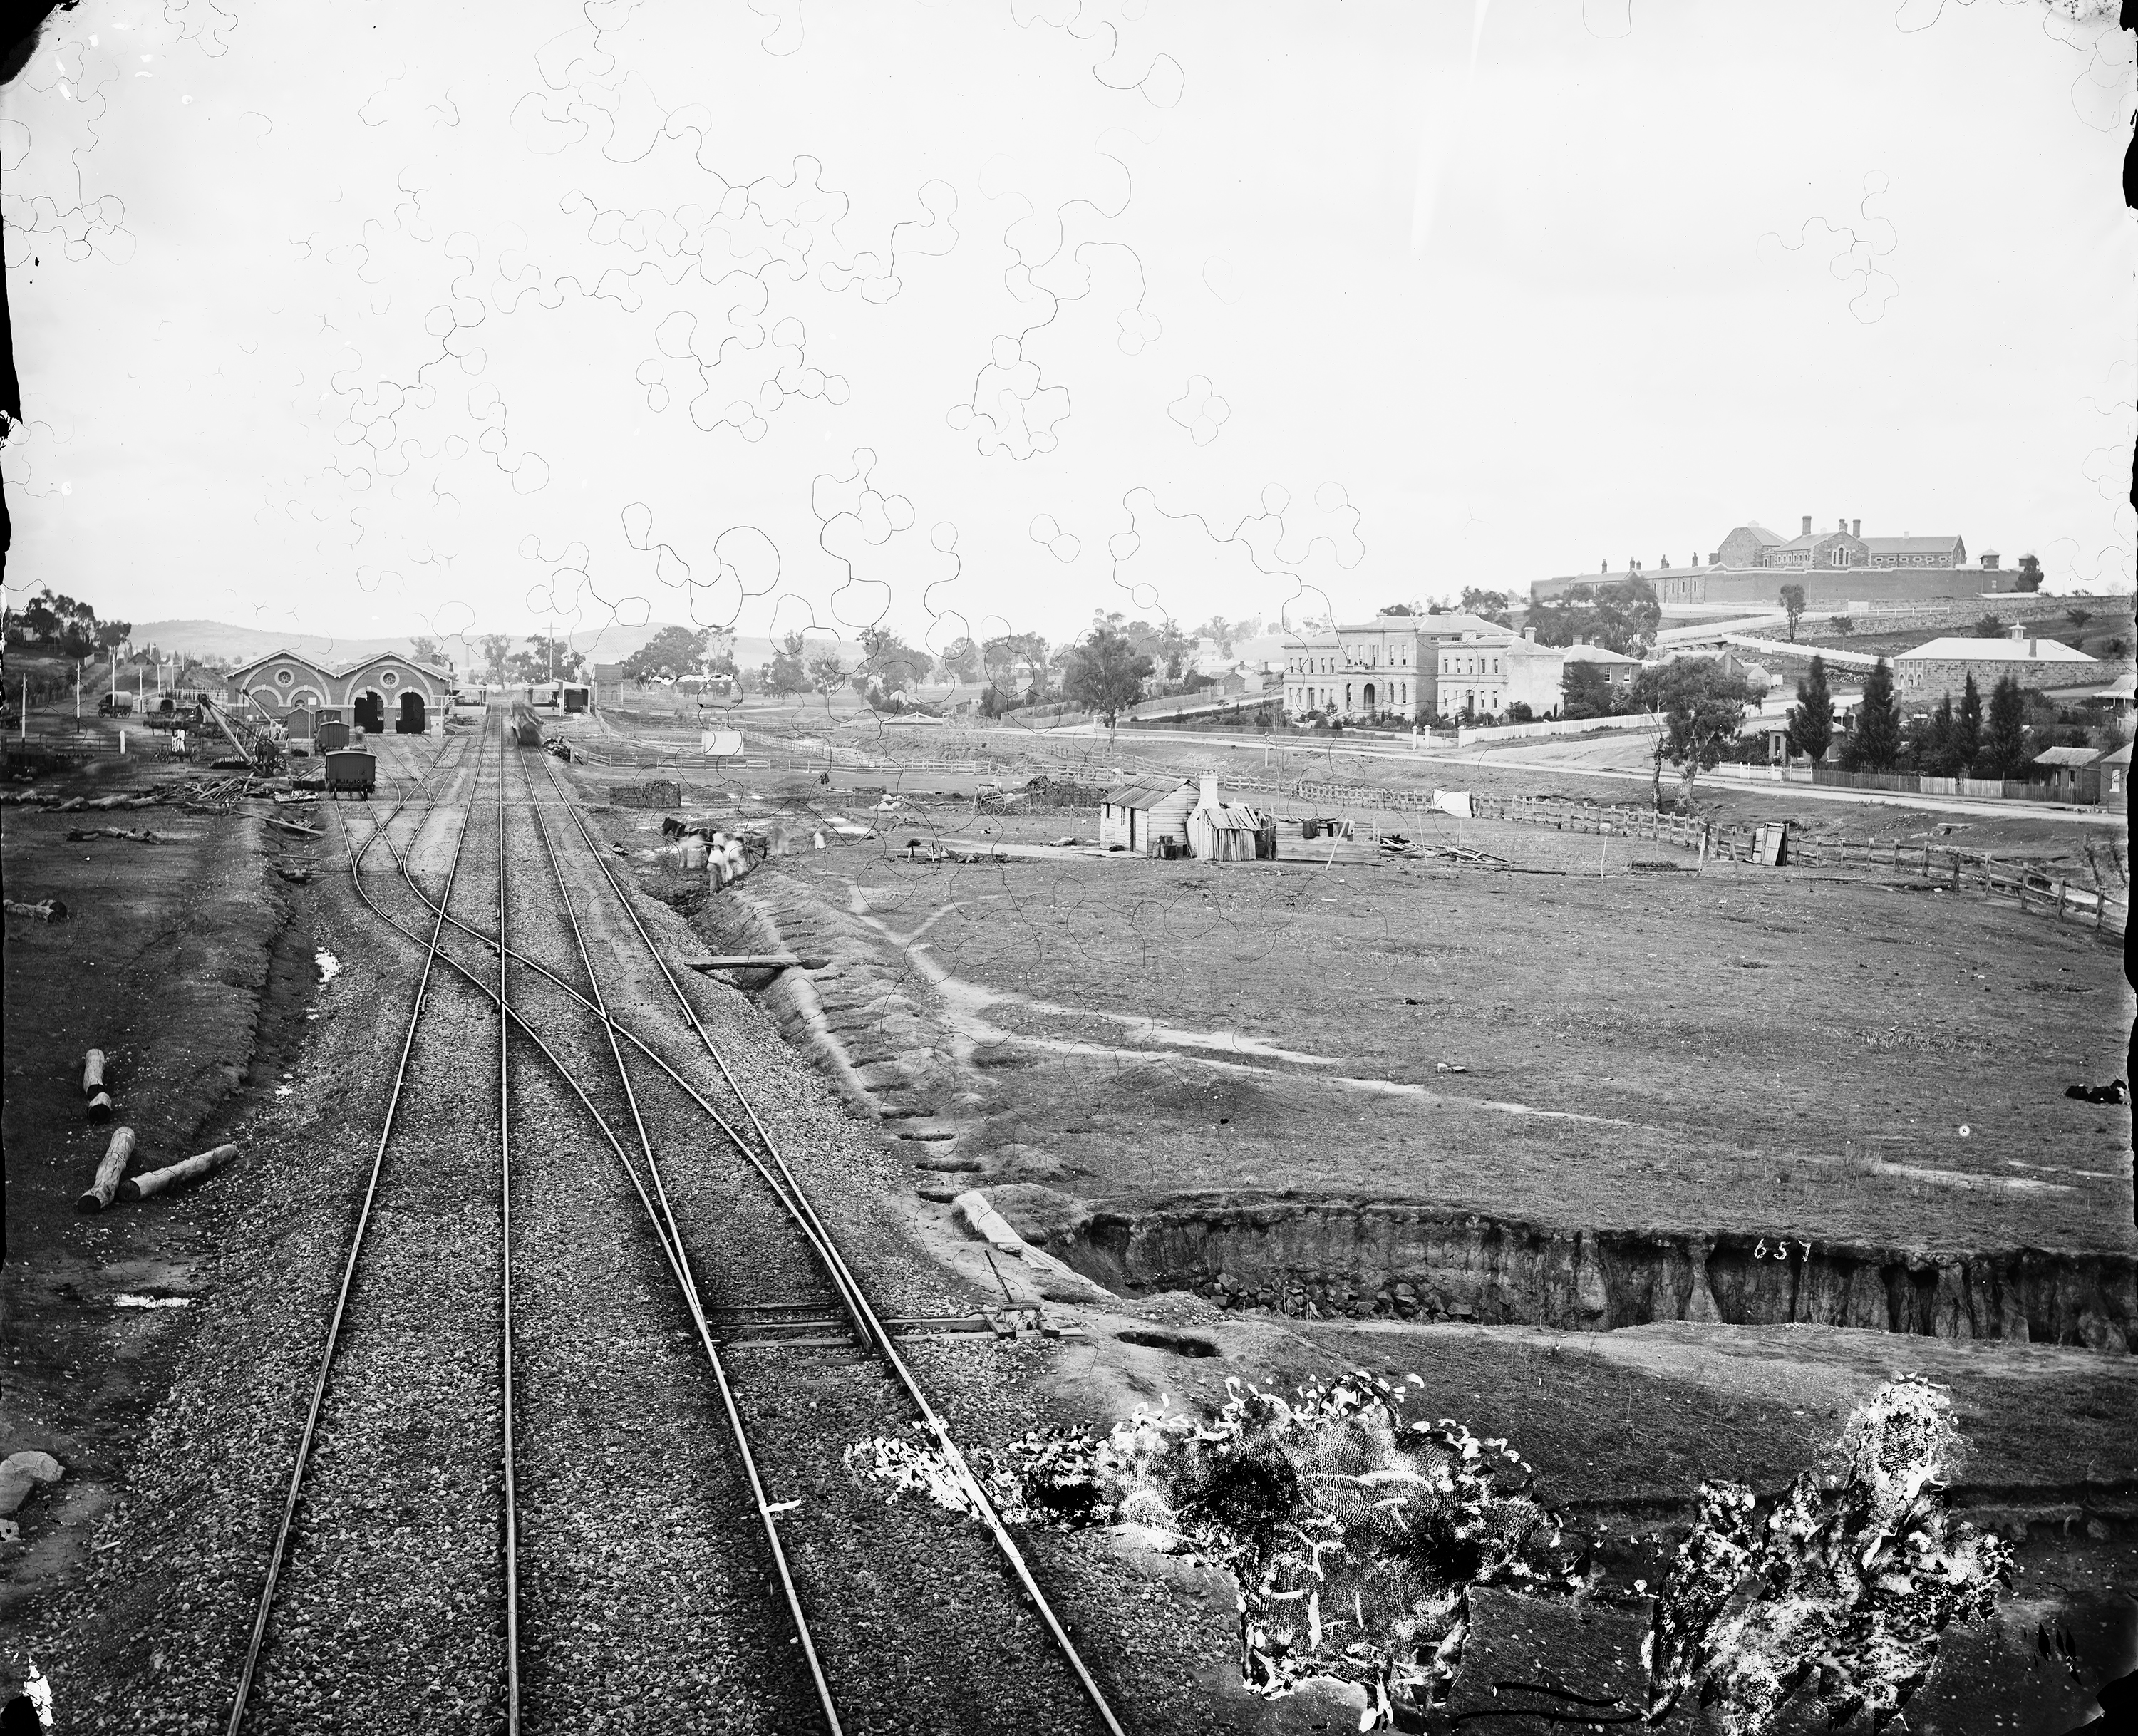
ABOVE: A slightly later view looking towards Melbourne, probably taken not long before the opening of the line to Maryborough as only a single signal mast is evident. The loop line has been roofed over, but no platform has been provided for it as yet. The area on the right is in the process of being levelled and quite a supply of bricks is on hand. It is currently unknown what this was for, it seems to be too early for the yard expansions.
(Photo courtesy State Library NSW).
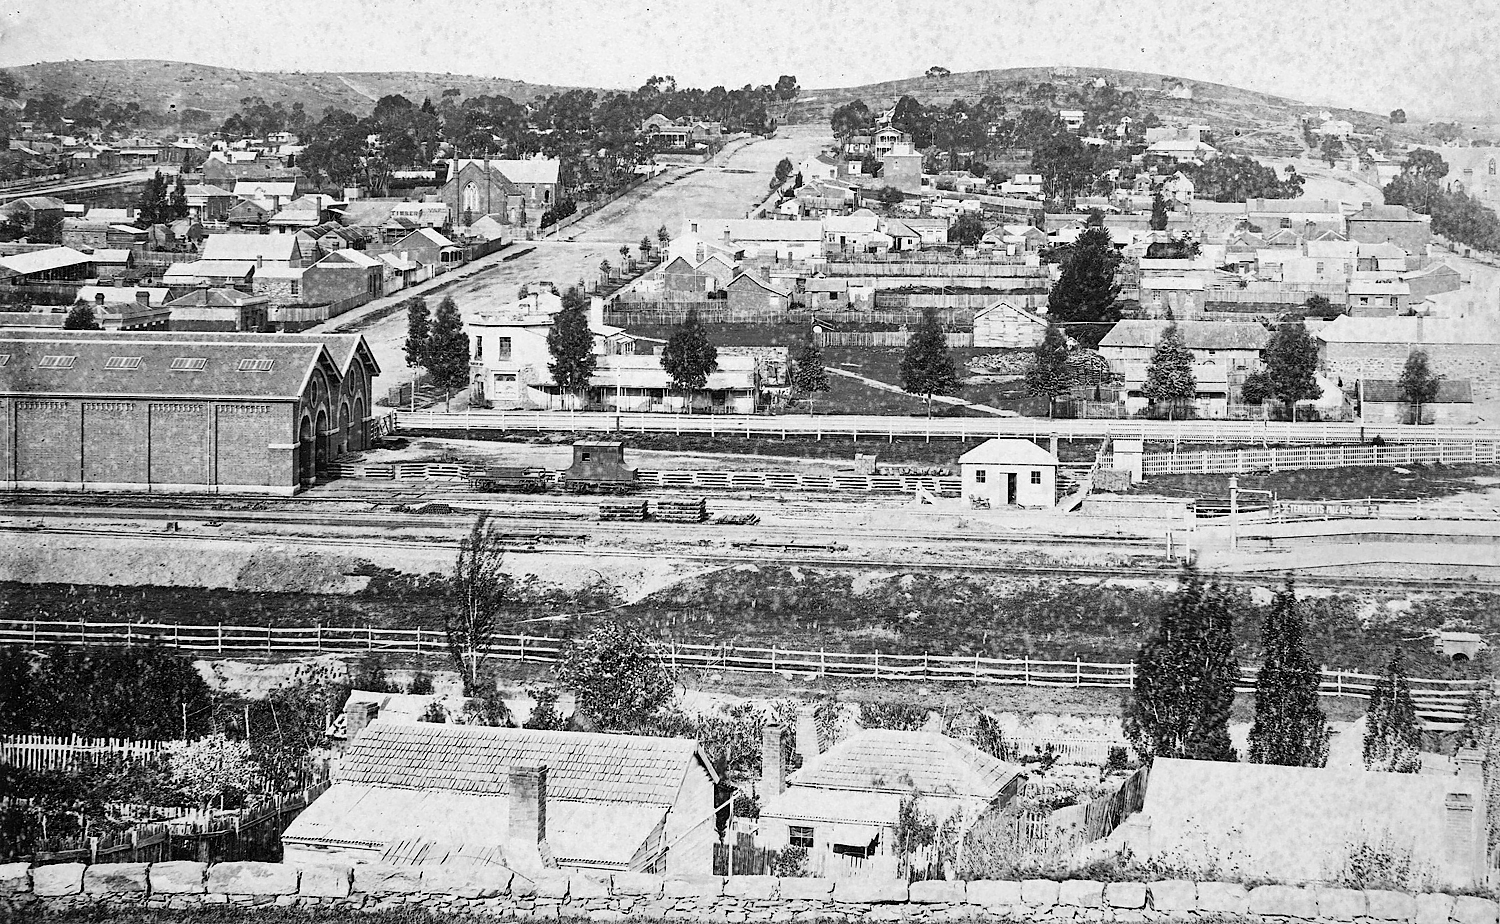
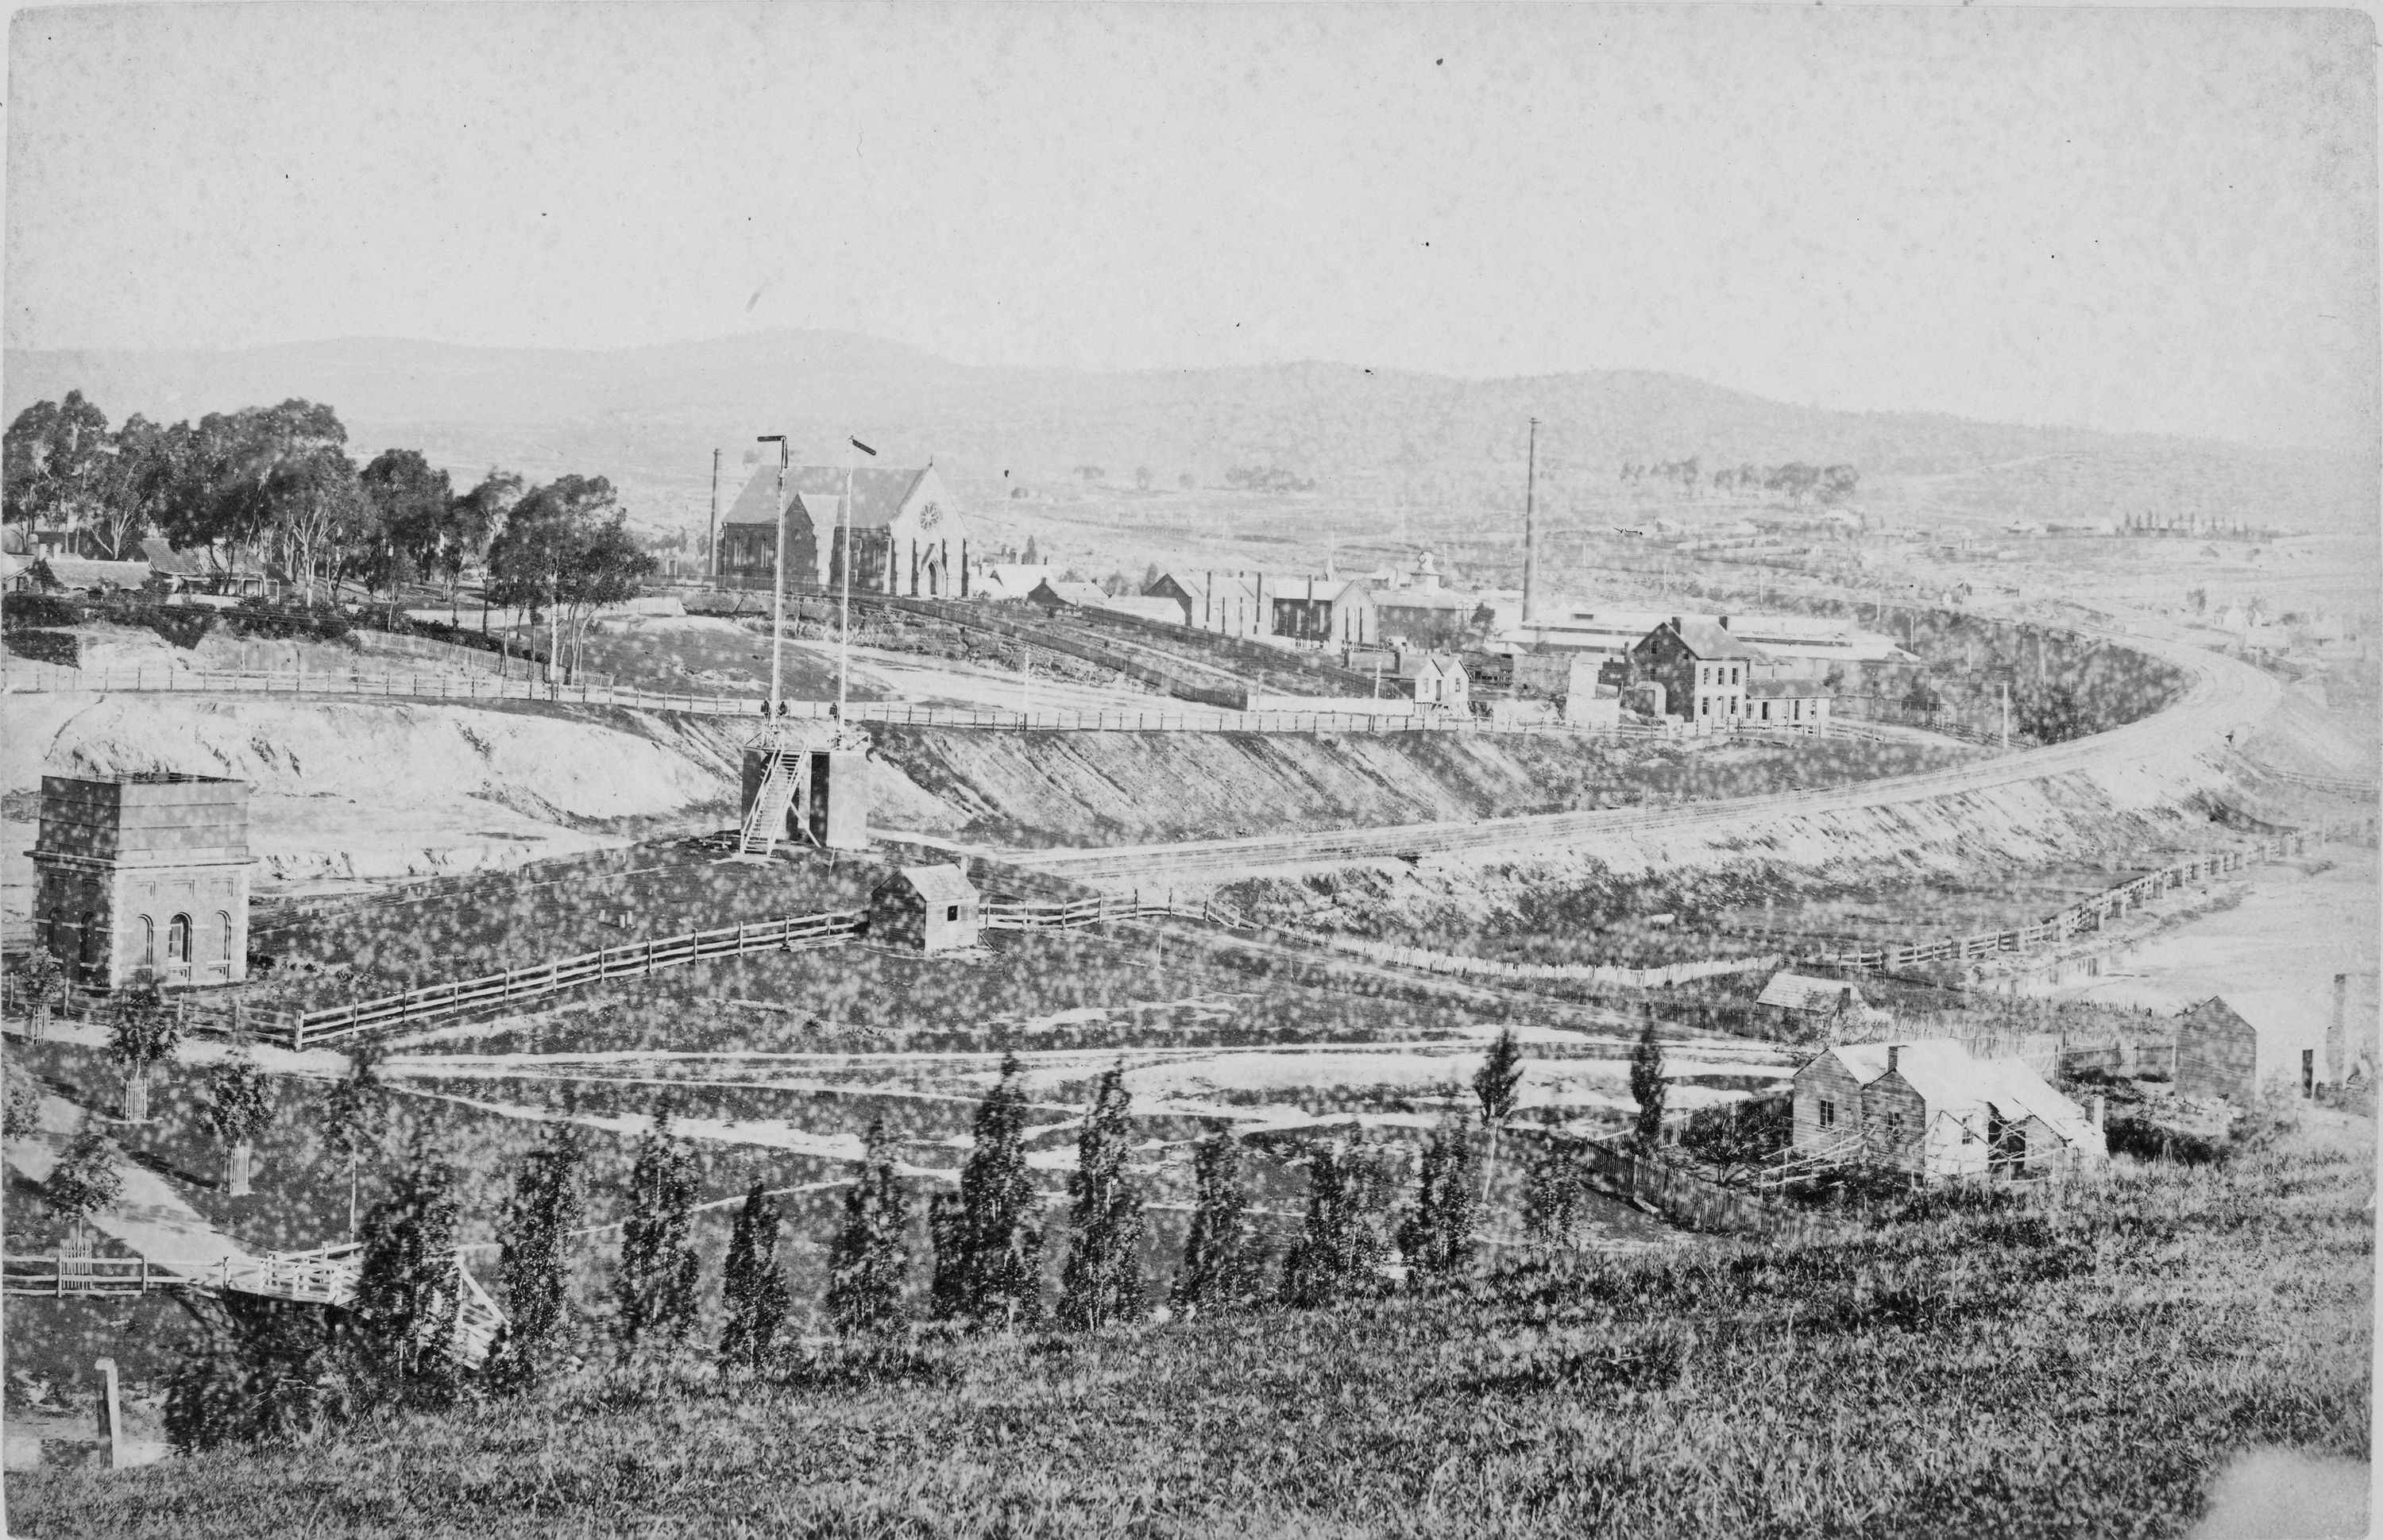
ABOVE: The first of what appears to be a set of three photos, that were taken on the same occasion from the hill near the gaol. This one, looking eastward, shows the goods shed on the left and the platforms on the right. It's almost certain that these pictures were taken after the Maryborough line was opened in 1874.
(Photo courtesy State Library Victoria).
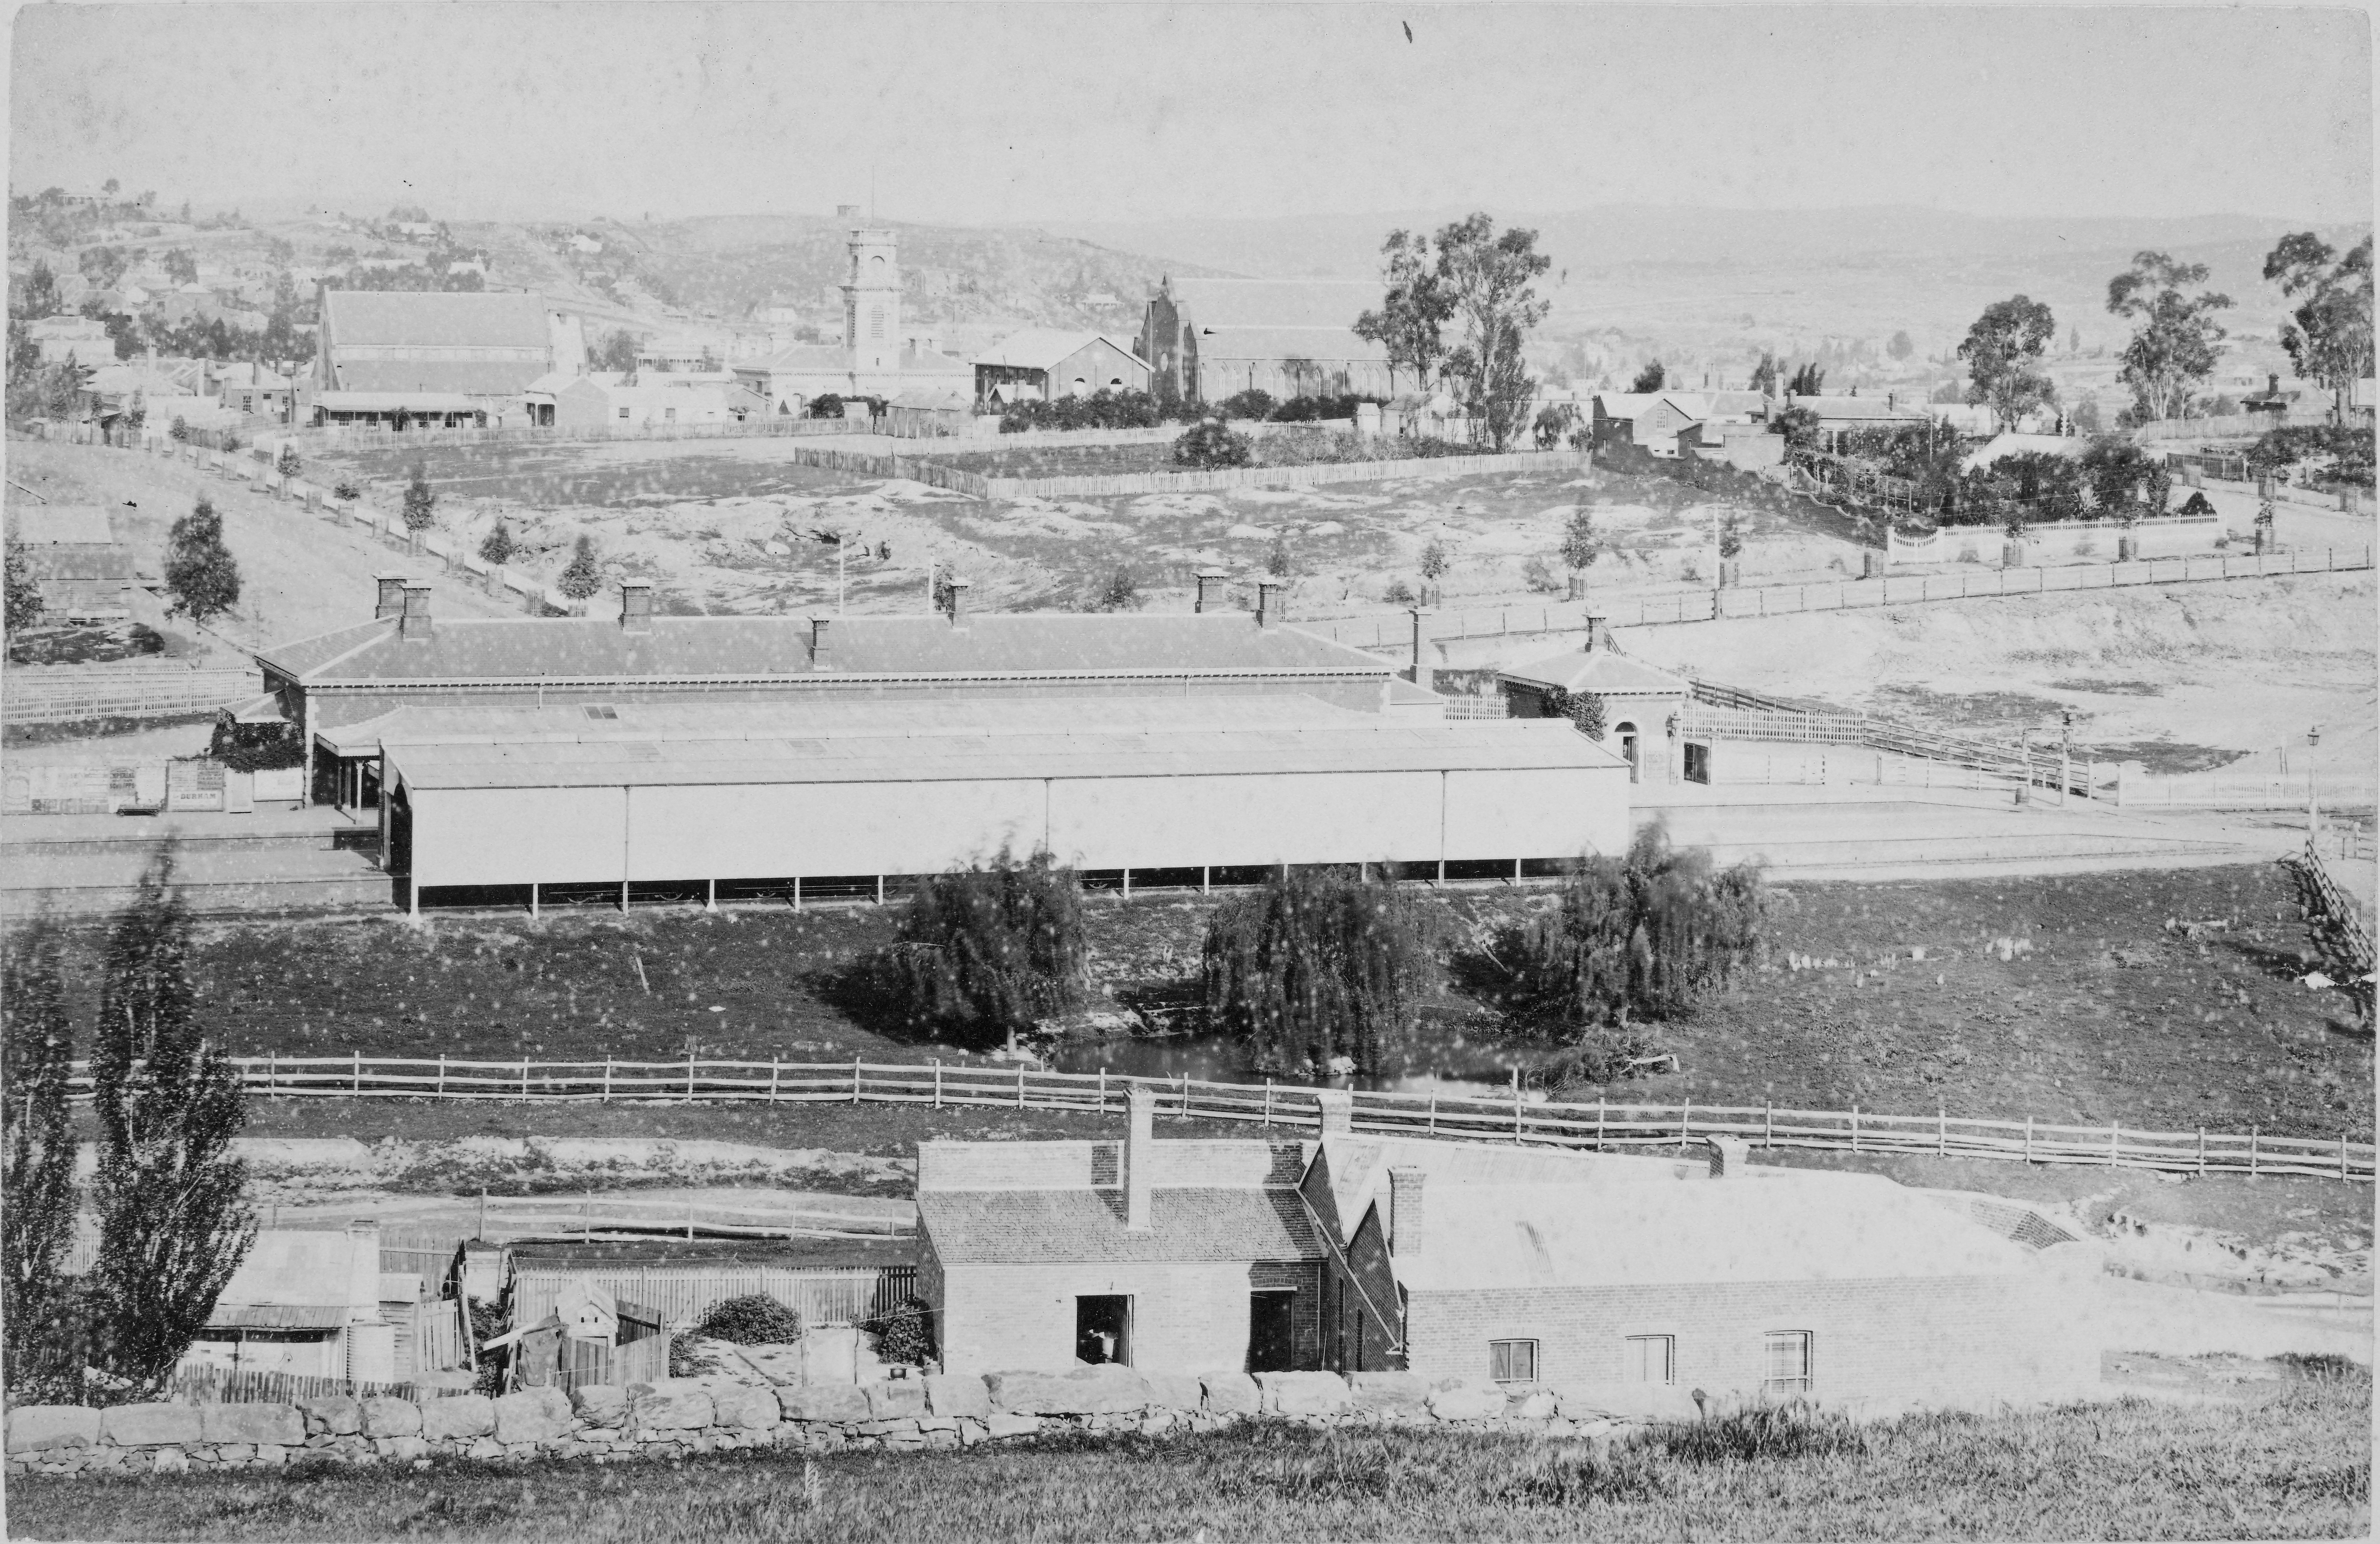
ABOVE: Looking a little further to the right and across the station. By this time, the third platform has been provided, which faces onto the loop line.
(Photo courtesy of State Library Victoria).
ABOVE: Having panned further to the right, looking towards Melbourne. A second Signal Post has now been installed, to control trains working the new line between here and Maryborough. The bridge over Forest Street, the viaduct over Forest Creek and the skew arch bridge over Johnston Street have been widened to accomodate the third track.
(Photo courtesy of SLV).
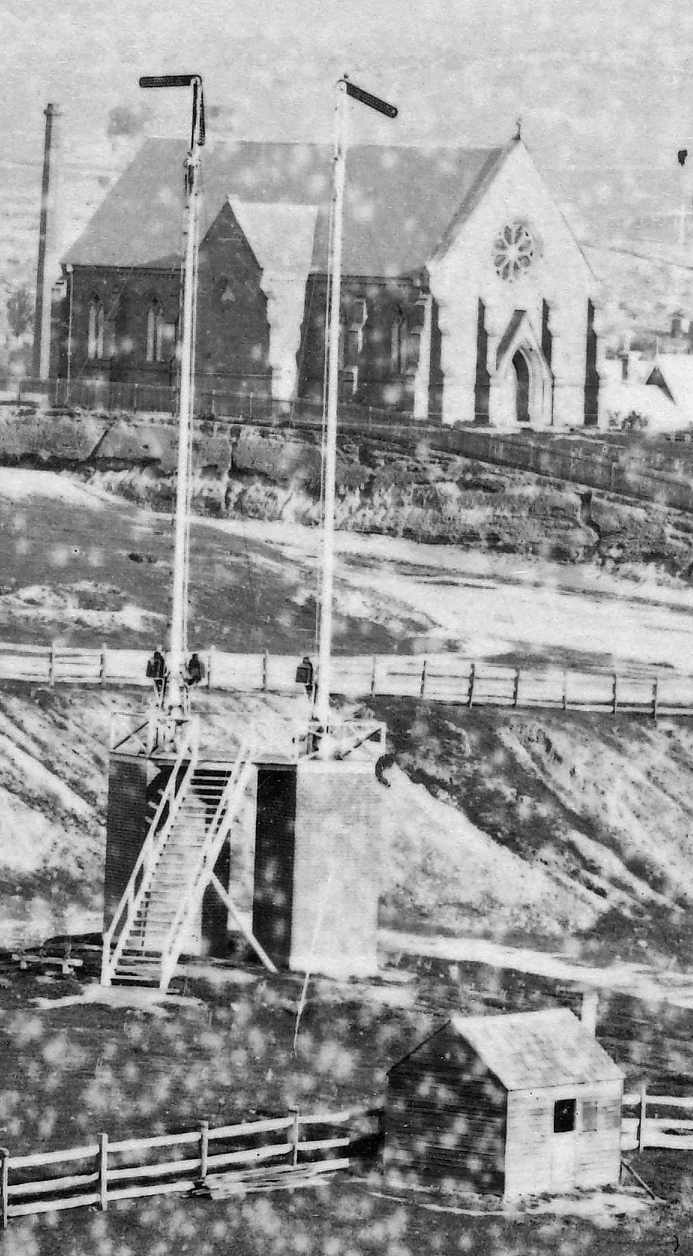
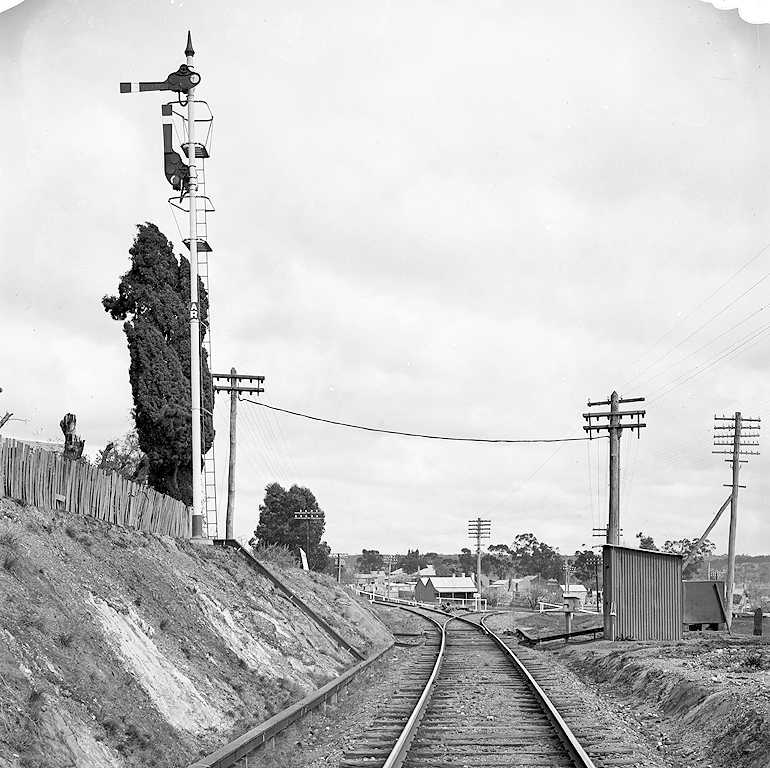
BELOW: Cropped detail from the above photo, showing the up and down slotted arm signal post on the left and the other, with a single arm for the branch, on the right. These were used in conjunction with time interval working, which was the first form of safeworking along the Main line when it was opened.
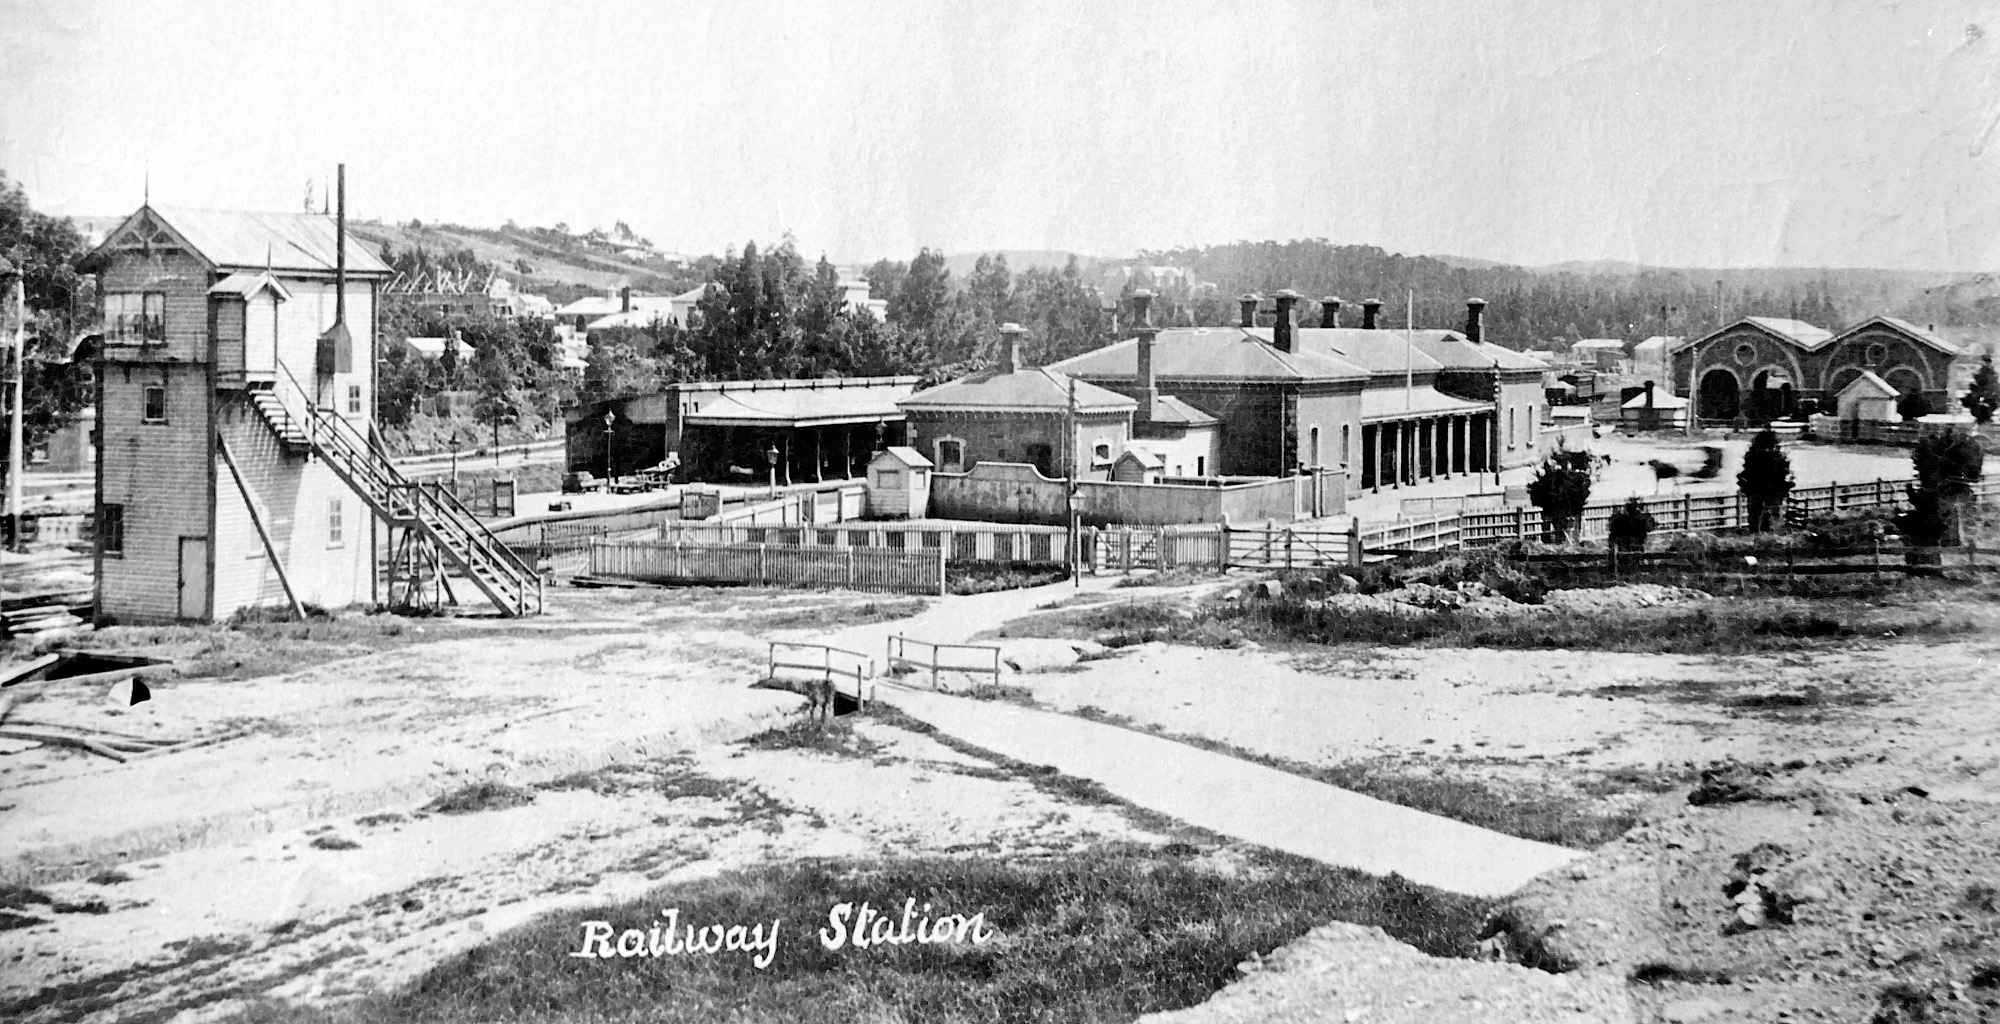
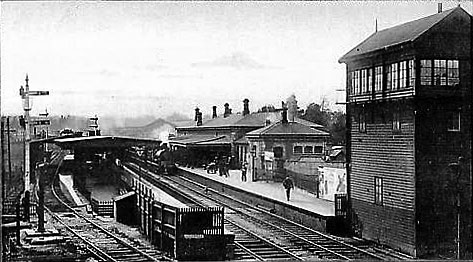
ABOVE: Looking north towards Sandhurst (Bendigo) after 1888, and prior to the island platform verandah extensions of 1908/1910, showing the original 'A' Signal box.
(Photo courtesy of PROV).
ABOVE: This view of Castlemaine was taken about 1912, it shows a down passenger train arriving with an A2 and very new E cars. A train to Maryborough or Maldon is seen in the back platform. Photo from the Chris Elliot collection
BELOW, same view as above photo, date circa 1908
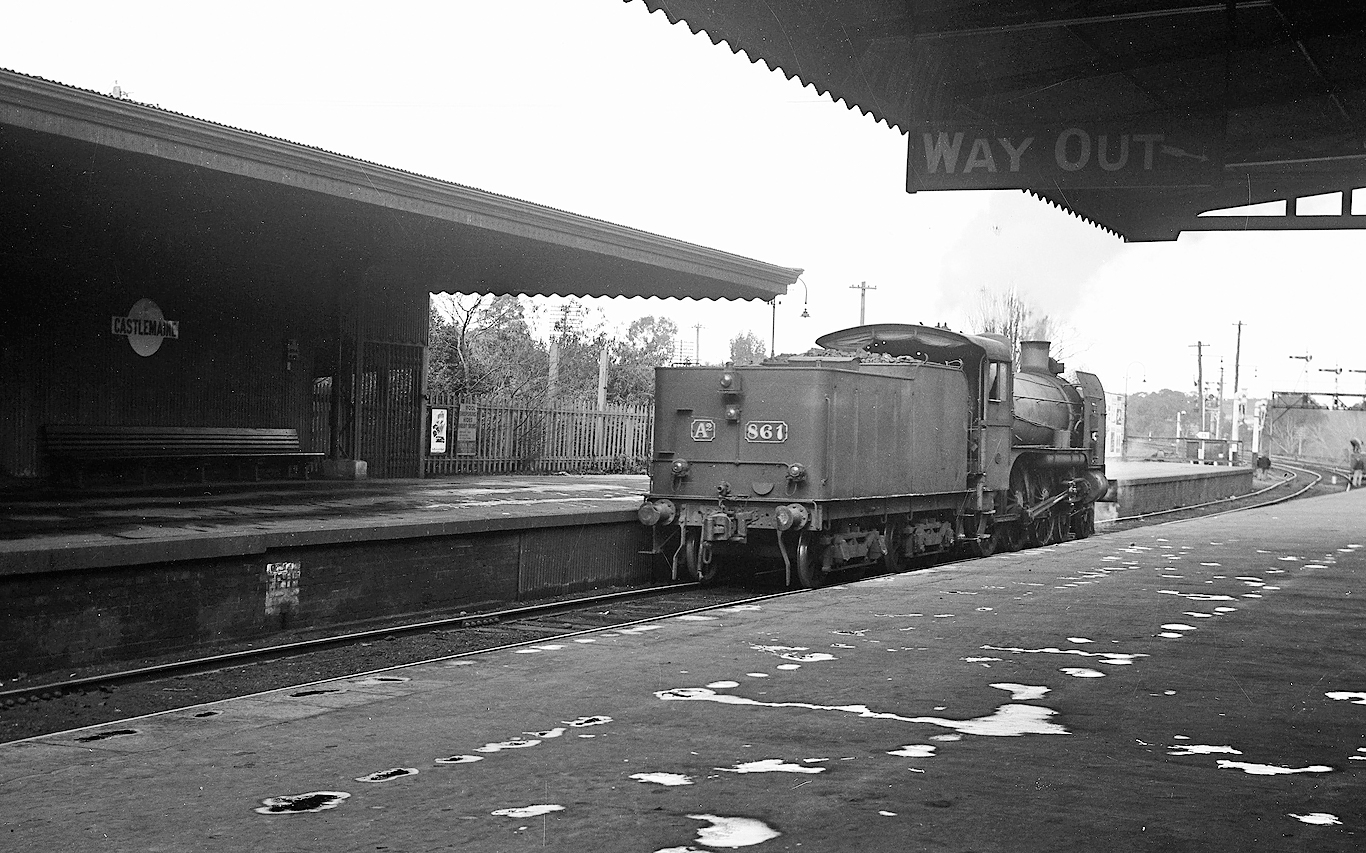
ABOVE: The electric lighting was first switched on in Castlemaine in July 1926. Very near to the tail end of that same decade, an unidentified variant of the DD class of locomotive is paused at the station with an up goods train.
(Photo courtesy of PROV).
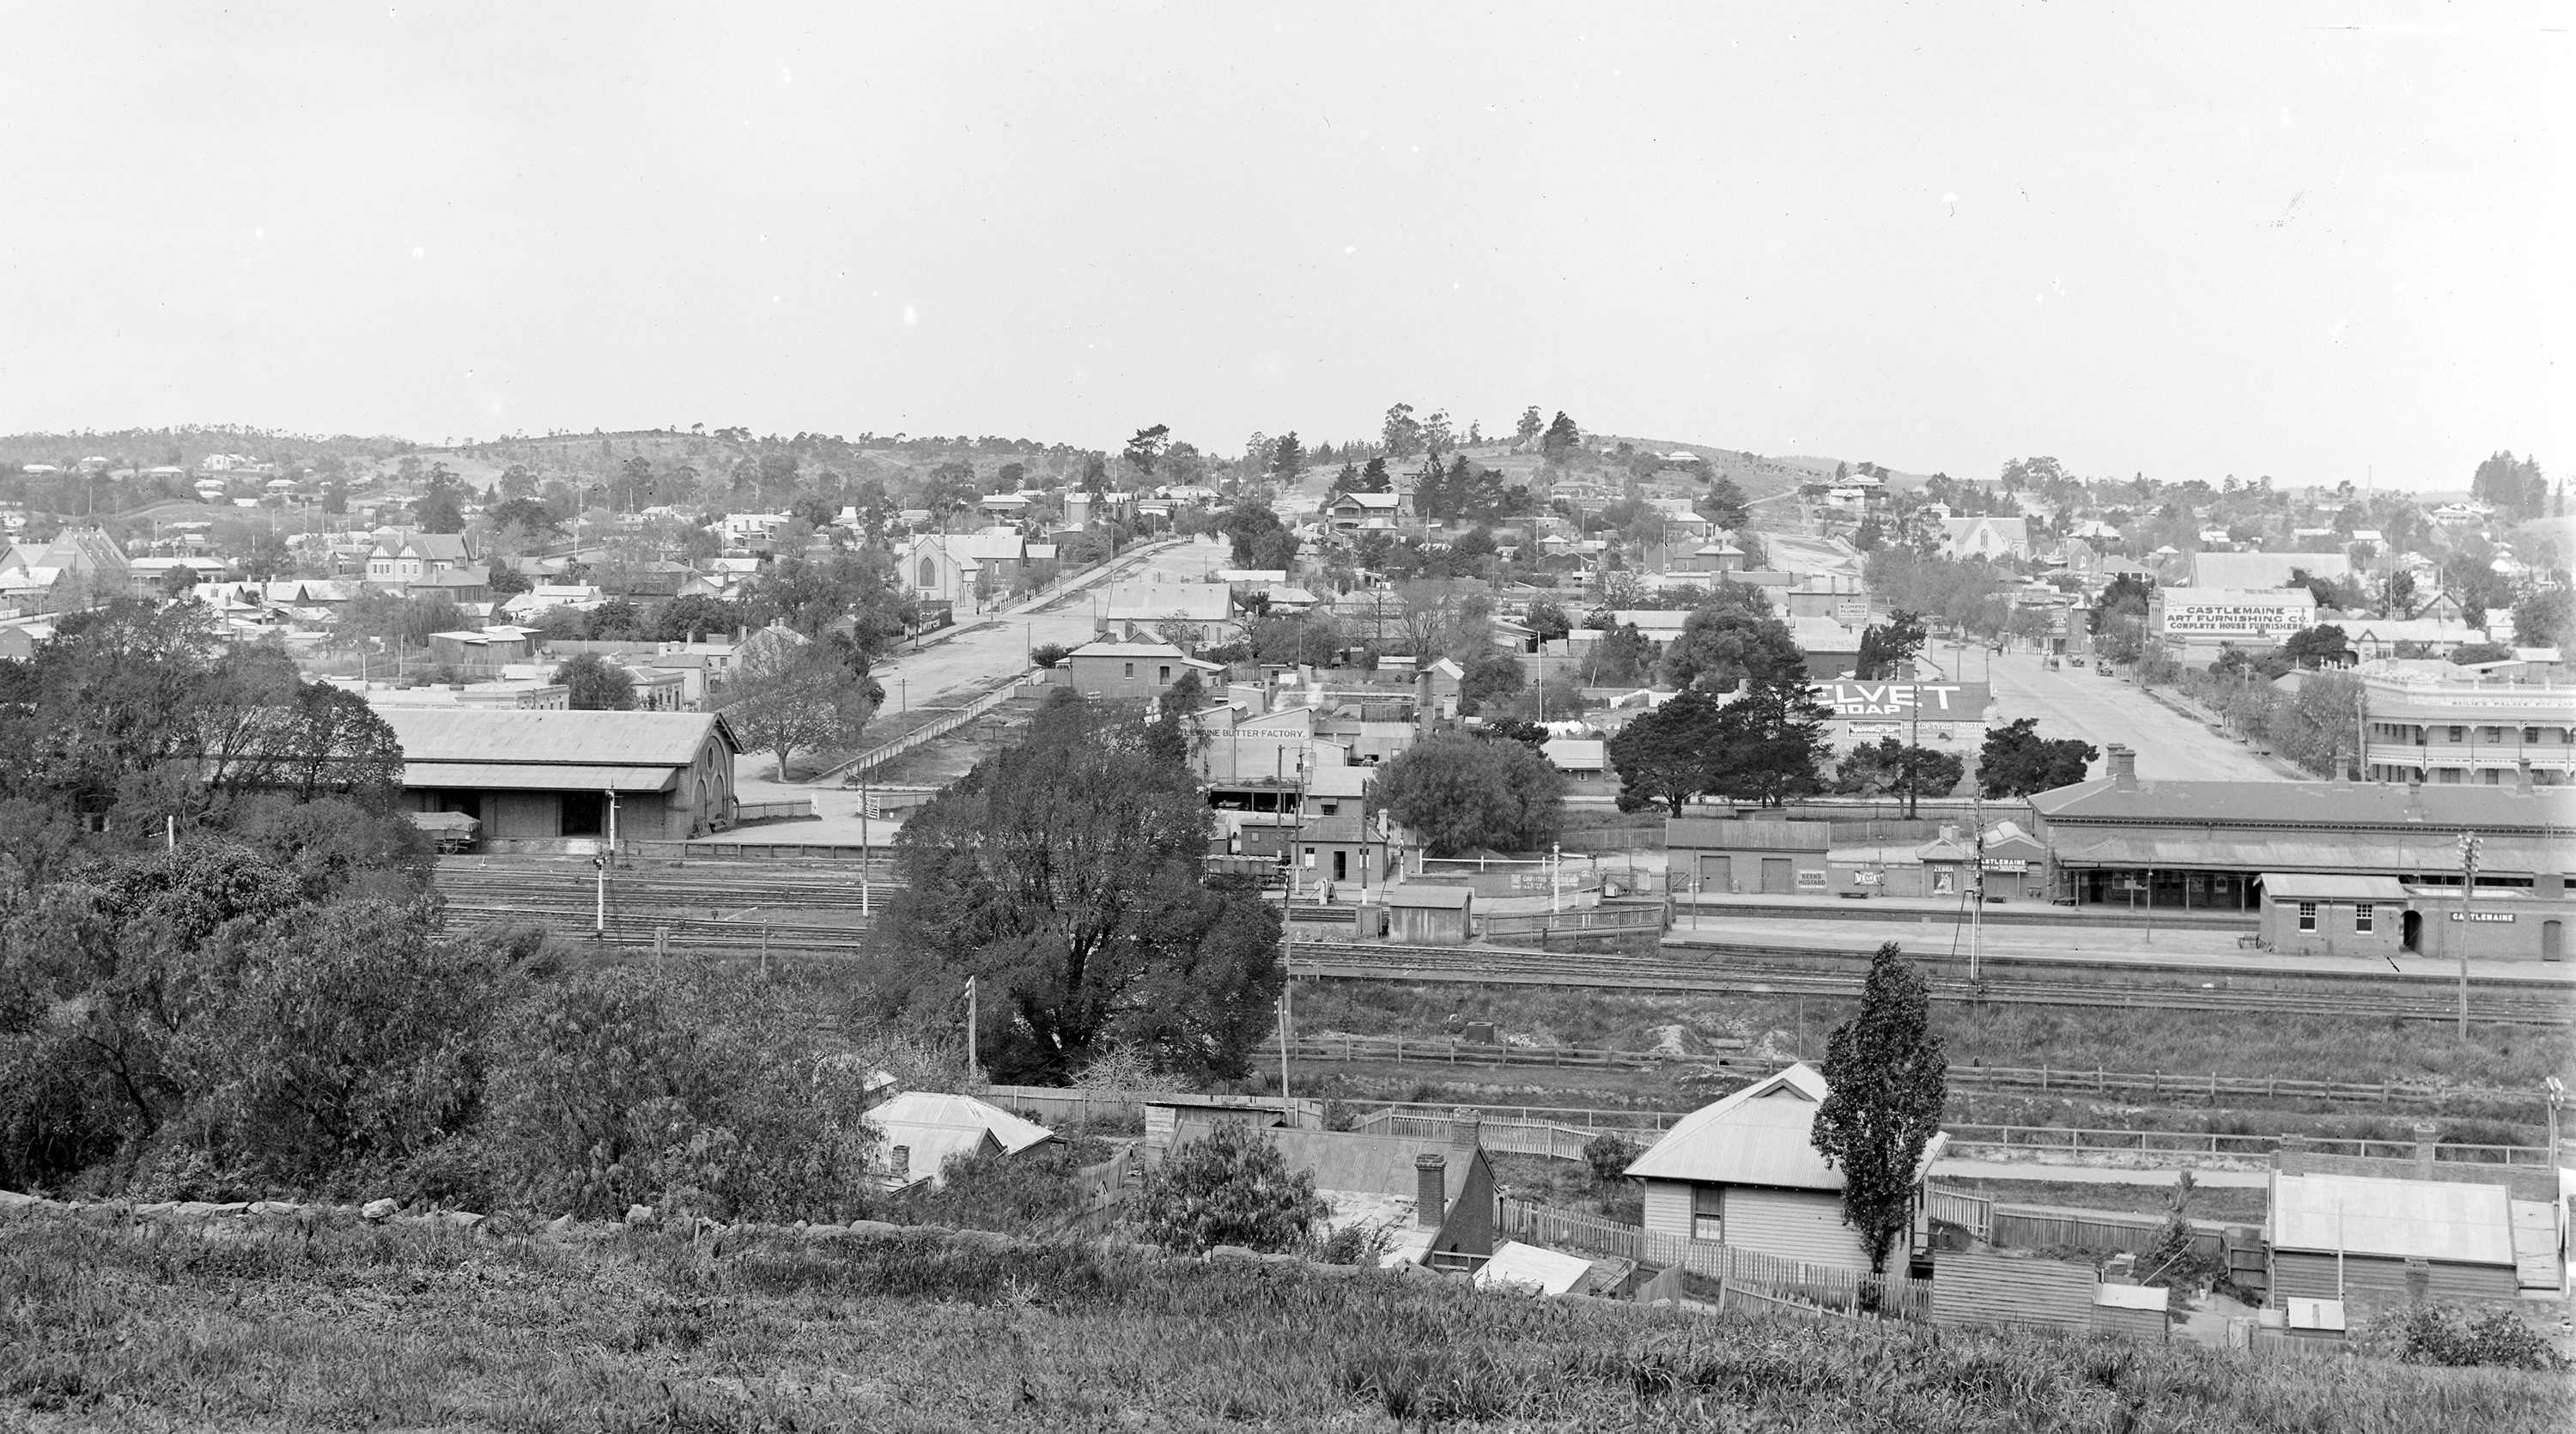
ABOVE: Another view, (undated, but appearing to be very 1930's), looking east from near the gaol. In about 1915, the western half of the goods shed had been removed, to allow for the expansion of sidings on the up side of the line.
(Photo source unknown).
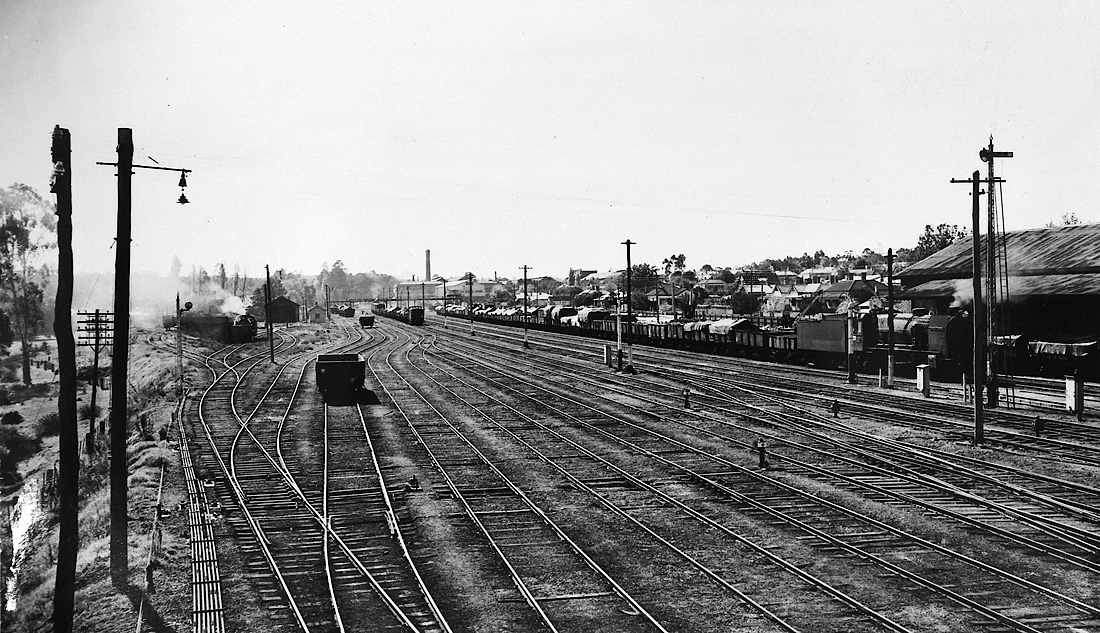
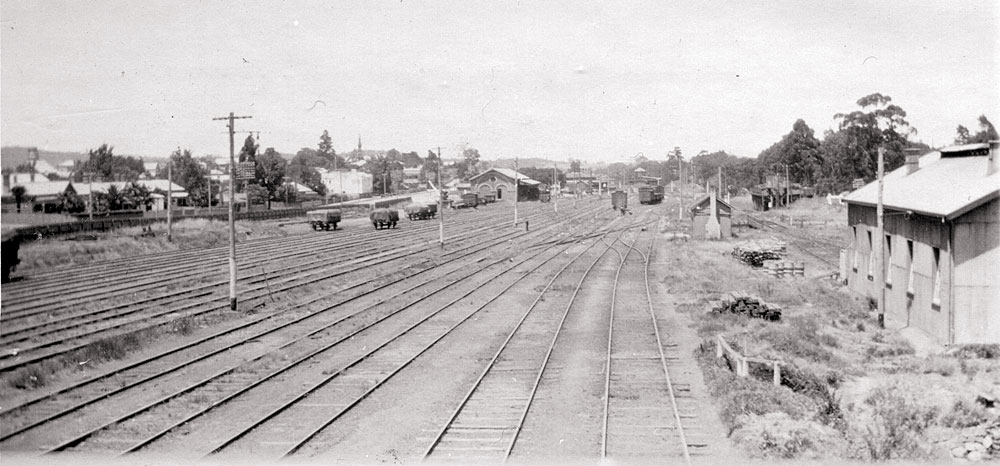
Two views of Castlemaine yard, circa 1940. ABOVE:Looking north towards B box and Bendigo, and
BELOW:Looking south from the footbridge.
(Photo source unknown).
ABOVE: Looking towards Melboune from the down platform, circa 1947.
(Photo courtesy Phil Dunn).
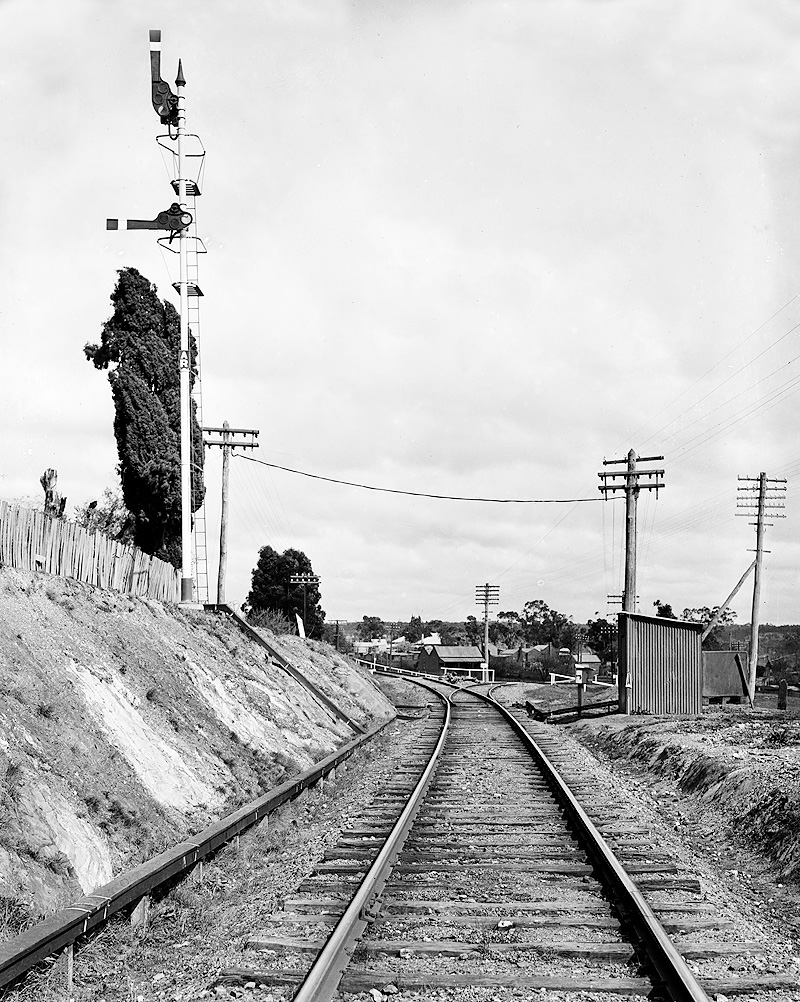
ABOVE: From 1926, Maldon Junction was remotely controlled by Castlemaine 'A' box. Trains departing Castlemaine got adavance warning of the signal at the junction, by the three position signal on post 51. The remote control of the junction only lasted until 1952, at which time this signal was abolished.
(Official VR photo, c1926).
Maldon Junction was a little over half a mile from Castlemaine and was controlled by Castlemaine 'A' signal box. ABOVE: We see the points set for the main line towards Maryborough, and the top arm is off as this is the straight move.
BELOW: The points are set for the branch line towards Maldon. The bottom arm is off, as this is the diverging move.
(Official VR photo's, circa 1926).

ABOVE: X 38 passes the Thompson Foundry as it departs Castlemaine on a down empty sheep train, Dec 15 1959. photo courtesy Des Jowett.
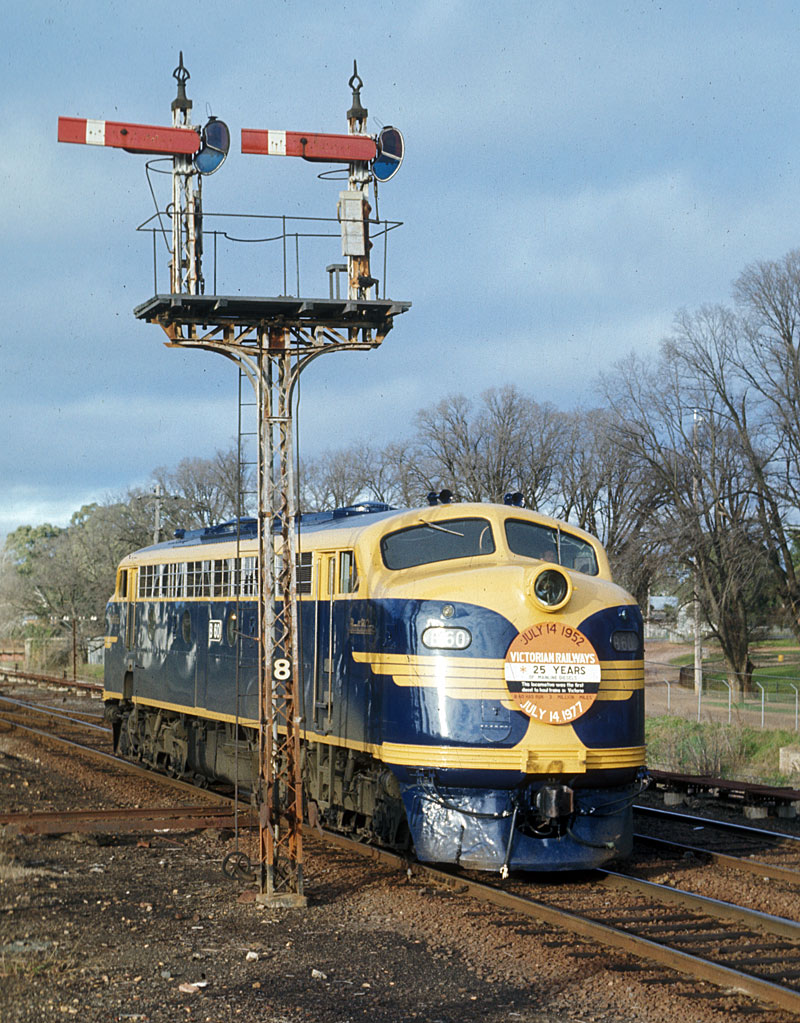
ABOVE: B 60 runs around its train from Melbourne prior to running its 25th anniversay train to Maryborough, July 16 1977.
(Photo courtesy Warren Banfield).
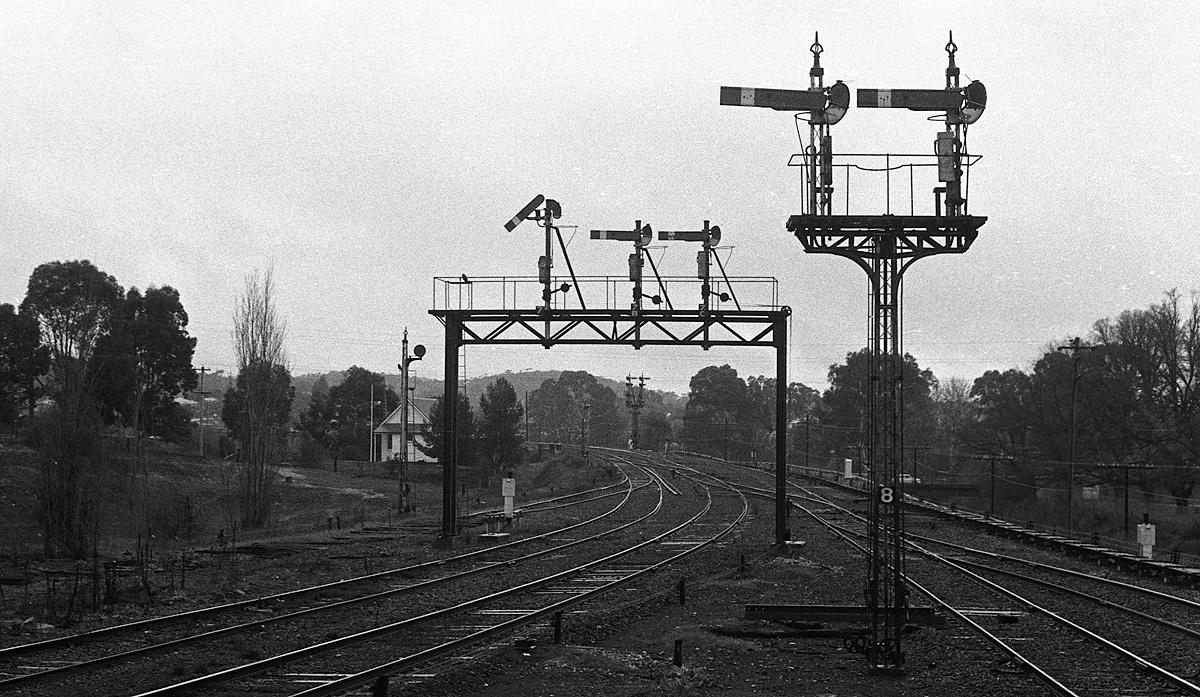
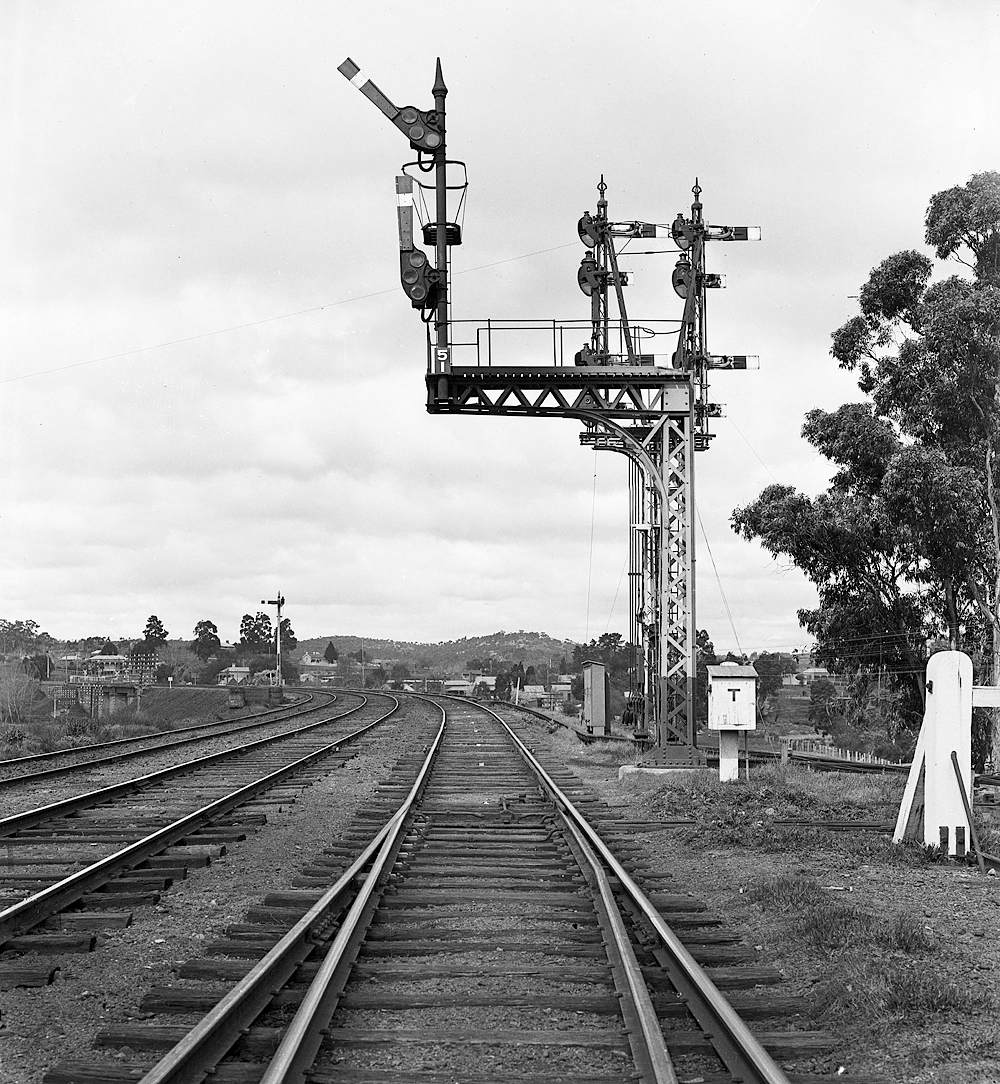
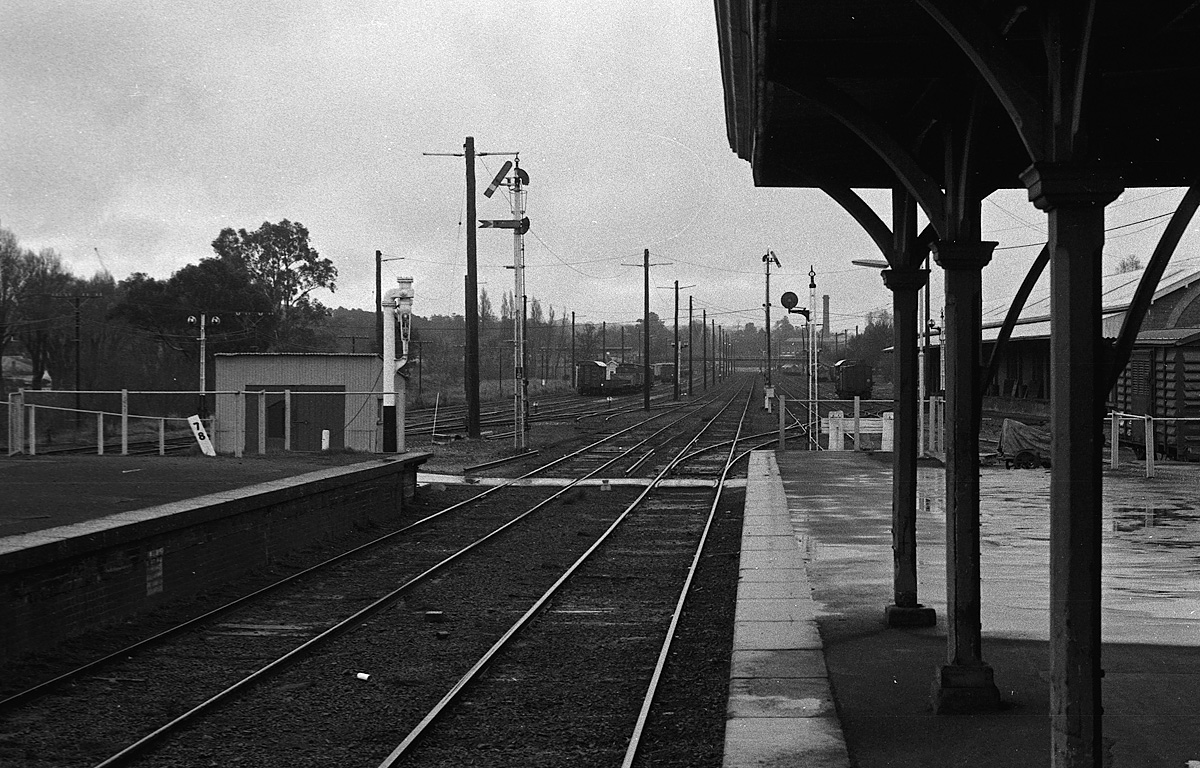
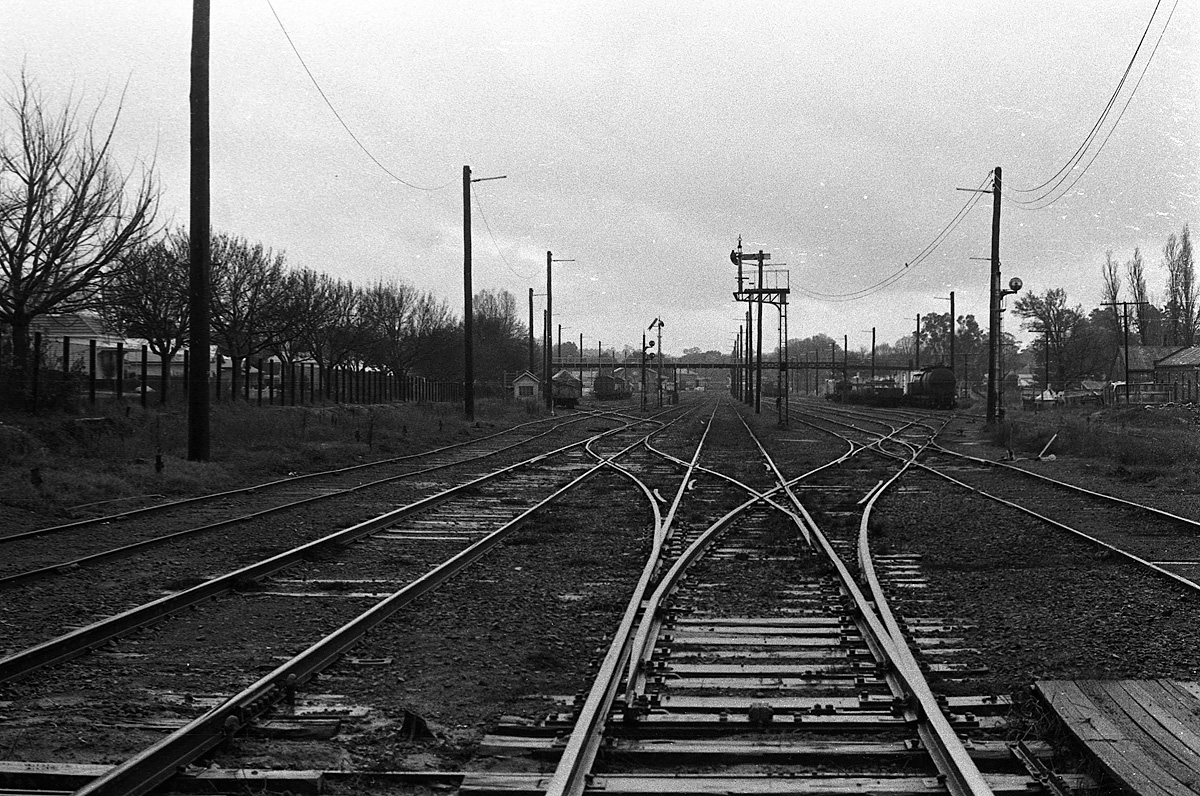
ABOVE: The view looking south (towards Melbourne).
Post 8: The left hand arm was an up signal, (back platform to Melbourne line),
and the right hand arm was a down signal,
(from the back platform to the Maryborough line).
The three home signals on the gantry likewise contained up and down signals. The left hand arm, post 7, (at proceed), was from the up platform to Melbourne.
Posts 7B (up home to Melbourne) and 7C (down home to Maryborough line) applied from the down platform.
On the far left the carriage dock road has been partially removed but the connection to the up line remains.
ABOVE: The view from the island platform looking south, June 12 1988. (photo courtesy Chris Wurr).

ABOVE: A down pass approaches Castlemaine. Feb 1989. Photo courtesy Noel Bamford.
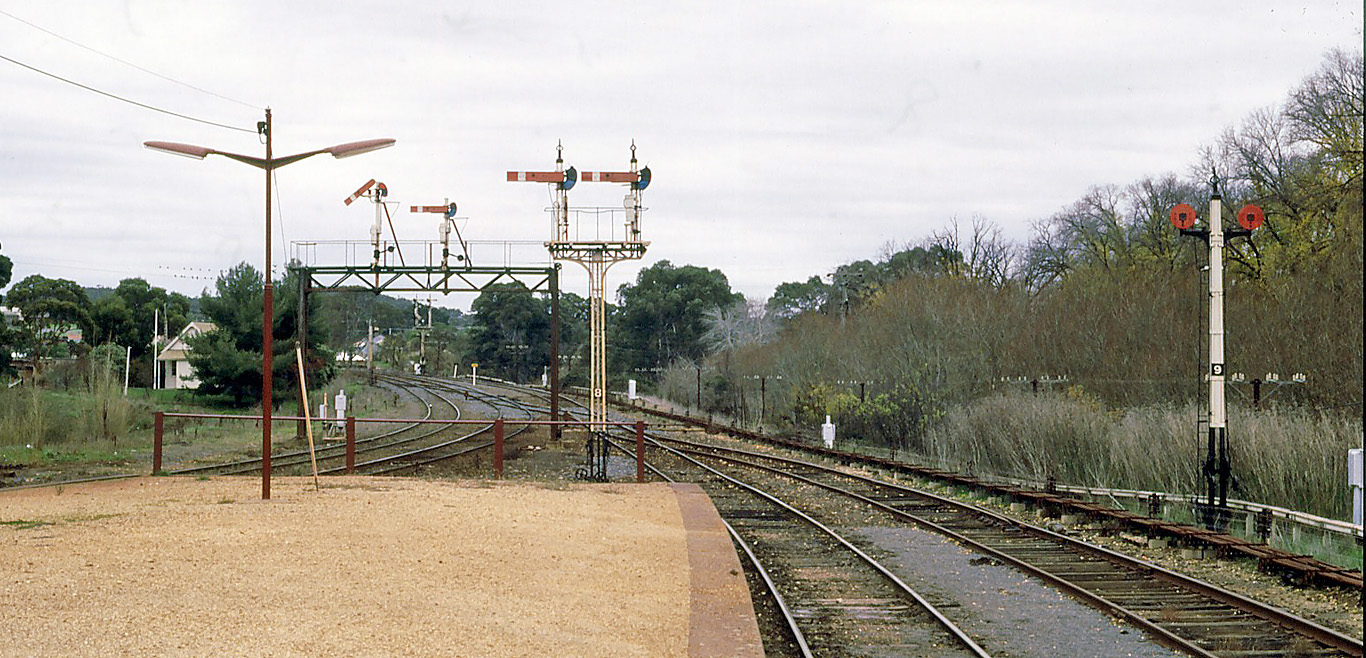
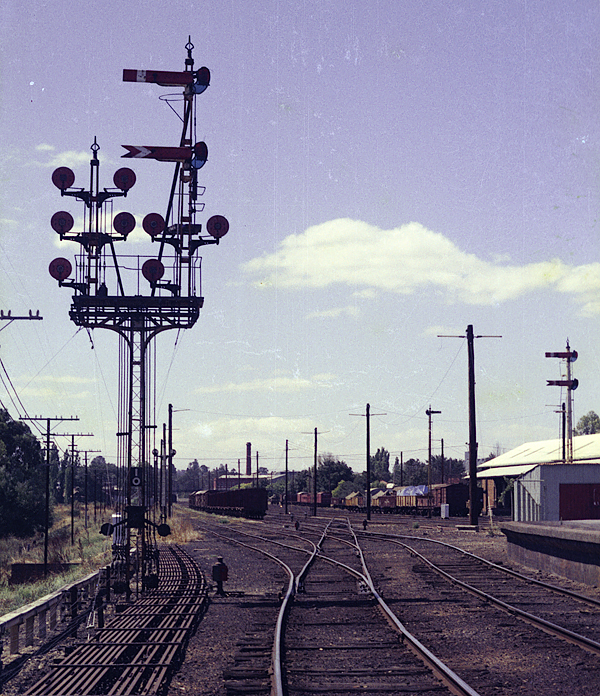
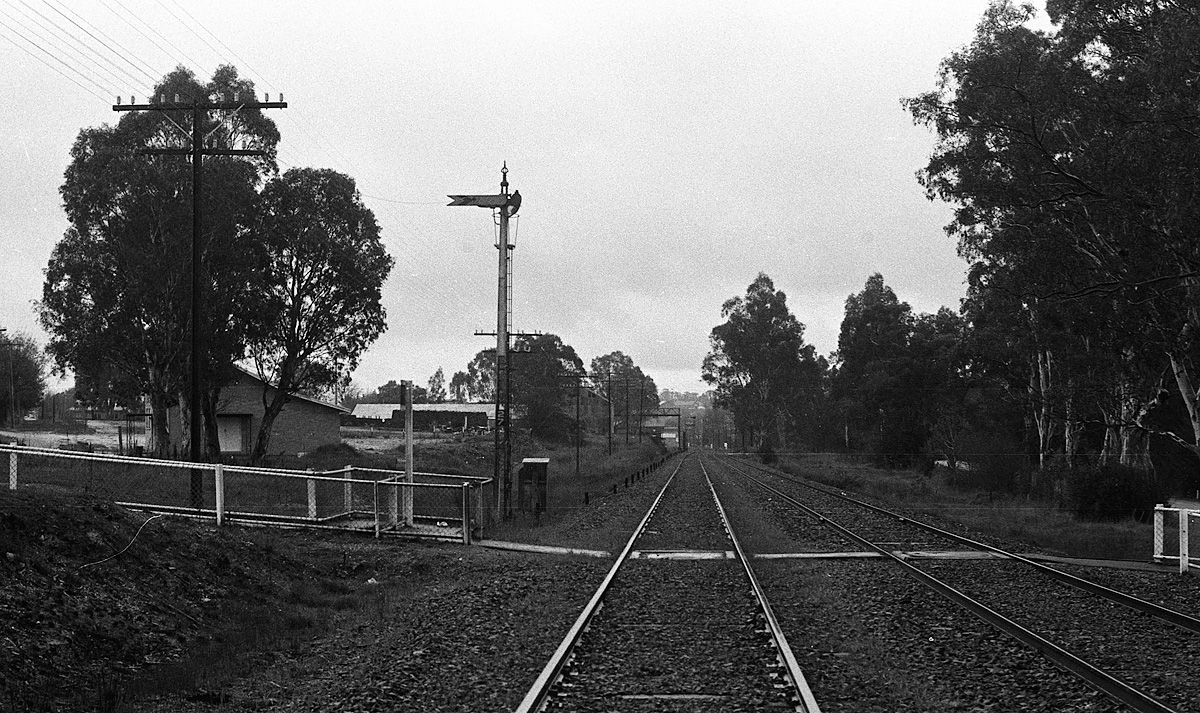
ABOVE: Looking north towards Bendigo from the up platform.
BELOW: An almost identical view, taken Nov 1982.(photo courtesy Noel Bamford).

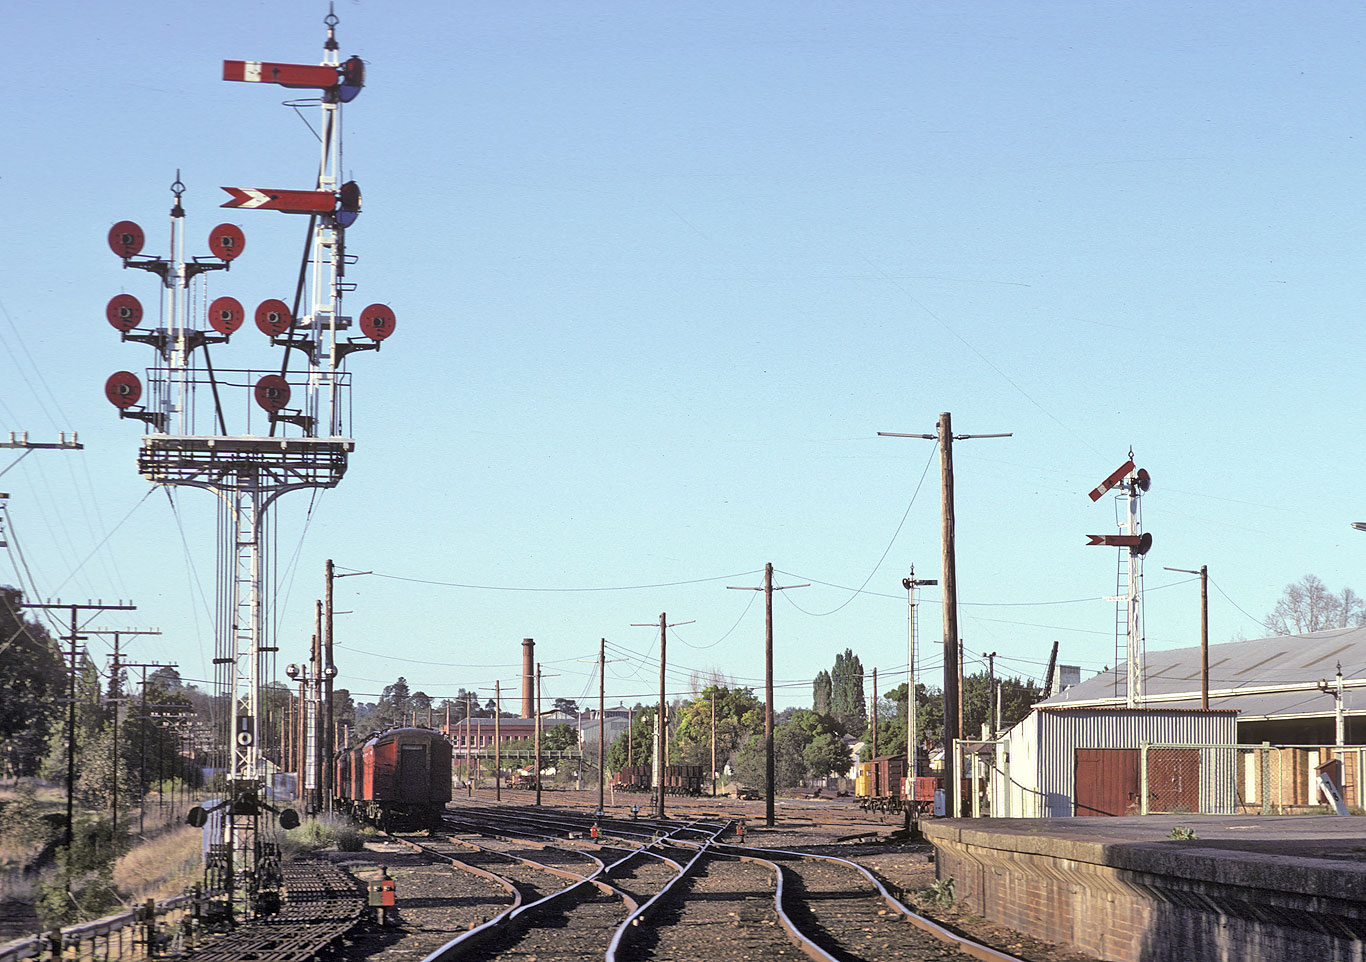
ABOVE: One of the most impressive bracket posts on the VR, post 10 at Castlemaine.
This post faced south which meant it was very difficult to get a photo with the sun shining on the signals. 1980.
BELOW: Noel Bamford did manage to get a good photo of this wonderful signal in Nov 1982.
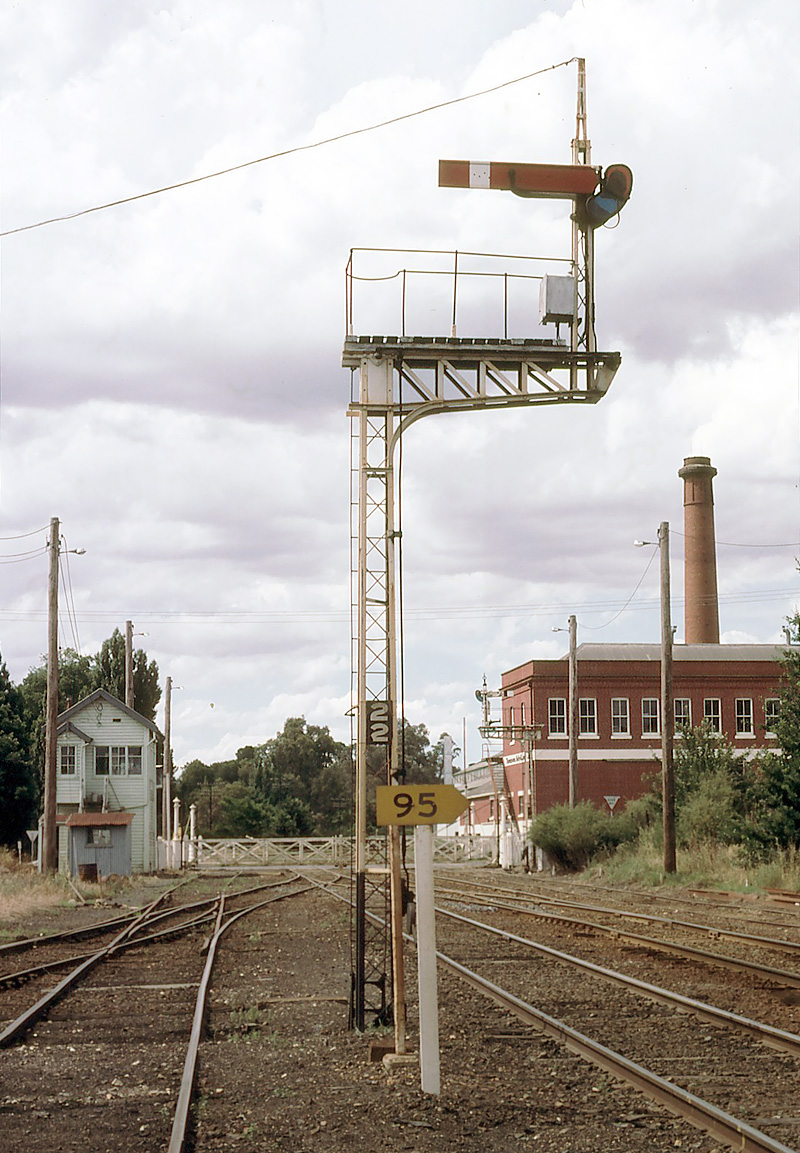
ABOVE: Post 22 was the down home operated by B box, it protected the points from sidings A, the crossover and the interlocked gates. June 12 1988. (photo coutesy Chris Wurr).
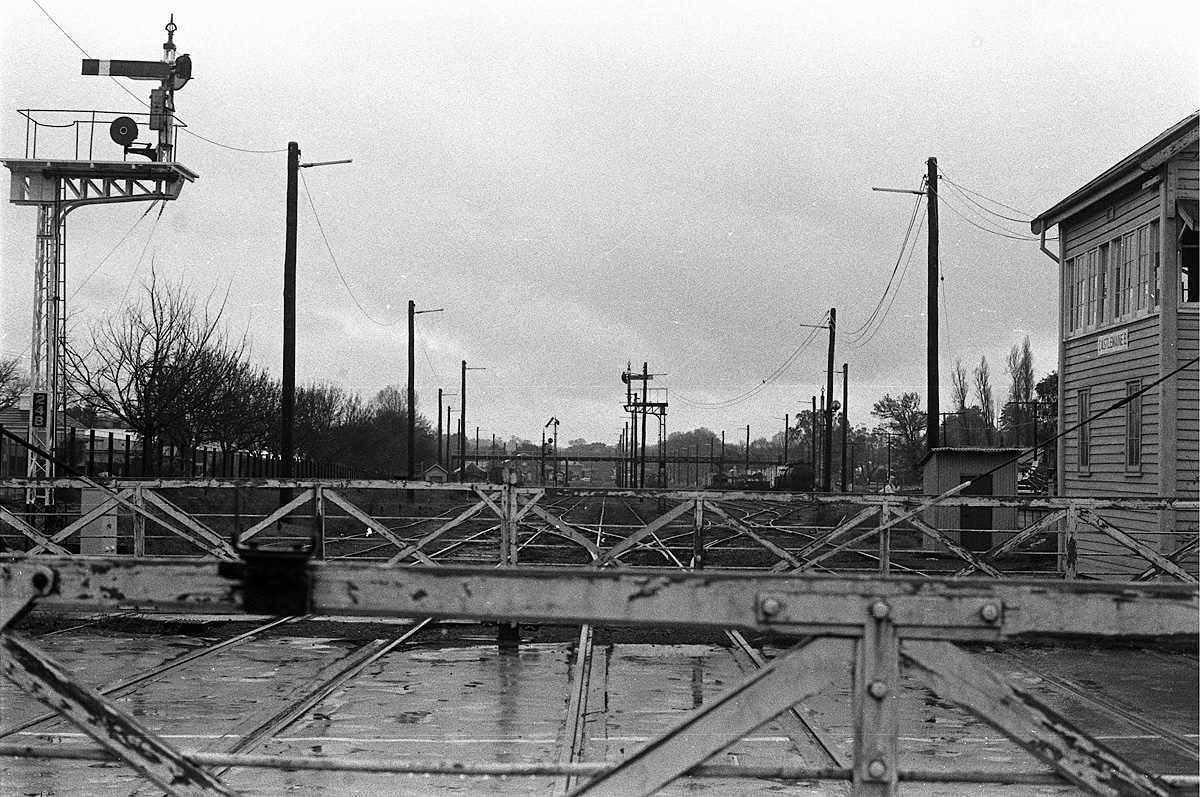
ABOVE: Looking south from Castlemaine B box.
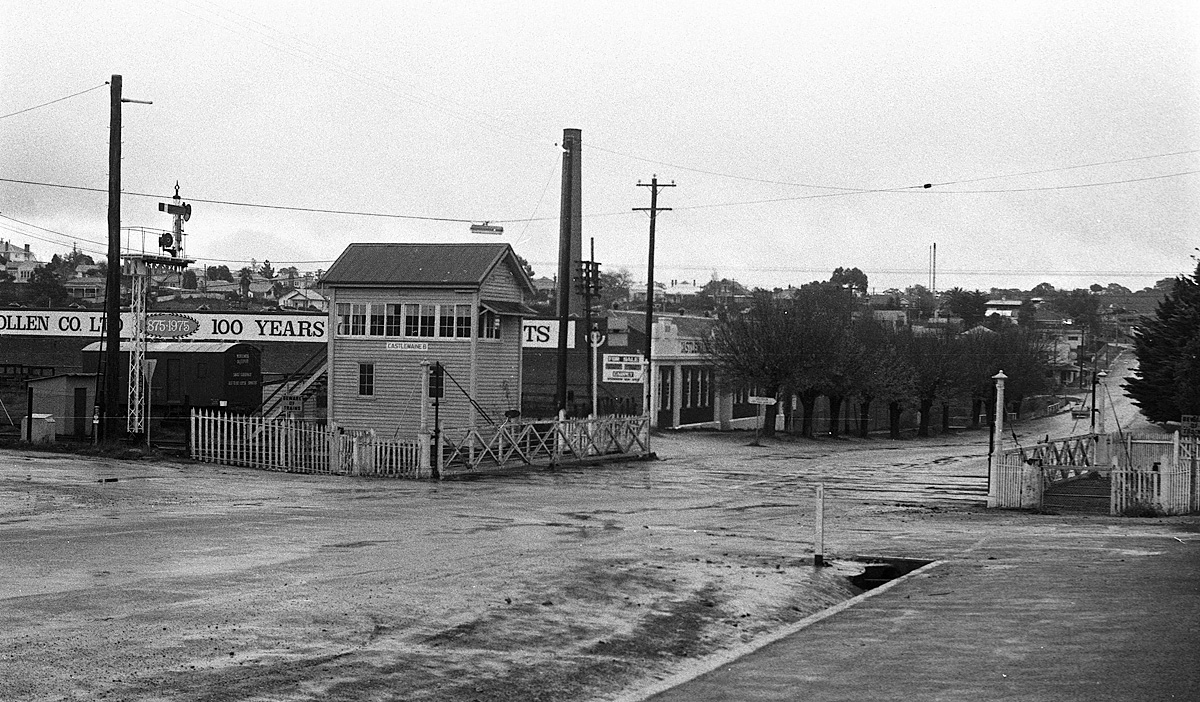
ABOVE: Looking south, towards Melbourne from the Parker street interlocked gates.
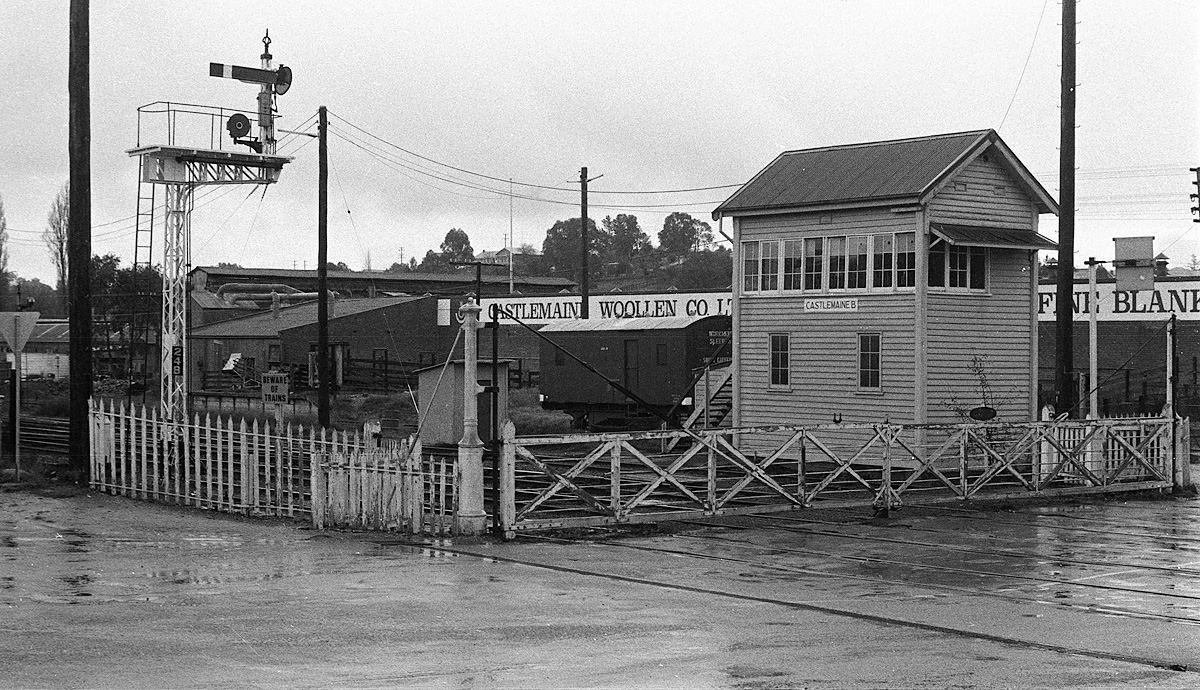
ABOVE & BELOW: The Parker street interlocked gates and Castlemaine 'B' box

ABOVE: Interior view of Castlemaine B box Feb 1989. Photo courtesy Noel Bamford.
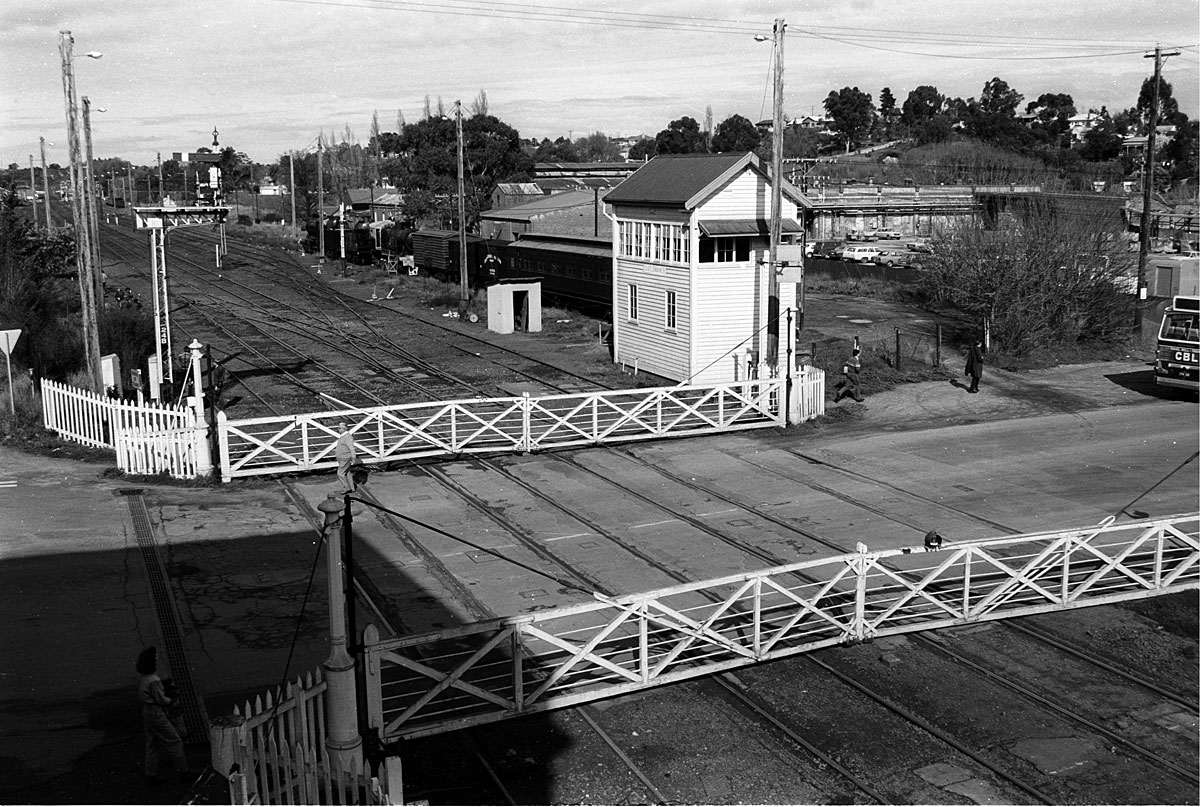
ABOVE: Castlemaine 'B' box and interlocked gates. Photographed in 1988.
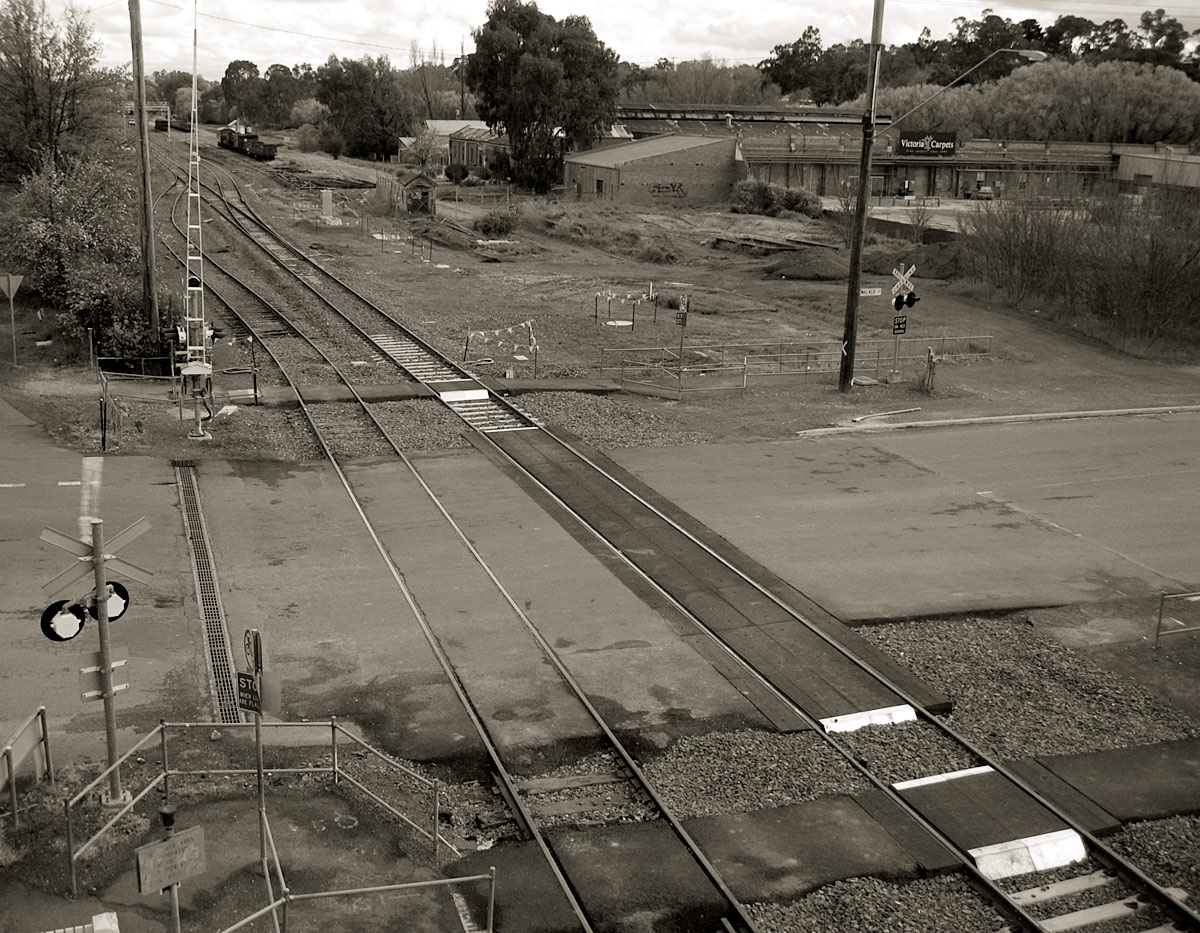
BELOW: The same view after the RFR project, 2006.
ABOVE: The up distant for Castlemaine 'B' box. In August 1979, this signal was moved 930 metres farther out and was provided with motor operation.
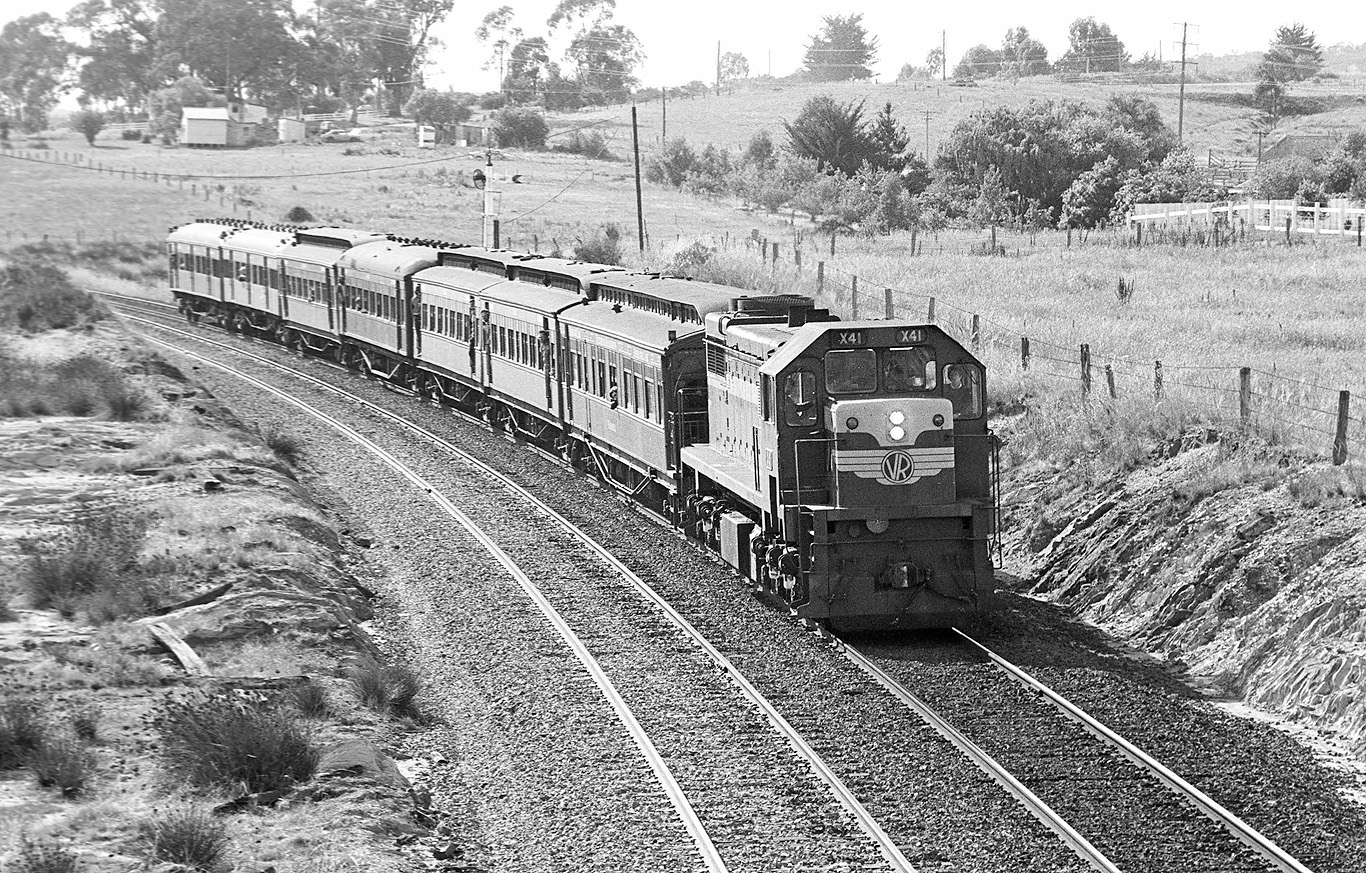
ABOVE: A down enthusiasts special passes Castlemaine's down distant signal, Nov 14 1981.
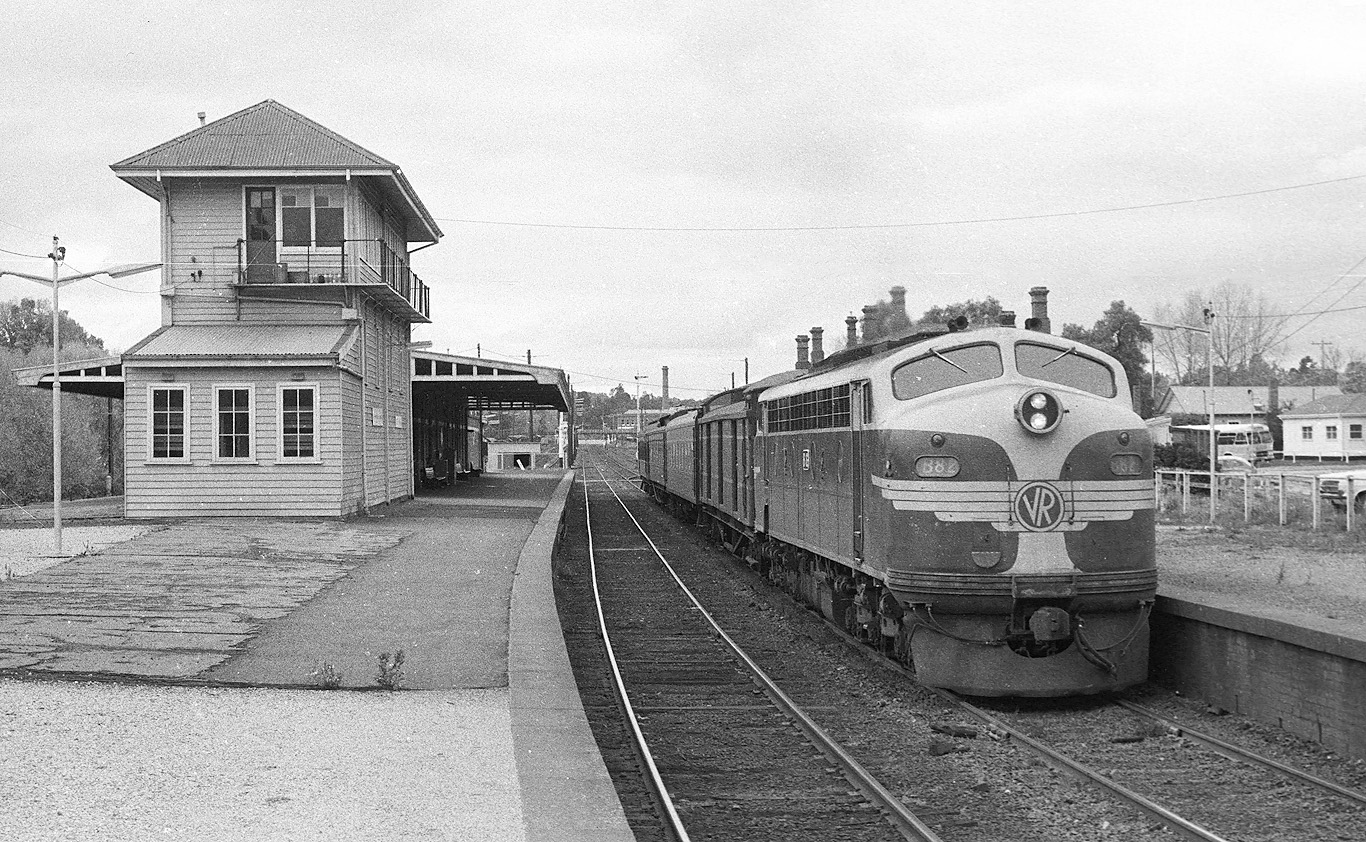
ABOVE: A up Bendigo pass pauses at Castlemaine, next to Castlemaine 'A' box. 1982.
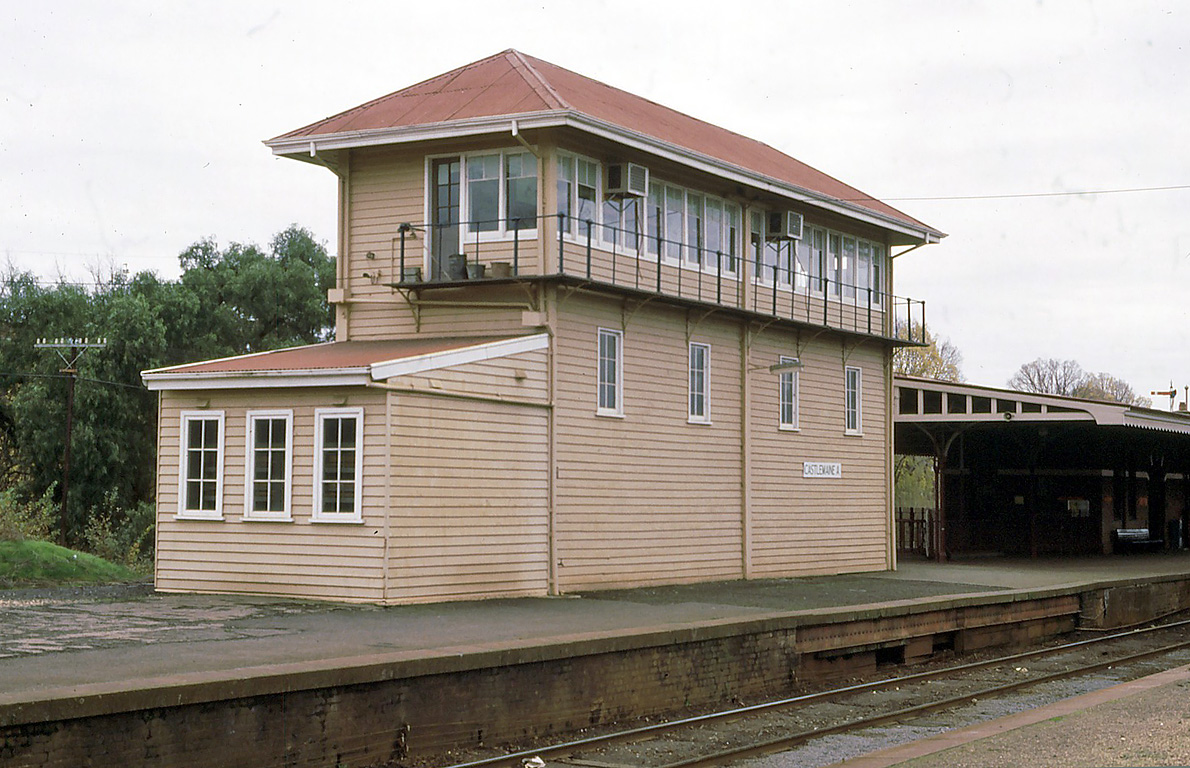
ABOVE: Castlemaine 'A' signal box photographed from the up platform. The add on building with three windows, I believe was added when Maldon junction became remotely controlled by 'A' box and contained the relays etc. June 12, 1988.
(photo courtesy Chris Wurr).
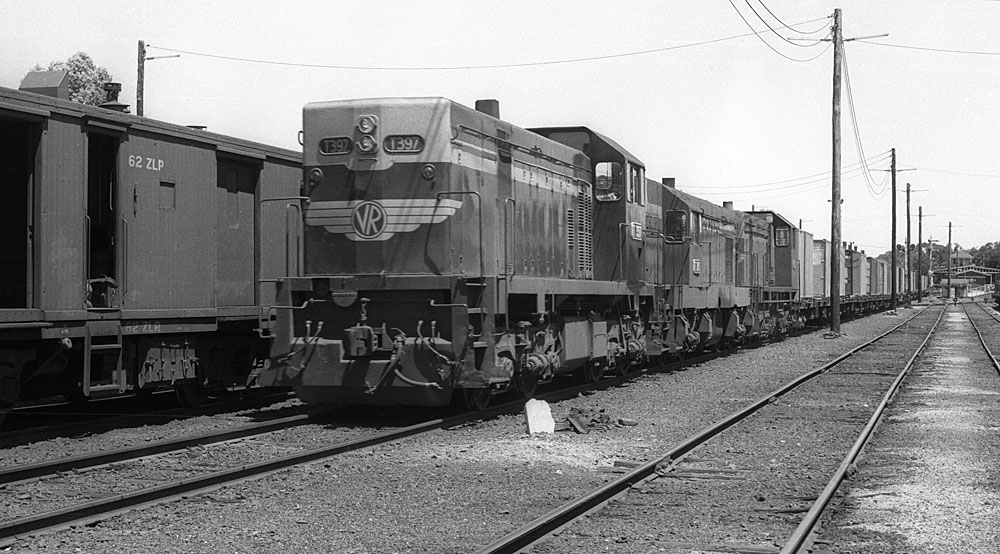
ABOVE: The guard has his kit in the doorway of ZLP 62, as he prepares to changeover with T 397 - T 345 - Y 173 on the 11.00am Melb Yard to Bendigo goods. Castlemaine, December 22, 1979.

ABOVE: B 73 on a Bendigo to Melbourne goods, is run through by another up goods that I was travelling on at Castlemaine. January 4, 1980.
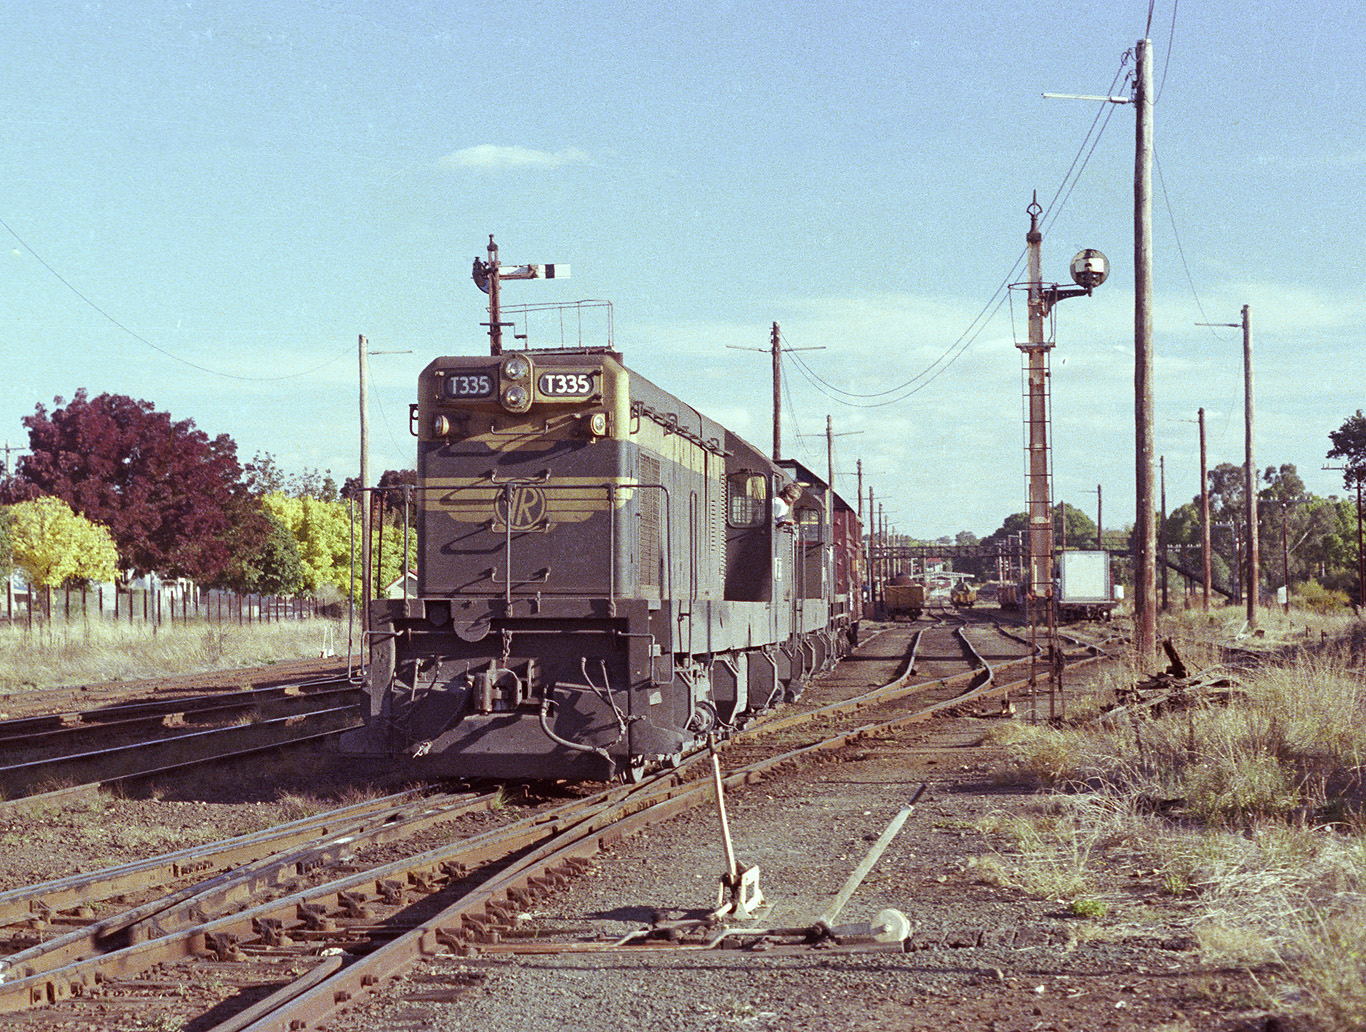
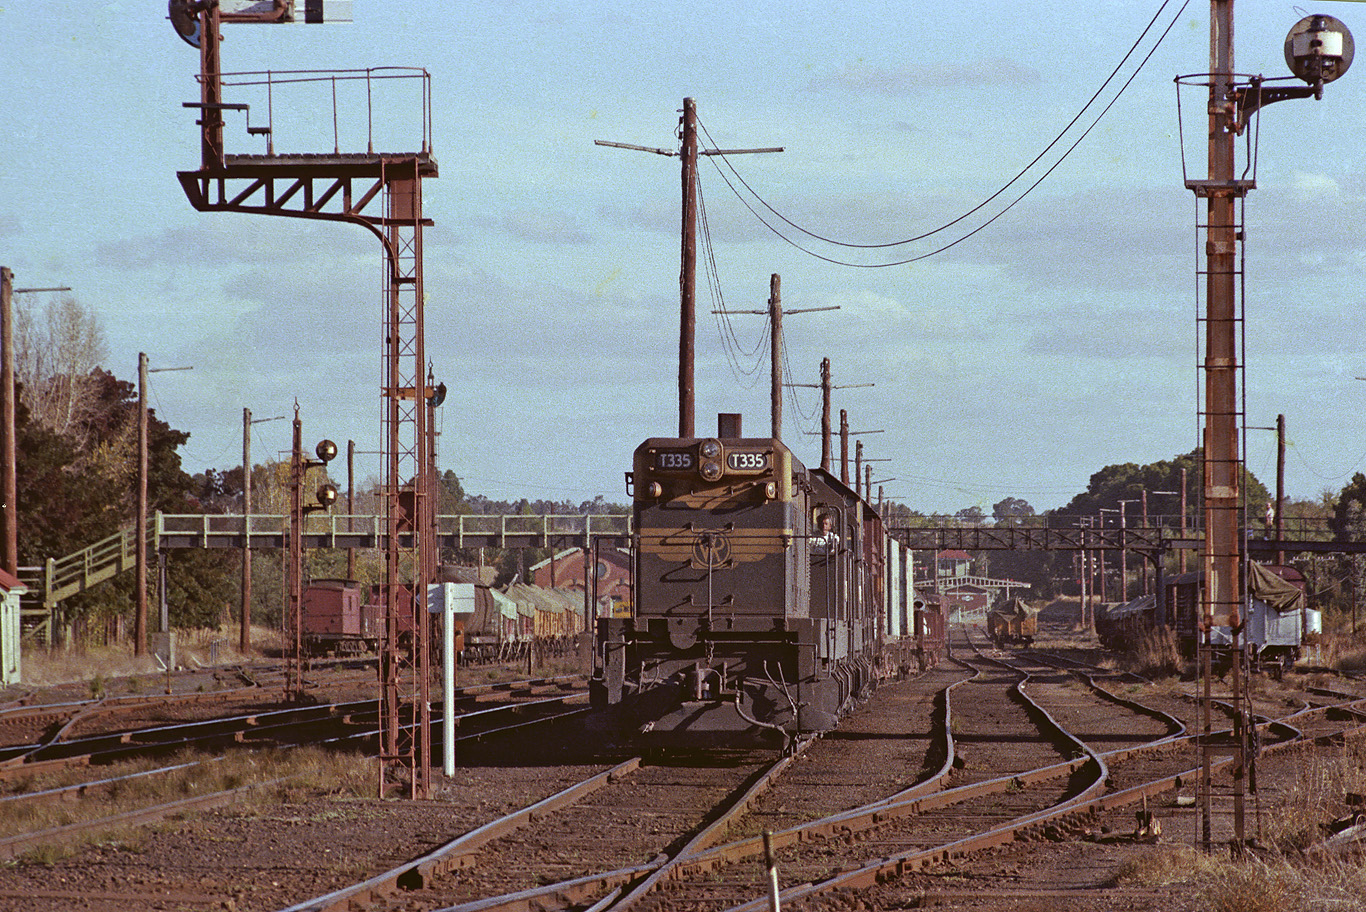
ABOVE: T 335 - T 336 - Y 160 shunt their down goods at Castlemaine, April 5 1980. I had chased this train from Sunshine and it had been put away at least twice to allow other down trains to run through it. I think it had taken about 5 hours to get this far! BELOW: I was still very much in my learning basic composition stage of photography and have managed to cut most of the home signal off and hide Castlemaine 'A's up distant behind the signal mast at left.
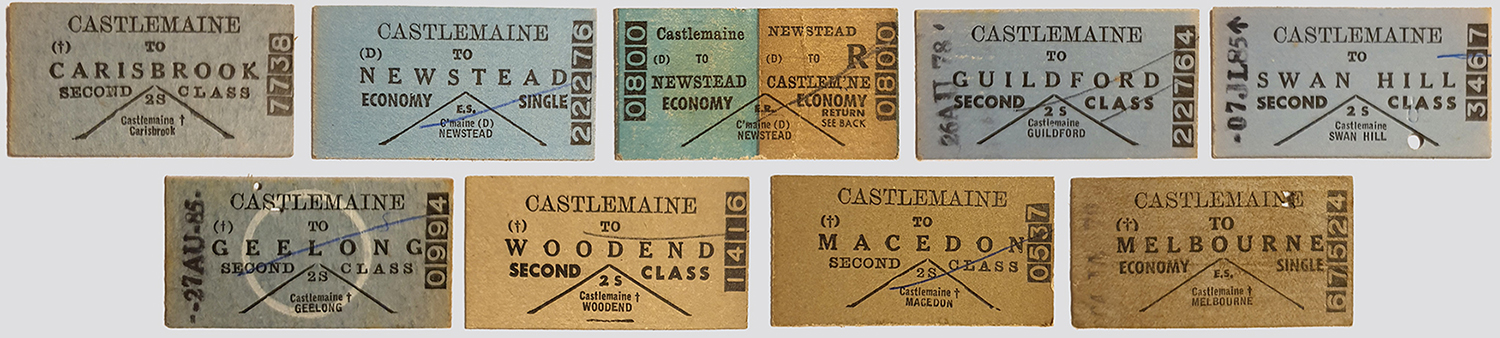
ABOVE: A selection of tickets issued from Castlemaine. (Courtesy Geoff Winkler).
| Castlemaine | Harcourt |
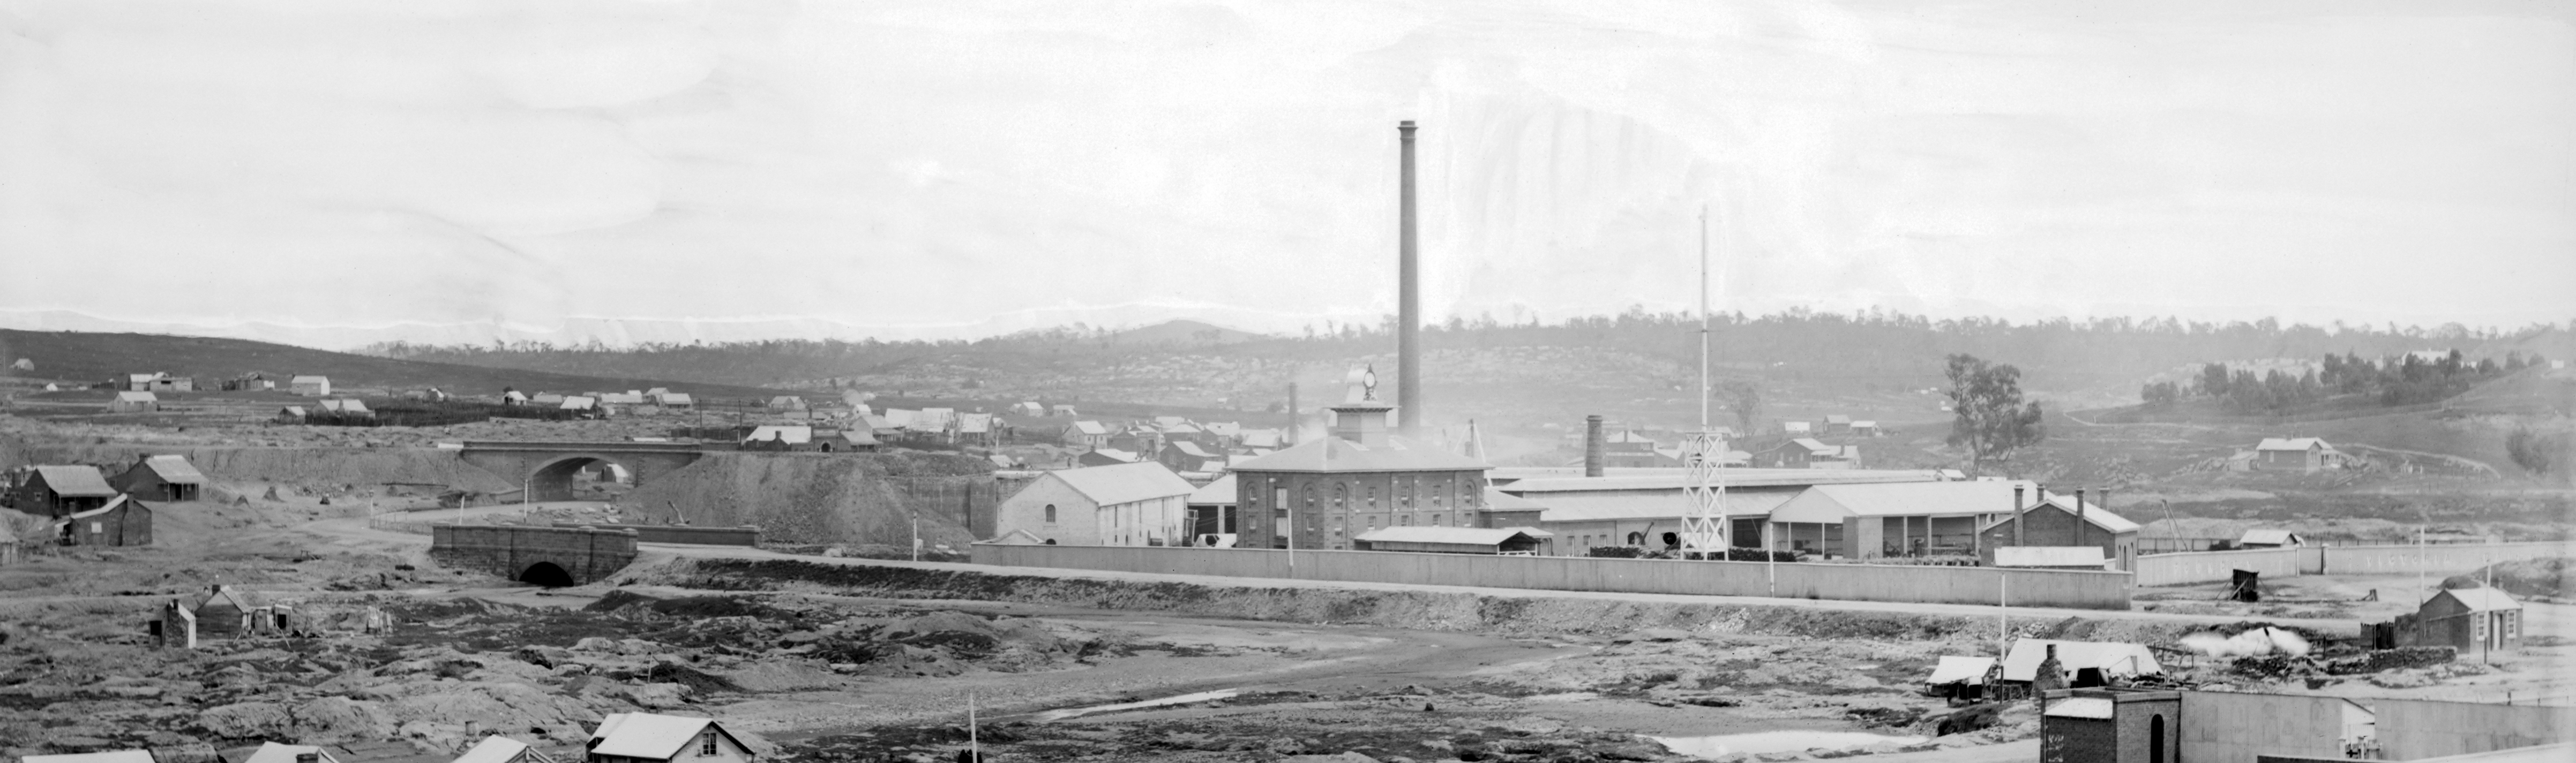
The Thompson, Kelly & Lewis, (Thompson & Co.), Foundry was situated beyond the north, (down), end of the Castlemaine yard, adjacent to the up side of the line. The foundry was established in 1875 by the Thompson brothers, who had previously constructed and operated a flour mill on the site. After commencing with the manufacture of mining equipment for gold excavation, one of their first major contracts was for the supply in 1882, of points and crossings for the Inglewood line, then under construction. The provision of many specialist castings to the VR lasted throughout the the entire span of the company's existence, and continues on that same site to the present day. Amongst the myriad of other products also produced here, the firm also manufactured some DD locos for the Victorian Railways.
A siding was provided to service the works from at least 1888, when the Castlemaine yard was extended to Parker Street. It was a dead-end siding, which ran northwards, parallel to the Main line.
By late 1894, the siding, which was already serving a 113 foot platform and a crane, was extended. This was by means of a sharply curved line trailing from the north end, which crossed over what was then the northern end of Kennedy Street and entered the works. This extension was constructed with 72lb chaired iron rails. Thompson & Co. were asked to pay for this extension, but they declined, as they considered the curved siding to be a mistake as it did not allow access to all trucks - especially QRs. The curvature on siding varied from 133 feet to 75 feet in radius, QRs required a minimun of 200 feet radius.
By August of 1900, the Siding was slued and the Platform and crane were shifted further eastward, to prevent the crane jib from fouling the main line.
On October 28, 1913, the Sidings were extended to serve a new three road locomotive erecting shop and paint shop. This was provided as a result of the contract to construct the DD class locomotives. The Existing dead-end siding was further slued to be 10 feet clear of the main line. The curved siding was extended by 107 yards and was also slued to match. On August 30, 1919, the Siding was extended by 520 feet, to serve new a forging shop.
By February 16, 1926, the curved siding was extended a further 180 feet by the company without authorisation. The grade being 1 in 20 rising from the points, required the trucks to be hauled in by an electric winch.
On February 07, 1941, the Siding was slued near Post 25 to clear an extension of the forge building. This also required the relocation of Post 25. An additional dead-end siding was provided around this time, to serve the extension of the forge.
By June 14, 1944, the tracks at the erecting shop had been simplified, now only one line entered the building, a second terminated at the wall, and the third, (the former paint shop road), had been lifted.
(Includes information courtesy of 'Engineers Australia' and Andrew Waugh's 'Victorian Station Histories').
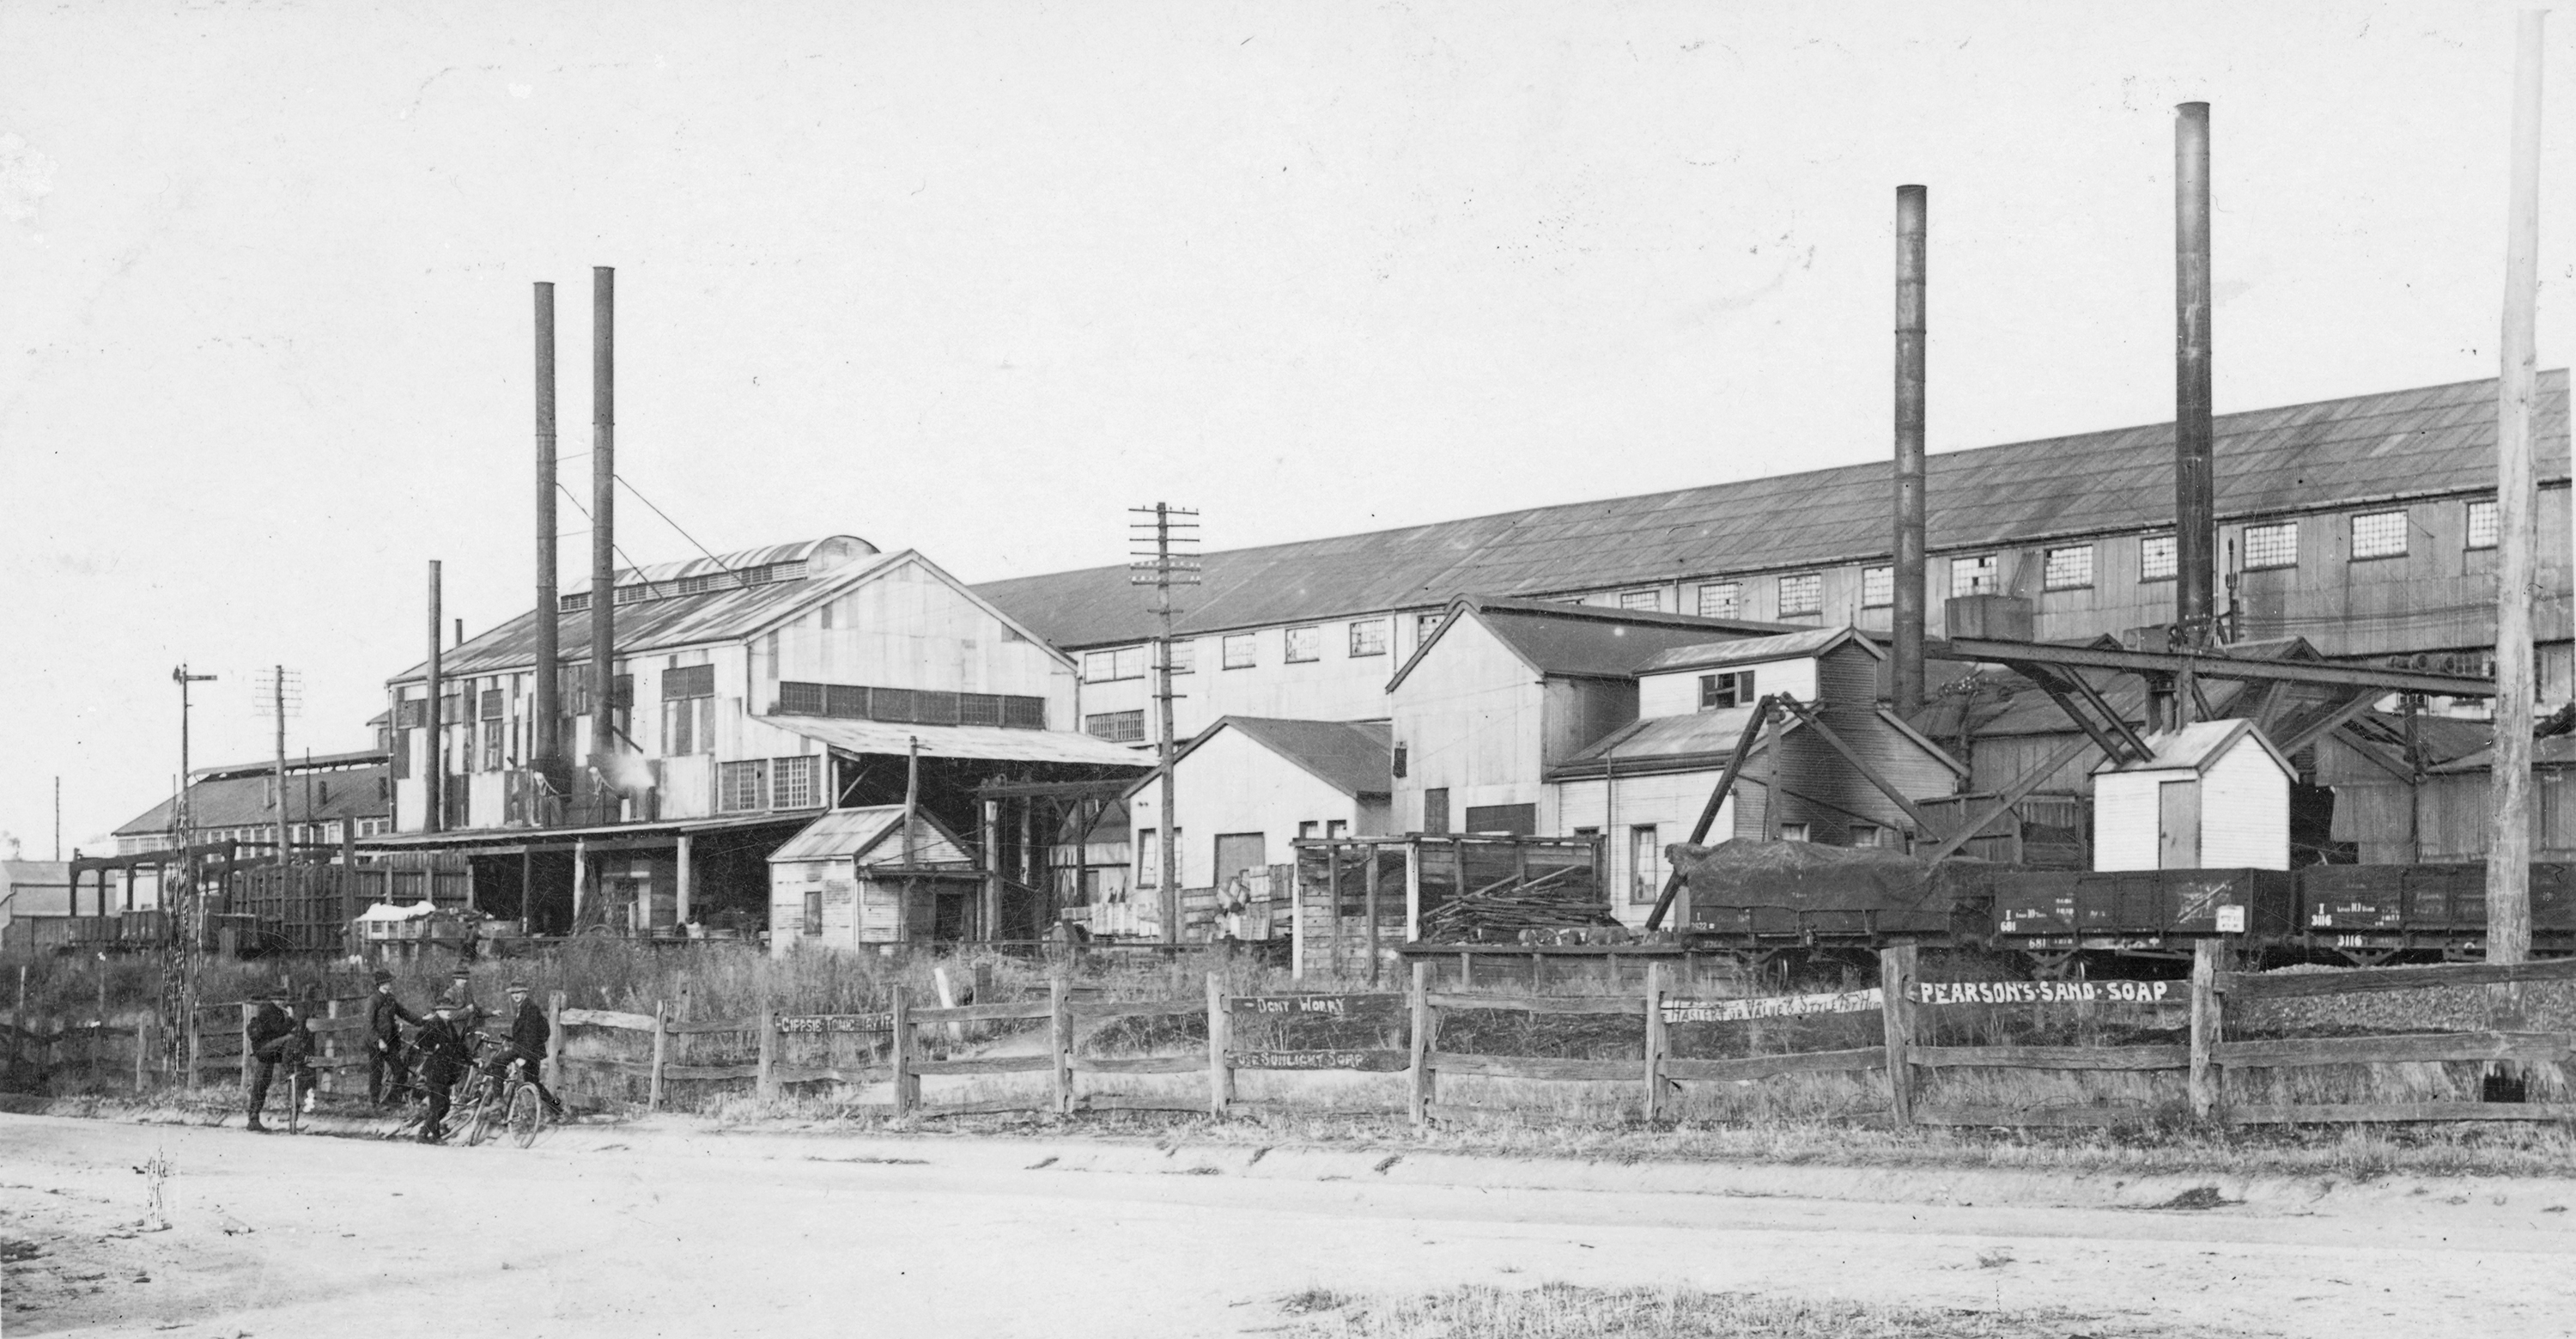
ABOVE: Thompsons foundry in about 1915.
(Photo courtesy of SLV)
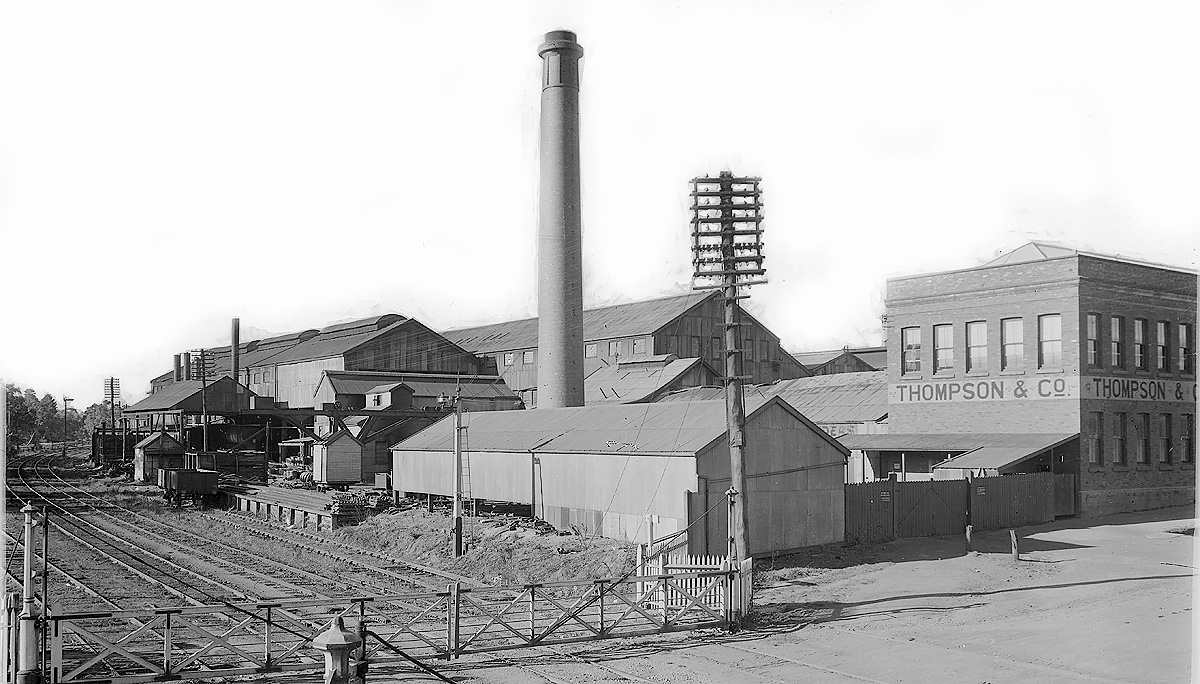
ABOVE: Viewed from Castlemaine 'B' box, this photo was taken about 1920 for the 'Rose' series of postcards.
(Photo courtesy of PROV).
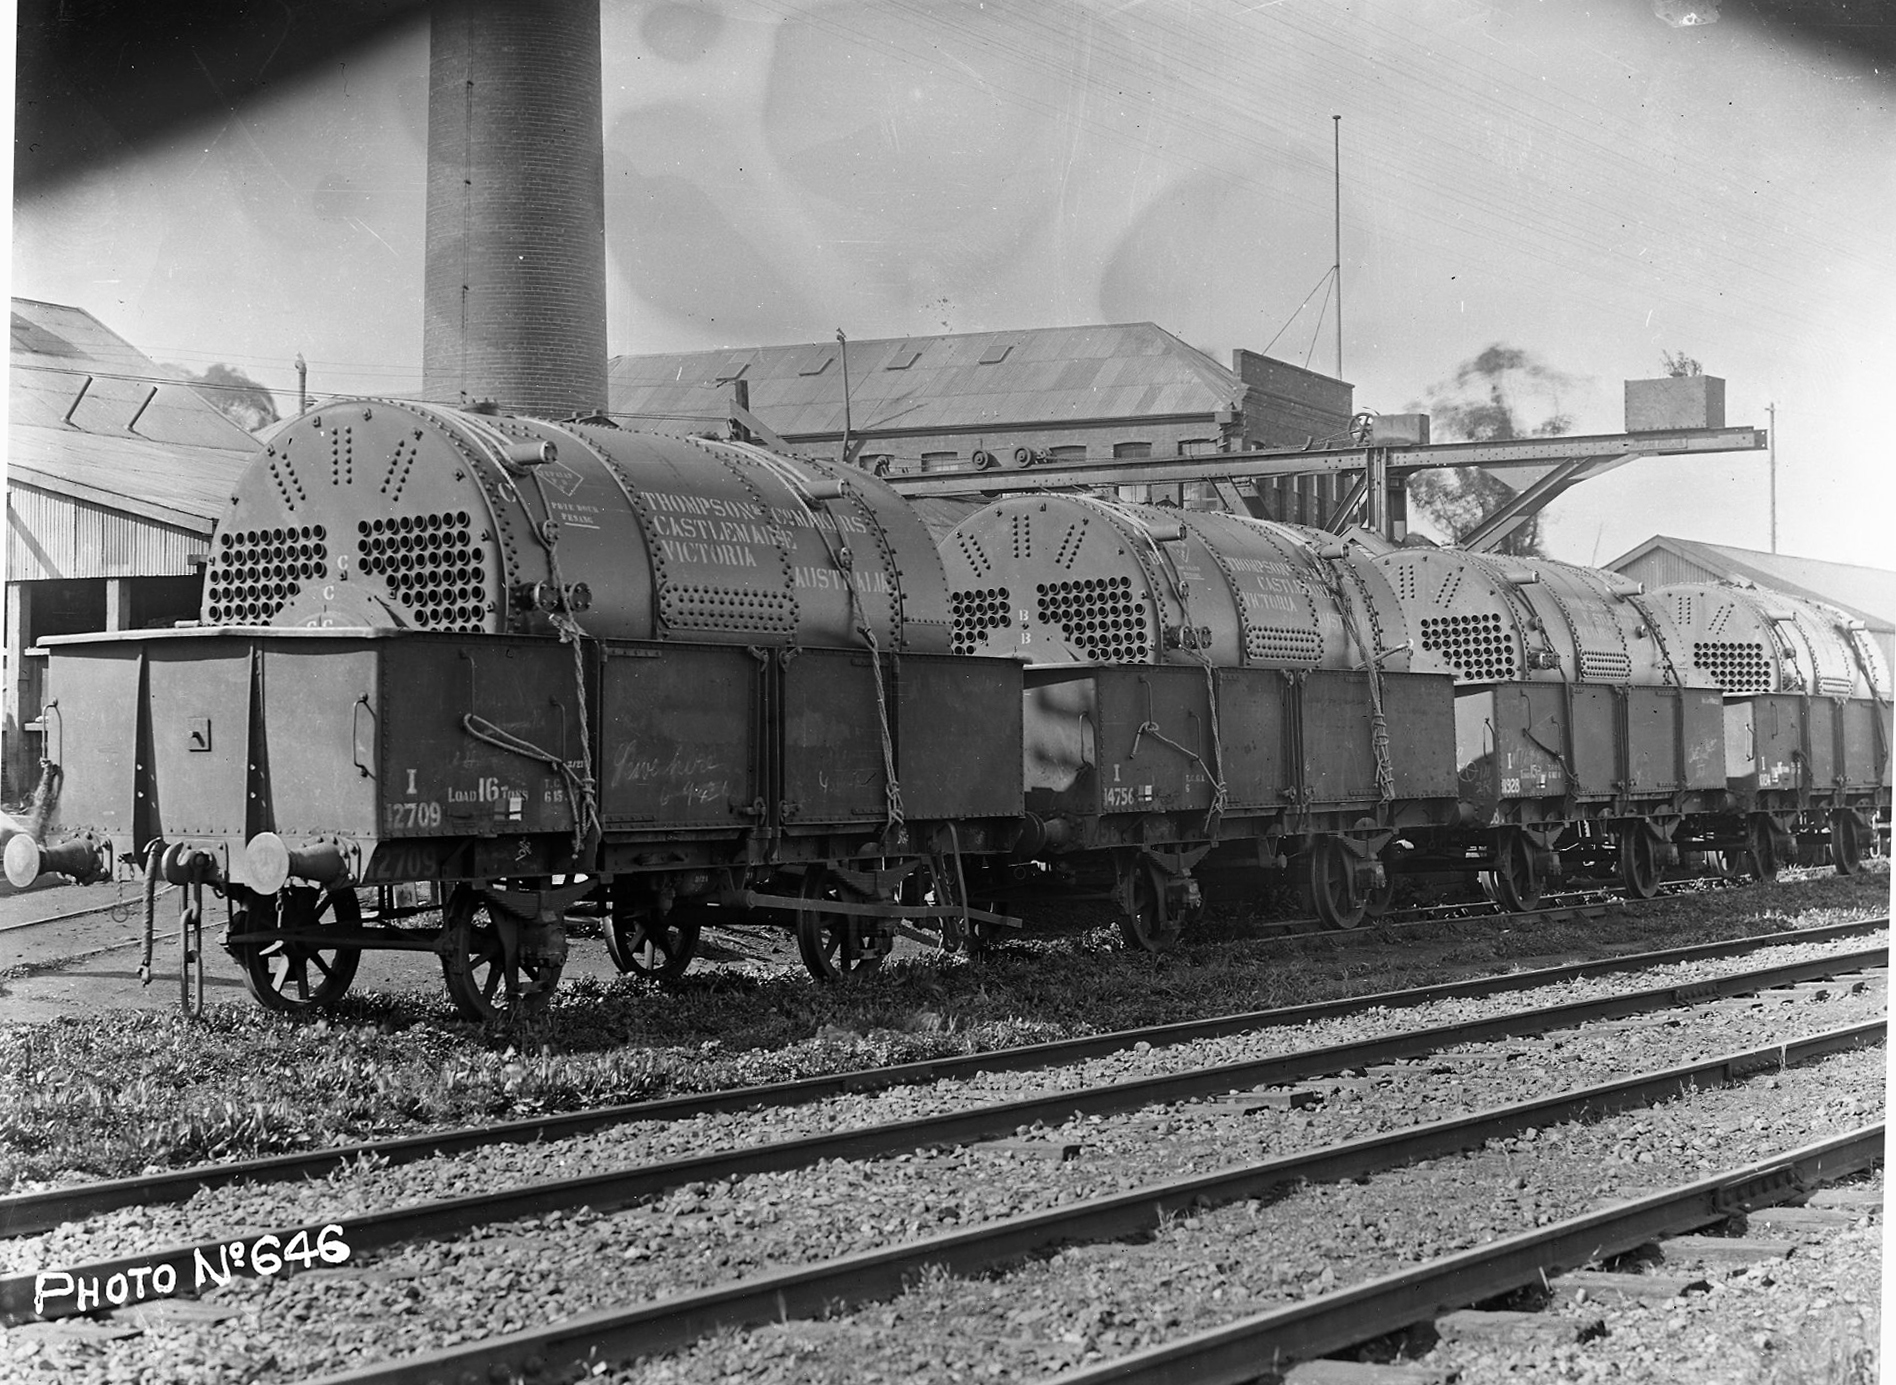
ABOVE: A consignment of boilers loaded into 'I' trucks and ready for shipment, c1922. The sharply 'curved siding' can be seen swinging away on the left.
(Photo courtesy of PROV).
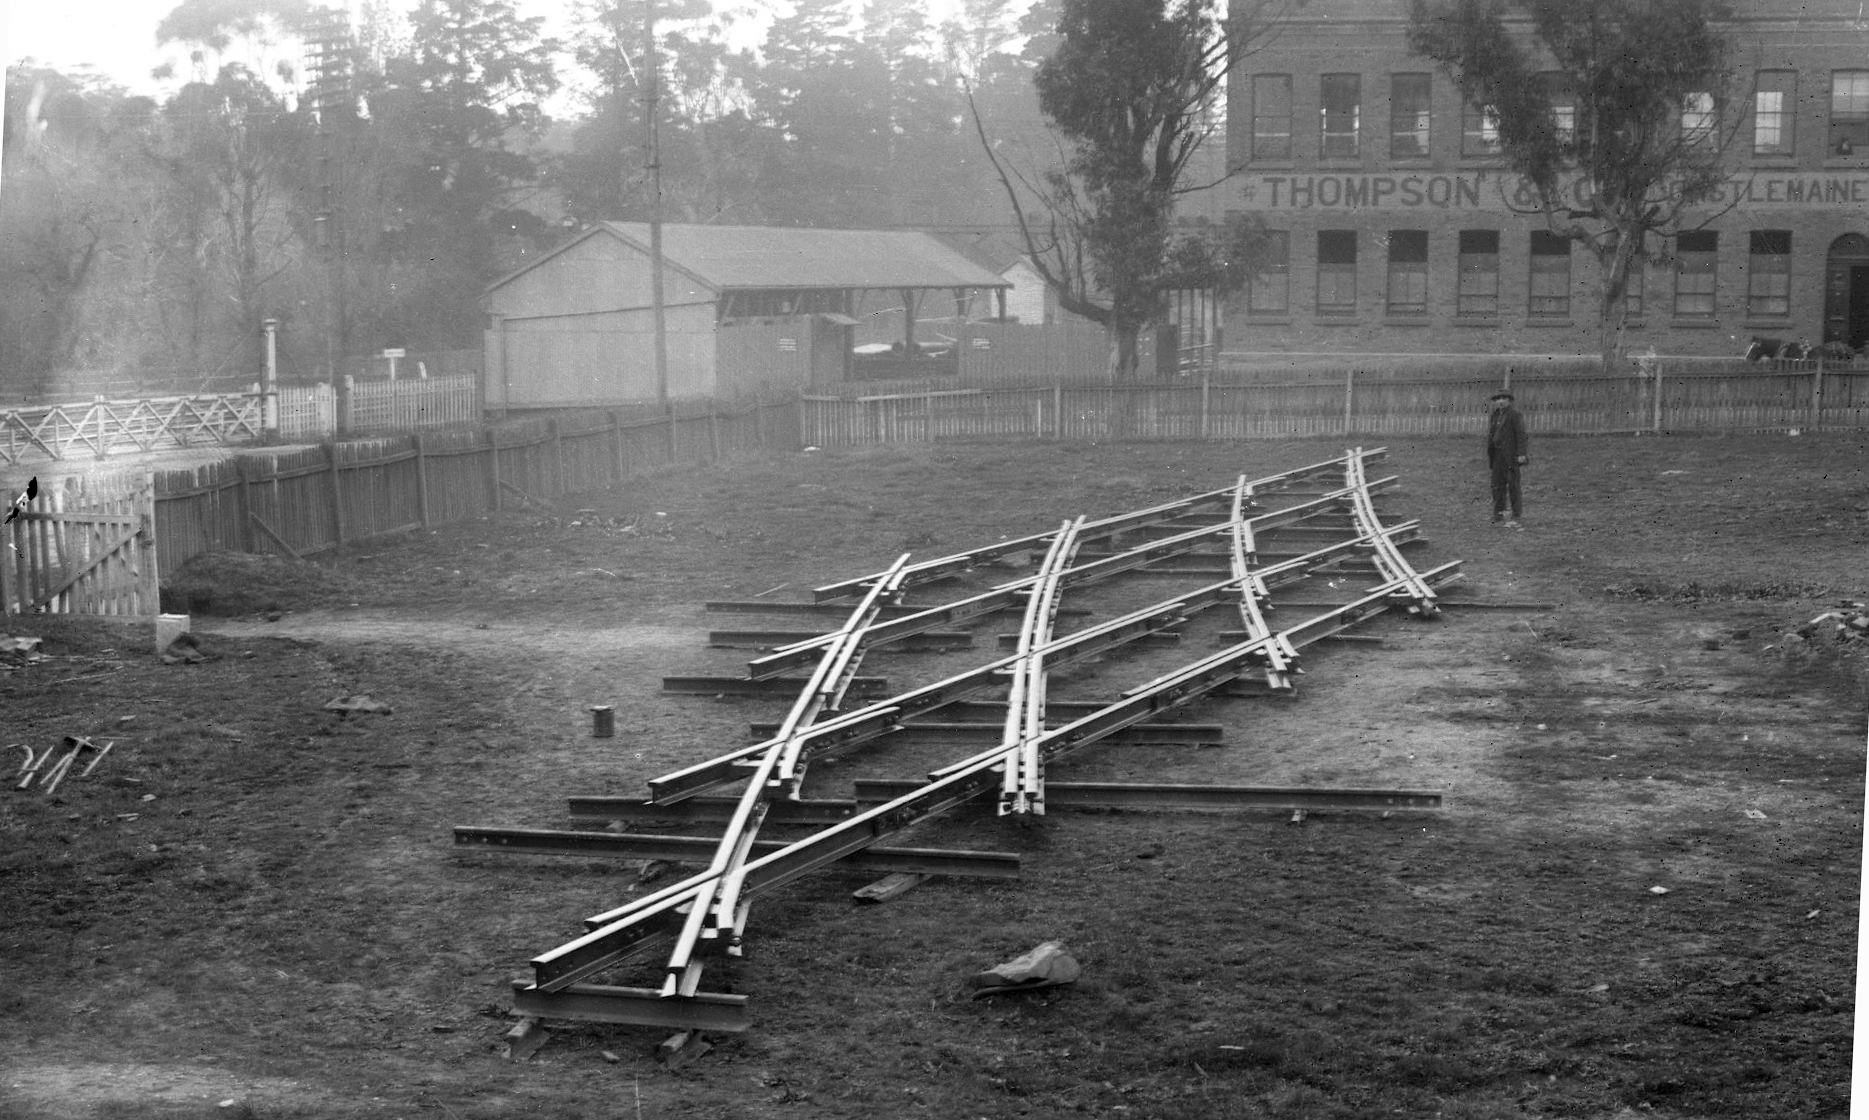
ABOVE: A trial assembly of a set of double line crossovers manufacured by Thompson & Co, arranged on the south side of Parker Street. c1921.
(Photo courtesy of PROV).
| Castlemaine | 80Miles 64Chains 17Links / 130.038km | Harcourt |
'Castlemaine Slate' had been quarried in Specimen Gully since at least 1860. This was from a site about one and a quarter miles east of the railway, just a stones-throw from where the first gold was discovered in the Mt Alexander region. The product was in great demand for use in building and especially as paving, (flagstone). The quarry extended to a very impressive depth of 220 feet, (67m). After ongoing requests from the 'Castlemaine Slate and Paving Co.', Barkers Creek siding was opened on September 28, 1887, principally for the loading of their traffic. It was situated just to the south of the bridge over Specimen Gully Road.
It is evident that a tramway was constructed at the quarry works, however no evidence has surfaced to support the notion that it also provided a connection to the Siding.
Shortly before opening, on September 20, 1887, instructions were issued for the removal of the portable office from Golden Square, and its re-location to Barkers Creek. On July 19, 1894 the siding was placed in the charge of a woman, who was supervised by Castlemaine. Details of the arrangement of trackwork and signalling at Barkers Creek are still very sketchy, as are the extent of the loading facilities provided. However, by July 1, 1899, a single Home signal had been installed, presumably for up trains. A single dead-end siding on the up side was provided with a ramped platform. References cite that points and crossings for a crossover were on site here, but it is not known if they were ever actually installed.
In 1902, the siding only had connection to the up line. The points were trailing for Up trains and padlocked, with the keys being held by the Woman-in-charge. Goods trains were only permitted to shunt here during daylight hours. Their Guards were to place the signal at Danger before starting the shunt, and instruct the Woman-in-charge to lower the signal immediately after the train's departure.
By 1907, the Quarry had been worked out, and operations shifted about a mile and a half further to the south-east. Subsequently, as the pockets of high grade slate deposits were exhausted, a southerly trend continued. This lessened demand for the facilities at Barkers Creek, with the stone being more conveniently shipped elsewhere.
On May 5, 1911, the siding was reduced to no-one-in-charge status.
By 1913, the keys were being kept at Harcourt and a scotch block as well as a set of catch points were installed on the siding. The Guard was responsible for their security and the working of the signal, which was to be placed at danger immediately upon arrival of the train. It was not to be again lowered, until the train was quite ready to proceed on its journey. Unless instructions were issued to the contrary, the Signal lamp was not to be lit at night. Trains were not to shunt there in darkness, foggy weather, or when the block working was disarranged.
Commencing in early in 1916, it seems that a caretaker was again placed in charge, (as referenced in the May working-time-table of that year). This was very shortlived though, with the position being removed again the following September. After that, the key to the entrance gate for the siding was held by a Mr Walter, a storekeeper. Any application for trucks was to be made to either of the Station Master's at Castlemaine or Harcourt.
From June 10, 1918, the siding was only available for use for goods in full truck loads. A small amount of Hay from Ravenswood and Flour from Bridgewater constituted the only inwards loadings during 1922 and 1923. Over that same period however, the outwards loadings consisted of reasonable shipments of gravel, being consigned by a Mr Norris to various Melbourne Councils. Anticipated orders for more of this in 1924 came to nothing, and a decision was made by the VR to close the siding.
The Home signal and lever quadrant were taken out of use on April 30, 1925, and the Points were removed. The siding remained until October 12, 1926, when it too was dismantled.
(Includes detail gleaned from Andrew Waugh's 'Victorian Station Histories').
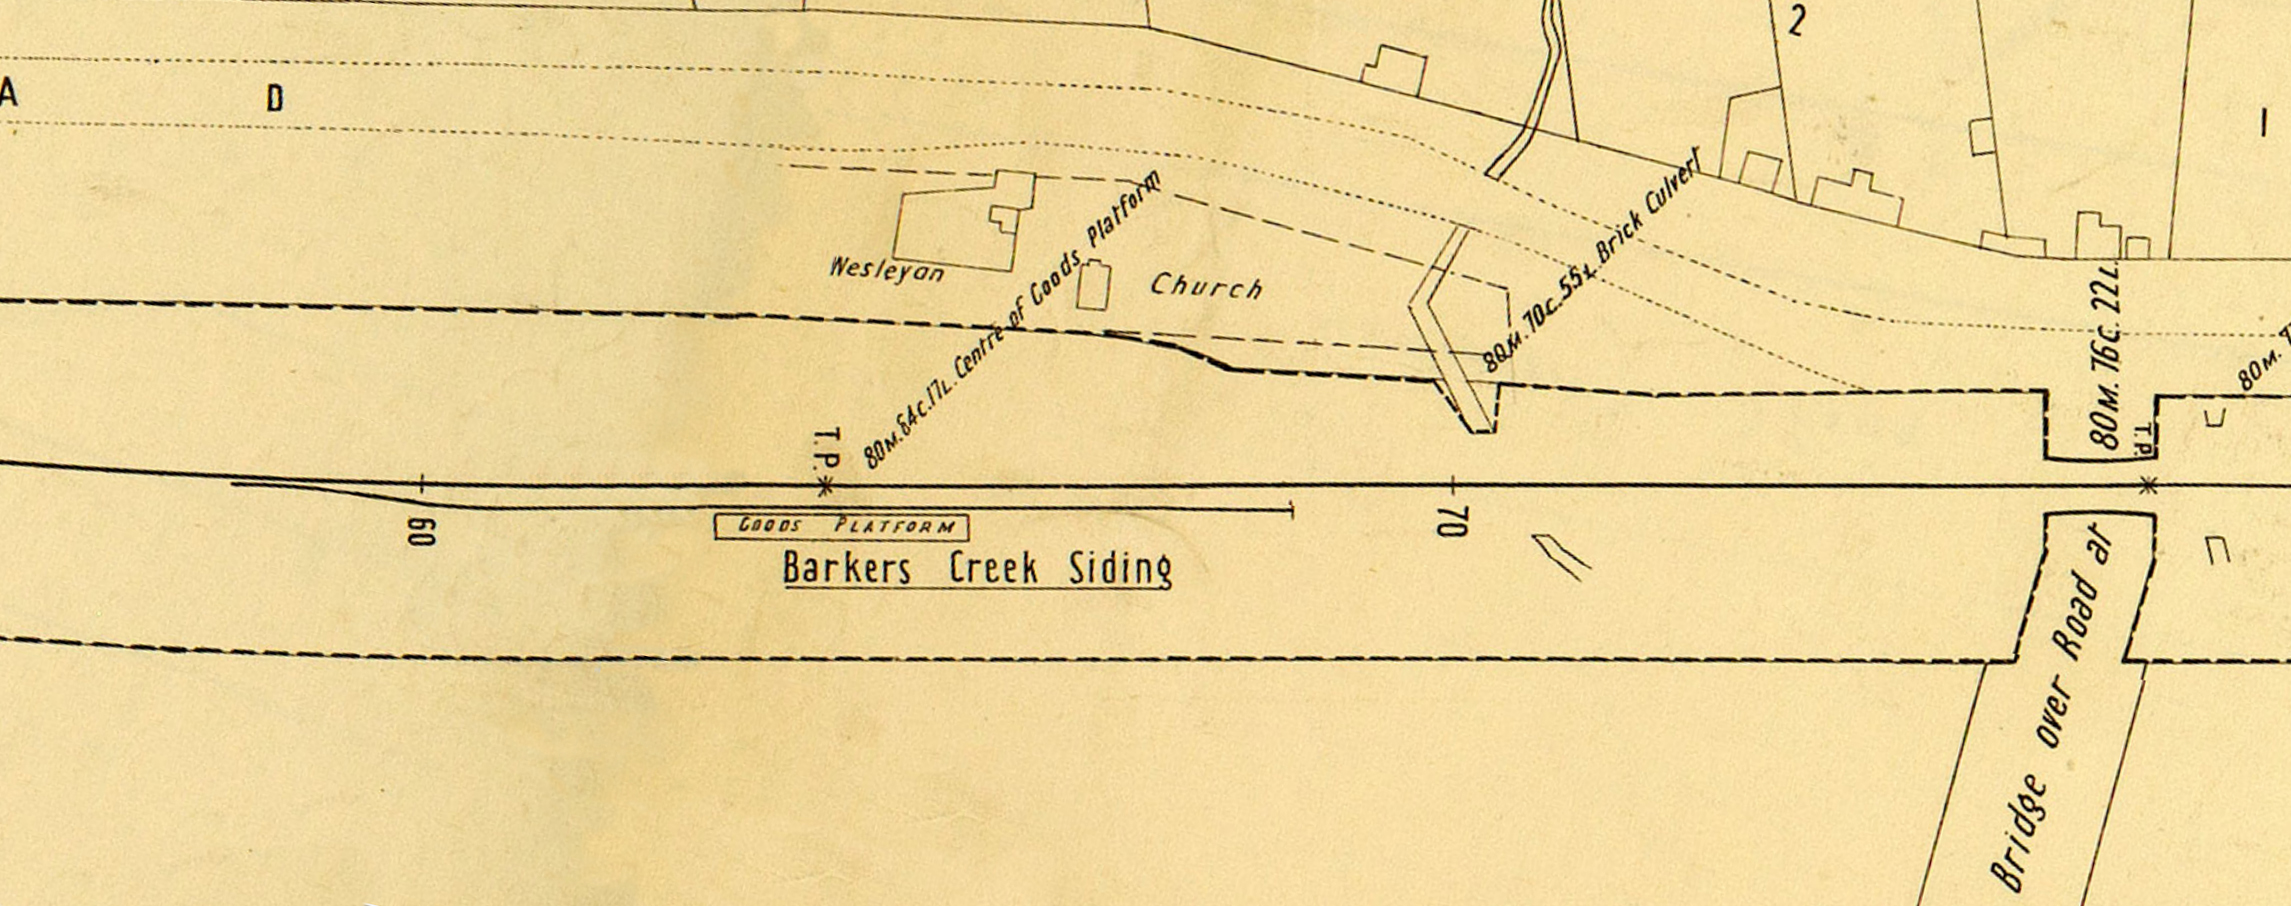
ABOVE: Extract from 1904 track plans.
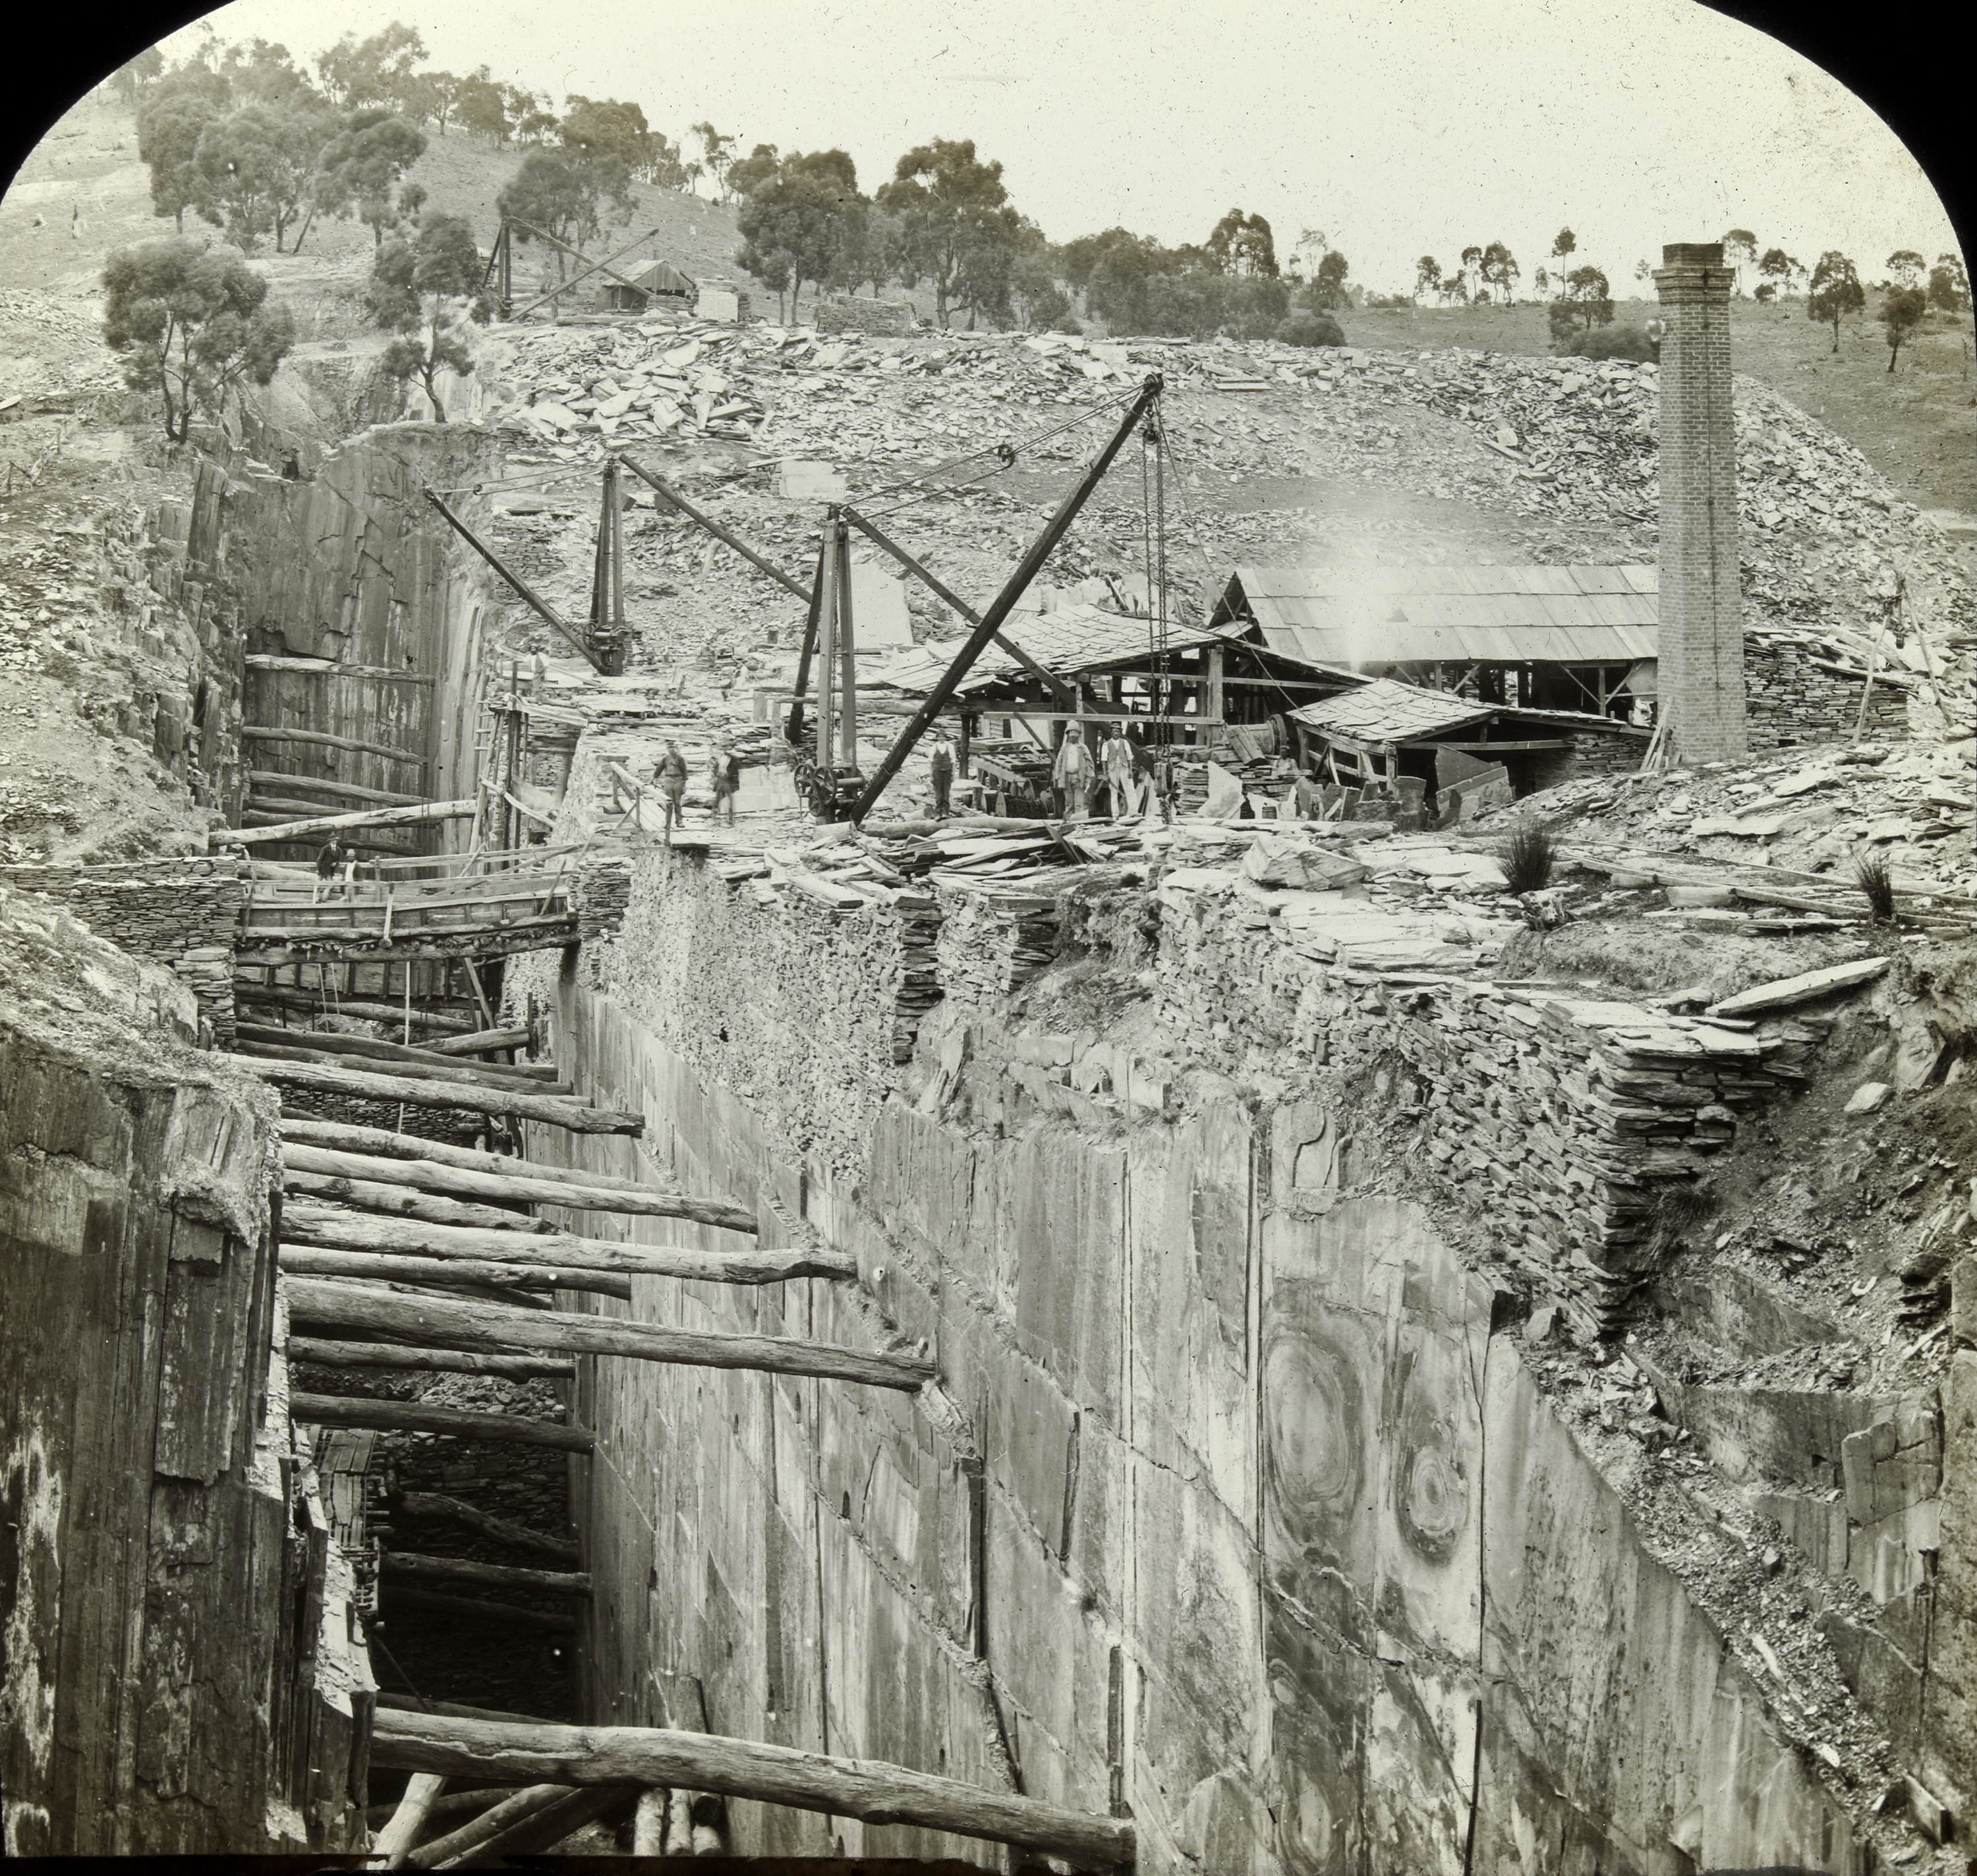
ABOVE: The Castlemaine Slate Quarry. Specimen Gully Road today passes across this, roughly at the same point as the rickety bridge.
(Photo courtesy of SLV)

Feel free to email me with any corrections or comments
Page modified Mar 31, 2022